Common causes of generator failure
Avto-VAZ very often presents car owners with various surprises that arise during operation. One of these is the generator on the Priora, which can hardly maintain 60 thousand kilometers without problems. Once the numbers on the odometer exceed the specified value, malfunctions of this most important component on the car may occur at any time. A faulty generator makes it simply impossible to operate the car, since it does not produce the current necessary to charge the battery. Everyone is familiar with the purpose of a generator on a car, and if there are gaps in memory, then below is material that will help refresh your knowledge.
The service life of generators depends on various factors. This includes the manufacturing quality of the device, operating features, and even work on diagnosing and eliminating minor defects. Typically, their service life on budget cars is at least 5 years or 100-120 thousand kilometers. This is exactly the service life that, in theory, devices on Priors should have, but as mentioned above, these values differ greatly (it is important to note that this is not always the case). This is all due to the quality of the generators that the Priors are equipped with from the factory. These are devices of the famous or “LADA”, problems with which are known not only on the VAZ-2170, but also on other cars from the Russian concern.
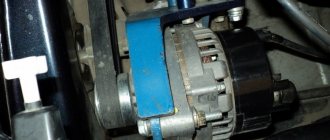
Touching upon generator malfunctions on Priora, it should be noted that a common problem is not in the electrical part, but in the mechanical part. The reason lies in the rotor bearing, which, when it fails, produces a characteristic hum and grinding noise, indicating that the car owner is faced with at least the need to dismantle the generator. Such repairs are not at all complicated, but quite labor-intensive for known reasons. The biggest difficulty is removing the generator on the Priora, which is located between the engine and the radiator. Owners of the VAZ-2170, who have had to look under the hood of their car more than once, are well aware that the generator is located in a very limited space, and access to it is closed from all sides.
Interesting! An overtightened alternator belt leads to accelerated wear of the bearings.
The most common reasons why Prior owners need to dismantle the generator are:
- Bearing failure. These elements fail more often than the brushes on the voltage regulator wear out.
- Voltage regulator malfunction. The brushes on the device wear out, and the generated voltage to the battery also drops.
- Worn slip rings or commutator.
- Malfunctions of the diode bridge, which often occurs when moisture gets into the device, and as a result, oxidation appears.
In all of the above situations, you can repair the generator by replacing or eliminating defective elements. If the stator or rotor winding fails, then in such situations the unit must be completely replaced.
Interesting! If it is necessary to replace generator bearings on a Priora, you should choose products of the following types: B17-102DG38 - front support (has the following dimensions: outer diameter - 47 mm, inner diameter - 17 mm, width - 14 mm), 6202DW8 - rear support (outer diameter - 35 mm, internal diameter 15 mm, width - 11 mm).
How to tension a belt and check its tension
For Priora, in addition to the original ones, similar belts from foreign brands such as Contitech, Dayco, Gates, and Flennor are recommended.
- Loosen the roller nut; you will have to hold the cage with a wrench. By then rotating this key, the clip can be turned.
- Tighten the nut against the roller. Check the quality of tension only on the long section between the pulleys. If, when pressing on the belt in this place, it bends no more than 10 millimeters, the tension is appropriate.
- If your Lada has a hydraulic booster, you should tighten it a little more. If you don't pull it tight enough, it will whistle obviously, a defect that can be easily detected by ear. Then pull it a little tighter. If you hear not a whistle, but a hum, the belt, on the contrary, needs to be lowered.
On a Priora, in a regular service, changing just the belt can cost from 300 rubles (not counting consumables). If the generator is with rollers or mounted, then the price will increase significantly to one and a half thousand rubles. Do not forget the receipt for the services provided; the warranty for the work performed must be at least six months; if the belt deteriorates due to poor installation or tension, you must demand a replacement at the expense of the service.
The replacement generator itself starts at 5 thousand rubles. The cost of removal and installation work alone will average 1000 rubles for simple models.
Priora generator repair,
Repair of the generator “Priora” by real boys))) Repair of the generator “Priora”
Generator bulkhead VAZ 8,9,10,11,12,13,14,15 Priora, Gazelle Volga, Sable
Generator bearings. How to replace.
Repair of VAZ generator (replacement of slip rings)
Repair of Lada Priora 115A generator
Priora does not have a charger. Generator repair
Diagnostics and repair of Generator VAZ, Gazelle, Volga, Sable, Lada, Priora
Lada Priora generator repair
Do-it-yourself repair of the Grant, Kalina, Priora 115 A generator. Advice from an auto electrician.
Lada Priora is one of the most common domestic cars. But sooner or later the moment comes when it is necessary to repair certain components. The electromechanical part is no exception; for example, Priora's generator bearings often fail.
In order to avoid surprises while driving, it is important to notice the malfunction in time and carry out repair work. You can learn more about how to replace a Priora generator bearing by reading this article. In this material we will consider the process of diagnosing and dismantling the VAZ generator and its parts, as well as the sequence of actions when replacing ball bearings with your own hands.
Features of detecting generator breakdowns on Priora
The generator on a car is the most important element, therefore, if its electrical part malfunctions, the battery icon on the panel will immediately light up, which indicates that the battery is not receiving current from the source of its generation. In this case, the unit must be checked, the cause must be identified and eliminated. The reason could be anything:
- oxidation of the battery terminal;
- alternator belt break or loosening;
- brush wear;
- malfunction of the regulator (integrator);
- failure of the diode bridge;
- collector wear.
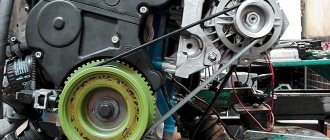
All these breakdowns will appear in the form of a highlighted battery icon on the instrument panel. If the cause of the generator breakdown is a faulty bearing, then it will also not be difficult for the driver to identify it. After all, in this case, extraneous noise will be emitted from the engine, and if you open the hood, it will clearly be visible next to the generator. To really make sure that the cause of this extraneous noise is the generator, and not the pump or other timing elements, you should remove the belt from the generator and start the engine. The absence of a characteristic sound is the main sign that the breakdown lies in the generator and it needs to be dismantled.
Interesting! You can check the serviceability of the generator for electrical function using a multimeter. With the engine running, you need to measure the voltage at the battery terminals. Without any electrical appliances on the car, the multimeter should show a voltage of at least 13.8V, and ideally 14.2-14.5V. Now let's make sure that the generator produces sufficient voltage under load. We turn on the car's heater, headlights, heated rear window, fog lights, and record the readings again. A voltage drop to 13.7V indicates that the electrical part of the generator is working properly and the unit can continue to be operated. If the value is 13.5V and below, then the device should be diagnosed, otherwise the battery will soon be completely discharged at one point.
Alternator malfunctions should be repaired after removing it from the vehicle. Exceptions include situations where the belt breaks or loosens, as well as contact oxidation. Some car owners are so afraid of the procedure for removing the generator on a Priora that they resort to replacing the voltage regulator on the installed device. However, this is quite possible to do, as evidenced by the experience of car owners.
It is only important to make sure that the cause of the corresponding malfunction is the voltage regulator, and not a worn-out collector or a broken diode bridge.
Generator device
A generator is an electrical machine that converts mechanical energy into electrical energy.
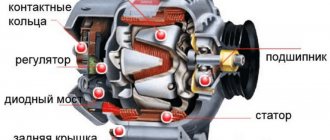
The main elements of the generator are the stator and the armature. The figure below shows the Priora generator disassembled and all its parts are described.
Initially, the generator produces alternating current, after which the alternating current, passing through the diode bridge, is rectified and becomes constant.
Generator for Priora with fasteners, brackets and belt: articles and types
The mounting scheme for the generator on a Priora without a generator and air conditioning differs from more expensive modifications. The difference lies in the unit mounting bracket. Below is a diagram of the device with the designation of all elements.
Priora without power steering and air conditioning
The names of the parts, as well as their original numbers, are shown in the photo below.
As can be seen from the diagram, on such motors the belt tension is adjusted by changing the position of the unit itself. The upper fastening element is designed accordingly for this purpose. In addition, it is important to pay attention to the fact that Priors are equipped with generators of various modifications. Their original codes are presented in the list above.
Priora engine without power steering and air conditioning
On Priors with air conditioners (and without them) and power steering, slightly different modifications of the generator brackets are used. The photo below shows their diagram with the designation of the elements.
Priora with air conditioning or power steering
Interesting! Priora was also produced in a limited number of models with power steering and air conditioning.
It can be seen that the bracket is significantly different from the previous type. It does not have an adjustment plate, and the tensioner roller is responsible for adjusting the belt tension on Prioras with this fastening design. Below are the names of the parts, as well as their article numbers, which may be needed if it is necessary to purchase new original products due to failure of standard elements.
Having understood the differences, you can now consider the process of removing or dismantling the generator on a Priora in different ways.
What bearings are on the Priora generator (VAZ 2170): size, price, article number
We have already figured out how to replace failed parts. Now it remains to understand which bearing is better to buy. There are different generators on Priors - 115A or 90A. The second is for a less powerful car without air conditioning and power steering. Ball bearings have a number (marking). Front element – 6303, rear – 6202.
There are a lot of both original and non-original spare parts on the market:
- Front ball bearing 6303: FAG 6303 2ZR (Germany), SKF 6303-2Z (Sweden), KOYO 6303 ZZ, CM (Japan), NTN 6303 ZZ (Japan).
- Rear ball bearing 6202: FAG 6202-С-2HRS, SKF 6202-2-RSH, KOYO 2RS, NTN; 6202LLU.
In addition to the bearings listed above, below is a table that will help you navigate the offers on the market and select the best quality part:
Removing a generator on a Priora for replacement or repair
In this material, we will consider in detail how you can remove the generator on Priors of various modifications, using various techniques. How the unit is repaired is a topic for another material. You can read about choosing a new generator to replace the standard one here. If you are looking for an answer to the question of directly performing dismantling according to instructions, then it is presented below.
Interesting! Alternator malfunctions on Priora are a popular topic, as evidenced by the large number of video instructions from car owners. However, most of these instructions are only superficial, and you often have to watch other videos to find the answer to your question. The material discusses in detail all stages of removing the generator, regardless of the chosen method.
First, let's see what instructions Avto-VAZ offers for removing the generator on a Priora. Below is a picture with a detailed description and photo.
The photo below shows that it can also be removed not only from below, but also through the engine compartment.
This manual is intended for Priora cars in a budget modification (without air conditioning and power steering). Dismantling the unit in such Prior modifications is not difficult. By following the instructions, you can implement the process quickly and correctly.
Now let's look at the instructions from Avto-VAZ for removing the generator on a Priora with air conditioning.
Experience shows that the instructions from the factory are not at all sufficient to be able to remove the generator on a Priora. That is why we will consider in detail the dismantling process for VAZ-2170 cars with and without air conditioning.
How to remove the generator
It is preferable to have a crane beam indoors; in extreme cases, you can use a jack on wheels, special for hanging the engine. You should proceed in the following way.
- Disconnect the battery terminals.
- Hang up the motor.
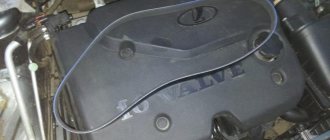
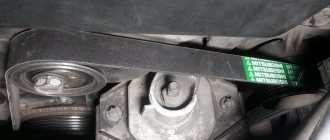
- Remove the drive belt.
- Loosen the hoses on the power steering or air conditioning.
- Remove the mountings from the generator.
- The generator can now be disconnected and powered up. First to the side, then up.
- When all wiring is disconnected, the generator can be removed.
Replacing the alternator belt on a Priora 16 valve is carried out in the reverse order, just install the new part following the instructions.
How to remove a generator without air conditioning from a Priora with power steering: detailed instructions with photos and videos
Without much further discussion, let's get straight to the point. For ease of work, it is recommended to install the vehicle on an inspection hole, if available. However, this is not a prerequisite, since you can reach the generator mount from below and without a hole. Be sure to begin dismantling work by first removing or disconnecting the negative terminal from the battery. This will protect the car from shorting the wiring.
On a Priora without air conditioning with power steering, the process of dismantling the generator is performed in the following sequence:
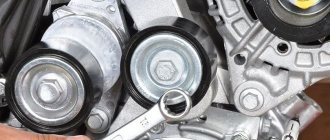
- First of all, using a key set to “17”, you need to loosen the bolt securing the tensioner pulley. There is no need to remove the bolt together with the roller if you do not plan to replace them. Remove the alternator belt from the pulley and move it to the side.
- Using a wrench set to “13”, unscrew the nut of the upper mounting of the generator. If necessary, hold the bolt with a key set to “13” on the other side. After unscrewing the nut, remove the bolt from the upper mounting of the generator. The photo shows it already removed.
- Now we move on to unscrewing the lower mount of the generator. To do this, we first remove the engine protection (if it is, and if not, then it is better to install it after completion of the work). We move down and unscrew the nut with a wrench at “13” of the lower generator mount. After this, we pull out the bolt, which is impossible to do on Priors with power steering. It will definitely rest against the engine mount bracket.
- And this is where the fun begins. Further actions throw everyone involved in the dismantling into a stupor. To remove the bolt, you need to remove the spacer sleeve from the side where the nut is located, as indicated in the instructions class=”aligncenter” width=”600″ height=”494″[/img]
- However, in practice this does not work, and after removing the bushing, the bolt still cannot be pulled out. That is why there are already proven methods on what to do correctly in this case in order to remove this bolt. The first method can be called anti-vandal. To implement it, you need to install a jack under the engine and jack it up.
- Next, in the engine compartment, we find the rear engine mount (aka guitar) and use a “15” key to loosen fastening No. 1 in the photo below. Having unscrewed the nut of bolt No. 2 (also with a key set to “15”), we pull it out (we do not pay attention to the air conditioner pipe, these instructions are specifically for Priora without air conditioning).
- We perform the same procedure with the front engine mount. Unscrew the nut with a 15mm wrench and remove the bolt. At this point, the engine must be secured with a jack so that it does not fall down.
- Unscrew the right support nut using a 17mm wrench. There is no need to remove the right airbag unless you plan to replace it. If you need to replace it, it is secured with two bolts with a Torx-E10 socket head.
- Next, slowly and carefully jack up the engine until the power steering pump pulley rests on the right cushion bracket.
- You can now remove the lower alternator mounting bolt. After this, the unit is removed. We’ll look at how best to do this a little later. For now, the second option is how to remove the lower bolt of the generator on a Priora. This method, unlike the first, is called vandal. To implement it, you will need a metal file (not a hacksaw, but only a blade).
- The blade is used to saw the bolt leg. There is no need to cut completely, but until it bends to be removed from the seat. If you cut the bolt completely, a new problem will arise. The rest of it will be difficult to get.
- We remove the bolt from the seat after bending it, and now all that remains is to disconnect the wires from the generator and begin dismantling it.
- In this case, it is important to purchase a new bolt to replace the deformed product. The original part has the number 21100-3701376-00 and standard dimensions M8×110. The bolt is installed back on the other side so that next time you don’t have to worry about removing it.
- Disconnect the “D+” wire connector from the device. After this, we move the rubber protective cover aside and use a “10” key to unscrew the contact nut “B+”. The negative terminal on the battery must be disconnected (check again).
- Now we remove the generator. If the engine has not been jacked up, then it is better to remove the device from below in the gap between the engine and the radiator.
- If the engine has been jacked up, the generator can be removed from the engine compartment.
Further actions with the removed generator depend on the type of its malfunction. After repair or in case of replacement, installation is carried out in the reverse order.
Below are video materials that show how to remove a generator on a Priora with power steering without air conditioning by lifting the engine.
And also a video instruction, which shows in detail how to saw off the lower mounting bolt of the generator on a Priora with power steering (without air conditioning), and remove the device from below.
Another method of removing a generator on a Priora is described in the video below.
Alternator bearings for Lada Priora: diagnostics, signs of malfunction and replacement
The following circumstances indicate the need to replace the bearing:
Malfunctions of electrical equipment;
Extraneous noises, whistling and humming when starting up;
Slow or insufficient battery charging;
Distinct beating due to uneven rotation of the shaft;
Diagnosis of the malfunction is carried out using the following steps:
What kind of bearing is needed
- For a 17 mm shaft, bearing No. 303 is suitable.
- Bearing No. 302 is suitable for a 15 mm shaft.
- They have the same rear bearing No.202.
Bearing replacement
For work you will need: Phillips and flathead screwdrivers, 8 and 10 wrenches, 8 and 24 socket wrenches, a hammer. First you will need to remove the generator of the Lada Priora car, and then follow the sequence:
- Remove the voltage regulator.
- Remove the generator cover and remove the stator from it.
- Using a spanner, unscrew the nut holding the shaft from turning.
- Remove the pulley with the spring washer of the generator rotor shaft.
- Press the rotor shaft out of the bearing.
- Remove the 4 screws holding the bearing thrust washer.
- Using a 24mm socket wrench and a hammer, press in the bearing.
Reassemble the product in the reverse order, starting with pressing the new bearing into the generator cover.
How to remove the generator on a Priora with air conditioning through the headlight
On Prioras, where an air conditioner is installed, the process of dismantling the generator is also complicated by the fact that the climate system pipes interfere with its removal. However, dismantling is quite possible, and there are different ways to do this. The most time-consuming option is to remove the generator through the headlight. How to do this correctly, we will consider in detail below.
- We de-energize the car by disconnecting the negative terminal from the battery.
- Next, you need to remove the right headlight, and also dismantle the adsorber. How to do this correctly is described in detail in this manual (for 8 and 16 valve models).
- After the headlight and adsorber have been removed, we continue to further describe the process of removing the generator on a Priora with air conditioning. Using a “10” wrench, unscrew the bolt securing the air conditioner pipes (shown in the photo).
- Lift the tubes out.
- Unscrew the bolt securing the air conditioner pipes next to the right engine mount.
- Remove the belt from the generator pulley by unscrewing the tensioner pulley bolt with a 17 key.
- Disconnect the wires from the generator. It is most convenient to do this from below, so we remove the protection (if it has not already been dismantled). Having gained access to the rear cover of the generator, disconnect the first connector “L” by removing the plug. To turn it off, you need to press the corresponding tab (latch or flag).
- Next, we move aside the protective cover from the other contact “B+” of the generator, and unscrew the nut with a wrench set to “13”.
- Using two “13” keys, you need to unscrew the upper mount of the generator and remove the bolt. The instructions from Avto-VAZ indicate that you need to unscrew the lower fastening first, but in reality there is no difference.
- After this, unscrew the lower mount of the generator using keys “13” (nut) and “17” (bolt head). We take out the bolt.
- We remove the generator through the vacated headlight hole.
- It is installed back in a similar way.
As noted above, removing the generator on a Priora through the headlight is one of the most labor-intensive processes, since many parts need to be removed. However, there are other options for dismantling the unit. Let's consider other methods.
Preparation and necessary tools
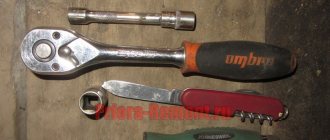
It is more convenient to remove the generator on a Lada Priora on an overpass or inspection hole. Before you begin dismantling, prepare the following tools:
- locksmith's crank;
- extension;
- cardan from the tool kit;
- heads for 10, 12, 13, 17;
- spanners for 10, 12, 13, 17.
- WD-40 product.
When driving onto a pit or overpass, do not forget to install chocks under the wheels so that the car does not roll spontaneously. Then disconnect the negative terminal from the battery. Apply WD-40 to the mounting areas of the generator and air conditioning compressor. Wait 10-15 minutes for the product to take effect.
Removing the generator Priora with air conditioning: pulling it down without removing the headlight
If the process of removing the headlight seems complicated and time-consuming, which in reality it is, then you can use another method. Its implementation occurs in the following order:
- We de-energize the car.
- We remove the belt from the generator pulley by first unscrewing the bolt securing the tensioner pulley. It is recommended to remove it to check for serviceability.
- The upper mount of the generator is unscrewed using two “13” keys.
- The engine protection is removed.
- The electrical part of the generator is disconnected.
- Unscrew the lower mount of the generator. The nut is unscrewed with a wrench at “13”, and the bolt is fixed with a head at “17”.
- To pull the generator out through the space between the engine and the radiator, you must also loosen the fastening of the air conditioning compressor and move it to the side by 3-5 cm. The design of the compressors differs depending on the type: Halla and Panasonic. Let's immediately look at the location of the mounts for the Panasonic air conditioner. Using a “12” wrench, unscrew (not completely) the 4 bolts securing the Panasonic air conditioning compressor. The bolts on the right are shown below.
- Another bolt on the lower left side is at “12”.
- And one more left upper bolt for securing the Panasonic air conditioning compressor, which is best reached using a universal joint or a flexible ratchet extension.
- Below is shown where the top mounting bolt is located and how best to access it with a tool.
- Below is a picture of the Panasonic air conditioning compressor with the mounting holes placed for easier reference.
- Next, we move the Panasonic compressor to the side (closer to the radiator at the distance of the unscrewed bolts), and pull out the generator, moving the rubber tubes of the cooling system and air conditioning to the side.
Installation of the generator in place is carried out in the same way. The method involves removing a minimum number of parts. You can watch it in the video clip below.
It is important to consider that this method is only suitable for situations where the car has separate cooling fans. This is actually typical for Priors with Panasonic brand air conditioners, where the main fan is located between the radiator and the engine, and the additional one is moved forward between the radiator and the bumper (shown in the photo below).
If there are two of them paired (as on Priors with Halla air conditioning), then a different method for dismantling the generator is described below.
Principle of operation
When you turn the ignition on, current from the battery enters the field winding through the brush assembly, where a magnetic field appears. When the crankshaft rotates, the rotor goes into rotation. The magnetic field passes through the stator winding and an alternating voltage is generated at the output. Having reached a certain rotation speed, the excitation winding begins to be powered directly from the generator.
The alternating voltage is changed to constant thanks to the rectifier unit. Now the generator charges the battery and powers consumers. When the rotation speed changes, the voltage regulator is connected to the operation.
Basic faults
Why does the generator not charge the Lada Priora car? There may be several reasons:
- the diode bridge is damaged;
- the turns of the stator winding are closed;
- slip rings wear out;
- the pulley is damaged or worn out;
- the wires of the charging circuit are damaged;
- the bearing is destroyed or worn out;
- the voltage regulator is damaged;
- The current collecting brushes wear out.
In all of the above cases, repair of the Lada Priora generator will be required.
Repair work
Replacing a Lada Priora generator with air conditioning
If you need to replace a Priora generator with air conditioning, then there are two nuances that lie in the manufacturer of the air conditioner. Panasonic allows you to remove the unit without a compressor, but the Hull compressor will not allow you to get the generator.
Removing the generator from a Lada Priora with air conditioning step by step:
- remove engine protection;
- if necessary, remove the ridge belt of the compressor drive;
- access to the generator contacts that need to be disconnected is opened;
- unscrew the engine compartment mount and remove the bolt;
- if the above steps allow you to remove the compressor, it must be moved down and to the right;
- remove the bolt and bushing;
- remove the generator from the bottom plane of the engine.
If the bolt cannot be removed, there are two options:
- Cut the bolt with a grinder and then install a new one.
- Raise the engine with a jack, remove the cushion, remove the bolt.
During subsequent fastening, screw the bolt with the head outward to prevent such difficulties.
You may also be interested in our specialist’s article on how to remove the front bumper on a Priora.
We recommend that you further study our expert’s article, which talks about how to remove a headlight on a Priora.
If you are sure that the problem is caused by wear of the carbon brushes, then you can change them without removing the generator. It is worth noting that generators on Priors have a non-repairable brush mechanism, that is, this part is completely replaced when the brushes wear out.
Replacing generator brushes
Step-by-step process - replacing the Priora generator brushes without removing the generator:
- remove the negative terminal;
- remove the power wire going to the generator;
- remove the plastic casing;
- unscrew the fastening mechanisms holding the brushes;
- install a new spare part and connect the wires.
It is recommended to check with a voltmeter whether the charging process is in progress and what is displayed on the panel. If the indicators correspond to each other, you can install the remaining parts in place.
How to remove a generator from a Priora without removing the air conditioner in the absence of an overpass
Taking into account the technical features of the location of mounted units, including the generator, sometimes it is impossible to do without a pit or overpass. But there is an option to remove the dynamo not from below, but through the headlight. This option is convenient to use for models with air conditioning.
- unscrew the plastic protection above the headlight;
- loosen the bumper mounting nuts from below;
- completely unscrew the fastenings from the wing;
- unscrew all headlight mounting bolts;
- disconnect power;
- remove the headlight;
- disconnect the adsorber clips and remove it;
- loosen the tension roller of the generator belt;
- move the air filter aside;
- unscrew the generator mounting bolts;
- disconnect the wires;
- remove the generator.
If you do not have experience in disassembling, removing units and replacing elements, then it is better to enlist the support of specialists or contact a VAZ service workshop.
In the absence of experience, there is a possibility of damage to air conditioner elements or, as often happens, poor-quality fastening of parts, which is confirmed by excess bolts and nuts remaining after repairs.
Reasons for replacing the belt on a Priora and how to change it
The generator has to be removed for various purposes, for example, to repair it, modify it, check it, or replace it with a new one. Sometimes in order to gain access to other elements of the engine compartment. The process of removing the generator may vary depending on the engine type and vehicle configuration. The instructions presented below will also be useful for replacing the alternator belt.
Generator replacement
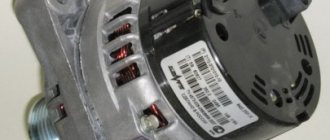
Taking into account that the Lada Priora is equipped with a large number of electrical appliances, it is necessary to install a powerful generator that can cope with all tasks. Characteristics of a suitable device:
- marking 5102.3771;
- power 80 Ampere or 115 Ampere. For lovers of good music, the power should be 170 Amps.
First, you need to remove the old generator. This should be done in three steps, shown in the photographs:
- Remove the terminal from the battery and the belt placed on the generator and crankshaft pulley (there is no need to lift the engine mount).
- Disconnect the three wires going to the generator. The first is in the form of a connector, the other two are in the form of terminals under a protective cap, which must be bent and the fastening nut unscrewed to disconnect the wires.
Secondly, install a new suitable generator. It is mounted in the same order in which the old mechanism was removed. It is necessary to take into account that installing a generator with a power of 115 Amps from Priora Lux on the Lada Priora requires connecting a new D+ wire connector, which has different parameters. It can be bought at any car dealership. Finally, you should connect the remaining wires to the generator.
As you can see, replacing the generator with a new one according to the above scheme is not difficult.
If you find an error, please select a piece of text and press Ctrl+Enter.
Causes of problems
Lack of power supply may be due to mechanical damage or disturbances in the electrical device of the generator.
In the first case it is:
- body deformation;
- violation of fixation (breakage of fastenings);
- wear of bearings, springs, couplings and other components.
Electrical problems on Lada Priora:
- interruption of the electrical circuit in the winding/short circuit;
- relay failure;
- disturbances in the conductivity of the diode bridge current;
- wear of carbon brushes;
- armature plate deformation/short circuit.
Given the differences in models, there are also nuances in removing the generator.
Preparation and necessary tools
It is more convenient to remove the generator on a Lada Priora on an overpass or inspection hole. Before you begin dismantling, prepare the following tools:
- locksmith's crank;
- extension;
- cardan from the tool kit;
- heads for 10, 12, 13, 17;
- spanners for 10, 12, 13, 17.
- WD-40 product.
This is interesting: On the way to a “perpetual” engine When you drive onto a pit or overpass, do not forget to install chocks under the wheels so that the car does not roll spontaneously. Then disconnect the negative terminal from the battery. Apply WD-40 to the mounting areas of the generator and air conditioning compressor. Wait 10-15 minutes for the product to take effect.