The popular domestic Lada Priora, from the very beginning to this day, has been produced in a variety of configurations, and this, among other things, also depends on what type of drive the so-called auxiliary units are installed on. As an example, we can recall a car with an electric steering system with a conventional alternator belt tensioning mechanism, and in order to change it, it takes no more than 10 minutes, because the design is exactly the same as in the 10th generation versions of the Lada.
If you take a car with a configuration that includes power steering and air conditioning, then the trajectory of the belt will be different, even replacing the alternator belt will be different from the usual one. Below we will look at what the differences are.
Description and location
The generator's job is to provide power to the vehicle's electrical equipment. Like other components in a car, the generator is powered by the engine; to ensure constant rotation of the rotor, pulleys are installed on the generator shaft and the crankshaft of the power plant. A belt is pulled between them. After starting the engine, the crankshaft begins to rotate, and the movement is transmitted through the belt to the rotor.
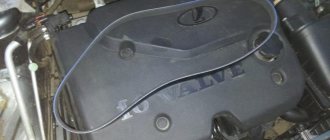
On the latest Priora models, this element operates the air conditioning and power steering. This material discusses the replacement and tensioning of the belt in a new model car, where additional equipment is installed.
The belt is a consumable item that requires replacement after 45-60 thousand kilometers . The size of the standard belt on a Priora with air conditioning is 1125 mm.
Tension check
Tension checking process
Now let's look at the issue of checking tension. It’s worth mentioning right away that the force values are unique and depend not only on the make and model of the machine, but also on the generators and belts used. Therefore, look for the relevant information in the manuals for your car or in the operating instructions for the alternator or belt. This will also be influenced by the presence of additional equipment installed in the car - power steering and air conditioning. In general terms, we can say that if you press the belt on the longest section between the pulleys with a force of about 10 kg, then it should deflect by approximately 1 cm (for example, for a VAZ 2115 car, when applying a force of 10 kg, the belt deflection limits are 10 .15 mm for generators 37.3701 and 6.10 mm for generators type 9402.3701).
Symptoms of malfunction and their elimination
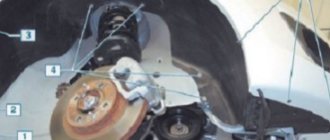
You can determine whether a replacement is needed or whether you can simply tighten the power steering belt with air conditioning on the Priora 16 valves only after inspecting this component. To do this, just open the hood and examine the belt; it is located next to the right front wheel. There are signs that indicate it's time to check the alternator belt: something whistling and squeaking from under the hood.
The reasons may be the following:
- Antifreeze, oil or other working fluids have come into contact with the generator pulley or belt.
- The belt is worn out - you can tell by its appearance.
- The tension has dropped - in this case, the component must be tightened.
- The bearing in the generator is worn out.
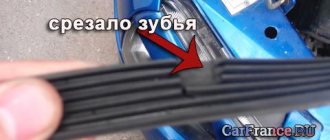
When the belt whistles in a Priora with 16 valves, it’s time to carry out diagnostics. If there are cracks, tears or other serious damage on its surface, then replacement is required. If the generator component with hydraulic booster and air conditioning looks normal, you should check its tension; the optimal level of deflection is 6-8 mm - you need to press the component in the middle between the generator and the pulleys.
Are there visible coolant or engine oil stains on the surface? If the contamination is not significant, they can be cleaned. If the liquid has penetrated into the material, cleaning will not bring any results; replacement is needed. If the component is well tensioned and no damage or stains are visible, then you should move on to checking the bearings. They may need to be changed.
Principle of operation
When you turn the ignition on, current from the battery enters the field winding through the brush assembly, where a magnetic field appears. When the crankshaft rotates, the rotor goes into rotation. The magnetic field passes through the stator winding and an alternating voltage is generated at the output. Having reached a certain rotation speed, the excitation winding begins to be powered directly from the generator.
Basic faults
Why does the generator not charge the Lada Priora car? There may be several reasons:
- the diode bridge is damaged;
- the turns of the stator winding are closed;
- slip rings wear out;
- the pulley is damaged or worn out;
- the wires of the charging circuit are damaged;
- the bearing is destroyed or worn out;
- the voltage regulator is damaged;
- The current collecting brushes wear out.
In all of the above cases, repair of the Lada Priora generator will be required.
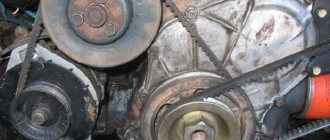
Alternator belt tension
If the quality of adhesion of pulleys, rollers and the surface of the generator belt decreases, the tension should be increased. This procedure should also be carried out if the consumable has been used for more than 15-20 thousand km, but there is no damage (replacement is not required). If you open the hood and see a frayed tape, then immediately proceed to the replacement instructions, then you will still have to retighten it. To carry out the work, you will need a special key for the roller and standard keys for 19 and 17.
Process and result verification
- We clamp the clip with a wrench and loosen the roller fastening nut;
- Now we need to clamp the eccentric collar and start cranking. The rotation of the tool should be minimal - this will allow for better tension of the component;
As you can see, the process consists of only three steps, but the main stage is checking the tension on a Priora with air conditioning and power steering (or with these components separately). In this case, the tension should be stronger when compared with the basic version of the VAZ 2170 with 16 valves. In the longest section between the shaft and the pulleys, the material should bend by about 5-6 mm.
You can determine the result by the sound: when moving, you can hear slipping, the belt whistles - insufficient tension; from under the hood after adjustment you can hear the hum of the bearings - the component is overtightened, the holder needs to be loosened.
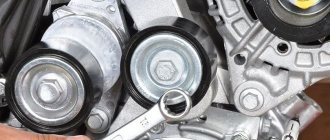
Tensioner pulley design
Thus, on most modern cars the roller is of the following design:
- ball bearing inside
- plastic cover with a working surface for the belt on top
- landing sleeve inside the roller
There are eccentric rollers, the adjustment of which is carried out by shifting the axis relative to the mounting bolt, and conventional ones. In the second option, the roller is mounted motionlessly on the tensioner bracket, and for adjustments the bracket itself is shifted relative to the internal combustion engine shaft.
Some cars use self-adjusting spring brackets, in which the number of turns and the diameter of the spring wire are designed for a specific force at the factory.
Since there is a bearing inside the structure, the roller is replaced when any of these parts (bearing race or plastic lining) wears out. In addition, when replacing a belt, it is also recommended to install a new roller/bearing set on the tensioner.
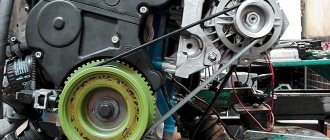
An example of the layout of two generators with one tensioner pulley for high-quality car audio
To ensure its recharging, the best option is to duplicate the generator, for which a second pulley is mounted on the crankshaft of the internal combustion engine. In this case, you have to service two rollers and a belt of the tension system.
Replacement
Required Tools
We will prepare everything necessary for the repair:
- Lubricant WD-40.
- Keys to 19, 17.
- Two copies of the key for 13.
- Head for 10 and 17.
- Jack.
- Special key for tensioning.
- Lever arm.
The alternator belt on a modified Priora with air conditioning and power steering runs around the engine mount. The designers decided to carry out such a modification for the Priora 16 due to the fact that the power steering pulley is installed low. Hence there are additional steps that you need to be aware of.
Step-by-step instruction
- First of all, we need to wet the bolts that hold the bracket and motor mounts. Wait 10-15 minutes for the lubricant to spread over the surface;
The replacement is complete, all that remains is to adjust the alternator belt with power steering and air conditioning. The new consumables on the Priora will have to be tightened several times until you get the required tension. If the component whistles or there is a hum coming from under the hood, then it is necessary to carry out repeated adjustments until these defects are eliminated.
Tension using adjusting bolt
Adjustment with a bolt on a VAZ-2110
This method is more progressive and is used in most modern machines. It is based on the use of a special adjusting bolt , by turning which you can adjust the position of the generator relative to the engine. The algorithm of actions in this case will be as follows:
- loosen the generator, its upper and lower fastenings;
- Using the adjusting bolt, we change the position of the generator;
- fix and tighten the generator mount.
The belt tension level in this case can be determined during the adjustment process.
Step-by-step tensioning of the generator belt
Probably every car owner, especially those with experience, knows that during the operation of a Priora or another car model, the belt drive is subjected to a slight, but still stretching. This, in turn, reduces the degree of adhesion of this element to the rollers and pulleys. There is only one way out of this situation - to properly tension the belt drive.
You can make sure that the alternator belt needs tensioning by the peculiar whistle that is heard when the engine is activated.
Tensioning the belt drive is easy if the car owner performs the work in a certain sequence and prepares the following tool:
- two wrenches size 19 (socket and open-end);
- a wrench that is required to work with a car roller, used to replace the disk on a tool called an “grinder”;
- protective gloves if necessary.
Having prepared the necessary tools, you can begin to tension the alternator belt yourself:
- The fastening of the roller is loosened using a tension wrench, with which you need to hold the tension roller cage.
- When making rotational movements using a tension wrench, you need to carefully rotate the belt drive tension roller cage, thereby increasing the tension force of the belt.
- Having tightened the generator belt to the desired level, you should securely fix the previously loosened roller fastener.
A correctly tensioned belt drive should bend by about 10 mm with slight pressure between the pulleys, but this only applies to the simplest vehicle configuration. After all, if the Priora is equipped with a car air conditioner or power steering, then the belt drive should provide a different trajectory of movement, since the area of interaction between the pulleys and the belt should be slightly reduced. If upon visual inspection the compensation is not enough, you will have to repeat the tensioning process to tighten the belt a little more. Experienced drivers can determine the belt tension by ear. If the element whistles and slips after tensioning, then the tension will be insufficient, and if you overdo this process, the bearings will make a hum.
Sn9shimo
The belt should not rotate more than 90°. Otherwise, the belt tension needs to be adjusted. To tighten the belt, turn the tension roller counterclockwise, and to loosen it, turn it clockwise. To do this, insert a special key into the holes of the tension roller in the form of two rods with a diameter of 4 mm, welded to the base of the key (the distance between the rods is 18 mm). You can use the key for the old-style timing belt tension roller, installed on all front-wheel drive VAZ cars. If you do not have a special key, you can insert two pins (screws) with a diameter of 4 mm into the holes of the tension roller. Using the screwdriver shaft located between the pins, turn the roller.
How to tighten the alternator belt on a Priora 16 valves
So, the belt should be tightened in some cases:
- If the battery is insufficiently charged, if the on-board network voltage decreases when the engine speed decreases
- When the belt whistles (when water gets on it or in damp weather)
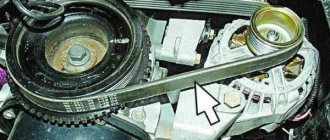
First of all, open the hood of the Priora and, using a 13mm wrench, loosen the upper bolt of the generator:
Now you need to set the optimal belt tension by tightening or unscrewing the tension bolt of the mechanism. The diagram below clearly shows where the generator needs to be moved to loosen the belt, and where to tighten it.
Now turn the adjusting bolt in the direction you need to adjust the belt.
When the optimal tension is achieved, it is necessary to tighten the upper bolt of the generator. Then we start the engine, turn on the maximum energy consumers, such as: high beams, heater, heated rear window. And if, when they are turned on simultaneously, the belt does not whistle and the engine speed does not drop, then we can assume that the belt is tensioned normally.
When you have dealt with this, you can tighten everything thoroughly and check it again. It is worth checking the tension periodically, as the belt tends to stretch.
Tension with adjuster bar
Securing the generator using a strip
This method is used for older cars (for example, “classic” VAZs). It is based on the fact that the generator is attached to the engine using a special arc-shaped strip , as well as a bolt and nut. By loosening the fastening, you can move the bar with the generator relative to the engine to the required distance, thereby adjusting the tension level.
Actions are performed according to the following algorithm:
- unscrew the fastening nut on the arc-shaped bar;
- Using a pry bar, we adjust the position (move) of the generator relative to the engine;
- tighten the nut, fixing the new position of the generator.
The procedure is simple, it can be repeated if you were unable to achieve the required level of tension the first time.
Step-by-step instructions for replacing consumables on models without power steering and air conditioning
Briefly about how to disassemble the main elements and remove the strap in cars without air conditioning and power steering:
- First of all, it is necessary to loosen the nut of the generator unit bracket using a wrench, as well as the adjusting screw.
- Next, the unit should be moved as far as possible towards the engine.
- After this, you need to unscrew the bolts securing the front wheel (right) and remove it.
- Next, the fender liner is dismantled, so you can gain access to the installed strap.
- It should now be removed from the pulley and replaced.
- A new strap is installed, after which it is tightened. The tension is checked - note that the part should be normally tensioned, but not overtightened. Over-tightening can cause more accelerated wear of the bearing device.
Photo gallery “We change it ourselves”
Snapshot1111
We tighten the belt until the cutout of the outer race coincides with the rectangular protrusion of its inner sleeve and tighten the roller mounting bolt to a torque of 34–41 Nm. Excessive belt tension reduces the service life of both the belt itself and the bearings of the coolant pump, tensioner and guide rollers. Insufficient belt tension leads to its premature failure and can cause irregular valve timing and, as a result, lead to contact of the pistons with the valves and expensive engine repairs.
We turn the crankshaft two turns until the marks on the camshaft sprockets align with the cutouts on the rear timing cover and check that the rectangular protrusion of the inner bushing of the tension roller coincides with the cutout of its outer race. If necessary, repeat adjusting the belt tension. If belt defects are detected or if there is a significant discrepancy between the position of the protrusion of the inner bushing of the tension roller and the cutout of its outer race (by more than half the width of the protrusion), the belt should be replaced. You should also change the belt if traces of engine oil are found on it (before installing a new belt, you need to eliminate the cause of oil getting on the belt), when replacing one of the rollers or the coolant pump.
The belt check was shown on a vehicle with air conditioning. If there is no air conditioning on the car, then the alternator drive belt should be removed, as shown in the article “Checking and replacing the Lada Priora alternator belt”.