The vehicle's electrical circuit includes a device such as the voltage regulator of the VAZ 2110 generator. Its task is to limit the output voltage of the generator and bring it to optimal values in accordance with the parameters of the on-board equipment. In this article we will tell you how this device works, what malfunctions are typical for it, how to check and replace. We will also give you detailed recommendations that will allow you to continue driving with a faulty regulator.
Replacing the VAZ 2110 generator relay on your own
The amount of electrical voltage generated by a car generator is not constant and depends on the number of revolutions of the crankshaft. In order to stabilize it, a special regulator is designed. We will talk about it in this article using the example of a VAZ-2110 car.
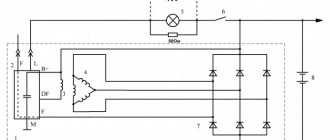
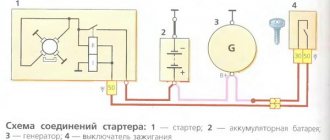
The voltage regulator on most cars is connected to the on-board network according to the diagram below.
The operating principle of a voltage regulator (VR) is the same as that of a relay. In other words, it opens and closes an electrical circuit. That is why the device is also called a relay regulator. It is triggered when a predetermined voltage value coming from the generator changes.
The first regulators had an electromagnetic design. These were real relays. Modern devices are made on the basis of semiconductors. They are small in size, and in addition, they work much more accurately and efficiently. Some of them are even equipped with special alarms that allow the driver to monitor their performance.
The process of replacing the voltage regulator is not particularly difficult. All you need to do is purchase a new device, check it as described above and install it on the generator, fastening it with two screws. And don't forget to connect the yellow wire!
Initially, you need to carefully study the complete set of the regulator. Usually these are instructions, a device and connecting wires with holders that are required to fix the case.
Before installation, make sure you have an open-end wrench and a crosswise screwdriver on hand. Additionally, a knife and a voltage tester will not hurt. Clamping the terminals is done using pliers or take pliers.
Before starting installation work, disconnect the negative terminals from the battery. It is important to completely unscrew it from the battery.
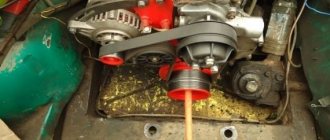
Next, unscrew the generator nut using the appropriate wrench. To gain access to the casing, the block is removed, which is usually secured with three latches. To disconnect, you need to slightly pry the block from the edge. Next, the casing should be easy to remove.
The next step is to unscrew the screws, but first make sure that the plug is completely removed. Next, the nut is removed, the ends of which should be well processed with a file. This is necessary in order to improve the contact of the diode bridge with the bushing. The brush holder is mounted in place of the regulator. It is important to take care of its seal during installation in order to fix the device more securely.
The next step is to reinstall the plastic casing in its place and you can begin laying the regulator wire. Do everything carefully and take into account the placement of the main wiring of the machine.
To prevent the wires from dangling, secure them with plastic clamps.
Only after all the above steps are completed, the device itself is installed. Contact with ground must be reliable. Often, a shunt is used for this, which makes it possible to fasten the regulator and generator housings much better.
Once the device has been connected, you need to screw in the other wires from the kit. Upon completion of all installation work, the functionality of the device should be checked. It is important to load the battery to full - turn on the stove, radio, headlights, and so on.
The traditional voltage regulator circuit involves the presence of various diodes. Element performance may vary significantly. This is because there is often a sharp change in the voltage level in the system. In addition, the current must be taken into account.
Regulators often have radiators that are designed to cool the diodes. The device is controlled using a toggle switch. An electric drive strip is used to complete the circuit.
The vehicle's electrical circuit includes a device such as the voltage regulator of the VAZ 2110 generator. Its task is to limit the output voltage of the generator and bring it to optimal values in accordance with the parameters of the on-board equipment. In this article we will tell you how this device works, what malfunctions are typical for it, how to check and replace. We will also give you detailed recommendations that will allow you to continue driving with a faulty regulator.
During operation, the voltage regulator may fail. In VAZ 2110 cars of all editions, a semiconductor relay is used, which contains graphite generator brushes. A relay malfunction can lead to the following consequences:
- Failure of all vehicle network devices. Usually, the first thing that happens is that all the lamps in the lighting devices burn out. If this suddenly happened, the relay has failed because the output voltage exceeded the rated values.
- Recharging the battery. Overcharging a galvanic cell is also unacceptable. This can lead to boiling of the electrolyte and subsequent damage to the battery.
- Low charge. As many car enthusiasts say, “undercharging” occurs. A weak battery will not be able to fully ensure reliable engine starting.
In total, there are only two malfunctions of the voltage regulator relay. These are: failure of the relay (charging does not occur, or the battery is overcharged) and its incorrect operation (the relay works, but passes too little voltage, which is not enough to charge the battery). All relay malfunctions can be identified by many external signs, as well as through diagnostics.
The most reliable way to check the voltage regulator is to measure the electrical value at the battery terminals with the engine running and idling. The normal voltage is considered to be between 13.5 and 14.2 Volts. If the voltage level exceeds these values or is lower, it means that the voltage regulator is faulty and must be replaced.
In addition, there are other signs of a relay failure, after which the device usually begins to be checked:
- The charging indicator light came on while the engine was running. As the speed increases, the lamp goes out.
- Dim headlights when the engine is running. Likewise, as the speed increases, a brighter glow can be observed.
- Too bright headlights and subsequent burnout of the lamps also indicate incorrect operation of the relay.
- If the battery charge is sufficient for a small number of starts, it means that the relay does not fully provide the required charge.
After detecting all of the above faults, it is necessary to replace the relay. To do this, you need to know exactly which relay is installed on your car. The fact is that depending on the car model, different generators are used. Modifications of the VAZ 2110 also have different generating devices.
Conventionally, regulators can be divided into two types: for injection cars and carburetor cars. They have few design differences, but the parameters on the basis of which they work may differ.
After determining the type of relay, the exact same new regulator is purchased. Then, disconnect the negative terminal of the battery and remove the plug from the relay connector. Unscrew the two screws securing the relay and unscrew the ground wire nut. Remove the old brushes and install new ones in their place. Installation is carried out in reverse order.
This completes the replacement of the VAZ 2110 voltage regulator.
Relay regulator VAZ
Replacing the VAZ 2110 generator relay can be done in two ways: with removing the generator and without removing it. Both options can be done at home, although the second involves fewer manipulations with the car. But despite this, the first option may be simpler for some. Anyone can replace the VAZ 2110 generator regulator relay if they read and study the instructions below.
Relay replacement is needed in the following cases:
- The brushes are worn out. By the way, this is the main reason. The fact is that due to their wear, contact with the relay is lost, so due to lack of power, the generator will stop working.
- A breakdown is observed in the circuit, which leads to an increase in voltage in the system.
- Wire breaks causing loose contacts.
- Damage to the housing or fastenings. This is not something to joke about, as it can lead to an unwanted short circuit.
Relay replacement
- Disconnect the negative terminal of the battery.
- Unscrew the two bolts securing the generator.
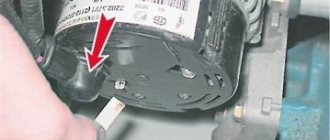
- Remove the yellow wire going to the relay from the generator.
- Remove the relay. Examine it carefully. If the brushes are worn out, replacement cannot be avoided.
- If any of the wires are broken or there are holes on its surface, then you can only get by by replacing them.
- Check the new voltage regulator, and then attach it to the generator.
- Reconnect the yellow wire and battery terminal.
As noted earlier, you can replace the relay with your own hands. The main thing is to familiarize yourself with the work process in advance so that questions do not arise later. To do this, you can find photos in various auto repair magazines. It’s much easier to use videos, of which there are many on the Internet. Our instructions will also help in this difficult matter. But the price of home repairs will not exceed 100 rubles.
The voltage regulator on a modern car automatically and continuously adjusts the excitation current of the generator. Moreover, this process proceeds in such a way that when the current load and rotation speed of the generator changes, the value of its voltage remains in a strictly defined range.
To analyze the condition of the regulator, you need to purchase a voltmeter, which has a measuring scale in the range of 15–30 volts. The check is performed as follows:
- start the car engine at medium speed and let it run for a quarter of an hour (the operation is carried out with the headlights on);
- A voltmeter is used to determine the voltage between the “ground” of the generating device and the “plus” on the battery.
- Failure of all vehicle network devices. Usually, the first thing that happens is that all the lamps in the lighting devices burn out. If this suddenly happened, the relay has failed because the output voltage exceeded the rated values.
- Recharging the battery. Overcharging a galvanic cell is also unacceptable. This can lead to boiling of the electrolyte and subsequent damage to the battery.
- Low charge. As many car enthusiasts say, “undercharging” occurs. A weak battery will not be able to fully ensure reliable engine starting.
conclusions
In the electrical system of a car, the voltage regulator relay of the Bosch generator (as, indeed, of any other company) plays a very important role. Monitor its condition as often as possible and check for damage and defects. Cases of failure of such a device are not uncommon. In this case, in the best case, the battery will be discharged. And in the worst case, the supply voltage in the on-board network may increase. This will lead to the failure of most electricity consumers. In addition, the generator itself may fail. And its repair will cost a tidy sum, and considering that the battery will fail very quickly, the costs will be astronomical. It is also worth noting that the Bosch generator voltage regulator relay is one of the leaders in sales. It has high reliability and durability, and its characteristics are as stable as possible.
What is a generator voltage regulator?
The voltage regulator is a relay that closes and opens the electrical circuit at the right times. In cars, this relay works to limit the output voltage. The fact is that a generator with a certain rotor speed can produce a specific voltage.
The first voltage relay was made in the form of an electromagnet, which opened with a change in the input value, and closed again when the voltage dropped, thus, the voltage in the electrical circuit of the on-board system was kept within a strictly specified range. This range is necessary for the correct operation of electrical devices. If you increase the voltage to values exceeding the nominal values, the device will simply fail.
Another stage in the development of mechanical relays was the emergence of a semiconductor device, which works much more accurately and reliably. A semiconductor relay has smaller dimensions and a special indicator that indicates whether the device is working or has failed.
The main difference between a mechanical relay and a semiconductor relay is the ability to make adjustments. If the output voltage of the supply circuit has changed, then by changing the position of a special device, you can set new values that will allow the relay to operate for a long time.
The "tens" launch vehicle also has a semiconductor design. It is integrated into the generator, which allows you to maintain the required voltage directly at the output of the device.
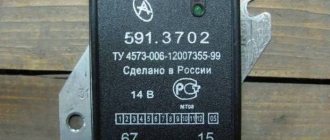
The stock “tens” regulator is available under catalog number 1702.3702. It can also be used in generators of all Samar models.
On new modifications of the VAZ-2110, the voltage regulator may be marked 1702.3702-01. This is a new generation of relays that are manufactured using MOSFET technology, which can significantly reduce output power losses. In addition, these devices are characterized by increased reliability and resistance to overheating.
The voltage regulator relay for the VAZ-2110 generator has the following characteristics.
Regulation voltage with battery at a temperature of 25 o C and a load of up to 3A, V
Regulation voltage with battery at a temperature of 25 o C and a load of more than 3 A, V
Operating temperature range, o C
Maximum output circuit current: standard/agreed with the manufacturer, A
Permissible long-term exposure to high voltage, V
Permissible exposure to high voltage for up to 5 minutes, V
If you find at least one of the listed signs, do not be lazy to check the voltage regulator on your VAZ-2110. This procedure will not take more than 10 minutes. To do this, you will need a voltmeter or multimeter turned on in its mode, as well as an assistant. The verification procedure is as follows:
- We start the car engine and warm it up to operating temperature.
- Without turning off the engine, we connect one voltage probe of the generator, and the second to the “ground” of the device.
- We ask the assistant to turn on the low beam headlights and press the accelerator pedal, keeping the speed at 2000-2500 thousand rpm.
- We measure the voltage with the device.
For the VAZ-2110, the voltage regulator should produce 13.2-14.7 V. This is the norm. If the voltmeter readings differ from those shown, diagnostic measures should be continued.
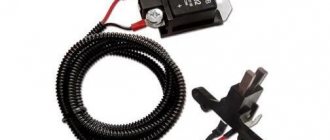
Now let's go back a little. If you discover a faulty LV and decide to replace it, do not rush to buy a stock device. There is a good alternative to it - a three-level regulator. How is it different from the usual one? It allows you to regulate the output voltage depending on the air temperature, thereby optimizing the load on the battery.
Modes are switched using a toggle switch in the following ranges:
- 13.6 V (minimum) – for operation at temperatures above 20 o C;
- 14.2 V (normal) – from 0 o C to 20 o C;
- 14.7 V (maximum) – for operation at temperatures below 0 o C.
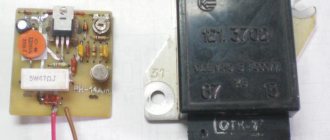
The three-level voltage regulator VAZ-2110 consists of two parts: the pH itself and the brush holder. The latter is installed directly on the generator and is connected to the former using a wire. The regulator, equipped with a toggle switch, is attached to the car body in the engine compartment in a convenient place. You can install the launcher yourself using the instructions that come with it.
Domestic cars have a serious problem of rapid battery discharge. Unstable battery operation leads to rapid loss of resource, and buying a high-quality battery today is not a cheap pleasure.
The main provocateur for the rapid failure of batteries is the frequent change of operating modes and little depends on the driver of the vehicle. The battery, in turn, requires different voltages to charge.
To solve this problem, a regulator comes to the rescue. The standard device installed by default does not cope well with its responsibilities, because the circuit uses a very simple design that supplies only constant voltage. The disadvantage of such a regulator is that it does not take into account the speed of the vehicle, the amount of energy required and the ambient temperature.
The three-level voltage regulator from Energomash for VAZ-2110 cars is almost ideal for those drivers who drive in difficult operating conditions.
In this case, it becomes possible to climb the mountain for a long time. In hot weather, battery performance increases significantly.
Starting the engine becomes much easier, and the battery itself remains charged for a long time. The minimum output voltage from the regulator in question is 13.6 V, the maximum is 14.7. The device itself is quite compact. The circuit can withstand current up to 5 Amps.
The cost of the Energomash regulator for the VAZ-2110 is approximately 345 rubles.
To summarize, we note that replacing the standard voltage regulator on VAZ-2110 cars and not only provides many advantages. We examined all the advantages in this article and at the end we noted a worthy model of equipment produced by Energomash.
Installing the regulator is not difficult, so all work on installing the device can be performed by a motorist with any level of technical training.
Relay regulator VAZ
Replacing the VAZ 2110 generator regulator relay
However, before proceeding with the replacement, you need to check whether the problem is really with a faulty relay. In this case, it will be checked directly on the car. To do this you need:
- Take a voltmeter with a scale of 15-30.
- Turn on the engine.
- Turn on the headlights (see Replacing headlights on a VAZ 2110: do it yourself).
- The motor must run for at least 15 minutes.
- The voltage must be measured between the “B” terminal and the generator ground. However, it should not be less than or more than 13.2-14.7 V.
- Replacing the relay is necessary if both undercharging and overcharging are observed.
Replacing the regulator relay on a VAZ 2110 generator
It is advisable to check the relay together with the brush holder, since in some cases problems arise due to poor contact between the relay and the brushes. To check the regulator after removing it, you must:
- Turn on a 12 V lamp between its brushes.
- First, connect a power source with a voltage of 12 V to the relay terminal “D”. If the relay is faulty, the lamp will light up.
- Then you need to take a more powerful current source - 15-16 V. If the relay does not work correctly, the light will go out.
Generator relay VAZ 2110
By the way, many people confuse a faulty relay with a faulty capacitor (see Changing the capacitor (VAZ 2110 generator)), since the “symptoms” are quite similar. Thus, if after checking the relay, it is clear that it is fully operational, but the voltage generator is not working well, then you need to check the capacitor. It protects all electronic equipment from voltage surges. To check its operation, you should:
- Turn on the radio. If there is interference in its operation, then all is not well with the capacitor. The engine must also be turned on.
- You can check its serviceability using a megger or tester. When connected to a capacitor, the needle should quickly move to the side and then slowly return to its original position.
Many people believe that if the battery does not hold a charge, then the problem is in the generator. However, sometimes this can be caused by a faulty relay regulator. To check what exactly is not working, you need to do the following:
- Open the hood of the car.
- Start the engine. Put 2 or 3 speed on the gearbox.
- Remove the battery terminal.
- If after this the machine still works, then the relay is faulty. But if the car stalls, then the reason is still in the generator.
The voltage regulator is mounted on board the machine, while the generator brushes and panel are mounted directly into the generator. Thanks to these three levels, the battery will remain charged for a long time, and its service life will increase significantly. These levels are:
- Minimum level. It is necessary for the car to work even in the hottest conditions. That is, it will not stall even in areas where the air temperature exceeds 20 degrees. In addition, the car can withstand even the highest slopes.
- Level "norm". Allows the machine to operate under normal conditions.
- Level "maximum". Necessary for using the machine even at sub-zero temperatures. At the same time, the car will be able to start even with a discharged battery.
Circuit breakers
Now let's see which fuses are responsible for what in the same mounting block. I will also give the main reasons for troubleshooting.
F1 (5 A) - license plate lighting lamps, dashboard lighting, side lights on the panel, trunk lamp, left side lights . If any of the listed lamps do not work, check this fuse, as well as the lamps themselves and their contacts. If everything is in order, check the headlight switch button.
F2 (7.5 A) - low beam in the left headlight . If both low beam headlights do not work, also check relay K4 and the lamps themselves. It could also be the light switch and its contacts.
Malfunctions and checking regulators on a VAZ
In VAZ-2110 cars, the voltage regulator breaks quite rarely, but if this happens, signs of its malfunction may be:
- Failure of the control panel backlight.
- Exceeding the battery charging voltage.
- Insufficient battery charge voltage.
If the voltage regulator relay of the VAZ-2110 breaks down, the fuses responsible for the safety of the power supply circuit of the instrument panel may blow out. If the backlight lamps do not light up when the ignition is turned on, there is a possibility that the LV is to blame.
The same can be assumed when the voltmeter needle, indicating the battery charge level, deviates from its usual position, i.e., shows higher or lower voltage.
To make sure that it is the LV that has failed, and not the generator itself, it should be checked separately. To do this, you will need to disconnect it from the main device. The procedure is as follows:
- Remove the negative terminal from the battery.
- We find the place where the launch vehicle is attached to the generator. Unscrew the 2 screws that secure it.
- Disconnect the yellow wire going from the regulator to the generator.
- We dismantle the launch vehicle.
To diagnose the device, you will need a power supply with the ability to adjust the output voltage, a light bulb (12 V) with a socket and a pair of wires. The verification algorithm is as follows:
- We assemble a “control” from a lamp and wires and connect it to the regulator brushes.
- Set the voltage on the power supply to 12 V.
- We connect the “plus” from the power supply to the “D” terminal of the regulator, and the “minus” to its “ground”.
- We look at the lamp: it should be lit.
- We increase the voltage on the power supply to 15-16 V. If the regulator is working properly, the lamp should go out. If this does not happen, the LV must be replaced.
Additional block
It is located under the center console and is covered with a lid. One part is accessible from the right side.
Designation
p, blockquote 27,0,0,0,0 —>
- 15A - Ignition module, controller
- 15A - Canister purge valve, vehicle speed sensor, oxygen concentration sensor (heating), air flow sensor
- 15A - fuel pump, fuel pump fuse, injectors
- Electric fan relay
- Fuel pump relay
- Main relay (ignition relay)
The other part is on the left side of the console:
Decoding
p, blockquote 31,0,0,0,0 —>
- Central locking control unit
- Immobilizer block
- Relay for turning on rear fog lights.
On our channel we also prepared a video on this publication. Watch and subscribe.
What to do if the voltage relay fails?
If you are new to electronics, then such an undertaking will be quite difficult.
As we mentioned earlier, the main element of the circuit is a certain number of diodes. Finding three-stage switches for them is quite problematic. In addition, you need to correctly calculate and install radiators for cooling. Otherwise, the risk of diode burnout increases significantly.
During the development of the regulator, long wires will be needed, because the connection is made directly to the device through the cover.
Additionally, you will need to make or find a suitable plastic case for such equipment. All internals must be securely fastened inside the device.
It happens that the relay fails at the most inopportune moment, when you still have a drive home and the battery is not charging. The battery capacity in economical mode can ensure fairly long engine operation, which will allow you to get to the repair site without any problems. Below we will provide a list of recommendations that will help you drive, as they call it, “on battery power” and not stall.
- If the battery is overcharged, the relay must be disconnected from the circuit. To do this, the contact wires are removed from it and left hanging. In the case of the “ten”, it is enough to unplug the plug with the wire from the generator brush connector. Thus, battery charging is turned off, and further movement will no longer harm the battery.
- Many experts suggest going the other way - turning off the generator excitation winding. To do this, remove the corresponding fuse. However, this can be done if you know where the fuse is located.
- If the battery is weakly charged, then there is practically no reason to panic. To get to your destination, you need to maintain high speeds in order to, at least a little, bring the voltage value to the nominal value. Before stopping the engine, it is recommended to maintain the speed at 3000 rpm for a few seconds using the gas pedal. This will prepare the battery for the next start.
- Avoid using music, power windows, headlights (especially high beams), and other electrical devices unless their use is absolutely necessary. This will save battery power well.
Relay regulator VAZ
- disconnect the negative terminal from the battery;
- disconnect the drive block from the terminal marked “D”;
- unscrew the nut, which is located under the rubber boot (it needs to be moved a little to the side);
- disconnect all existing wires in the contact pin;
- unscrew the nut in the generating device circuit (this fastener secures the terminal) and remove it.
Then you will need to remove the generator casing by unscrewing the nuts (there are three of them) that hold it in place, as well as dismantle the relay housing and remove the screw securing the disassembled mechanism from the rectifier compartment. Now the VAZ 2110 voltage regulator can be easily removed. You can install a new device instead. After replacing the relay, all the described steps are performed in the reverse order.
- If the battery is overcharged, the relay must be disconnected from the circuit. To do this, the contact wires are removed from it and left hanging. In the case of the “ten”, it is enough to unplug the plug with the wire from the generator brush connector. Thus, battery charging is turned off, and further movement will no longer harm the battery.
- Many experts suggest going the other way - turning off the generator excitation winding. To do this, remove the corresponding fuse. However, this can be done if you know where the fuse is located.
- If the battery is weakly charged, then there is practically no reason to panic. To get to your destination, you need to maintain high speeds in order to, at least a little, bring the voltage value to the nominal value. Before stopping the engine, it is recommended to maintain the speed at 3000 rpm for a few seconds using the gas pedal. This will prepare the battery for the next start.
- Avoid using music, power windows, headlights (especially high beams), and other electrical devices unless their use is absolutely necessary. This will save battery power well.
Three-level voltage regulator for VAZ-2110
The three-level mechanism is mounted as follows:
- first remove the old relay according to the algorithm given above;
- grind the ends of the spacer bushing using a file (this operation ensures more reliable contact with the diode bridge);
- a new element with a brush holder (sold as a set) is installed in place of the relay;
- Sealant is used to seal the cable entry point;
- put back the plastic casing;
- lay the cable along the standard wiring to the area where the relay is mounted, and secure the new wire tightly with small plastic clamps.
It is recommended to connect the housing of the installed voltage relay and the autogenerator using a reliable shunt. This ensures the necessary contact of the device with ground. However, you can do without a shunt.
The mounted three-level mechanism should be checked with a tester at full consumer load (window heating, stove, headlights, etc. are turned on). At maximum, the device should show 14.5 V, in normal mode - 14.1 V, at minimum - about 13.4 V.
What is the advantage of three-phase regulators
The main advantage of such devices is the ability to preserve the life of the car battery. This is very important for any driver. The list of benefits does not end there:
- Eliminates heating problems.
- In cold weather the engine will start faster.
- Problems with alarms disappear, which quite often happens to vehicle owners. Such surprises especially happen in winter.
- The power of light emission from lamps increases. Visibility will improve both with low and high beams.
- The regulator can also affect the operation of the vehicle's heating system. There is an established opinion among experienced drivers that the stove works much better with a fully charged battery.
- Some car enthusiasts have noted that power windows work faster with a working battery.
As you can see, a high-quality battery with an additional three-level regulator can save you from a lot of problems.