If there are problems with the battery, you need to check the generator voltage regulator. Specifically, the battery is undercharged or overcharged. If this fault occurs, it's time to check the generator voltage regulator relay.
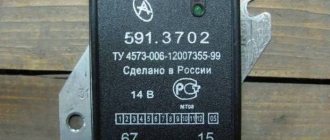
The relay should turn off at a voltage of 14.2-14.5 V.
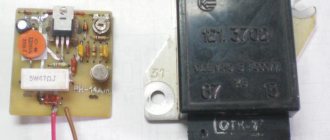
The purpose of this simple device is to regulate the amount of electrical current that is supplied from the generator to the battery. If it fails, the battery will be undercharged or overcharged, which is also dangerous as it significantly reduces the battery life.
Agree, this perspective is not very good for one small detail. This is why it is so important to check the technical condition of the voltage regulator (it can also be called a tablet or strip). However, to properly test a voltage regulator, you need to know its type and some important characteristics.
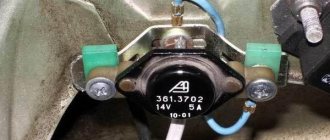
Generator voltage regulator VAZ 2112 16 valves
To perform the operation test you will need:
– a power supply with regulated voltage up to 20 V or a battery charger.
1. We prepare the car for work and disconnect the wire block from the negative terminal of the battery (see “Preparing the car for maintenance and repair”).
2. Disconnect the wire block from terminal D of the generator and remove the protective cap.
3. 10 mm
unscrew the nut securing the wire lugs to the “+” terminal of the generator.
4. Remove the ends of the two wires from the contact bolt.
5. Release the three spring clamps securing the housing of the rectifier unit.
. and remove the casing from the generator.
Using a Phillips screwdriver, unscrew the two screws securing the voltage regulator.
6. Remove the voltage regulator and disconnect the wire block from its output.
7. 10 mm
Unscrew the nut securing the capacitor wire lug. Using a Phillips screwdriver, unscrew the screw securing the capacitor.
1. Inspecting the brushes of the voltage regulator, we make sure that they are mobile. If the brushes are broken or badly worn (protrude no more than 5 mm
) or they get stuck in the brush holder, we replace the regulator.
2. To check the voltage regulator, we assemble a circuit (see below). We connect the test lamp to the regulator brushes. We connect the negative terminal of the power source to the “ground” of the regulator, and the positive terminal to its terminal. We connect the test lamp to the brushes of the voltage regulator.
When connecting the wires supplying voltage to the voltage regulator, strictly observe the polarity. Incorrect connection of the wires will damage a working regulator.
Using a voltmeter we monitor the voltage supplied to the regulator.
Diagram for checking the voltage regulator: 1 – multimeter (in voltmeter mode); 2 – control lamp; 3 – “mass” of the regulator; 4 – regulator output; 5 – brushes
3. Turn on the power supply and supply 13 V to the regulator. The control lamp should light up, indicating that at this voltage in the vehicle's on-board network, the excitation current will flow to the generator rotor winding.
4. Gradually increase the voltage until the control lamp goes out. The voltage at which the control lamp goes out should be 14.5-14.7 V.
5. Reduce the supply voltage until the control lamp lights up again. The voltage at which the control lamp turns on should not be lower than 13.2 V.
The capacitance of a capacitor can only be measured with a special device. You can verify that the capacitor is faulty using an ohmmeter with a measurement limit of at least 1000 kOhm
6. Connect an ohmmeter to the terminals of the capacitor and observe its readings. If the capacitor is not “broken,” then when the device leads are connected to it, the ohmmeter will initially show a small resistance, then this resistance will quickly increase until it stabilizes. A similar change in ohmmeter readings should be repeated when the polarity of the device is changed.
We replace the faulty capacitor and voltage regulator.
Install the capacitor and voltage regulator in reverse order.
In 1995, the Volzhsky Automobile Plant began producing a new model of the four-door sedan VAZ-2110. This model was initially created on the basis of the G8, but a large number of changes made distinguished this car into a separate class, which later served as the progenitor of several models of VAZ small cars.
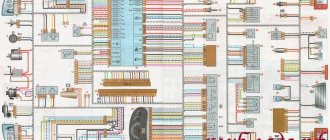
The range of currently used spare parts is significantly influenced by design features and innovations introduced in a given car brand. The VAZ-2110 uses an electronic engine control system and for the first time introduced an on-board computer, which in this case acts as a diagnostic unit. Such innovations led to a significant increase in the number of sensors used in cars, the quality of which left much to be desired. Until now, the problem of failure of the VAZ-2110 diagnostic system is quite acute. A positive aspect of introducing innovations in car design is the use of galvanized metal, which increased the service life of body parts. The needs for these types of parts directly depend on the regional location of the vehicle and increase when moving to the northern regions.
Symptoms of a problem
So in case of low voltage, the battery simply will not charge.
This means that in the morning the car will not be able to start, the light on the dashboard may not even come on, or problems will arise while driving.
For example, dim lights at night, unstable operation of the electrical system (problems with electrical appliances - wipers, heating, radio, etc.)
High voltage can cause the electrolyte level in the battery cells to drop or boil. This may cause a white residue to appear on the battery. If the battery is overcharged, it may not behave correctly.
Signs, malfunctions and repair of the generator and voltage regulator
In addition, you can also pay attention to the following signs of voltage regulator failure (in some cases, some of them may or may not be present, it all depends on the specific situation):
- after turning on the ignition, the warning lamp on the instrument panel does not light up (however, it may indicate other malfunctions, for example, a lamp has burned out, a contact has fallen off, etc.;)
- the battery control light on the instrument panel does not go out after starting, which means that there are obvious problems with charging the battery;
- The brightness of the headlights becomes dependent on engine speed (you can check this somewhere in a secluded place by placing the car against a wall and accelerating - if the brightness changes, the voltage regulator is probably faulty)
- the car does not start normally the first time;
- the battery is constantly discharged;
- indicators on the instrument panel turn off when engine speed exceeds 2000 rpm;
- the dynamic characteristics of the machine are reduced, this is especially noticeable at high engine speeds;
- In some cases the battery may boil over.
Which TRN is suitable for LADA
| Generator, article number | Automobile | TRG, article number |
| 26.3701, 37.3701, 371.3701, 372.3701 | VAZ-2107, -2108, -2109, -2110, OKA | 67.3702-01 |
| 3002.3771, 332.3771, 3202.3771, 3212.3771, 4302.3771, 94.3701, 9402.3701, 9422.3701, 3740.3771-38, 3743.3771-61, 3747.3771- 93, eld-a-21214, LG01214 | VAZ, GAZ | 67.3702-02 |
| 4052.3701, 409.3701, PRAMO “ISKRA” 5102.3771, -10, 5112.3771, -10, 5122.3771, -10, -30, 5142.3771, AAK 5727 | VAZ, GAZ, UAZ with generators PRAMO “ISKRA” 5102.3771, 5122.3771 | 67.3702-04 |
| G222 | VAZ-2104, -2105, -2107 | 67.3702-09 |
| 26.3701, 37.3701, 371.3701, 372.3701 | VAZ-2107, -2108, -2109, -2110, OKA | 67.3702-11 |
| 3002.3771, 332.3771, 3202.3771, 3212.3771, 4302.3771, 94.3701, 9402.3701, 9422.3701, 3740.3771-38, 3743.3771-61, 3747.3771- 93, eld-a-21214, LG01214 | VAZ, GAZ | 67.3702-12 |
| generators with an additional three diodes, the excitation winding of which is connected to the positive circuit | 673.3702 |
Installation and connection instructions
For Lada cars (except Vesta, XRAY)
, photo author:
2.
Remove the plastic casing of the generator. To do this, first disconnect the generator excitation wire. Then unscrew the nut from the stud (10mm wrench) and move the power wire to the side. Next, 3 latches on the plastic casing are unfastened.
3.
Remove the standard voltage regulator from the generator. To do this, unscrew two screws ("8" key) and disconnect the wire.
4.
Install a three-level voltage regulator on the generator instead of the standard one.
5.
Output 2 wires for the control module. The module itself should be mounted in conditions of reliable contact with the “ground” and as far as possible from the possibility of moisture ingress. For example, on a hairpin near the right headlight.
For Lada Vesta, XRAY cars (with Valeo TG12C209 generator).
This generator is no different from the previous ones, the only difference is in the voltage regulator. It communicates with the engine ECU via a “lin” interface. The task of this “lin” is to avoid loss of throttle response at power modes. By installing the TRN, we cut off the ability to control the regulator using the ECU!
For this generator there is no ready-made solution in the form of a TRN yet, so the design will have to be modified.
- three-level voltage regulator (article 67.3702-01)
- 2-pin block 904576 NORD YADA
- generator voltage regulator (leave the standard one (if the brushes are live) or ARV1103AD)
- wire for powering the regulator (2 meters)
What to do if the voltage relay fails?
It happens that the relay fails at the most inopportune moment, when you still have a drive home and the battery is not charging. The battery capacity in economical mode can ensure fairly long engine operation, which will allow you to get to the repair site without any problems. Below we will provide a list of recommendations that will help you drive, as they call it, “on battery power” and not stall.
- If the battery is overcharged, the relay must be disconnected from the circuit. To do this, the contact wires are removed from it and left hanging. In the case of the “ten”, it is enough to unplug the plug with the wire from the generator brush connector. Thus, battery charging is turned off, and further movement will no longer harm the battery.
- Many experts suggest going the other way - turning off the generator excitation winding . To do this, remove the corresponding fuse. However, this can be done if you know where the fuse is located.
- If the battery is weakly charged, then there is practically no reason to panic. To get to your destination, you need to maintain high speeds in order to, at least a little, bring the voltage value to the nominal value. to maintain the speed at 3000 rpm for a few seconds using the gas pedal This will prepare the battery for the next start.
- Avoid using music, power windows, headlights (especially high beams), and other electrical devices unless their use is absolutely necessary. This will save battery power well.
Checking the work
- Switch position “min” - for operation at high ambient temperatures (above 20ºС), as well as during operation in particularly difficult conditions (traffic in traffic jams, long climbs in the mountains, etc.);
- The middle position of the switch is for operation at ambient temperatures from 0ºС to 20ºС;
- The “max” switch position is for operation at low ambient temperatures (below 0ºC), as well as for recharging a discharged battery.
Average load (PTF, dimensions, music and heater fan at first speed)
:
Maximum load, maximum number of consumers activated
:
Will you be installing a three-level voltage regulator on your car? Take part in the survey and leave your feedback in the comments.
Let us remind you that another reason for low voltage on the on-board network may be a bad ground.
Share on social networks:
Found an error? Select it and press Ctrl+Enter..
Source
We install the voltage regulator of the VAZ 2110 generator
The voltage regulator on a modern car automatically and continuously adjusts the excitation current of the generator. Moreover, this process proceeds in such a way that when the current load and rotation speed of the generator changes, the value of its voltage remains in a strictly defined range.
Voltage regulator - its main functions
On a VAZ 2110 car, the voltage potential in the generator is formed under the influence of alternating current. This phenomenon becomes possible due to the presence of silicon diodes in the generating device of the vehicle. The generator rotor (the rotating component of the mechanism) operates according to the following diagram:
- First, the crankshaft begins to function, which is affected by the current;
- the crankshaft sets the movement of the rotor;
- After this, the generating device itself begins to work.
All stages of the sounded process are monitored by a voltage regulator, which is also often called a relay. It is this that is considered the main control unit of the generator.
Without a regulator, the current-generating mechanism of the VAZ 2110 will not perform its tasks, which are listed below:
- starting the generator;
- control (in offline mode) of current supply;
- “holding” in a certain voltage range.
The described relay cannot be repaired. In the event of a breakdown, the regulator must be replaced, which is done after checking the functionality of this unit.
Fault diagnosis
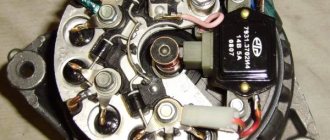
Now that we have the brush holder with the regulator and the capacitor in our hands, replacing the generator brushes on the VAZ 2112 is carried out together with the brush holder and the relay regulator, but we need to make sure that the cause of the malfunction lies here, so we begin to look for the fault. So:
- It is necessary to clean the contact on the brush holder with sandpaper, they are marked in the photo below; poor contact in this place can also cause poor operation of the electric generator
Clean the contact highlighted in red
- We check the serviceability of the relay - voltage regulator, to do this we connect a 12 Volt light bulb to the brushes
- We apply a voltage of 12 Volts, “+” goes to the terminal, and “–” goes to the ground of the brush holder
- The indicator light should light up
We connect the light bulb to the brushes and apply 12 volts to the contacts of the relay-regulator
- Next, we apply a higher voltage: 15–16 Volts - the light should go out
- When the light is on or does not light up in both cases, this means that the regulator is faulty and needs to be replaced along with the brush holder
- We check the ease of movement of the brushes in the brush holder body and the height of their protrusion
- If they protrude from the body by less than 5 millimeters, replacement is needed; the brushes of the VAZ 2112 generator are changed along with the relay - voltage regulator and brush holder
Required brush height
- If you find chips and cracks on the brushes, then replace the generator brushes on the VAZ 2112
- To change the brushes alone, we pull out the holder from the relay housing - voltage regulator, to do this we press on terminal “B”
- Before installing the voltage regulator with new brushes in place, blow the installation socket on the generator from dust and wipe off oil
This completes the replacement of brushes on the generator for the VAZ 2112; we move on to the last small but important part - the capacitor (see Changing the capacitor (VAZ generator)).
Tip: When there is already wear on the slip rings of the electric generator, it is recommended to slightly grind down the contact corners on the brushes, so that the new brushes will fit more easily into the grooves of the worn slip rings
Capacitor functions and testing
If you have never dealt with capacitors, these instructions will help you:
- The capacitor is designed to protect all electronic equipment of the car from voltage pulses (jumps) appearing in the ignition system; it also reduces radio interference
- If the capacitor is damaged or its fastening on the electric generator is loosened (contact with the housing worsens), it sharply increases the interference of the radio receiver when the engine is running
Its serviceability can be checked using a megger or tester (with a scale of 1–10 Mega Ohms):
- We connect the probes of our tester to the terminals of the capacitor
- It should show infinity before connecting
- Resistance decreases only at the moment of connection, and then must return to infinity again
- This means the capacitor is working properly
- Otherwise, the capacitor must be replaced
Attention: The K73-58-4 capacitor is installed on the VAZ2112 electric generator. The marking is located on the side of the case. To avoid problems, it is not recommended to install a different type of capacitor.
- We screw the capacitor back, pay attention that it is important to accurately orient the capacitor relative to the special mounting protrusion located on the cover of the electric generator, otherwise the brush holder will not fall into place
- We connect the connector back to the brush holder (the bend of the output wire faces up), screw it back, and the brushes must fall onto the slip rings
- Snap the plastic cover, insert and screw the wires back
- If there is a spring washer on the “+” bolt under the nut, it must be removed; dirt and moisture often accumulate under it, which often leads to oxidation and deterioration of contacts
- We put the terminals on the battery
That’s all for the VAZ 2112 generator, replacing the brushes is over, if some points are not entirely clear to you, we recommend watching the video.
How to check the relay on a VAZ 2110?
To analyze the condition of the regulator, you need to purchase a voltmeter, which has a measuring scale in the range of 15–30 volts. The check is performed as follows:
- start the car engine at medium speed and let it run for a quarter of an hour (the operation is carried out with the headlights on);
- A voltmeter is used to determine the voltage between the “ground” of the generating device and the “plus” on the battery.
If the measurement shows a voltage value from 13.5 to 14.2 volts, replacing the regulator is not necessary. But in situations where the voltage has a different value, indicating a constant overcharging or undercharging of the battery, the relay needs to be replaced.
Checking with a multimeter without dismantling
You can check the condition of the relay using a multimeter. In this case, the generator is not dismantled. Before starting diagnostics, it is enough to clean the battery terminals (their oxidation can affect the operation of the car and the readings of the measuring device).
The diagnostic procedure is as follows:
- First you need to start the engine and let it warm up for a few minutes.
- Next, you need to connect the multimeter probes to the battery terminals. The device displays a value of 20V.
- After this, the voltage is measured. It should be between 13.2–14V. Such readings are considered normal for most cars.
- Now you need to increase the engine speed (up to 2-2.5 thousand). The voltage should increase by about 0.2V.
- If it exceeds 3,500 rpm, the multimeter should show 14–14.5V, but no more.
Serious deviations in the readings of the device indicate the presence of breakdowns of the relay regulator.
How to replace the generator voltage relay?
If you have some skills, removing and disassembling the mechanism described in the article does not cause difficulties for a person. The most difficult thing is to change it for the first time, and subsequent replacements, as a rule, take place quickly and without problems.
The regulator on a VAZ 2110 is dismantled according to the following scheme:
- disconnect the negative terminal from the battery;
- disconnect the drive block from the terminal marked “D+”;
- unscrew the nut, which is located under the rubber boot (it needs to be moved a little to the side);
- disconnect all existing wires in the contact pin;
- unscrew the nut in the generating device circuit (this fastener secures the terminal) and remove it.
Then you will need to remove the generator casing by unscrewing the nuts (there are three of them) that hold it in place, as well as dismantle the relay housing and remove the screw securing the disassembled mechanism from the rectifier compartment. Now the VAZ 2110 voltage regulator can be easily removed. You can install a new device instead. After replacing the relay, all the described steps are performed in the reverse order.
Reasons for failure of the relay regulator
The reasons for failure of the voltage regulator may be:
- short circuit in the circuit, including interturn short circuit in the excitation winding;
- Failure of the rectifier bridge (failure of diodes);
- polarity reversal or incorrect connection to the battery terminals; moisture getting inside the regulator and/or generator housing (for example, after washing a car or driving in heavy rain);
- mechanical damage to the device;
- natural wear and tear of the device, including brushes;
- low quality device, directly tested.
- There are several simple ways to check the regulator, regardless of whether the unit is removable or not.
The easiest way to test the inverter is to measure the voltage with a multimeter. on the battery terminals. However, it should be noted that the algorithm below does not provide a 100% probability of controller failure.