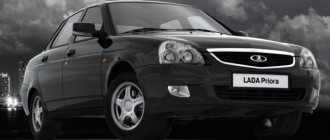
Life hack: brake discs of a Priora car - malfunctions, removal and installation
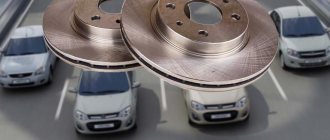
The brake discs on a Priora car, like any other, are an important part of the front suspension, which is the first to begin braking. There are two options for wheels on Priora - regular factory ones and ventilated ones.
The design of the Lada Priora brake system is such that “drums” are installed at the rear, and calipers at the front. This has been going on since 2101. However, it is possible to modify the rear brakes - that is, install brake discs with calipers and backwards, instead of drums. Spare parts for the brake system on Priora must be purchased and installed by the owner on time - the safety of travel depends on their “freshness”. The ventilated front disc has an advantage over a regular one; it is lighter and has plenty of holes, which means it cools down faster! The Priora, of course, brakes well in stock, but until you have driven a Ford or Kia, disc brakes are better there. The price of ventilated brake discs for a Lada Priora car starts from 4,000 thousand rubles and above, standard ones are cheaper than 1,100. In three years, my factory production has reached 2 millimeters.
Remember that the price of these spare parts is incomparable to the damage that you may incur if the braking time increases due to wear and tear of the components. Replacement must be done on time. On the Priora, front brake discs are installed in all trim levels, but the rear ones are a subject of tuning for daring car owners.
Non-ventilated
These are the simplest brake discs that are installed on the basic configurations of Lada Priora cars. It is believed that this type has an outdated design and is practically not used on modern machines. Foreign manufacturers installed non-ventilated discs back in the 90s of the last century. Starting from the “zeros”, even the budget class was equipped with ventilated elements.
The disk itself is a round blank with a thickness of 10 to 20 millimeters. It is often made by casting - it is one continuous element. More expensive analogues have a collapsible design. They can change the working surface. But their price is several times higher than the cost of brake discs on a Priora of the usual cast type. The range ranges from one and a half to seven thousand rubles. The “budget” niche is occupied by non-ventilated disks due to their simple design.
Instructions for replacing brake discs on a Priora
So, the first step is to jack up the front of the car, and then remove the front wheel brake caliper.
After that, using a 7 mm socket and a wrench, unscrew the guide pins of the brake disc, as is clearly shown in the photo below.
To minimize the risk of breaking the studs, tap them with a hammer first without using excessive force. And only then unscrew it. Then you can tap the area where it contacts the hub with a hammer.
Now you can try to remove it with your hands, or with the help of special devices. If you can’t remove it by hand, and you don’t have a puller at hand, you can carefully knock it off from the back with a hammer, of course, using a special wooden spacer.
We finally remove the Priora brake disc from the front wheel hub, which is clearly demonstrated in the photo below.
Before installing new discs on the Priora, it is necessary to clean the surface of the hub with a metal brush if there is rust or other formations on it. It is also worth applying copper grease to the contact area between the hub and the inside of the disk.
This procedure will reduce the occurrence of vibration and extraneous sound when braking, as well as reduce the temperature effects on the elements of the braking system. Replacement is carried out on both sides simultaneously. To ensure that the surface of the disc remains smooth and free of defects, it is necessary to use only high-quality pads, and it is advisable to replace them at the same time!
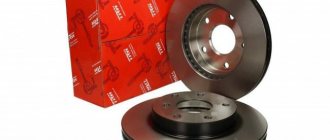
The price of a new brake disc on a Priora is from 900 rubles per piece. Of course, there are more expensive options, even up to 1500 per unit, but factory components for around 1000 rubles per unit are also quite good.
What to choose in the end?
What kind of front brake discs should I put on the Priora? Reviews from motorists agree on one thing - it all depends on the driving style. If you prefer an aggressive style, with sharp acceleration and braking, the presence of perforations and grooves is simply necessary for you. But if the car is used for leisurely driving, there is reason to think about installing non-ventilated discs. A compromise option is to purchase ventilated discs without perforation, but with grooves.
This is the average price range - from 3 to 5 thousand rubles per unit. This way you will be confident that the system is working properly and ensure maximum driving safety by reducing the braking distance by several meters. Plus, if these are alloy wheels, these grooves will give your car more sportiness.
What front brake discs can be installed on the Lada Priora?
It should be noted that the front brake discs constantly heat up and are subject to greater loads than the rear ones. That is why their replacement is necessary more often than the rear ones. But it is important to familiarize yourself with all the dimensions in advance. Before you make a purchase, you need to decide on your budget. Original disks are usually slightly more expensive than analogues.
ATTENTION! A completely simple way to reduce fuel consumption has been found! Don't believe me? An auto mechanic with 15 years of experience also didn’t believe it until he tried it. And now he saves 35,000 rubles a year on gasoline! Read more"
At the same time, it is important to remember that the latter are sometimes in no way inferior in quality to the originals. Some famous brands have the status of official suppliers. Therefore, the quality of the products they supply is satisfactory. The price fluctuates depending on various factors. It is necessary to take into account all the nuances. If the car has ABS, discs are required, which require connecting the corresponding sensors.
The price also varies depending on the brand. Such as TRW and Ferodo will cost slightly more than noname products. The cost of ventilated and conventional ones varies. The latter are suitable for drivers practicing an aggressive driving style. They cool down much faster. Moreover, the pedal will be more responsive. But the cost of such disks is much higher.
Original
Many drivers choose original parts. Moreover, there is a certain logic in this. Since such components are 100% likely to fit. It is only important to study all offers in advance. Counterfeits of original components and parts are often found on sale. There is a hologram on AvtoVAZ boxes; the box itself is made of high-quality cardboard.
| Name | vendor code | Cost, rubles |
| LADA | 21120-3501070-02 | From 1 thousand rubles |
Substitutes
Purchasing analogues does not cause problems. It is only necessary not to confuse the article. The minimum cost of such components will be 800 rubles. Having installed such items, it is important for the owner to constantly monitor their condition. This will avoid many difficulties. It is better to replace the disks in advance.
| Name | vendor code | Cost, rubles |
| BREMBO Brake disc VAZ 2110-2112 R14 front ventilated | 09.8903.14 | From 1.2 thousand rubles |
| BOSCH Brake disc VAZ 2110-2112 R14 front ventilated | 0 986 479 346 | From 1.4 thousand rubles |
| MILES Brake disc VAZ 2110-2112 R14 front ventilated | K000075 | From 1 thousand rubles |
Which VAZ is better to buy: the model range of the domestic manufacturer
Let's sum it up
avto-flot.ru
For each motorist and for each individual case, choosing a car for a taxi is an entirely individual matter. It is important to realize that it is the right choice in your individual case that can please you and provide normal travel conditions in any situation.
The choice of taxi car depends on the city, the characteristics of working in a taxi service and other important characteristics. Taxi cars can travel up to 1000 kilometers per day, which sets certain limits in terms of quality and endurance. However, if you ride in a taxi after your main job, your mileage will increase by only a hundred kilometers per day. In this case, you can give preference to a cheaper car.
A taxi car will be a good purchase if it is inexpensive and not too expensive to maintain. These are important points that make the purchased car profitable to operate or too expensive. If your car requires constant investment in repairs and maintenance in large quantities, you will not be able to earn much money in a taxi, since you will spend exclusively on the car.
Therefore, you should look for a cheap but reliable car. Many people think about purchasing a used car, but in this case the risks are very high. With such a huge potential mileage, it is better to buy a new car and get a warranty for the next few months.
Lada Granta is the cheapest taxi solution
If you want to make a profit from the first month of using the car in a taxi, the best solution would be to purchase a Lada Granta. This is a domestic compact sedan, created on the basis of previous developments. The changed appearance was not the only update to the AvtoVAZ model line; engine settings have changed significantly, and an automatic has appeared in the trim levels. The main benefits of Lada Grants for taxis are as follows:
- the starting price of the car is only 330,000 rubles, despite inflationary processes in the country;
- Car maintenance may be required quite often, but everything in this car costs pennies;
- The reliability of the machine is quite high, in most cases you will not feel any negative aspects;
- The Lada Granta is quite convenient to use; you can drive 1000 kilometers a day without a sore back;
- the car is ready for significant mileage, the design of the car is very simple, the car can boast of endurance.
These are the features that a domestic car offers as a taxi car. Choosing such a car provides several more important aspects. For example, when purchasing, you can take advantage of preferential loans and other convenient programs, since the domestic manufacturer is actively supported by the state and is promoted to the masses.
Renault Logan - for lovers of foreign cars
A European alternative to Grants with a slightly higher price tag and a different class. The machine is quite simple in its design, very reliable, and prepared for intensive use. Owners of the previous generation of Logan actively used the car in taxis, so the manufacturer provided these features in the new generation:
- the car has a very comfortable place for the driver and passengers;
- the cost of the car remained within 400,000 rubles, which is not much more expensive than the Grant;
- the car does not require maintenance, even basic equipment is very reliable;
- Excellent low consumption criteria allow savings in machine operation;
- no problems with inexpensive regular service and periodic repairs.
DETAILS: How to pass the traffic police exam the first time
The cost of owning a Logan may be even lower than the price of driving a Grant, if you use the French car wisely. The low-power engines under the hood of this car are not too fond of spin-up; they work well at low speeds and provide sufficient dynamics. If you twist them, they begin to eat oil and require maintenance.
Daewoo Gentra - a new representative of the taxi class
Another car that has received the title of one of the best solutions for taxis is Daewoo Gentra. The car offers a very favorable price for the version with an automatic transmission - 500,000 rubles. Considering the fact that the car has a standard 4-automatic transmission with high reliability, an automatic transmission will greatly facilitate the taxi driver’s work and make his everyday life more enjoyable. The main benefits of Gentra are as follows:
- the car costs very affordable money - the basic version will cost 420,000 rubles;
- the car is descended from the Chevrolet Lacetti, a respected and reliable taxi car;
- a large spacious salon provides space for each passenger with high comfort;
- the car drives smoothly, absorbing road unevenness; the suspension remains from the Lacetti;
- Repairing this Korean and Uzbek car will be quite cheap.
Regular maintenance won't take too much money out of your pocket, but you'll have to fork out more at the gas station. The base Lacetti engine was also transferred to the Gentra, and this is a 109-horsepower unit with a fairly high appetite. The car is heavy, you have to turn the engine quite hard. But high consumption can be called the only drawback of the car.
Mitsubishi Lancer X - if you need an executive class
In 2015, Mitsubishi restyled its Lancer X sedan, changing the only body part - the shape of the front bumper. With such changes, the car became one of the most amazing updates, the car has not changed for so many years, and the new generation has also not changed at all. Lancer is bought for an elite taxi. The machine has important advantages:
- the car belongs to the executive class of Japanese production;
- a large and spacious interior and soft suspension confirm its role in a taxi;
- transport costs affordable money - 750,000 rubles in the basic version;
- repair and maintenance of equipment will not cause problems, everything under the hood is classic;
- There are automatic versions that also won't cost you too much money.
Among its competitors in the standard C-Class, the car turned out to be one of the most successful solutions for use in an executive taxi. But if you need a car for private transportation, it is better to choose a cheaper option. Lancer X is only suitable if you will pay more for transportation.
Skoda Octavia is the world leader in taxi ratings
Many companies that open taxi services in Moscow use Skoda Octavia cars of various generations and modifications. Despite their high cost, the cars turn out to be much more profitable than their rivals for a number of reasons. The cars offer many important advantages for use as city and intercity taxis:
- excellent endurance of the car, excellent body options for taxis;
- the presence of station wagons, as well as a basic body in the form of a liftback;
- the basic model will cost the buyer 816,000 rubles - not so expensive;
- There is practically no need to maintain the car, the car is quite reliable;
- Regular service costs much less than that of the same Volkswagen segment.
Let's sum it up
There are several dozen car models that are ideal for taxis. What is important here is the combination of price and quality, as well as potential earnings from the car. It is very important to purchase cars that will provide the highest quality of travel and can provide the necessary resources.
You can give preference to the budget segment and get a low purchase and maintenance price; you can purchase a middle price class and get benefits in terms of operation, travel comfort and potential cost of transportation. Each option has its own advantages and disadvantages.
avto-flot.ru
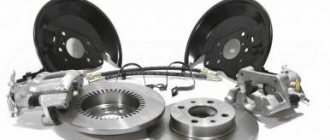
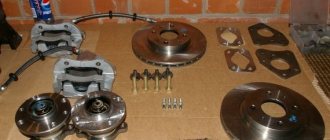
What rear brake discs can be installed on the Lada Priora?
Initially, in the stock version of the car with r14 wheels, there is a brake drum on the rear axle. But there are many dedicated rear wheel disc brake kits on the market. You can purchase them at any time. The installation process is quite complicated, but even an ordinary driver can do it. You need to stock up on special tools.
Original
Despite the lack of a standard, stock model with rear disc brakes, purchasing the originals will not be difficult. Since parts from other cars produced at the AvtoVAZ plant are suitable. it is possible to use the following:
| Name | vendor code | Cost, rubles |
| Lucas with ABS is the official supplier of AvtoVAZ | DF2586 | From 2 thousand rubles per pair |
Substitutes
There is a wide range of analogues on the market. Purchasing a suitable model is not difficult. It is only important to familiarize yourself with all the nuances of the choice in advance. Since the stock version of the car does not have such brakes. Particular attention should be paid to the dimensional parameters. If they do not match, it will simply be impossible to install them in place.
| Name | vendor code | Cost, rubles |
| N.K. | 202264 | From 2.7 thousand rubles per pair |
| Ferodo | DDF1096 | From 3.1 thousand rubles per pair |
| REMSA | 6144.10 | From 2.3 thousand rubles per pair |
Step by Step Actions
The nuances of pumping depend directly on the ABS model. The location of individual components and the presence or absence of additional modules affect the order of the procedure.
The preparatory stage is the same regardless of the car brand. Turn off the ignition and press the brake pedal intensely several times.
Pumping using the example of Lada Granta
The car is placed on an overpass or driven into a pit. This is necessary so that you do not have to remove the disks for free access to the working surface. Next, turn on the ignition to open the solenoid valves. Start the procedure with the right rear wheel.
How to replace front and rear brake discs yourself
Replacing and installing new brake discs is a relatively simple process. But it has some subtleties and features. It is important to study all the nuances. And stock up on all the necessary tools.
Replacing front brake discs
Removing and reinstalling the front brake discs is not difficult. This algorithm includes the main stages:
- the car is raised on a jack or lift, the wheel must be removed;
- then the two caliper bolts are unscrewed so that it can be removed;
- two bolts are unscrewed using a Phillips screwdriver, after which the disk is removed from its seat;
- the new disk is installed and fixed;
- assembly is performed in reverse order.
Installing rear disc brakes
Selecting and installing rear disc brakes is not difficult. If you have no experience, you need to be well prepared. For example, watch a video. The installation process is as follows:
- the old brake mechanism is dismantled;
- a special shield is installed;
- a bearing and the rest of the mechanism are mounted on it and bolted;
- The brake disc is installed in its seat.
Installing disc brakes on the rear wheels can significantly improve handling and reduce braking distance by 1.5-2 times.
It is necessary to carefully consider the modification of the brake mechanisms on the rear axle. Making any mistakes is simply not acceptable. Otherwise, serious problems may arise on the road. It is advisable to purchase brake discs and pads from the same manufacturer. This will avoid installation problems and other difficulties. The composition of the friction linings is no less important. It is advisable to avoid purchasing pads that contain ceramics. Such pads can lead to premature wear of the brake disc.
There were bolts with non-standard star-shaped heads. I had to go to the broom and buy a spanner for it. This type of bolt has a different dimension! I bought it on 13. Be careful, look at your Priora for such a bolt or an old-style caliper.
I found the photo on the Internet, but I didn’t take a photo of mine.
Next we removed the brake disc, fortunately everything came off easily, we didn’t have to worry about anything)
We put on a new one, screwed the caliper back on and put new pads in there
Old pads compared to new ones -
We secured everything back, and did a similar procedure with the other front wheel)
Next came the matter of the drums -
They removed the wheel, removed the drum, removed all the springs and pads, only the brake cylinder remained -
Then we put the new springs back on, inserted all the plates and new pads
The next step was to attach the drum, problems arose with this, it did not want to fit on the pads. We pressed in the brake cylinder and loosened the handbrake as much as possible - it still won’t work.
There were two ways to solve the problem - either saw down the brake pads or the spacer plate. They did this and that, but with difficulty the drum fell into place.
Then they began to do a similar procedure on the other wheel and it became clear that one side of the brake cylinder simply did not work. And the other one is leaking. We decided to immediately change the brake cylinder on the spot, but were unable to unscrew the bolt that disconnects the brake fluid pipe. Tearing off the bolt was also not an option, so we postponed replacing the right brake cylinder until later and put an old brake pad on the non-functioning side.
Return to step-by-step instructions
This concludes the review of errors and returns to assembling our brakes.
Step 22: after installing the spacer bar, place the second block in the block with the lever.
Install carefully so as not to damage the ABS sensor. After installation, all that remains is to put on the springs.
Look again at how the spacer bar should be installed.
If it’s the same for you, then everything is fine.
Step 23: The next step is to tighten the top spring. It is more convenient to tighten the spring with a hook.
Step 24: put on the lower spring.
Step 25: We put on the side spring in the same way.
Make sure all four springs are in place before moving on to the next step.
Step 26: put the ABS rotor in place.
Step 27: put on the brake drum.
Step 28: We turn out the guides that we had screwed into the threaded holes to fix the brake drum with them.
We tighten the guides. If the brake drum turns easily, then everything was done correctly.
Step 29: After installing the brake drum, you can put on the wheel.
Step 30: at the end, do not forget to tighten the handbrake back, which you loosened at the beginning, screw on the casing and hang the muffler on the rubber bands.
At this point, the replacement of the rear brake pads can be considered complete.
Replacing the front brake discs of Priora
You will need: remove the caliper and prepare a ring wrench “7”.
Procedure:
- Unscrew the two guide pins using a 7mm wrench.
- Remove the Priora brake disc with your own hands. If this cannot be done, then you should knock it down with a hammer.
Installation of brake discs is carried out in the reverse order.
The mating surfaces of the hub and disk should be cleaned of rust and scale. If a small particle of dirt gets between them, then it will cause the disc to run out and vibrate when braking. In order for the Priora brakes to work properly, when replacing brake discs, be sure to replace the brake pads with a new set.
Which brake discs are best for Priora?
Sooner or later, any part of the car wears out during its operation, first ceasing to efficiently perform its basic technical functions, and then completely requiring a complete replacement. In many cases, this process is also accelerated by our domestic roads, most of which, unfortunately, are in rather poor condition.
One of the most famous (in the negative sense of the word) parts of the Priora car in our country, which require frequent replacement, are its brake discs. Many auto mechanics cite dirt and dust on the roads as the main factor contributing to the frequent occurrence of this type of breakdown.
The fact is that dust, getting into the space around the parts and accumulating between the pads and the disc, interferes with the normal operation of the entire braking system of the car, which significantly accelerates the wear of its components. Therefore, replacing Priora brake discs is a fairly popular service in all car service centers in the country.
Do you know how to change the brake discs of your “iron horse” yourself, without using the services of auto mechanics and thus saving money? This is done according to fairly simple instructions, which you can read right now below.
Instructions for quickly and easily replacing Priora brake discs:
- We get rid of the support. Immediately before replacing the main elements of the car’s brake system, it is necessary to remove the caliper. The tools required for this action are a 17-size wrench.
Remove the two front wheels of the car and unscrew the shoe guide bolts that secure them using the above tool. Carefully remove the pads and their guide along with the bracket from the discs.
Carry out the process so that the brake hose is not stretched or twisted, otherwise it may be damaged, and you risk losing brake fluid in this situation.
Tie the caliper securely to the suspension spring. You need to put it back in place at the end of the job exactly the opposite.
We replace disks. To complete our main task, we need the “7” key. Using this tool, unscrew the two guide pins, allowing you to easily remove both brake rotors from your car. Installing new disks in place follows the same procedure, only in reverse order.
An important point: if you want to install old drives for further use, then you should definitely make sure that they are suitable for this. In addition, you will have to try hard to clean them of scale, dirt and rust. Therefore, it is best, for your own safety, to purchase new car parts and install them.
Brake discs on the Lada Priora were installed only in size R14 and ventilated. For them, the minimum thickness is 17.8 mm. If, when measuring with a caliper or other device, it turns out that the thickness is less than acceptable, the disks must be replaced, on both sides.
To perform this repair you will need the following tools:
- head for 17 mm and 7 mm
- ratchet and crank
- hammer
- copper grease
- calipers
Instructions for replacing brake discs on a Priora
So, the first step is to jack up the front of the car, and then remove the front wheel brake caliper.
After that, using a 7 mm socket and a wrench, unscrew the guide pins of the brake disc, as is clearly shown in the photo below.
To minimize the risk of breaking the studs, tap them with a hammer first without using excessive force. And only then unscrew it. Then you can tap the area where it contacts the hub with a hammer.
Now you can try to remove it with your hands, or with the help of special devices. If you can’t remove it by hand, and you don’t have a puller at hand, you can carefully knock it off from the back with a hammer, of course, using a special wooden spacer.
- We finally remove the Priora brake disc from the front wheel hub, which is clearly demonstrated in the photo below.
Before installing new discs on the Priora, it is necessary to clean the surface of the hub with a metal brush if there is rust or other formations on it. It is also worth applying copper grease to the contact area between the hub and the inside of the disk.
This procedure will reduce the occurrence of vibration and extraneous sound when braking, as well as reduce the temperature effects on the elements of the braking system. Replacement is carried out on both sides simultaneously. To ensure that the surface of the disc remains smooth and free of defects, it is necessary to use only high-quality pads, and it is advisable to replace them at the same time!
The price of a new brake disc on a Priora is from 900 rubles per piece. Of course, there are more expensive options, even up to 1500 per unit, but factory components for around 1000 rubles per unit are also quite good.
About the resource
The replacement period for this element directly depends on your driving style. The more often you accelerate and brake, the lower the resource of the node. Factory brake discs installed on Priora can withstand up to two hundred thousand kilometers. But with aggressive driving, this period can be less than one hundred thousand. If possible, brake in gear and switch to neutral in advance before a red traffic light. Use more “rolling” - this will not only preserve the discs and pads (the latter are changed every 25 thousand kilometers), but will also increase the service life of the gearbox. Fuel savings are also significant.
So, we found out how to choose the right brake pads and install them on a Lada Priora car with our own hands.
Replacing brake discs
Brake discs are one of the main components of the braking mechanism. It is the discs that help to efficiently and quickly stop a car in emergency situations and perhaps even save a human life.
Some cars have high-quality ceramic wheels. This applies to expensive and fast cars in which it is necessary to brake quickly and effectively. As for middle-class civilian cars, the disks in such cars are made of cast iron.
Types of disks
On Lada cars, wheels come in several types, namely 13th and 14th radius. Recently, AvtoVAZ has been installing 14th wheels on its cars; they have a more modern structure. Ventilation appeared, which reduced the temperature load of the brake mechanism.
This is what a ventilated brake disc looks like
In earlier versions of Lada cars, regular 13-radius wheels were installed; they do not have holes for ventilation. The lack of ventilation holes resulted in overheating and rapid wear of the pads and discs.
This is what a brake disc looks like without ventilation
On average, discs can travel 100 thousand km. But the driving style and operation of each car is different, so wear may occur earlier.
When replacing front brake pads, the disc should be inspected. If its thickness is less than 17.8 mm, then it must be replaced.
Brake disc thickness measurement
Also, if, upon inspection of the disk, deep grooves, chips and cracks are found on it, it must also be replaced. Driving on such wheels is not safe.
Brake disc cracks
An indicator of faulty and overheated brakes is the steering wheel beating when braking. This happens because the disc becomes deformed after overheating and vibration occurs during braking when the pads compress it.
Which disks to choose
As a replacement for the standard ones, you can install brake discs with perforations and additional ventilation.
- Standard Lada wheels cost around 2 thousand rubles.
- Discs with notches cost around 2.5 thousand rubles.
- Discs with notches and additional ventilation cost around 3 thousand rubles.
Changing discs is quite easy; any driver who has ever held a wrench or hammer can handle it.
Required tool:
- Ratchet
- Head "17" or Torx E10
- Head "7" or key "10"
- Grease “WD – 40”
- Wood block
- Hammer
- Sandpaper
- Powerful screwdriver
- A piece of wire or rope
How to Bleed Brakes on a Grant With Abs
Depending on the type and type, ABS is classified into:
- One scheme of operation of the ABS system is when all the devices that make up the ABS are located in one unit. That is, the hydraulic valve block, hydraulic accumulator and pump are located in one unit.
- The second ABS scheme is when the component devices (hydraulic valve block, hydraulic accumulator and pump) are located in different places. In this type of braking system, in addition to the ABS module, there is also an ESP module and an SBC module.
Whether you can bleed the brake system yourself depends on what type of brake system is in your car.
If the car has a system of the first type, then it is easy to properly pump the ABS.
If the car has a system of the second type, then one cannot cope without a scanner; it needs to be pumped to a service center for maintenance.
The ABS system consists of:
- Sensors (installed on the hubs). When replacing rear wheel hubs, as well as some front ones, you may notice special recesses for sensors. They are engaged in transmitting data about the speed of movement.
- Control valves (installed in the brake system). Serve to change the pressure in the system.
- The electronic unit. Receives speed information from sensors and adjusts control valves.
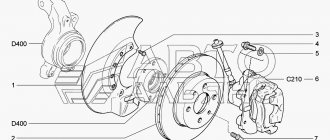
How to remove the Priora caliper
You will need: remove the front wheels and prepare a 17mm spanner. Procedure:
- Unscrew the two bolts securing the shoe guide to the steering knuckle using a 17mm wrench.
- Remove the pad guide from the disc along with the bracket and pads.
- Make sure that the brake hose is not stretched; to do this, tie the caliper to the suspension spring.
If you have to unscrew the working cylinder from the tip of the brake hose, then you should close the hole in the hose in any way so that the brake fluid does not leak out.
Installing the Priora caliper is done in the reverse order. Check that the brake hose is not kinked. After installation, do not forget to check the brake fluid level in the reservoir and remove air from the brake system.
What's next?
First, put the car on the handbrake and put the anti-roll bars back. Next, use a wheel wrench to remove the wheel bolts and jack up the front part. Remove the wheels and unscrew the brake fluid reservoir. Using a vacuum syringe, pump out some of it into a previously prepared container until the level in the tank drops to half. This way we will prevent it from getting on the pads when dismantling them. Next we need a thick minus screwdriver. We install it between the outer brake pad and the caliper and pull back the piston. It is important not to damage it - for this reason, work extremely carefully. Then we take the “13” key in our hands (you can take a horn or ratchet) and unscrew the lower mounting bolt. If there is a locking bracket, turn it with a screwdriver or bend it with a chisel and hammer. Using the “17” key, we tighten the rotary pin.
We lift the bracket, take out the pads, remove the two bolts going to the caliper and use the “7” key to unscrew the disc itself. Then you can install new brake discs on the Priora. Assembly is carried out in reverse order.
Removal and installation process
- So, the first thing you need to do is tear off the front wheel mounting bolts, then jack up the car and finally unscrew them.
- Then remove the wheel completely.
- Then unscrew the two guide pins using a 7-mm socket and a wrench
- Knock off the brake disc using a hammer or a special puller from the hub
- During installation, it is advisable to apply copper grease to the contact points between the disk and the hub, thereby reducing future vibration and sticking of parts
You can see more detailed information on replacing brake discs on a Lada Priora in the video clip below.
Please note that in the video the caliper is dangling in a suspended state. Fortunately, it needs to be fixed so as not to damage the brake hose. In my case, all the parts will be disassembled, so the hose is not particularly valuable.
| Ventilated brake discs of the Lada Priora change as they wear out, when the thickness of one of the discs becomes less than the minimum allowable 17.8 mm. Do you know how to replace brake discs with new ones? |
Signs
What symptoms can be used to determine that the brake discs on a Priora need to be replaced? The main sign of wear and tear is the behavior of the car. If the working surface of the brake disc is deformed or worn, it will “cling” when you press the pedal. Also, when the pads are activated, a strong grinding noise is possible (not to be confused with the squeaking of the friction material itself). If there is a crack, braking is accompanied by beating against the steering wheel. The friction lining touches the slightest shoulders and other irregularities on the working surface of the disk.
As a result, its material crumbles and you feel increased vibration. It can be transmitted not only to the steering wheel, but throughout the body. Depends on the severity of wear or amount of deformation. In this case, it is recommended to carry out a visual inspection of the element. If there are no visible cracks, remove the wheel and run your finger along the working surface of the disc. If you feel unevenness, this means that the element has overheated and, due to expansion and contraction, has become deformed. It is worth noting that the steering wheel can only wobble when you press the pedal. If this symptom occurs while driving, your wheels may be unbalanced or one of the weights has fallen off. Often these vibrations increase as speed increases.
Instructions for quickly and easily replacing Priora brake discs:
- We get rid of the support. Immediately before replacing the main elements of the car’s brake system, it is necessary to remove the caliper. The tools required for this action are a 17-size wrench.
Remove the two front wheels of the car and unscrew the shoe guide bolts that secure them using the above tool. Carefully remove the pads and their guide along with the bracket from the discs. Carry out the process so that the brake hose is not stretched or twisted, otherwise it may be damaged, and you risk losing brake fluid in this situation.
Tie the caliper securely to the suspension spring. You need to put it back in place at the end of the job exactly the opposite.
We replace disks. To complete our main task, we need the “7” key. Using this tool, unscrew the two guide pins, allowing you to easily remove both brake rotors from your car. Installing new disks in place follows the same procedure, only in reverse order.
An important point: if you want to install old drives for further use, then you should definitely make sure that they are suitable for this. In addition, you will have to try hard to clean them of scale, dirt and rust. Therefore, it is best, for your own safety, to purchase new car parts and install them.
Brake discs on the Lada Priora were installed only in size R14 and ventilated. For them, the minimum thickness is 17.8 mm. If, when measuring with a caliper or other device, it turns out that the thickness is less than acceptable, the disks must be replaced, on both sides.
To perform this repair you will need the following tools:
- head for 17 mm and 7 mm
- ratchet and crank
- hammer
- copper grease
- calipers
Adviсe
When replacing a disc, new pads should be installed. This is a required step. Some manufacturers include a pair of new pads when purchasing a disc. Also maintain symmetry. Let's say your disk is cracked and you buy one standard “replacement” one. If you install a new one on only one side, there will be uneven distribution of braking forces and asymmetrical wear. The same goes for the pads. They only change in pairs. Also, when replacing, pay attention to the condition of other parts - caliper boots, guides. If there are any gaps or signs of deformation/wear, replace them. After the brake discs have been successfully installed on the Priora, add fluid to the reservoir and bleed the system. The presence of bubbles in it is unacceptable - braking on such a car becomes ineffective. The liquid simply boils from the compression of air.
Instructions for replacing brake discs on a Priora
So, the first step is to jack up the front of the car, and then remove the front wheel brake caliper.
After that, using a 7 mm socket and a wrench, unscrew the guide pins of the brake disc, as is clearly shown in the photo below.
To minimize the risk of breaking the studs, tap them with a hammer first without using excessive force. And only then unscrew it. Then you can tap the area where it contacts the hub with a hammer.
Now you can try to remove it with your hands, or with the help of special devices. If you can’t remove it by hand, and you don’t have a puller at hand, you can carefully knock it off from the back with a hammer, of course, using a special wooden spacer.
We finally remove the Priora brake disc from the front wheel hub, which is clearly demonstrated in the photo below.
Before installing new discs on the Priora, it is necessary to clean the surface of the hub with a metal brush if there is rust or other formations on it. It is also worth applying copper grease to the contact area between the hub and the inside of the disk.
This procedure will reduce the occurrence of vibration and extraneous sound when braking, as well as reduce the temperature effects on the elements of the braking system. Replacement is carried out on both sides simultaneously. To ensure that the surface of the disc remains smooth and free of defects, it is necessary to use only high-quality pads, and it is advisable to replace them at the same time!
The price of a new brake disc on a Priora is from 900 rubles per piece. Of course, there are more expensive options, even up to 1500 per unit, but factory components for around 1000 rubles per unit are also quite good.
About the groove
Is it wise to repair your brakes? "Priora" is a relatively inexpensive car, but the cost of turning old discs is up to 75 percent of the cost of new elements. In addition, this restoration method is ineffective for serious deformations in the form of cracks and large wear (the thickness of the working surface is less than 6 millimeters). Reviews from motorists say that a smart decision would be to buy a new set of wheels. When old ones clear up, there is a high probability of repeated symptoms. After a couple of thousand kilometers, such a car begins to vibrate again, and the brakes become less informative. Moreover, it makes no difference whether the groove was performed on the removed element or directly on the hub. If you want to be sure of your safety, install new brake discs on your Priora. Which ones are better to choose - we will consider further.
Perforated
These elements have a more complex structure. The design combines two thin metal disks 5 millimeters thick. Between them there are so-called channels through which air flows. Thanks to such ventilation, the operating temperature of the disk is reduced by one and a half to two times. And as we know, when braking, a friction force arises, which is converted into thermal energy. Disks require high-quality heat dissipation.
If it is not there, the metal will overheat. As a result, we get literally crooked disks, and possibly cracked ones. The braking distance is also reduced. Compared to non-ventilated analogues, it is 15 percent lower. In addition, the service life of the brake pads increases, since the friction material no longer operates under critical temperature loads.
Original or analogue?
This is what AvtoVAZ writes about the original LADA brake discs.
Original brake discs meet high LADA standards and guarantee quality, for this:
- Each batch of brake discs undergoes random inspection and checks of the metal structure using special equipment, excluding porosity and other casting defects
- The disc is made from high-quality cast iron, which guarantees no warping effect during sudden braking or overheating.
- Brake discs undergo high-precision processing to ensure the absence of runout and imbalance
- All original LADA spare parts undergo numerous tests confirming the reliability and quality of each part.