September 25, 2015 Lada.Online 166 477 2
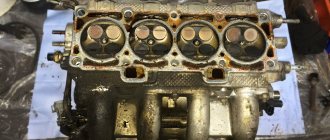
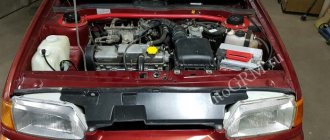
AVTOVAZ equips modern Lada cars (Granta, Kalina, Priora, Vesta and Largus) with engines of various powers, among them there are both 16 valve and 8 valve power units (for example, VAZ-11183, VAZ-11184, VAZ-11186 engines, VAZ-11189, VAZ-21116). In this article we will show you how to change the timing belt on an 8-valve engine.
The timing belt has broken. Replacing the timing belt VAZ 2115
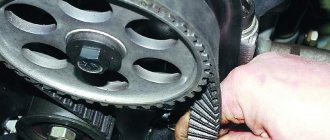
The timing belt broke. The engine stalled while driving. An error appeared on the on-board computer - phase sensor error. On a rope to the house. Well not far. It's good that it has an 8 valve engine. I bought a timing belt for 310 rubles PowerGrip 5521-98111*19mm Made in EU www.gates.ru Number of teeth: 111 Width (mm): 19 mm Replace 1) Remove the plastic casing Unscrew three bolts Nut M10. And we see the belt is torn.
We see a torn timing belt
In principle, the belt is not in very bad condition. But on the right side it is a little erased. A few months ago I changed the pump (it leaked, the bearings fell apart). And when the pump died, it rubbed the belt. It was necessary to change the timing belt along with the pump. But my hands did not reach the belt. But in vain. I changed it on August 25, 2013. The mileage on this old belt is 32,000 km.
Belt break location
And the belt isn't so bad
Erased from the right side
2) Loosen the generator belt (nut M 10). Loosen the generator (M13 nut) I only loosened it from the top. Didn't loosen it from below. Removing the belt
The alternator belt needs to be removed
3) Remove the generator belt pulley on the crankshaft. But we still have to get to it. Turned the steering wheel all the way to the right. I jacked up the right front wheel. I took off the wheel. In principle, specialists do this without removing the wheels. Next, you need to unscrew the casing fastening that covers the pulley. To do this, the protection (fender liners) is usually removed. I managed to tighten this protection with a screwdriver and unscrew the fastening screw.
You need to connect and bend this casing
The generator pulley is secured to the crankshaft with a bolt (Nut M19). First, I vibrate the crankshaft so that it does not rotate when I remove the nut.
You need to unscrew this hook 19 and then remove the pulley
Recorded like this. I removed the rubber plug at the top of the clutch housing (photo below) and stuck a screwdriver into the teeth.
Next, I unscrew the bolt with a 19mm head. The bolt was seriously tightened. The screwdriver popped out a couple of times. Well, that's it, it moved. We remove the generator belt. We remove the pulley from the crankshaft.
4) We start a new timing belt on the KV pulley. We put the pulley on the crankshaft. Tighten with a bolt.
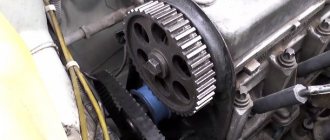
We wind the timing belt according to the marks on the camshaft and crankshaft.
Camshaft mark.
Turn the camshaft pulley until the marks match. I turned the nut on this pulley.
Camshaft mark
We mark the crankshaft in two stages.
Stage 1 is approximate.
The generator pulley mark on the crankshaft should be at the top. And the round key (the ugly part, I don’t know what to call it) should be at the bottom.
Marks on the crankshaft pulley of the generator belt
Stage 2 is accurate. More precisely, we look at the mark in the upper part of the clutch housing. Use a screwdriver to turn the flywheel teeth.
Mark (mark) on the crankshaft flywheel
The mark like risks on metal is not very noticeable. I cleaned the flywheel surface with a bucket. Found this risk. You can see it on the video.
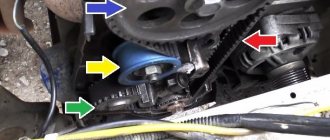
Next I tighten the roller. I had a special key. And I fix the roller by tightening the nut (M17) on its axis. After tightening, I check the marks again. For some reason I always miss by one tooth. Therefore, on the first attempt, I draw a stripe on the camshaft pulley and belt with a flame marker. After checking the marks, I flip the belt one tooth in one direction or another. I assemble it in reverse order. Pulley casing, tension the alternator belt, timing belt casing.
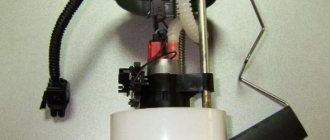
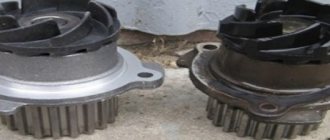
When replacing the timing belt, I checked the pump and tension roller for play. The pump seems fine. But there is some play on the video. It’s a shame I didn’t buy the video right away. The roller is usually changed together with the timing belt.
2016-06-17
I installed a new timing belt
. I drove 300 km and I looked and saw that on the right side (closer to the engine) the timing belt had been eaten away, about 2 mm to the depth of the teeth. I determined that the tension roller shoulder was eating the belt. The belt on the roller was pulled to the side towards the engine. I placed a gasket from a beer can (0.1 mm aluminum) under the roller on one side.
Install a spacer 0.1 mm thick
To prevent the gasket from falling when installing the roller, it is glued with sealant. I didn’t find any sealant, so I tied it with a thin cotton thread. With this I adjusted it so that when the engine is running, I use a screwdriver to shift the belt first to the left, then to the right. The roller is wider than the belt by about 1.2 mm. The belt does not go back. That is, everything seems to be displayed perfectly.
With the engine running, use a screwdriver to move the timing belt left and right. In this case, the timing belt should not return spontaneously.
Note: The belt can withstand a load of 1000 kg. The engine theoretically cannot create such a force. And the belt breaks according to the “paper-rag” principle. That is, if you tear the rag at the edge, then it breaks across the entire width without much effort. In general, it is difficult to determine the cause. The geometry of the mechanism must correspond to fractions of a millimeter. It is practically impossible to determine this either by eye or by instruments. How to determine and measure that a roller or pulley has shifted by 0.1 mm? People just start changing everything in a row - pulleys, pump, pulley, belt, tension roller pin, tension roller spacer washer. You can only determine the play of the pump, roller and perhaps pulleys. I haven't installed the timing belt cover yet. I'll see what happens next. Examination
We start the engine. The belt should not move in any direction. In any case, do not press too hard. Move the belt left and right with something (a wide screwdriver). Ideally, the belt should not return in any direction.
How to set the ignition on a VAZ using marks
Almost all modifications of the VAZ-2114 and 2115 are equipped with engines with BSZ (non-contact electronic ignition). To make the setup, you need to:
- Unscrew the timing case fasteners and remove it.
Removing the timing case
- Adjust the gap from the crankshaft sensor (located near the generator pulley) to the gear disk. The permissible value is up to 0.7 mm.
Adjusting the gap from the crankshaft sensor to the gear disk
- If the distance is normal, check that the crankshaft pulley is not misaligned.
- To ensure that the marks on the flywheel align with those on the gearbox housing (can be seen on the hatch), the crankshaft must be rotated. It is convenient to do this by grasping the pulley mounting bolt.
Note! It is prohibited to turn the camshaft pulley itself.
Rotating the crankshaft pulley
- The mark on the cylinder block must align with that on the oil pump pulley. They should be adjusted.
- The last mark (on the camshaft pulley) should coincide with the other mark on the cylinder head.
We check the marks on the camshaft and the block.
Having placed the marks on the VAZ model, you will notice that the pistons of cylinders 1 and 4 are located at the dead center at the top, if everything is done correctly. In this case, the power unit operates correctly because the crankshaft sensor sends correct data to the ECU.
How often to change the roller and belt
The recommended replacement rates for VAZ 2114 cars, determined by the manufacturer, define the replacement period as 60 thousand km, but this statement is only true for vehicles under five years old, otherwise this figure should be reduced by approximately 15 thousand km.
The replacement period is also affected by the performance of the liquid pump, with a maximum service life of 90 thousand km. You should not take the original pump under any circumstances, because it will quickly break on its own or “eat” the belt from the outside.
Also, do not forget about the need to replace the crankshaft seals, which also have similar wear measured at 40 thousand.
Broken timing belt
Therefore, taking into account the data described above, we can come to the conclusion that it is necessary to change the belt, adjustment roller and oil seal every 40 thousand km, and after one replacement, install a new pump along with them, if no unforeseen breakdowns have occurred.
Checking the set ignition
To check the ignition on an 8-valve engine, an injector, you should prepare:
- Multimeter.
- Set of keys and screwdrivers.
- Pliers (necessarily with insulated handles).
Attention! Due to the lack of special equipment, the described method can only test the operation of the circuits. Diagnostics of the microprocessor part will not be available.
The process is:
- When the ignition is turned off, check how tightly the high voltage wires are seated and what contact is in the module.
- Remove the connector from the module, connect a multimeter (monitoring mode should be low AC) to pins C and B, make sure there is voltage. Check the coil (2nd and 4th contacts).
Checking the presence of power on the ignition module
- Check the functionality of high-voltage wires. Install a working spark plug in each cap in turn, attach one end to the block and crank the engine with the starter. The presence of a spark signals that everything is normal. Its absence on each wire means the module is faulty.
Checking high-voltage wires
If you managed to set the ignition correctly on the VAZ model and this was confirmed by the test, but problems are still observed, you need to check the power system.
conclusions
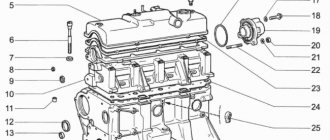
Replacing the gas distribution mechanism kit on a VAZ-2112 with an 8-valve engine is quite easy. Another problem remains the correct and timely identification of the problem, as well as the selection of spare parts. If you make the wrong choice, this can cause even more serious consequences for the engine. The same applies to the quality of products.
The question of how to replace the 8 valve belt on a VAZ 2110 with your own hands constantly arises, since such a procedure at stations is expensive. You should know that the part is a product whose main task is to transmit rotation from the crankshaft to the camshaft. In addition, the system also involves a water pump, which is also included in the system. The inner surface of the timing belt is equipped with teeth, the pitch between which varies depending on the type of car model. In order to provide the necessary voltage, the device is equipped with a tension system in the form of a roller.
Consequences of incorrectly setting timing marks
If the ignition is set incorrectly, the following negative aspects are possible:
- If the engine has 16 valves, then they become deformed or bent during operation, accumulating damage.
- The previous problem causes damage to the cylinder head.
- The guide bushings may also become unusable.
- Cracks may appear in other engine components.
Crack in the cylinder block
- The motor overheats.
- The engine piston mechanism can burn out.
- Oil residue may appear on the spark plugs.
Oil deposits on spark plugs
- The fuel mixture loses its ignition moment.
Note! If the engine has 8 valves, then the consequences are not so critical - traction disappears, the belt quickly wears out and breaks.
After repairs, the following factors most often indicate an incorrectly set ignition:
- The car accelerates worse.
- Frequent overheating of the motor.
- The craving became much worse.
Recommendations for purchasing consumables
When buying a timing belt, choose only high-quality consumables. Here are the best belts to buy:
- The Lada automobile plant produces fairly durable belts. By the way, here excellent quality is combined with low cost, which may well be the deciding factor for some car enthusiasts.
- The Japanese company Lynx produces very high quality consumables. The belt is made of high quality material and at the same time it is inexpensive.
- Bosch belts are the embodiment of quality and durability. Consumables from this company have proven themselves well in the market and are very popular among car enthusiasts. They will definitely work out the allotted time to the end.
- The German company ContiTech also produces consumables that you can pay attention to. The belt drive here is made durable by adding fiberglass, synthetic rubber and polyamide fiber to the structure.
- Optibelt. The service life of this company's belts is very high. There is not yet a single case known when they failed ahead of schedule.
- Gates. Belts are made here only from high-quality materials. Cases of their breakage have not yet been recorded.
- The Russian company BRT produces belts that are not inferior in quality to their foreign counterparts. Moreover, they are cheaper.