A specialist at a service station or an experienced car enthusiast who has already performed this procedure several times will be able to replace the timing belt in a few minutes. Another thing is for a car owner who has encountered this for the first time and does not know how to set timing marks on a VAZ 2114. In this case, the process will take much longer.
At the same time, the better a person knows the very operating diagram of the engine and the functions performed by the part being replaced, the easier it will be for him to understand the features and subtleties of the replacement. So let's understand the theory.
Timing marks in VAZ 2114
What is timing belt?
The timing belt, also known as the gas distribution mechanism, is a part responsible for synchronizing the injection and gas distribution phases in the power unit of the machine. In order for the entire system to work as a single whole, it is necessary to align special marks, which are the point of manual synchronization of the gas distribution.
Most often they go astray when the timing belt is replaced or it breaks while the engine is running. If you do not double-check that the marks match, the engine will not operate correctly, which means you will have to remove the belt again and set everything up.
Timing diagram
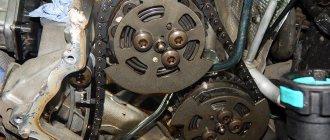
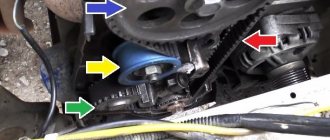
TAKE INTO ACCOUNT! The timing belt has two pairs of marks, one of which is located on the pulleys, and the second near the block. They must coincide at the highest position of the first or fourth cylinder.
Replacing the timing belt Priora 16 valves
Replacing the timing belt on a 16-valve Priora is a little more difficult than on 8-valve engines, however, this procedure is accessible to almost every car enthusiast.
A belt in a car engine is one of the main parts for transmitting torque from one mechanism to another. But it is worth remembering that everything has an expiration date. We will outline the nuances of working and replacing the belt in the article below.
Tools and spare parts
Let's start with the fact that to replace the timing belt on a Priora 16 valves you will have to stock up on a very specific set of tools.
This is definitely a set of hexagons, a set of torx bits, and a set with a small 1/4-inch ratchet will not work, we’ll tell you why later.
In addition, you will need a device for tensioning the roller, but the usual one from 2114 will not work, you need a slightly wider one. If you have enough strength, you can tighten the roller simply by leaning against it with a mounting tool; many people do this.
The fact is that initially the 16-valve 21127 was designed without air conditioning. Everything was simple. The pump is driven by the timing belt, the alternator belt is no longer responsible for anything. In general, it couldn’t be simpler.
Crankshaft and generator with tensioner, without rollers.
The designers were faced with an almost unimaginable task - to install an air conditioning compressor, which they accomplished. Yes, not perfect, but we did it. And therefore, two additional pulleys appeared here - a compressor and a tension roller.
By the way, many car owners later began installing these same brackets with a tensioner in order to dismantle this circuit.
Replacing the timing belt on a Priora 16 valves
Let's get to work. First, unscrew the oil filler neck, then pull off the plastic casing. Then there are two development options. We will look at a more complex one, with air conditioning. Its difference is in the additional video, this has already been said. The whole point is that it also needs to be unscrewed, because it simply interferes with removing the protective cover.
Here you need a 15mm head. Unscrew the roller and remove the alternator belt. On the way, we listen to the video so that it doesn’t buzz, otherwise we need to replace it. Next, the timing belt casing opens before us. Remove the front upper and lower parts of the casing. To do this, unscrew the 8 Torx bolts.
There is also a surprise here if you use a ratchet. One of the bolts, the one closest to the passenger compartment, will have to be unscrewed using a simple Torx wrench, because the head with a tip and a ratchet will not fit between the engine and the spar.
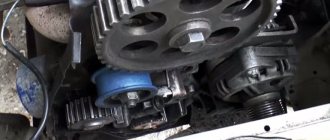
So, we removed the casing, in front of us is the timing belt and all the rollers.
It is best to rotate by the camshaft - it is easier than by the crankshaft. It is not advisable to rotate the camshafts separately from the crankshaft. A maximum of 10 degrees to correct the marks if they misalign by a tooth or two.
Then we turn the wheel all the way to the right, someone removes it, which is not necessary. We unscrew the 4 bolts securing the mudguard using a Torx and one using a Phillips screwdriver to gain access to the crankshaft pulley.
Preparation process
This procedure is quite simple, but before you put the tags on the VAZ 2114 and for complete convenience, you will need an assistant and a little preparation.
So, for everything to go quickly you need to:
- We find a flat surface that allows us to easily fix the car so that it does not roll (put a shoe under the left rear wheel).
- We tear off the fastenings on the right wheel and lift the car with a jack so that the wheel can be removed freely.
Jacking up the car
- We unscrew all the fasteners and finally dismantle the wheel.
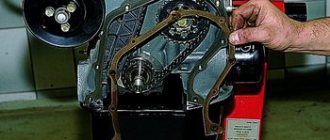
- We completely remove the belt protection, for this you will need a 10mm wrench, with which you unscrew the 3 head bolts, at this point the preparation stage is considered completed, now you can safely get to work.
Removing the timing belt protective cover
IMPORTANT! Some believe that if you fix the position of the shafts when replacing the belt itself, then there is no need to make further adjustments; this is not entirely correct. A competent car enthusiast, along with the timing belt, also changes the tension-regulating roller along with the oil seal on the crankshaft. The first one tends to wear out quickly and leaves the possibility of breaking a completely new belt, and the second one is simply a disease of the entire VAZ family; over time it leaks and the car begins to “eat” oil.
Setting the tags: step-by-step instructions
Tools for working with timing marks
In order to correctly set the timing marks, you will need the necessary tools. So, what is directly required in order to perform this operation:
- Key for 10.
- Thin flathead screwdriver.
- Jack.
The process itself
Now that everything is assembled, you can proceed directly to the work process itself:
- Jack up the right side of the car.
Setting up the car on a jack
We set marks on the camshaft and block
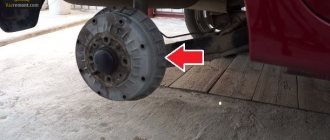
Remove the crankcase plug, where the mark on the flywheel should coincide with the block
Consequences of incorrectly setting timing marks
The consequences of incorrect placement of the timing marks on the car can be both minor and very severe.
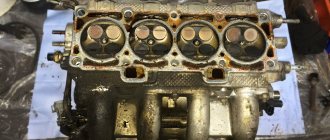
A torn timing belt on an 8-valve valve does not threaten to bend the valves, but the 16-valve version of the VAZ-2114 is already deprived of this advantage.
Let's consider the main options for the development of events:
- Misaligned timing will cause the valves to burn out.
- Bent valves (bent valves) are also an unpleasant option. The 8-valve version of the VAZ-2114 does not bend the valve.
- As a result of the above actions, the cylinder head may become deformed, guide bushings may fail, and cracks may form inside the main power elements.
- Burnout of the piston mechanism also becomes a consequence of incorrect placement of the gas distribution mechanism marks.
- Oil residue on the spark plugs, as well as poor ignition timing of the fuel mixture.
- Other consequences.
Installation process
The timing belt itself is a rubber product closed with teeth inward, which synchronizes the torque between the camshaft and crankshaft. Ignoring its wear will not lead to anything good, because in the best case, your engine will stall while driving, and in the worst case, the entire wheelbase will jam, which can lead to the most unpredictable incidents on the road.
The replacement and debugging itself is carried out in two stages, in the first stage the main repair and debugging work is carried out, and the second stage carries the function of monitoring the work done.
First stage
- The assistant gets into the car and puts 5th gear in the gearbox, and at this time you remove the front belt protection.
- Insert the ratchet into the place allocated for it and begin to turn the crankshaft, you need to do this until you see that the mark located on the camshaft has not moved to remove several teeth from the control antenna of the rear cover. (this action is necessary to reduce the degree of belt tension).
- We dismantle the drive pulley on the crankshaft and return the mounting bolt to its place.
- The assistant switches the gearbox to “neutral”.
- Again, we begin to carefully turn the crankshaft until the mark on the VAZ 2114 flywheel is in the central position.
Coincidence of the mark on the flywheel with the slot in the bar
- We check that the installation mark of the rear cover matches the mark located on the camshaft pulley; if they match, then you can unscrew the roller nut, then remove the belt itself.
- We install a new belt - we start with the roller, then we put it on the pump pulley and lastly on the crankshaft pulley.
- We adjust the tension by turning the adjusting roller counterclockwise.
- Carefully turn the crankshaft again so that the marks are in their previous position (they will 100% go astray when putting on a new belt and adjusting the tension).
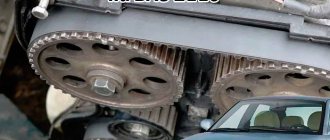
Mark on the crankshaft pulley
Second stage (control-final)
- Before checking the timing marks on the VAZ 2114, you need to fix the pulley on the generator and tension the belt with a roller to the maximum.
- Now we check all the matches, if nothing is wrong anywhere, then we install the protection back and clean the workplace.
Looking under the hood of your car, with knowledge of this information, you will understand that there is nothing difficult in this procedure, but its success is quite dependent on the skill of the performer. Therefore, if something doesn’t work out the first time, just repeat the operation, you may even need to do it twice. Don’t be discouraged, because after the difficult first time it will only take you a few minutes, like a seasoned professional.
How to set the ignition on a VAZ using marks
Almost all modifications of the VAZ-2114 and 2115 are equipped with engines with BSZ (non-contact electronic ignition). To make the setup, you need to:
- Unscrew the timing case fasteners and remove it.
- Adjust the gap from the crankshaft sensor (located near the generator pulley) to the gear disk. The permissible value is up to 0.7 mm.
- If the distance is normal, check that the crankshaft pulley is not misaligned.
- To ensure that the marks on the flywheel align with those on the gearbox housing (can be seen on the hatch), the crankshaft must be rotated. It is convenient to do this by grasping the pulley mounting bolt.
Note! It is prohibited to turn the camshaft pulley itself.
- The mark on the cylinder block must align with that on the oil pump pulley. They should be adjusted.
- The last mark (on the camshaft pulley) should coincide with the other mark on the cylinder head.
Having placed the marks on the VAZ model, you can see that the pistons of cylinders 1 and 4 are located at the dead center at the top, if everything is done correctly. In this case, the power unit operates correctly because the crankshaft sensor sends correct data to the ECU.
How often to change the roller and belt
The recommended replacement rates for VAZ 2114 cars, determined by the manufacturer, define the replacement period as 60 thousand km, but this statement is only true for vehicles under five years old, otherwise this figure should be reduced by approximately 15 thousand km.
The replacement period is also affected by the performance of the liquid pump, with a maximum service life of 90 thousand km. You should not take the original pump under any circumstances, because it will quickly break on its own or “eat” the belt from the outside.
Also, do not forget about the need to replace the crankshaft seals, which also have similar wear measured at 40 thousand.
Broken timing belt
Therefore, taking into account the data described above, we can come to the conclusion that it is necessary to change the belt, adjustment roller and oil seal every 40 thousand km, and after one replacement, install a new pump along with them, if no unforeseen breakdowns have occurred.
Causes of belt breakage
One of the common problems with the model is the failure of the timing belt. The reasons for this may be different:
- Simple wear and tear caused by a long period of use of the vehicle;
- Regular increased loads under which the engine has to work intensively;
- Mechanical damage as a result of improper operation or received during the repair of other components;
- Manufacturing defect.
Regardless of the causes of the problem, it must be eliminated.
Over time, it stretches so much that the gear teeth jump by 1-2 links. This disrupts the valve timing and causes interruptions in engine operation. But this is the best-case scenario for such a situation. The worst is when the strap breaks and the valves bend.
A few tips before you start replacing the timing belt
Firstly, it is recommended to immediately change the tension roller along with replacing the timing belt. Secondly, before installing a new timing belt, you need to check whether there is grease on the roller and whether there is any play in the pump. Thirdly, if after replacing the timing belt you hear a characteristic whistle, then its tension needs to be slightly loosened. It is worth noting that the operation of replacing the timing belt is not complicated and therefore you don’t have to pay the technicians at a car service center, but carry out all the work yourself. The timing belt replacement process is divided into two phases, which we will discuss below.
How to check the condition of the VAZ 2110 timing belt
To check the condition of the timing belt you need to:
- remove the front timing belt protective cover plug,
- remove the alternator belt so that it does not interfere,
- unscrew 6 bolts and remove the front protective cover,
- Having gained access to the timing belt, we inspect it.
If during your next inspection you notice:
- cuts on the timing belt, bulges,
- delamination, appearance of broken threads,
- numerous cracks, folds, severe abrasions,
- oil leaks on the belt,
it must be replaced immediately.
As a rule, young drivers perform such repairs in specialized auto repair shops or car repair centers. But, if you decide to replace the old belt with a new one yourself, prepare the tools and materials: heads “10”, “17”, a special wrench used to tension the belt, a screwdriver, a new timing belt, detergent, clean rags.
VIDEO: FEATURES OF REPLACING THE DRIVE BELT OF THE GAS DISTRIBUTION MECHANISM
As you can see, replacing a belt on a VAZ 2107 is not very difficult and can be done even by a novice driver. The power, reliability and efficiency of the car depend on the correct location of the marks and the correct belt tension, so you should show maximum attention and accuracy in your work. Only in this case can you count on the fact that the engine will not fail on a long journey and the car will always return to its home garage under its own power.
Sources
- bumper.guru/klassicheskie-modeli-vaz/grm/grm-2107/metki-grm-vaz-2107-inzhektor.html
- drive2.ru/c/493560600299831762/
- 7vaz.ru/jekspluatacija/metki-grm.html
How to change it yourself?
You can replace the belt on an 8-valve VAZ 2114 with an injector engine yourself or by ordering the appropriate service at a service station. During the shift process, there are nuances that must be taken into account when performing the task. If you make mistakes and do not change the strap correctly, this can lead to rapid wear and breakage. Below are instructions for replacing the belt in a VAZ 2114 8 valve.
Tools
If you change the belt yourself, prepare the following:
- a set of open-end wrenches, you will need tools for 13 and 17;
- long flat blade screwdriver;
- 10mm ring wrench, you can use a ratchet head;
- key for installing the tension roller;
- wheel wrench;
- jack.
User Pro Remont shared a video that describes in detail the procedure for replacing the timing belt pulley and timing belt in a VAZ 2114 car.
Algorithm of actions
How to change a belt correctly:
- Drive the car into a garage with a pit. The surface on which work is performed must be level. Switch the gear selector to neutral position.
- Loosen the bolts on the front right wheel. Place this part of the car on a jack so that the wheel can be rotated.
- Open the hood of the car. Using a 10mm wrench, remove the three screws that secure the plastic strap protector.
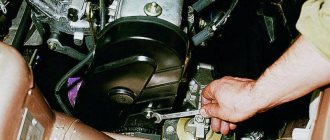
- Using a 13mm wrench, you need to loosen the bolt that secures the tension roller. Remove the device.
- You can see a mark on the camshaft gear; it is made in the form of a rectangular protrusion on the edge. When performing work, it is necessary that this mark coincides with the protrusion located on the fastening of the strap casing. If these marks do not match, you need to turn the wheel until they match.
- Then find the rubberized plug installed on the top of the clutch housing; it is located to the right of the power unit’s BC. The part is carefully pryed off with a screwdriver and removed from the seat. Under the plug you can see the flywheel crown; there is a mark on this device. It should be opposite the triangular protrusion located on the left. If the marks do not match, then take a 17mm wrench and loosen the tensioner. Using a pulley removal wrench, turn the device counterclockwise to loosen the timing belt.
- When the upper part of the belt is removed from the gear assembly, take a 17mm wrench and turn the crankshaft until the flywheel marks are opposite each other. The flywheel itself must be secured in this position; to secure it, use a screwdriver and install it between the teeth. If you have an assistant, ask him to hold the tool to prevent it from turning.
- Now you can remove the right wheel. Unscrew the screws that secure the arch protection and dismantle it.
- Using a 17 mm wrench, unscrew the nut securing the generator set pulley. When unscrewing, make sure that the flywheel does not turn.
- Dismantle the generator pulley and remove it from its seat.
- Remove the timing belt from the crankshaft disc.
- Using a 17mm wrench, completely unscrew the tensioner pulley lock and remove it from its seat. If you loosen the fastening, the belt can be removed.
- Install the new product onto the crankshaft disc. When installing, make sure that the marks are not broken. Install the generator set drive pulley by first placing a strap on it.
- Place the product on the gear of the mechanism. Install the tension roller.
- The strap is being installed. During installation, the tension roller must be turned with a special tool purchased in advance at the store. If you don't have one, you can use two self-tapping screws and a screwdriver. Self-tapping screws are installed in the grooves, and a screwdriver secures them. Turning is done counterclockwise. Tension the belt using the tension roller and tighten the screw that secures the roller.
- It is necessary to set marks if they are lost during the work process. The installation procedure for all components is performed in reverse order.
Photo gallery
Photos of belt replacement are shown below.
Remove the screws securing the timing belt guard.
The mark on the camshaft gear must coincide with the mark on the housing mount
Loosen the strap tension roller by turning it counterclockwise
Remove the belt from the pulleys and install a new product
Unscrew the nut securing the generator shaft
Put on the new belt and tighten the roller