| EXECUTION ORDER |
|
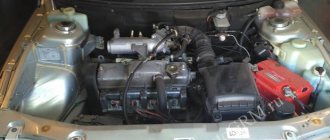
- Remove the right wheel and the plastic shield of the engine compartment.
|
|
|
|
|
|
- Turn the tension roller to a position in which the belt will be loosened as much as possible.
|
|
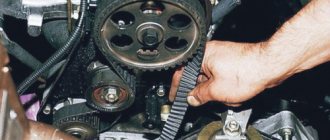
- Install the timing belt in reverse order. We put the belt on the crankshaft pulley. Then, tensioning the rear branch, we put the belt on the coolant pump pulley and wind it behind the tension roller. We put the belt on the camshaft pulley.
|
- Tighten the tension roller mounting nut.
- We screw the bolt securing the generator drive pulley into place and use the “19” head to turn the crankshaft two turns clockwise by the bolt.
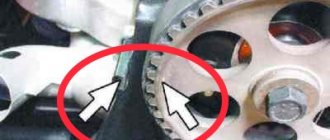
- We check the alignment marks of the crankshaft and camshaft.
|
Camshaft drive diagram
- If the marks do not match, repeat the operation to install the belt.
- To adjust the belt tension, turn the crankshaft counterclockwise so that the mark on the camshaft pulley moves down from the rear cover antenna by two teeth.
|
| previous page4.4. Changing the engine oil | next page 4.6. Replacing the timing belt on the VAZ-2112 engine |
Belt faults
Malfunctions of the timing belt can arise as a result of its long-term operation, and can also be the result of incorrect adjustment or malfunctions of the pump or tension roller. These include:
- violation of the integrity of the belt (cracks, delamination);
- deformation;
- belt break.
If any of the specified malfunctions are detected, the belt must be replaced.
Why change the belt?
In accordance with the list of routine maintenance for the VAZ 2110, the timing belt must be changed after every 60-75 thousand kilometers, however, here you also need to take into account the conditions of its operation, and this is:
- temperature changes;
- oil getting on the belt;
- problems with the tension roller;
- faulty pump.
All this will inevitably lead to damage.
It is necessary to inspect at least once a month:
- belt (determining its integrity);
- tension roller ;
- water pump gear.
And although on 8-valve VAZ engines, the valve does not bend when the belt breaks, this breakdown can damage the pump or generator.
Replacing the timing belt VAZ 2110 8 valves with your own hands on video
Although the timing belt drive seems at first glance to be a simple element, it plays a very important role in the operation of the mechanism. Its breakage is fraught with serious consequences, so the condition of this consumable must be monitored all the time. On an eight-valve VAZ 2110, the belt will normally serve for 60,000 km. Then it needs to be changed. Of course, replacement may be required before this time. A number of reasons may contribute to this, such as extreme driving habits, weather conditions and poor road conditions. In addition, the consumable must be replaced if oil gets on its surface. The interaction of oil with rubber leads to corrosion of the latter, so such a belt will not last long. It can break off at the most inopportune moment. It's better not to let it come to this.
Timing belt price
The price of a VAZ 2110 timing belt, depending on the manufacturer, can vary from 400 to 1000 rubles. The tension roller costs about the same, which is recommended to be changed along with the belt. The cost of replacing these timing drive elements is 600-1000 rubles.
To save money, you can replace the belt and roller yourself. There is nothing complicated in this procedure, and no special tools are required. You just need to purchase spare parts.
The table below shows timing belt models for the 8-valve VAZ 2110 from different manufacturers, indicating their catalog numbers.
| TIMING BELT VAZ 2110 (8 VALVES) | |
| AVTOVAZ | 2112-1006040 |
| BOSCH | 1987949559 |
| CONTI | CT996 |
| CONTITECH | CT 996 |
| GOODYEAR | G1535 |
| GATES | 5539 |
| FLENNOR | 4428 |
| LUZAR | LTB0112 |
| LYNX | 136CL254 |
| PILENGA | CTP0996 |
| OPTIBELT | ZRK1538 |
| TENSION ROLLER | |
| AVTOVAZ | 21120-100612000 |
How to tighten the timing belt with your own hands
Depending on the make and model of the machine, the belt can be installed in a closed space or an open space.
In many new engines, the timing belt rotates, in addition to the camshaft, also a pump (pump for circulating coolant). To adjust the tension and make the entire belt mechanism compact, adjusting rollers are provided.
When starting to replace the belt, you should loosen the adjusting rollers (rollers), after which the tension of the entire belt will be released and it can be easily removed.
Next, install a new belt in the grooves of the pulleys and tighten it using adjustable rollers. It is recommended that the new belt last longer by also replacing the rollers when replacing the belt. Also, when replacing, you need to check the grooves of the pulleys so that they are not broken off and check the parallelism of the pulleys, that is, there should be no misalignment of the belt.
Replacement
- keys for 10, 13, 17;
- key for rotating the roller;
- flat screwdriver;
- wheel wrench;
- jack;
- a little engine oil to lubricate the tension roller.
1. Place the car on level ground and put it in gear.
2.Using a 10mm wrench, unscrew the bolts securing the timing case.
3. Loosen the generator belt tensioner using a 13mm wrench. Remove the belt.
4. We check the marks on the camshaft gear and the protrusion on the rear cover of the belt housing.
5.If they do not match, you need to turn the crankshaft until they match. This can be done by rotating the front wheel, jacking it up first, or turning the crankshaft with a 17mm wrench using the crankshaft pulley bolt (the gear must be engaged).
6.Behind the 4th cylinder on the clutch housing there is a rubber plug. We open it by prying it off with a screwdriver. Below it you can see the flywheel crown, which also has a mark. It should coincide with the triangular cut located on the crankcase to the left of the flywheel.
7.If they do not match, you need to loosen the tension roller, turn it to the left, thus loosening the belt, and remove it from the camshaft gear.
8.Using a 17mm wrench, turn the crankshaft as described above until all the marks match.
9.We immobilize the flywheel by locking it with a screwdriver in the hole where the plug was located.
10.Using a 17mm wrench, unscrew the bolt securing the generator pulley.
11.Behind it there is a crankshaft pulley onto which the belt to be replaced is placed.
12.Remove the old one and put on the new timing belt, starting with the crankshaft gear.
13. We fasten the generator pulley by putting a belt on it. Let's pull it on.
14. We dismantle the old tension roller, install a new one, lubricating it with oil on both sides.
15. We tension the timing belt by turning the tensioner roller to the right (if there is no special key, you can insert two suitable pins into the holes and secure with a screwdriver or other similar object). The tension should be 1.5-2 kgf. If you don’t have a tool to measure the tension, we do it the old proven way. The optimal tension is when one plane of the belt can be rotated horizontally by 90 degrees by holding your fingers in the middle between the crankshaft and camshaft gears.
Tension adjustment
If you discover that the V-belt drive is not yet worn out, but is whistling, you must first check its tension. According to the book, its deflection with a force of 10 kg/cm2 (100 N) should be 10 - 15 mm. To put it simply, you just need to press it approximately in the middle with some force.
If the tension is correct, then the deflection will be 6 - 8 millimeters. If it is more, it needs to be tightened, if less, it needs to be loosened. And it's not just that he whistles. If the tension is weak, then the battery charges less well, and the drive wears out faster. If the tension is too strong, there is a risk of failure of the generator bearings and the belt stretches.
We carry out the necessary adjustments as follows:
- Loosen the generator mounting nuts from the bottom and top;
- By turning the adjusting bolt, we make the adjustment: - To increase the tension, turn the bolt to the right - this moves the generator away from the cylinder block; — To loosen, turn the bolt to the left - bringing the generator closer;
- Having hooked the key onto the mounting bolt, turn the crankshaft two turns and check the tension again;
- If everything is fine, tighten the fastening nuts.
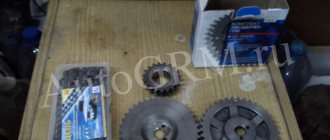
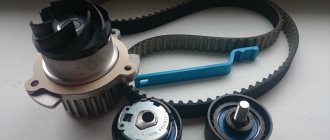
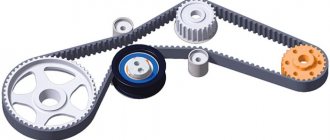
Timing belt replacement process
Timing kit for VAZ
Replacing the timing belt on a VAZ-2112 is carried out once every 50,000 km or if there is a suspicion that it will soon fail. So, replacing this unit must be carried out on a pit or a lift, but if there are none, then it can be done using a jack, since the wheel must be removed.
So, consider the step-by-step process of replacing the timing belt and pulley:
Removing the generator belt
Unscrew and remove the timing case
View of a removed wheel from a car
We set the tags in src=”https://carfrance.ru/wp-content/uploads/2016/09/metka-mahovik-650×420.jpg” class=”aligncenter” width=”650″ height=”420″[ /img]
Setting the flywheel marks
Fixing the camshafts from turning so as not to disturb the valve timing
Unscrew the generator pulley
Unscrew the fastening nut, remove the roller and unscrew the stud
Removing the timing belt
For complete clarity of the picture, we will describe the drive diagram of the distribution mechanism.
Gas distribution mechanism diagram
1 – crankshaft toothed pulley 2 – coolant pump toothed pulley 3 – tension roller 4 – rear protective cover 5 – camshaft toothed pulley 6 – toothed belt A – mounting lug on the rear protective cover B – mark on the camshaft pulley C – mark on the oil pump cover D – mark on the crankshaft pulley
Belt selection
The choice of belt and roller should be approached carefully. The reliable and uninterrupted operation of the entire gas distribution mechanism depends on the quality of these parts. It is worth noting that in addition to original spare parts, there are also a number of analogues that can be installed on a car.
Of course, do not forget that the belt and roller can be purchased either as a set or separately. The kits can be found on the car market, but with AvtoVAZ’s vision of some changes in the policy of production and sale of spare parts, from October 1, 2015, the manufacturer no longer produces timing kits, and all parts are supplied separately. Therefore, when choosing, you should be very careful so as not to buy a fake.
Let's first consider the choice of belt.
Original
2112-1006040 is the original catalog number of the timing belt for the 8-valve VAZ-2112 engine manufactured by AvtoVAZ. The cost of this product averages 2300-2500 rubles .
Analogs
Also, along with the original, there are a number of analogues that can, and as experience shows, be used by car enthusiasts. Let's consider the main ones.
| Manufacturer's name | Catalog number | Price in rubles |
| Contitech | CT 996 | 600 |
| Master-sport | 996T-PCS-MS | 600 |
| Gates | 5539 | 800 |
| Fomar Roulunds | RR1131 | 900 |
| GoodYear EP | G1535 | 900 |
| LYNXauto | 136CL25.4 | 900 |
| Bosch | 1 987 949 559 | 1000 |
| Flennor | 4428 | 1100 |
| Hola | TH1362 | 1200 |
| Finwhale | BD 136 | 1200 |
| Dayco | 94714 | 1300 |
| Luzar | LTB 0112 | 1600 |
Analogue timing belt produced by LYNXauto
As can be seen from the table, all analogues are much cheaper than the original, but this does not mean that their quality is lower. As practice and experience show, most products have the same service life.
Video selection
Now, let's look at the original and analog option for purchasing a timing pulley.
Original
2112-1006120 – original catalog number of the timing pulley for installation on VAZ-2112 engines with 8 valves, manufactured by AvtoVAZ. The average market price of the product is 1000-1200 rubles .
Analogue
In addition to the original spare parts, you also have the opportunity to choose from analog manufacturers that have successfully proven themselves in the price-quality category. So, in the table below, there are analogues that can be installed on a car:
Set the timing marks correctly - otherwise you will bend the valves!
The VAZ-21124 engine has a special feature: no matter how its pulleys are turned, it does not bend its valves. With the 21120 engine (16v 1.5 l) such jokes will not work! If the pulley positions are not too far off, try putting on the belt and turning the mechanism to the “TDC 1 and 4” position. From now on, always use the following instructions:
- The crankshaft is set to the required position by checking the mark on the generator drive pulley (photo 1) or on the crankshaft pulley (photo 2);
Alternator drive pulley and crankshaft pulley
- Let us clarify: there should be 20 teeth between the DPKV sensor and the “pass”;
- The marks on the “upper” pulleys should point straight up (photos 3 and 4). These pulleys must be fixed, after which the tension can be released;
Exhaust and intake shaft pulley
When the belt is loose, the crankshaft cannot be rotated.
In theory, on the VAZ-2112, marking is carried out the same way, no matter what engine we are talking about. Here are photos for engine 21120.
What it looks like in reality and in the instructions
Take the time to find the inspection window on the gearbox housing. There is another mark under the plug.
The last step is optional. And they do it so as not to redo all the work “from scratch.”
The number of belt teeth between the “upper pulley” marks is exactly 16; The mark on the crankshaft pulley sometimes breaks off - use the control method “1” (photo 1) or “3” (lower photo).
Updates for VAZ-21124
On a 1.6 engine, all actions are performed in the same way as described above. There is one exception - the generator drive pulley is aligned according to the mark on the casing (see photo).
Generator drive pulley, motor 21124
However, if this mark is not there, use the proven method: 20 teeth are counted from the DPKV body. Instead of the 21st there should be a “pass”.
The timing pulleys can be rotated as you like - the pistons will not touch the valves in any case. Compare what the pistons of two different engines look like and it will become clear what we are talking about.
Two different 16 valves
For those who don't understand anything
The number of teeth on the crankshaft pulley is 21, on the camshaft pulleys – 42. When the crankshaft rotates 360 degrees, the camshafts rotate 180. In general, the full engine operating cycle consists of two crankshaft revolutions (720 degrees).
In theory, you can use an alternative configuration method. Let the camshaft pulley marks point straight down. Then the mark on the crankshaft pulley should face up (TDC 1 and 4).
conclusions
Replacing the gas distribution mechanism kit on a VAZ-2112 with an 8-valve engine is quite easy. Another problem remains the correct and timely identification of the problem, as well as the selection of spare parts. If you make the wrong choice, this can cause even more serious consequences for the engine. The same applies to the quality of products.
The question of how to replace the 8 valve belt on a VAZ 2110 with your own hands constantly arises, since such a procedure at stations is expensive. You should know that the part is a product whose main task is to transmit rotation from the crankshaft to the camshaft. In addition, the system also involves a water pump, which is also included in the system. The inner surface of the timing belt is equipped with teeth, the pitch between which varies depending on the type of car model. In order to provide the necessary voltage, the device is equipped with a tension system in the form of a roller.
Reason for replacing the timing belt
Do-it-yourself replacement of the VAZ 2110 8-valve injector timing belt is carried out after the car has run from 65 to 75 thousand km. Sometimes the number changes. It depends on the operating conditions.
Reasons leading to the need for replacement:
- work in conditions of sudden temperature changes;
- the presence of machine oil on the product, which has a corrosive effect;
- problems in the tension roller;
- the pump has failed.
- natural wear and tear of the product has occurred;
- accelerated failure of the element due to increased loads;
- mechanical damage during repairs;
- manufacturing defect.
In a VAZ car, the links should not be allowed to jump. This causes poor performance of the gas distribution system. There is a danger of the strap breaking.
The question often arises: how to replace the timing belt on a VAZ 2110 8 valve. The main thing is that this procedure must be done in a timely manner, because when it rushes, the valves will bend. On this model, the manufacturer did not include special grooves on the surface of the pistons that would eliminate this problem. It is possible to make them yourself. However, experience is required in such work, otherwise compression may be damaged.
What is needed to replace the timing belt
The leading link of the gas distribution mechanism is the crankshaft. It sets the pace of operation of the timing belt. Rotation at high speed and friction forces lead to fairly rapid stretching and wear of the belt. However, the decision about what to change when replacing the timing belt is made after a careful inspection of the mechanism.
It is checked for the presence of play in the tension and support rollers, the absence of oil leaks, and the serviceability of the water pump, the drive (pulley) of which is part of the timing belt, is determined. Therefore, when repairing the gas distribution mechanism, you may need more than just a belt. To replace it, you will definitely need the following set of tools:
- a set of open-end, socket and ring wrenches Nos. 10, 13, 17, including a special fork wrench for fixing the tension roller;
- a torque wrench for tightening the nuts with the required force;
- a device for checking belt tension;
- screwdrivers;
- jack.
Before you begin replacing the timing belt, you should prepare the vehicle. First of all, the car needs to be fixed so that it does not rock back and forth. Remove the front right wheel and the protection under it, as well as other parts that may cause you inconvenience when working. After removing the protection, return the wheel to its place. It is most convenient to combine marks and marks on timing pulleys and engine body parts.
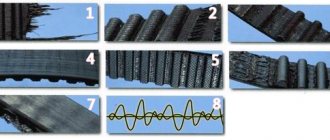
List of damage to the timing belt on the VAZ 2110
Replacing the timing belt of a VAZ 2110 8-valve injector with your own hands is carried out:
- As a result of increased tension, the surface begins to become shaggy. Gaps appear.
- If the product was loosely tensioned, this leads to cutting off the tooth. In such a situation, replacing the 8-valve timing belt on a VAZ 2110 is required immediately.
- The teeth are largely worn. This is also a consequence of poor tension adjustment.
- The surface of the product is covered with small cracks. This happens due to prolonged overheating or hypothermia.
- Sometimes the wear area is between the teeth. This is also the result of poor belt tension.
- If oil constantly leaks from the engine and gets on the belt, then the product is removed. Then you need to find and fix the leak. The timing belt is replaced with a new one.
- On a VAZ 2110 with 8 valves, the timing belt is changed if there was a misalignment during its installation. Its end wear is observed.
When driving the car, you must constantly listen to noises. When it is clearly audible in the engine area, it means you need to stop and tighten the belt.
Checking belt tension with fingers or scales
Checking the timing belt tension is usually done with your fingers, without special measuring devices. To do this, on the longest section of the belt, twist the belt with two fingers. A properly tensioned belt should barely turn 90 degrees. If the belt can be easily turned 1.5 turns, then it needs to be tightened. And, conversely, if you can’t turn it 90 degrees with two fingers, then the tension has been exceeded.
The optimal distance that you can move the timing belt with your fingers in the middle of a long section of the belt is 1 cm.
If you don’t trust the manual method of checking belt tension, then you can use conventional measuring instruments: calipers and spring scales.
We hook the scales in the middle of the belt between the pulleys and pull the scales to a value of 10 kilograms. Then, using a caliper or a regular ruler, measure the distance by how much the belt was pulled back under such a load. The permissible distance for optimal tension is considered to be 5.5 mm (+ - tenths of millimeters if using a caliper).
Are you aware of the SRS safety system? It consists of impact sensors, actuators and an SRS control unit.
Choosing a timing belt manufacturer
Knowing how to replace the 8-valve timing belt on a VAZ 2110, you also need to select it correctly. The size of the timing belt VAZ 2110 8 valves is selected based on the number of teeth. Their sum must correspond to the number 136. The width of the drive is 25.4 mm.
The most representative companies include: Gates, Bosch,
Before choosing a product, it is visually inspected for defects. At the same time, the tension rollers are inspected for defects. If necessary, they should also be replaced. There are also companies here that produce quality products: Gates, Power
| Belt manufacturer | Parts catalog number |
| Timing belt for VAZ 2110 (8 valves) | |
| G1535 | |
| 1987949559 | |
| LTB0112 | |
| ZRK1538 | |
| 2112-1006040 | |
| 5539 | |
| 4428 | |
| CT996 | |
| 136CL254 | |
| CTP0996 | |
| CT 996 | |
| Tension roller | |
| AVTOVAZ | 21120-100612000 |
Help in choosing a timing belt and rollers
The reliability, efficiency and operating life of the motor depend on the quality of the rollers and belts chosen for replacement.
Research shows that the cost of a belt is from 450 rubles, and rollers will cost you at least 600 rubles.
When buying spare parts, be guided by the opinions of VAZ 2110 car owners. There are many forums. Also consult with specialists at the service station. They will be able to give professional advice, or even order quality components for you.
Surveys among owners of AvtoVAZ’s creation, namely the VAZ 2110, showed that the most popular belts are products manufactured by the following companies:
- Gates;
- Bosch;
- Kraft;
- Power Grip;
- Dayco;
- Contitech.
As for videos, it’s better to pay attention to the following brands:
- Gates;
- Power Grip;
- VPZ;
- BRT;
- Dayco;
- Marel.
Of course, the choice is purely individual and depends on the financial capabilities and available assortment of a particular store. But if the necessary elements are not available in your city, you can always order them online. Nowadays this is not a problem.
Visual belt check
Before replacing the timing belt on a VAZ 2110 8 valve, it is necessary to inspect it. It is carried out after a run of 15 thousand km.
Tools are prepared for this:
- keys: overhead and open-end.
- different types of screwdrivers;
- a mount is required;
- pliers with special jaws for proper installation of the roller;
- jack.
The check consists of the following points:
- There is a special plug on the front protective timing cover that can be removed.
- The belt is removed from the generator pulley. This is important for ease of use.
- The timing cover is held in place by 6 bolts that need to be unscrewed.
- The belt opens. He is visually inspected.
Do-it-yourself replacement of the VAZ 2110 8-valve injector timing belt is carried out in the case when all defects are clearly visible.
The process of removing the old belt
To understand how to change the timing belt on a VAZ 2110, you need to study the instructions.
Stages of the soft product replacement process:
- The wire leading to ground is disconnected from the battery.
- The alternator belt is removed.
- The piston of number 1 cylinder rises. The front right wheel must be removed. Setting the VAZ 2110 8 valve timing marks is done by turning the crankshaft in the direction of movement clockwise. The marks of the camshaft gear are aligned with a special antenna located on the rear cover of the timing drive.
- The bolt on the generator drive pulley is unscrewed and removed. A prerequisite is to lock the crankshaft. This will require at least two people. One is engaged in keeping the crankshaft from possible rotation. The other one, from the clutch housing, removes the plug and unscrews the bolt securing the pulley, which is removed. Immediately there is a check of the coincidence of the marks on the flywheel and the slot in the crankcase.
- To loosen the nut securing the tension roller, take a size 17 wrench. With its help, the roller is slightly rotated in order to reduce the belt tension.
- The timing drive is being removed.
Installing a new belt
Then the question arises: how to install a timing belt on a VAZ 2110 8 valves. The work is carried out in the opposite order.
Installing the timing belt VAZ 2110 8 valves consists of the following steps:
- The tension roller is being fixed. Attention is immediately drawn to the location of the key holes. They are heading outside.
- To install the VAZ 2110 8-valve timing belt, you need to put it on the crankshaft pulley. The same system includes a coolant pump and a tension roller. It is important to understand: how to tighten the timing belt on a VAZ 2110. A screwdriver is used to carry out this work. It must be installed between the pins that are screwed into the roller. The lever rotates the roller counterclockwise. The belt is then tensioned onto the pulley.
- Then the tension roller nut and the generator pulley bolt are returned to their place.
- Now the crankshaft rotates 2 turns clockwise. The crankshaft and camshaft marks are aligned. If the labels do not match, the entire operation is repeated.
Next you need to adjust the strap tension. The rotational movements of the crankshaft are carried out against the direction of movement clockwise. Normal tension is 1.5-2 kg. If there is no special device, then a manual method of checking is carried out. The free section of the belt is grasped with two fingers: the thumb and forefinger. The force should be enough to turn the belt at an angle of 90 degrees.
Knowing how to install a timing belt on a VAZ 2110 8 valve with your own hands, you still need to check the quality of the work done. To do this, start the engine and listen. There should be no extraneous noise. Their presence indicates a strong belt tension. To do this, the fastening of the roller is loosened, and the roller itself is rotated to the left by 10-15 degrees. The field of this system is fixed.
Replacing the alternator belt, replacing and lubricating the alternator belt tensioner roller VAZ 2110, 2111, 2112
Replacing the alternator belt without power steering VAZ 2112
I began to notice that often, when the engine was started for the first time, the alternator belt began to whistle. I started watching the battery light on the dash, but it didn’t come on. I consoled myself that the humidity might have weakened the strap a little... A week passed when suddenly the power steering seemed to turn off for a couple of seconds. At first I thought the car had stalled, but no. I stopped, opened the hood and went straight to the alternator belt... And there were threads sticking out of it and one side was completely worn out. Apparently, the idiots from the service department who changed the timing belt “for free” replaced the alternator belt; one track did not fit into place. And they probably thought that he would drop by later. And this very path was eaten by the rollers.
I went to the car market, bought a new strap for 600 rubles (I didn’t know the prices and don’t know now, but I didn’t want to waste time looking for a cheap one or alternatives, and I wasn’t in the mood). I approached the seller: “alternator belt for two cars, 1.6 liter engine, 16 valves with power steering.” – 620 rubles. - Let's.
I looked online for instructions on how to replace the belt on 12s with power steering. I heard that there are some nuances, that it is necessary to remove the engine from the mount. I ran through the forums, printed out the main points and headed to the garage. Now after last night I say: “This is 3.14... if you don’t know, then don’t write your advice on the forum. If you have an 8th grade, then you don’t have to say that on a 16-valve with power steering everything is the same as on an 8th, you just need to remove it from the pillow.” Yes, everything is written clearly: here are the instructions that I found and to which it was signed “you just need to remove the engine from the mount.”
Bullshit, comrades!
We removed the adsorber and the reservoir with power steering fluid from their mounts so as not to interfere.
We unscrewed the lock nut with a 13mm wrench.
(photo from the Internet, a lock nut with a shackle where the hose from the reservoir with power steering fluid is attached to a clamp)
They started looking for the tension bolt, but there wasn’t one! Maybe someone has a VAZ-21124, but we searched all around without success. Moreover, on one of the forums, one of those discussing it also unsuccessfully tried to find this bolt, and another participant, foaming at the mouth, proved that the bolt was 100% there.
I will not dwell on the discussion of the forums and will continue to explain how we changed the strap.
So, 1) Using a 13mm wrench, loosen the nut securing the generator to the mounting plate. Now the generator can be pushed towards the engine, loosening the belt tension.
2) Then, having examined the rollers, one turned out to be very similar to the tension one, they tried to loosen it and that’s it! Loosen the TENSION ROLLER.
Now the strap has loosened even more and should come off the rollers with ease.
3) Now you need to remove the engine from the support. To do this, you need to unscrew 2 bolts.
4) Now we raise the engine. We lifted it with a regular hydraulic jack, sliding it under the crankcase. The engine mount will rise and the belt can be pulled out.
5) Now we insert a new strap under the engine support. And we begin the reassembly.
6) We clamped the tension roller in its extreme position (corresponding to the minimum belt tension).
7) The generator was also moved to the most extreme position (as close as possible to the engine).
 Now the hard part is getting the new belt onto the rollers... The main thing is to wrap it tightly around all the rollers before pulling it onto the last one (we pulled it onto the tension roller). We lubricated it a little with WD40 to make it climb more confidently. Using 4 hands, using a hammer, a pry bar and a board, they threw the strap onto the tension roller. We suffered for 20-30 minutes.
It turns out that there is a special key that is used to adjust timing belts and generators. This is probably him:
I think it will greatly facilitate the process, but we didn’t have it and I learned about its existence later.
9) When the strap is on rollers, you can start tightening.
We did this: using the handle of a hammer, I pulled the tension roller with force and fixed it in this position. Then they tightened the bolt with the locknut, which was loosened and the generator was in its extreme position (closer to the engine).
In theory, it probably should have been done differently... Pull the generator as far as possible from the engine (tensioning the belt a little) and fix it first, and then work with the tension roller.
When starting the engine and releasing the gas (gas - throwing gas), the strap should oscillate and flop around a little. If at the same time it still does not whistle, then the tension can be left as is.
10) Next, we collect the remains: we put in place the adsorber, the reservoir with power steering fluid, screw the clamp to the bolt with a lock nut, and do not forget to put the chip on the adsorber in place.
So, conclusions and features of replacing the alternator belt on a VAZ with power steering
: 1) It is necessary to lift the engine from the support and remove/install the strap under the pillow. 2) The belt tension was adjusted (in my case) using a tension roller. NO tension bolt! 3) The main thing is not to overdo it with belt tension. 4) I saw disputes about the size (length) of the belt. I installed this one on my VAZ 21124 with power steering:
Replacing the alternator belt without power steering VAZ 2112
I was driving a couple of days ago for no apparent reason, a whistle coming from under the hood, I stopped, I opened the hood, everything was fine, I know that there cannot be a global breakdown, the car is technically sound and the timing belt was changed two weeks before this incident. I decided to turn off the engine after a couple of minutes, I started the car normally, it was running quietly as before, I wondered what it could be, when I arrived home, I looked at everything carefully, it turned out that the Alternator belt was slipping, the next day I went to the auto store and bought a new Belt for 250 rubles. Arriving home, the first thing I did was prepare the necessary tools: a wrench for “13”, a wrench for “10” and the belt itself. Everything is very simple: 1. Using a “13” wrench, loosen the generator mounting nut. 2. We turn the adjusting bolt with a wrench to “10”; it loosens the tension of the generator drive belt. Now we try if the generator moves towards the cylinder block (move towards the engine), then remove the old belt and tighten the new one, and rotate the adjusting bolt in the reverse order. 3. And if the tension of the generator drive belt has not weakened, as in my case, then there is another bolt under the generator that prevents the generator from moving. We unscrew it with a key to “10” and move the generator towards the engine. The belt is now well loosened and can easily come off the rollers. One of the most difficult parts is tensioning the belt while getting into the rollers, so that after a couple of weeks it doesn’t start to creep. Once you are on the rollers, you can begin to tighten the belt and pull the generator as far away from the engine as possible. 1. Tighten the adjusting bolt with a wrench to “10”; it will secure the tension of the generator drive belt. 2. Use a key set to “13” to secure the generator mounting nut. Now we start the engine and start degassing; this requires gas, for example, 3000-4000 thousand revolutions, releasing the gas to 500-1500 thousand revolutions, and so on for a couple of minutes. Then we turned off the engine, got out and looked at how our new belt is in the rollers and whether it is sitting too loosely (there should be no whistling) if it whistles, it means the generator is loosely tensioned. 3. Don’t forget to tighten the last bolt, which is located under the generator.
That's all, the alternator belt has been replaced with a “Dvenashka 1.5 16-valve without Gear”! It will take you about 30-40 minutes.
3. Replacing the generator belt tensioner roller and lubricating the tensioner roller on the VAZ 2110
Recently the generator belt tension roller began to rustle, and without thinking twice I went to the store to buy a new one.
Having removed the old video and twirled it in my hands, I was unpleasantly surprised. As it turned out, it spun much better than the new one, but it did it quite loudly.
After installing the new video, I decided not to throw away the old one, but to try to revive it.
First you need to remove the plugs; this can easily be done with a knife.
Then the roller was thoroughly washed to remove dirt and old grease. For washing, gasoline or “646” solvent will do.
Shit instead of lube
Clean bearing
After washing, the roller was filled with new grease. It is better to use a specialized lubricant, but I used Litol.
Theoretically, Litol is quite suitable; it is designed to work in bearings and has an operating temperature from -40 to 120 degrees. The main thing is not to use “Solidol”, its operating temperature is up to 90 degrees, and it will simply melt and leak out. The restored bearing rotates smoothly and quietly, it will be in reserve.
https://www.drive2.ru/l/4750927/
https://www.drive2.ru/l/288230376151764640/, https://www.drive2.ru/l/1441926/
next article:
Replacing the cylinder head gasket for VAZ 2110, 2111, 2112
Contents of the article: Milling and homemade desiccant from improvised means Homemade tripod for
Rating 0.00 [0 Vote(s)]