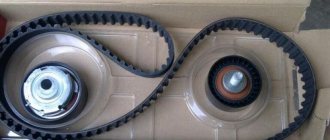
Replacing the VAZ 2110 timing belt and tension pulley with your own hands
The timing belt is an element of the gas distribution mechanism responsible for the intake of the fuel-air mixture and the subsequent release of exhaust gases. If the timing belt breaks, the valves and pistons will be damaged, which will require a complete replacement of the piston group or replacement of the cylinder head.
When does a timing belt need to be replaced?
Sometimes, at the same time as replacing the belt, it may be necessary to replace the cooling pump. when signs of malfunction appear or in the following cases:
- The timing belt is very old (more than 5 years, even if it has not been used).
- Cracks, abrasions and “fluffing”.
- Destruction of belt teeth.
- Depressurization and leaks in the timing case (oil and coolant destroy the rubber base of the belt).
- If the belt is worn out, the engine may start and run unsteadily.
- Belt wear can cause an ignition failure, after which the engine begins to knock and run noisily, and black smoke begins to come out of the exhaust pipe.
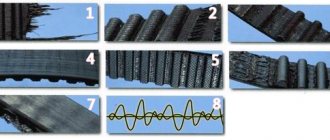
Timing belt damage analysis
1. When the timing belt is slightly damaged or completely torn and the cord is frayed, then most likely the reason for this is overtension.
2. When one of the teeth is missing, this is a sign of weak belt tension.
3. Lack or high wear of teeth on the belt, in turn, indicates incorrect tension.
4. A cracked timing belt indicates severe overheating or hypothermia.
5. When wear is noticeable between the teeth, the belt is most likely not tensioned correctly. (weak or strong).
It is possible that if the belt is loosely tensioned, the belt will jump over a tooth; in this case, “CHECK” lights up and immediately goes out. This is what the camshaft position sensor signals.
6. An oily timing belt indicates that oil is leaking from the engine somewhere. In this case, you need to replace the belt and look for leaks.
7. Noticeable end wear indicates angular or parallel misalignment of the belt.
8. Increased noise indicates excessive or insufficient belt tension. This problem should be corrected immediately to avoid cutting teeth or breaking the belt.
Wait, there are so many manufacturers here. So which timing belt is best?
Yes, there are many companies that produce the necessary materials for replacing the timing belt. They are usually divided into “original” and “analogues” - in the first case, the supplier is the car manufacturer, and in the second - third-party companies that specialize in the production of spare parts.
If you dig a little deeper, you will find out that the original belts, rollers or other parts are made by the same third-party manufacturers, only the packaging and markings are different. These are the so-called OEM suppliers - reliable companies with a good reputation that have entered into an agreement with the car manufacturer.
Among the manufacturers of timing belts and rollers, the following companies have proven themselves well: Gates, Contitech, Dayco, Bosch, INA. There are other, cheaper options that expand the price/quality range. But, as we have already found out, the timing belt is not a part you should skimp on.
Imported analogues
Various components are suitable for replacing belts “2108-1006040-10”:
- GATES – 5521 or 5521XS;
- BOSCH – 1 987 949 095;
- DAYCO – 94089;
- CONTITECH – CT527;
- Finwhale - 2108-1006040.
The timing belt “21116-1006040” can be replaced with another part:
- GATES – 5670XS;
- CONTITECH – CT1164;
- QUARTZ (Germany) – QZ-5670XS.
Usually the choice is made in favor of GATES products. The letters "XS" in its catalog mean "reinforced". Grantovods have already told us in detail about the timing of replacing the timing belt, its selection, and signs of wear in the material:.
Original timing belt and fake
Attention! Components from GATES (England) are most often counterfeited! From the photo you can understand what the main difference is. Beware of fakes.
Procedure for replacing the timing belt
Raise the hood and disconnect the battery terminal “to minus” (the key in the ignition switch must be “off”) so that the brake lights do not light up in vain and “just in case”. Important! Before removing the terminal from the battery and turning off the power to the car, you must study the “Operation and Repair Manual” of the car
In some cars, it is impossible to disconnect the terminal from the battery (!), since adaptations in the electronic control system will be reset. In this case, you need to work with a car that is not de-energized more carefully. To ensure free access to the necessary mechanisms, you will need to remove the wheel, engine cover, protection, and generator belt. Depending on the make of the car and engine modification, work may require removing the power steering fluid reservoir or adsorber, or the air conditioner bracket, intercooler with terminals, air intake (or something else). Using a hexagon, unscrew the screws securing the belt and gear guard. If there is a crankshaft position sensor (CPS), disconnect the connector with wires from it. Unscrew the bolt and remove the timing belt tensioning roller
Also remove the support (guide) roller, if there is one. Remove the old timing belt. Check the position of the mark on one camshaft gear (on an 8-valve engine) or on two gears on two camshafts (on a 16-valve engine) in relation to the marks on the timing case. If the marks do not coincide, to set them in the desired position (against each other), you need to turn the camshaft with a wrench using the bolt securing the gear to the camshaft. To check the alignment of the mark on the crankshaft gear with the mark on the oil pump housing, unscrew and pull out the crankshaft toothed pulley with a special washer. If the pulley bolt does not unscrew, then you can rest the handle of the L-shaped key against the rod, put on the negative terminal of the battery (if it has been removed) and turn it with the starter. After unscrewing the bolt, remove the terminal back. You can also use a pneumatic impact wrench or have an assistant engage the highest gear and apply the brake while you unscrew the bolt. If the gear mark is set incorrectly, then screw the fastening bolt into place and turn the gear by this bolt with a wrench until the mark on the crankshaft gear is correctly aligned with the mark on the oil pump housing. Install the support (guide) roller, if equipped. First place the new timing belt on the crankshaft gear, on the support roller, then on the camshaft gear (or two gears, if there are two camshafts) and then on the pump gear. In this case, you need to control the position of the marks on one or two camshaft gears. If the marks are lost, they must be set correctly immediately. Install the tension roller and tighten it loosely, without tightly tightening the bolt until it stops. Check the evenness of the belt pad. Then tighten the belt using a special key for the tension roller, turning the roller counterclockwise (or in the direction of the arrows on the roller body). Next, holding the roller with a special key in the desired position, fix the position of the roller by tightening the fastening bolt until it stops, with a little force. You can check the belt tension with one hand by turning the belt lengthwise with your fingers. A well-tensioned belt should not turn more than 90°. At the final stage, reinstall and secure all dismantled elements in the reverse order.
After completing all the work, you need to start the engine and check the work by ear.
Characteristics of Lada Granta timing belt
The Lada Granta gas distribution mechanism is driven by a belt. This type of device has been familiar to car enthusiasts for a long time. After all, the timing belt design migrated from the VAZ 2108 engine, which became the basis for all subsequent modifications of VAZ power plants. The Grant is equipped with two types of engines: an 8-valve engine and a 16-valve engine. The gas distribution system of the 16-valve power unit has a complex structure and increased dimensions compared to the 8-valve one. Accordingly, replacing the Granta timing belt becomes more complicated.
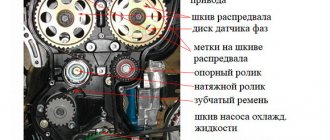
The main feature of the 16-valve device is the presence of two camshafts operating synchronously, in parallel with the crankshaft. The structure is located in the cylinder head. All three shafts are synchronized via a toothed belt. The main disadvantage of a timing belt drive is the unreliability of the belt itself. When it breaks or jumps, the valves meet the pistons and bend. The structure of the 16-valve timing belt is clearly shown in the photo.
16 valve unit
- Installation mark on the drive cover.
- Lid.
- Intake camshaft pulley.
- Phase disk (sensor).
- TDC mark on the camshaft.
- Exhaust camshaft pulley.
- Support roller.
- Tensioner roller.
- Drive belt.
- Pump pulley (coolant pump).
- Installation mark on the oil pump.
- Crankshaft alignment mark.
- Crankshaft pulley.
You can change the timing belt kit yourself. The main thing is to know about the presence and correct placement of installation marks. By the way, most foreign cars do not have such marks, so in this case VAZ cars have the advantage.
The eight-valve timing drive of the Lada Granta, compared to previous modifications of the car, looks simpler. The scheme is simple, because there is no idler roller and there is only one camshaft. The 8-valve timing device can be seen clearly in the photo.
If you have doubts about your own abilities, you should not try to replace the timing belt yourself, as you can cause even more damage. In addition, in a car service center such a procedure, performed on an 8-valve engine, is inexpensive. But in the case of a 16-valve engine, the price tag is usually much higher.
Replacing the timing belt on a 16-valve Granta engine
Access to the gas distribution device drive is covered with a plastic casing. To remove the cover, you need to unscrew five screws with a 5mm hex key. Pay special attention to the location of these screws. In the photo, number 1 shows the fastening screws of the top cover, and number 2 shows the fastening screws of the bottom cover. After unscrewing the five screws, the top cover must be lifted and removed from the engine.
If the car has a manual transmission, you need to engage fifth gear, lift the right front wheel and turn it clockwise. At the same time, it is necessary to inspect the belt for cracks, abrasions, delamination, etc. If the car is equipped with an automatic transmission, you need to remove the right front wheel and the boot (protective shield) on the right. Using a 17mm head, rotate the bolt securing the drive pulley for additional equipment (air conditioning, generator) and inspect the belt. If various defects and damage to the belt are diagnosed, it must be urgently replaced. Replacement will also be required if oil leaks, a malfunction of the water pump or tensioner roller are detected.
On a 16-valve engine, a broken belt drive will lead to a discrepancy in the angular position of the crankshaft and camshafts. As a result, the piston group will come into contact with the valves. As a result, repair work will be required.
Lada Granta 8 valve: how to make a timing belt with automatic replacement
Owners of domestic cars often prefer to repair themselves. This is due to the fact that the components for them are sold in almost any auto parts store and are inexpensive. In addition, the Lada Grant device is reminiscent of earlier models released from the AvtoVAZ assembly line. Replacing almost any component on this car will not result in any inconvenience.
Causes of belt breakage
One of the common problems with the model is the failure of the timing belt. The reasons for this may be different:
- Simple wear and tear caused by a long period of use of the vehicle;
- Regular increased loads under which the engine has to work intensively;
- Mechanical damage as a result of improper operation or received during the repair of other components;
- Manufacturing defect.
Regardless of the causes of the problem, it must be eliminated.
Over time, it stretches so much that the gear teeth jump by 1-2 links. This disrupts the valve timing and causes interruptions in engine operation. But this is the best-case scenario for such a situation. The worst is when the strap breaks and the valves bend.
Why change the belt?
In accordance with the list of routine maintenance for the VAZ 2110, the timing belt must be changed after every 60-75 thousand kilometers, however, here you also need to take into account the conditions of its operation, and this is:
- temperature changes;
- oil getting on the belt;
- problems with the tension roller;
- faulty pump.
All this will inevitably lead to damage.
It is necessary to inspect at least once a month:
- belt (determining its integrity);
- tension roller ;
- water pump gear.
And although on 8-valve VAZ engines, the valve does not bend when the belt breaks, this breakdown can damage the pump or generator.
Timing belt VAZ 2114 8 valves: functions, location and signs of malfunctions
So, the belt is under a protective cover on the crankshaft pulley side. The belt itself is a ring structure, made of reinforced rubber, and has an internal tooth structure so that the teeth on the crankshaft pulley and timing gear can engage with the belt.
Engaging with the crankshaft and camshaft with its toothed side, the belt ensures synchronous rotation of the shafts, and with its smooth side it drives the water pump shaft of the internal combustion engine cooling system. The required timing belt tension is maintained by a tension roller.
If the timing belt is torn or has become dislodged/flipped off or jumped, the vehicle’s internal combustion engine stalls or operates extremely unstably. Possible signs of timing belt failure:
- the engine stalls;
- the car does not start;
- “phase sensor error” lights up - failure of the timing belt (displacement or slippage of the belt).
It is important to understand that, subject to constant wear and various loads (including temperature), the timing belt 2114 may fail ahead of schedule
For this reason, it is important to pay attention to signs of problems with this element. For example, the timing belt on a VAZ 2114 “chews”. There may be several reasons why the timing belt is chewing.
This is either mechanical damage to the teeth of the crankshaft or pulley, sagging belt, displacement of the axes of the pump roller and tension roller, etc.
There may be several reasons why the timing belt is chewing. This is either mechanical damage to the teeth of the crankshaft or pulley, sagging belt, displacement of the axes of the pump roller and tension roller, etc.
For example, the timing belt on a VAZ 2114 “chews”. There may be several reasons why the timing belt is chewing. This is either mechanical damage to the teeth of the crankshaft or pulley, sagging of the belt, displacement of the axes of the pump roller and tension roller, etc.
Another such reason may be the belt slipping or moving to the side relative to its working position. This can lead to damage to the timing belt structure (contact with metal parts, abrasion on the edge of the tension roller) and, accordingly, disruption of the car engine.
The main reasons for belt displacement can be:
- manufacturing defect of the product (different rigidity across the width);
- failure of the water pump bearings (play, lack of lubrication, poor cleaning of the seat);
- deformation of the tension roller mounting pin (improper tightening or errors when replacing elements).
Explanatory video on where to look for tags
The gas distribution mechanism is one of the most important systems of an internal combustion engine. The timing belt controls the engine valves, ensuring the normal functioning of intake and exhaust. During intake, the fuel-air mixture enters the combustion chambers as a result of the opening of the intake valve. The next phase opens the exhaust valve, and the gas distribution mechanism removes exhaust gases from the combustion chamber. The VAZ 2190 uses a standard gas distribution unit, differing only in the number of engine valves.
Replacing the timing chain
It remains to note such a point as replacing the timing chain. We can say right away: it is absolutely no different from the belt replacement algorithm. The main difficulty is the preparatory operations, with the help of which you can get to the desired part. On average, this takes several hours, while direct replacement takes a few minutes.
So, it is quite possible to cope with replacing the timing belt yourself. Of course, this procedure is not quick, but it is quite accessible even to beginners.
The main thing is to stock up on the appropriate tools, as well as a user manual for the car. Some things are unique to a particular model.
For example, how to properly tension the timing belt is written there. Remember that if you do something once, it will be much easier the next time.
Article number and price of the video for Lada Kalina
An integral operation of selecting a belt is also selecting a timing pulley. As in the first option, there is an original and several analogues that can be used. Let's look at the article numbers and prices for the timing pulley Lada Kalina 8 valves:
- The original catalog number of the timing belt roller of the 8-valve Lada Kalina is: 21126-1006135. The average cost of this part in the Russian Federation is 700 rubles.
- There are quite a lot of analogues of the original timing pulley, which are successfully certified for use on a car and differ only in quality and service life. Let's consider which timing pulley can be installed instead of the original one on a Kalina with 8 valves:
Table indicating manufacturers, part numbers and prices for a non-original timing pulley
| Manufacturer's name | Catalog number | Average price in the Russian Federation in rubles |
| Master-sport | 21126-1006135-ST-PCS-MS | 580 |
| QML | BT1006 | 650 |
| Pilenga | PT-P1571 | 670 |
| Torque | KR5016 | 680 |
| Caffaro | 320-99 | 720 |
| Trialli | CM172 | 735 |
| Optimal | 0-N2044 | 750 |
| LYNXauto | PB-3012 | 1080 |
| Gates | T42150 | 1300 |
| Dayco | ATB2543 | 1450 |
| Ina | 532060410 | 1470 |
| SNR | GE372.00 | 1500 |
| Ruville | 57207 | 1550 |
| Coram | C834 | 1850 |
| Outlog | RT1663 | 2000 |
This is a Chinese video, the quality is not very good, it quickly became noisy
A fairly large selection of timing rollers is available to the owner of the 8-valve Lada Kalina. It is worth noting that most of the products from the table have high quality workmanship and also have a service life of about 40,000 km.
Step-by-step instructions for replacing the timing belt
- Unscrew the two bolts from the side of the timing belt protective cover. Key for 10.
- And one in front, remove the cover. Key for 10.
- Remove the generator drive belt. Loosen the locking nut, set the wrench to 13 and unscrew the tension bolt, set the wrench to 10. Move the generator towards the cylinder block.
Alternator belt tensioning mechanism.
- If you cannot move the generator, you need to loosen the fastening nut from below. The key is 17.
Generator mounting.
Set the top dead center
- Use the crankshaft pulley bolt to turn it clockwise.
- We ensure that the mark on the camshaft toothed pulley (hereinafter referred to as simply an asterisk) matches the mark on the metal casing.
Camshaft mark.
- The mark on the crankshaft sprocket should also coincide with the low tide on the oil pump.
Crankshaft mark.
- We unscrew the crankshaft pulley bolt, having previously locked the crankshaft. We block the rear wheels, engage fifth gear and insert a screwdriver into the ventilation hole of the brake disc below the caliper. 17mm head with extension and pipe as a lever.
- Unscrew the nut securing the tension roller and remove it along with the old timing belt.
Fastening the tension roller.
Replacing the pump
- Unscrew the bolt securing the camshaft sprocket and remove it. The key or head is 17.
Fastening the camshaft sprocket.
- Remove the timing belt protective cover. We unscrew the nut and bolt by 10, as well as the three bolts securing the water pump. Head for 10.
Fastening the timing case.
- Removing the pump
- Lubricate the pump gasket with a thin layer of sealant and install the pump in place. We install the protective casing and tighten all the bolts evenly.
Pump mount.
How to replace the tension roller
14
- Remove the faulty roller, put a new one in its place, and tighten it with a special wrench.
15
- Use a tension roller to adjust the timing belt tension (follow the instructions).
Replacing the timing belt of the Lada Priora engine
According to the maintenance regulations, the condition of the timing belt should be checked after 105 thousand km, and the belt replaced after 200 thousand km.
It is necessary to take into account that failure of the timing belt (breakage or shearing of teeth) can lead to valves sticking into the pistons due to mismatch of the rotation angles of the crankshaft and camshafts and, as a result, to expensive engine repairs. Therefore, we recommend checking the condition of the belt more often - every 45 thousand km.
The surface of the toothed part of the belt should not have folds, cracks, undercuts of teeth and separation of fabric from rubber. The reverse side of the belt should not have wear, exposing the cord threads, or signs of burning.
There should be no delamination or fraying on the end surfaces of the belt. The belt also needs to be replaced if traces of oil are found on it (before replacing the belt, the cause of its oiling should be eliminated) or when replacing a failed tensioner/support roller of the timing drive and coolant pump.
Use a 5mm hex to unscrew the five screws securing the front upper timing cover...
...and remove it. Remove the right mudguard of the engine compartment (see.
Using the “17” head, turn the crankshaft clockwise by the bolt securing the generator drive pulley... ...and inspect the belt for damage.
To replace the belt...
...using a 5mm hexagon, unscrew the two screws securing the front lower timing cover...
...and remove the cover. Remove the generator drive belt (see.
...until the marks on the camshaft toothed pulleys align with the marks on the rear timing cover. To check the position of the crankshaft...
…we remove the rubber plug in the upper part of the clutch housing (for clarity, the cooling system hose and the wire blocks from the coolant temperature gauge sensor and the ECM coolant temperature sensor are disconnected)…
...and make sure that the mark on the flywheel 1 is located opposite the slot 2 of the upper cover of the clutch housing. In order not to disturb the valve timing when unscrewing the bolt securing the generator drive pulley, an assistant fixes the flywheel by inserting a large slotted screwdriver through the hole in the clutch housing between the flywheel teeth.
Having unscrewed the bolt securing the generator drive pulley...
...remove the pulley...
...and its support washer.
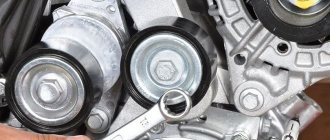
Using a spanner wrench or a 15mm socket, loosen the bolt securing the belt tension roller. At the same time, the tension roller will rotate and the belt tension will weaken.
Remove the belt from the camshaft pulleys of the tension and support rollers. After removing the belt from the coolant pump and crankshaft pulleys, remove the belt from the engine compartment.
After removing the timing belt, the crankshaft and camshafts must not be turned at large angles to avoid the valves sticking into the pistons. When replacing the timing belt, we also change the tensioner and support rollers of the belt. Unscrew the bolt securing the tension roller and remove the roller.
Using a 15mm spanner, unscrew the bolt securing the support roller... ...and remove the roller assembly with the bolt and thrust washer.
The roller thrust washer has cores that prevent the washer from being removed from the bolt. Before installing the new support and tension rollers, apply thread sealant to the threaded part of the bolts that secure them. We do not completely tighten the tension roller bolt.
Before installing the belt, make sure that the alignment marks of the crankshaft and camshafts are aligned.
With the generator drive pulley removed, it is convenient to control the position of the crankshaft...
...by aligning mark 1 on the crankshaft toothed pulley with mark 2 (rib) on the oil pump cover. We put the timing belt on the crankshaft pulley. While tensioning both branches of the belt, we place the front branch behind the support roller, and the rear branch, putting it on the coolant pump pulley, behind the tension roller. Then we put the belt on the camshaft pulleys. To tension the belt...
...insert the tips of the pliers to remove the retaining rings into the grooves of the outer race of the tension roller.
We tighten the belt by turning the tension roller counterclockwise with pliers...
...until cutout 1 of the outer race of the roller aligns with the rectangular protrusion 2 of its inner sleeve... ...and tighten the roller mounting bolt with a wrench.
Having installed the generator drive pulley, turn the crankshaft by the pulley mounting bolt two turns clockwise.
We check the alignment of the installation marks on the crankshaft and camshafts, as well as the alignment of the cutout with the protrusion on the tension roller.
Otherwise, we repeat the operations of installing and tensioning the timing belt.
Why change the belt?
In accordance with the list of routine maintenance for the VAZ 2110, the timing belt must be changed after every 60-75 thousand kilometers, however, here you also need to take into account the conditions of its operation, and this is:
- temperature changes;
- oil getting on the belt;
- problems with the tension roller;
- faulty pump.
All this will inevitably lead to damage.
It is necessary to inspect at least once a month:
- belt (determining its integrity);
- tension roller ;
- water pump gear.
And although on 8-valve VAZ engines, the valve does not bend when the belt breaks, this breakdown can damage the pump or generator.
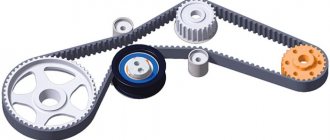
Help in choosing a timing belt and rollers
The reliability, efficiency and operating life of the motor depend on the quality of the rollers and belts chosen for replacement.
Research shows that the cost of a belt is from 450 rubles, and rollers will cost you at least 600 rubles.
When buying spare parts, be guided by the opinions of VAZ 2110 car owners. There are many forums. Also consult with specialists at the service station. They will be able to give professional advice, or even order quality components for you.
Surveys among owners of AvtoVAZ’s creation, namely the VAZ 2110, showed that the most popular belts are products manufactured by the following companies:
- Gates;
- Bosch;
- Kraft;
- Power Grip;
- Dayco;
- Contitech.
As for videos, it’s better to pay attention to the following brands:
- Gates;
- Power Grip;
- VPZ;
- BRT;
- Dayco;
- Marel.
Of course, the choice is purely individual and depends on the financial capabilities and available assortment of a particular store. But if the necessary elements are not available in your city, you can always order them online. Nowadays this is not a problem.
Purpose of the crankshaft pulley
The crankshaft pulley on the VAZ 2110 serves the following purposes:
- Reducing the amplitude of crankshaft vibrations during resonance. In particular, for this purpose, some craftsmen install a lightweight version of the crankshaft.
- Reducing noise from the operation of the power unit.
- Rotation of mechanisms that are directly involved in the operation of the motor. This happens with the help of gears and a belt.
- The damper, in turn, addresses pulses corresponding to the number of crankshaft revolutions to the ECU.
Crankshaft damper pulley VAZ 2110
The VAZ 2110 car has a crankshaft damper pulley. The pulley itself transmits torque to additional units. The part is a flat ribbed wheel with a special hole for installing a belt. To improve performance, automakers equipped the pulley with a damper. Damper - a rubber layer to dampen vibrations that occur in cars. However, with this innovation, the life of the pulley has been reduced because the damper loses elasticity due to excessive loads. Sometimes the pulley breaks completely, which is why the VAZ 2110 stops moving.
Possible faults
The crankshaft pulley is removed in the following cases:
- In the case of a VAZ 2110 hub turning. In most cases, this occurs due to careless repairs. The VAZ 2110 car is equipped with a special fixing sleeve, which is pressed into the gear. If installed incorrectly, it may fall out, which will cause the hub to rotate.
- In case of lubricant leakage from under the crankshaft oil seal. It needs to be removed and replaced with a new one.
New oil seal
- In case of strong resonance.
- Incorrect pulley type installations.
- Incorrect damper installation.
- A split in the place where the damper is installed. In this case, replacement is necessary, and better yet, together with the crankshaft gear.
- When removing the crankshaft - for repair work, changing bearings, etc.
Description of disassembling the mechanism
Disassembling the timing drive assembly on a VAZ 2110 with 8V and 16V engines is somewhat different; in the case of a 16-valve engine, some additional elements must be removed. Therefore, a description of the process will be posted specifically for it with reservations for the 8-valve unit. At the very beginning, you need to remove the protective plastic casing and, for greater ease of operation, remove the air filter housing and move it to the side. A sensor is installed below, opposite the crankshaft pulley. You need to disconnect the connector from it, unscrew and remove the sensor itself (this is not necessary in an 8-valve engine). Next, in both types of engines, you need to rotate the crankshaft to align all the marks on the camshaft pulleys and the engine housing. This alignment is checked by matching the mark and the slot on the flywheel; to do this, remove the rubber plug from the socket on the gearbox.
Carefully rotating the crankshaft, align all existing marks on the pulleys
Next, in order to disassemble the mechanism and remove the timing belt, you will first need to loosen and remove the alternator belt from the pulley. When performing this simple operation, the latter should be carefully examined. It is quite possible that it is also in poor condition, and at the same time the VAZ 2110 alternator belt will also need to be replaced. In cars equipped with power steering, this is an additional operation, which will be discussed below.
The next step is to loosen and unscrew the pulley bolt on which the VAZ generator belt of the tenth family is put on. To do this, jam the crankshaft with a screwdriver or a small pry bar and loosen the bolt with a spanner, after which you can remove the pulley itself. Now you can unscrew the roller, the timing belt tension will decrease, which will make it possible to unscrew and remove the support roller.
It is important not to lose the special washers that are located under the rollers (there is only one roller in the 8V engine). Disassembly is complete, the old timing belt can be removed
Preparatory work
Before you start work, familiarize yourself with the timing system diagram and the location of the marks on the camshaft and crankshaft.
This is what a detailed timing belt diagram looks like.
Diagram: 1. Crankshaft pulley. 2. Timing belt. 3. Water pump pulley. 4. Tension roller. 5. Intake camshaft pulley. 6. Upper timing belt protective cover. 7. Exhaust camshaft pulley. 8. Phase sensor synchronization dial. 9. Support roller.
A – TDC mark on the crankshaft pulley. B – Mark on the oil pump cover. C – Installation mark on the protective cover. D – Mark on the exhaust camshaft pulley. E - Mark on the intake camshaft pulley. F - Installation mark on the protective cover.
Tools for work
To carry out all the work you will need:
- New timing belt for the 16-valve VAZ-2112 engine.
- Socket head for “10” and “17”.
- The key is "17".
- Screwdriver.
- Tensioner pulley key.
Step-by-step replacement procedure
- First of all, after opening the hood, remove the negative terminal from the battery.
- Next, remove the timing belt protective cover by unscrewing 6 bolts using a “10” socket.
- Remove the chip from the crankshaft sensor. Read more about all sensors on the VAZ-2112.
- We unscrew one bolt that secures it and remove the sensor.
- You will then see that the pulley is missing a number of teeth, this is to allow the sensor to detect TDC and also block it in order to unscrew the pulley.
- Next, align this hole for the sensor with the pulley, and insert an object through the hole (a hex key with a “12” size works well - approx.).
- When the pulley is blocked, we “tear off” this generator nut.
- Then loosen the bolt on the tension pulley and remove the old timing belt. If necessary, we also shoot videos. Usually, along with replacing the belt, both the pump (water pump) and the rollers are replaced. We have already written in detail about checking the pump for play and about choosing a pump for a 16-valve engine.
- You can install a new belt by removing the tension roller, or by turning the exhaust camshaft pulley (pulley on the right side - approx.) with a key to “17”.
- We fix the crankshaft pulley bolt back and align the marks with the housing on the oil pump.
- Next, make sure that the pulley marks on the camshafts align and that the drive gear does not go astray.
- The next step is to tension the belt using a tension roller using a special wrench. However, if you don’t have one, you can use two nails and a screwdriver inserted between them.
- We tighten the belt until you feel its elastic state between the two camshaft pulleys. Don't forget to tighten the tension roller nut.
- Afterwards, we turn the crankshaft two full turns, if all the marks match and remain in place, then the work on replacing the timing belt can be considered complete.
- We tighten all the nuts until they stop, put the crankshaft sensor in place, connect the power supply to it and put the protective cover in place.
If all work is carried out in such a strict order, the entire replacement can be done with your own hands within an hour.
Belt tension on 8-valve VAZ engines
Before tightening the timing belt on the VAZ, the following preparatory work should be performed:
- Hang up and remove the right front wheel;
- Unscrew the 3 bolts securing the front timing cover;
- Remove the cover;
- Use a 17 key to loosen the tension roller.
After this, you should check the drive marks. One of them, located on the crankshaft pulley, must coincide with the installation tab of the rear cover. At the same time, check the mark on the flywheel. It should be flush with the alignment mark on the block boss.
IMPORTANT! In reality, it is not always possible to achieve an exact match of marks. Therefore, the mechanism is adjusted with an error of +/- 1-2 mm. This does not have a noticeable effect on the driving performance of the car.
If the marks match, the question of how to tighten the timing belt can be considered resolved.
Without removing the belt, it is necessary to move the weakened tension roller to the right so that the necessary tension occurs. After this, the roller is tightened tightly. To adjust the roller, a special “horned” key is used. If it is not available, you can use two Phillips screwdrivers, which are inserted into special holes on the roller. If the marks do not match, the timing belt on the VAZ-2109 must be removed from the pulleys. After this, the pulleys themselves are individually set according to the marks. It is better to start reinstalling the belt from the rear branch. After installing it, the roller is tightened.
IMPORTANT! When installing the timing belt on a VAZ-2114 and other front-wheel drive models, the pulleys located according to the marks can shift by 1-2 teeth. If this happens, the marks should be set with an error to the left, which allows you to compensate for the offset. After installing the belt, the pulleys themselves will move into the required position.
It is necessary to finish tensioning and fixing the belt, and then manually turn the engine 2-3 turns by the crankshaft pulley. To do this, it is convenient to use a “19” head with an extension. The gearbox must be in neutral. If after turning the marks have not moved relative to each other, the procedure can be considered completed. Assembly is carried out in reverse order. » alt=»»> The question of how to check the consistency of the tension should be answered. To do this, hold the strap between your thumb and index finger and turn it 90°. The technician must be able to do this, otherwise the belt is considered over-tensioned.
Honda GC 135 engine analysis
We directly disconnect the engine from the unit (remove the pulleys, starter flywheel, frame, etc.), we get the following:
We unscrew the cover bolts, pry the cover evenly around the perimeter (it sits on the sealant) and remove it, we get the following:
We remove the magneto and flywheel (lock the shaft, unscrew the nut and knock it off the cone by tapping). Don't forget about the keys, don't lose them.
Next is the crankcase. The plane of connection between the crankcase and the head is at an angle. We unscrew it around the perimeter of the crankcase (there are many of them), pry it along the seam with a strong screwdriver (it sits on the sealant). The direction of removing the crankcase is along the crankshaft, and not along the plane; the guide tubes are visible there in the photo.
We gained access to the crankshaft, later we will unscrew the two bolts with the numbers 12.
In order to avoid problems later when assembling and installing the timing belt in the correct position, we will make notes on the pulley and crankshaft gear relative to the marks on the belt. We remove the belt, unscrew the bolts on the crankshaft, remove the piston (here you will have to play around, since it comes out at a certain position. Remove the crankshaft. We received the following picture from the cylinder side
And then we are engaged in examining the problems. In my case, it was a ring on the piston (there were no scuffs on the cylinder). I bought the rings in a Honda brand store (on Google) for 1000 rubles, since the search for a cheap equivalent did not yield anything. Well, since the oil spilled through the air filter, then I carefully cut out the paper of the old filter, bought a regular filter for Lada cars (I don’t remember exactly which model for 100 rubles, the width and thickness were the same), removed the parallon, cut it to the required length and secured it with sealant. By the way, a native filter for GC135 costs approximately 500-600 rubles.
We received a new filter. When assembling, we clean anything, remove old silicone, degrease, apply sealants where necessary, check for unnecessary parts. After assembly, the engine does not start on the first try, so do not be alarmed
Features of labeling
Before installing another timing belt, it is better to set the crankshaft and camshaft to the specified marks from the very beginning. We set the gears to 0 position. Points A, B, C, D, E, F must match as shown in the picture. After this, you need to set the marks on the camshafts and the belt casing in the same position.
To check the location of the crankshaft, remove the plug from the box, which is installed under the thermostat, and look for the flywheel. If the marks on the camshaft and the casing match, then there should be a match in the cut on the flywheel and on the metal casing.
All alignments must be clear, the marks must match for proper operation of the belt. After the mark is installed on the flywheel, it must be fixed in this position so as not to break off the thread. And then, as mentioned, you can begin to tension and adjust the timing belt.
Installation of all shafts according to marks
First check that the gear is in neutral.
There is a rubber cover on the crankcase body closer to the clutch assembly. It needs to be removed. The point is to achieve alignment of the marks on the flywheel and in the scale slot. When this is done, fix the flywheel with a screwdriver.
Of course, it is easier to perform such an operation with two people. Know that the desired position of the shaft corresponds to the alignment of marks AB and CD (see figure).
The crankshaft itself must be rotated to the right using a 17 or 19 key (motor 11183).
The meaning of this is illustrated in the photo. The alternator belt must be removed.
The alternator belt blocks access to the timing drive parts. You will have to loosen the fastening and remove this belt.
Use a 13mm wrench to loosen the lower mounting bolt. Then unscrew the upper fastening nut and remove the bolt. The generator casing is pressed against the engine and the structure is secured with wire. The belt can now be removed. Installation of the alternator belt is carried out in the following sequence:
1
.
Secure the generator; 2
.
Throw the belt over the pulleys, as shown in the photo; 3
. Having engaged 5th gear, roll the car back.
Please be aware that reusing the alternator belt is a last resort. It would be better to buy a new part.
Manufacturer's recommendations
- Your primary task as a car owner is to periodically visually inspect the unit.
- In addition to replacing the element, it is necessary to simultaneously replace the tension rollers.
- VAZ 2110 comes with 8 and 16 valves. The replacement process also depends on this. So, in an 8-valve valve, one tension roller is installed, and in a 16-valve valve, a support and a tension roller are installed.
Replacing the timing belt of a dozen is not difficult. It is not necessary to contact specialists. It is quite possible to do it on your own.
Set of tools
To complete the job of replacing the timing belt you will need:
- A set of spanners and open-end wrenches;
- Mount;
- Screwdriver Set;
- A special key with which to tighten the roller or simple pliers with curved rings;
- Car jack;
- Rags, protective gloves.
Many people ignore the advice on using gloves. Especially in the summer when it's hot. But they are needed to protect you from injury.
There is no need for an inspection hole. You will need to remove the right wheel to remove the timing belt if your Ten is equipped with power steering. So you can't do without a jack.
Parts from the VAZ catalog
Let’s immediately look at the list of VAZ components and special tools:
- Tensioner roller for internal combustion engine 11183 – 2108-1006120, nut for it – 00001-0021647-21;
- Timing belt (11183) – 2108-1006040-10;
- Automatic tension roller – 21116-1006226;
- Timing belt (11186/21116) – 21116-1006040;
- Key for automatic roller – 67.7812.9573-01;
- Key for roller VAZ-11183 – 67.7834.9525.
The tension roller of the "2108" family has two slots on one side. These slots should look “up”, that is, away from the engine.
Tensioner roller for motor 11183
The slots were made for special tools. It is designated by the numbers “67.7834.9525” (see list). And for automatic rollers, the key is designated differently - “67.7812.9573”. What it looks like is shown below.
The automatic roller can also be adjusted
It remains to list how the mounting bolts, washers, etc. are designated:
- Three bolts for the VAZ-11183 cover – 00001-0009024-11, washers – 00001-0026406-01;
- Timing drive cover (11183) – 21080-1006146-10;
- Bolts for VAZ-21116 covers – 2108-1003286-00, spring washers – 00001-0011977-73;
- Top cover – 21116-1006226-00, bottom cover – 21116-1006218-00.
We hope no questions arise here.
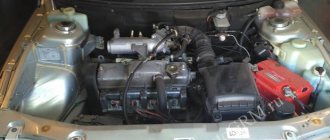
Lada 2112 2007, 89 l. With. - with your own hands
Lada 2112, 2007
Lada 2112, 2007
Comments 48
I don’t know what they write about here regarding belt tension on 2112, on PRIOR everything is tightened little by little through the tension roller. The right branch of the belt through the guide roller should already be laid: - through two camshaft pulleys, a crankshaft toothed pulley, through a pump and have sufficient tension. In this case, the marks on the camshaft pulleys and the crankshaft toothed pulley must be fixed using the corresponding counter marks
In this position, holding the belt with your hand on the left side of the branch, on the side of the tension roller, so that it does not weaken and does not jump over the teeth, no matter where and in what place (and this is possible even for one tooth), we place or slip the tension roller under the belt , insert its bolt and tighten everything with such a turn of the roller by hand that the belt does not loosen and does not jump over the teeth
Next, spin the engine several times, or maybe it’s better, by the wheel with 4-5 gear engaged, and make sure that all the marks on all the pulleys match perfectly. How to recognize the mark on the ring gear of the generator drive pulley on the crankshaft, I have already written below and given a drawing. With the wheel removed and the stand hanging with the steering wheel turned, this ring and the DPKV are clearly visible, or almost well, through the mirror.
Then, after cranking the engine several times by hand, carefully, slowly - and what the hell is not joking, the marks didn’t match when parked and the valves were bent with the starter, yikes, then you begin to tighten the roller to working condition. At the moment when, when cranking the engine, the right branch self-tensions when viewed from the side of the pulleys - and the left one weakens, this is where you need to tighten the roller - like how everyone around writes and rips off each other. On a Priora, the tension of the roller can be general or weak, the belt will jump, or the roller may be pressed against the belt so that it and other damn spare parts will feel sick
At the moment when, when cranking the engine, the right branch self-tensions when viewed from the side of the pulleys - and the left one weakens, this is where you need to tighten the roller - like how everyone around writes and rips off each other. On a Priora, the tension of the roller can be general or weak, the belt will jump, or the roller may be pressed against the belt so that it and other damn spare parts will become sick.
Don't be afraid to start the engine to see how your video lives when the engine is running. Nothing will happen to either the belt or the roller when adjusting in a tightened state. The main thing is that the belt does not dangle too much, otherwise it will either fly off or fly like plywood over the toothed pulleys and fucking bend the valves. If the tension roller is dead, overtightened, the belt may hum a little from the overtightening, which in turn will affect on a PUMP, therefore, it will not last long due to a strongly tightened belt (of course it will not immediately fall apart) - then we begin manipulations to tension the roller. The ROLLER on the Priora should be alive when the engine is running. It should vibrate inconspicuously on the tension spring and this is clearly noticeable, and when you press the gas sharply it jumps, pushing up well with the belt and this can be seen even by a blind mole.
What is written in the Talmuds about how to pull a roller does not always coincide with reality. Therefore, it may be that when you set it up as written in the bible for dummies, the roller will simply rest in peace and will not work properly. Therefore, everything is relative to different manufacturers and defects.
In general, honestly, it’s better to under-tighten the roller a little than to over-tighten it. The roller, the pump and the belt will live. The main thing is to watch and listen for extraneous sounds in the timing belt area.
More than once I had cases where the belt was about to fly off, dangled and shouted, pull me up, even rubbed the protective cover. The casing probably saved the day because the belt did not fly off and the piston did not stick into the valves.
But for those who have plugless pistons, they are destined to drive on loose belts. Well, just think, it fell off, hey, hey, but everything lasts a long time and doesn’t break. By the way, the tenth cans have 2110 and some others may have rollers with flanges, they don’t have to worry too much about it, these rollers won’t let the belt fly off just like that from weakness. — It’s okay to slip over the teeth of the pulleys, well, just think, the traction has dropped or it’s completely stalled, corrected it, tightened it and again the gas is up to the limit. The main valve head and pistons cannot be killed. They already write on the Internet that AvtoVAZ began producing engines with 98 hp. and 106 hp with plugless pistons - Freebie please! But the 1.8 liter engines are 122 hp. Not yet, just look for and install such pistons yourself.
So, change the pumps themselves and the safety belts. brr timing belt and don’t be afraid of anything. The main thing is logical thinking and the right approach to what you want to do.
REPLACING THE VAZ 2110 TIMING BELT (16 VALVES)
Not every car enthusiast knows how to replace the timing belt on their own. For 16 valves this procedure is carried out slightly differently than for 8 valves.
First of all, you need to remove the protection casing.
Remove the “chip” from the crankshaft sensor and unscrew the bolt. After this, remove the sensor itself.
The pulley is missing a tooth that allows the crankshaft sensor to find top dead center. In addition, the missing tooth is necessary to lock the crankshaft and tighten the pulley mounting bolt.
The pulley must be aligned with the hole for the crankshaft sensor. A tube of suitable size or some other suitable object must be inserted into this hole. We block the pulley, unscrew it and remove it.
We loosen the tension by unscrewing the tensioner nut and remove it.
We insert a new belt. You can do this in two ways, depending on what is convenient for you. This is done by turning the right camshaft with a wrench or by removing the tensioner roller.
We fasten the bolt that serves to secure the pulley, then align the marks of the belt drive gear. If there is no mark on the oil pump housing, you can use the flywheel marks as a guide. Afterwards, you can make a mark yourself to make it more convenient.
We align the marks on the camshaft pulleys, paying attention to the fact that the drive gear marks must certainly match. We use a tensioner roller and a special key to tension the part.
If you don't have such a key, you can use two nails and a screwdriver or pry bar that needs to be inserted between them. You can also use forks by first removing the two front teeth and shortening the two outer ones to half by bending them. Finally, be sure to tighten the tensioner nut.
We use a tensioner roller and a special key to tension the part. If you don't have such a key, you can use two nails and a screwdriver or pry bar that needs to be inserted between them. You can also use forks by first removing the two front teeth and shortening the two outer ones to half by bending them. Finally, be sure to tighten the tensioner nut.
Check the tension by pressing your finger up and down.
- We turn the crankshaft exactly two turns, and then check each mark. If they all match, the pulley can be screwed on. Otherwise, repeat steps 6 – 9.
- After everything is done, we return everything to its place and start the engine.
Now the replacement can be considered completed. As we now see, this procedure takes a little longer, but it is not much more complicated.
Possible malfunctions in the electric generator drive and ways to eliminate them
Replacing the fuel line of a VAZ 2110 with your own hands
Malfunctions in the belt drive of an electric generator during use, of course, manifest themselves in different ways:
- you will like the whistle of the unfamiliar drive layout;
- This is a weak generator voltage, due to weak tension and repeated slipping of the belt drive. Slippage occurs even with normal, standard belt tension due to water, antifreeze or oil getting on the working elements of the drive;
- more unsafe for the motor and very strong tension in the drive. Due to excessively huge loads, bearings are destroyed (how to change a bearing on a VAZ 2114 generator?), gears or shafts are damaged, and in addition, sometimes the belt breaks. Here the upcoming movement will be unrealistic until it is replaced with a new, working one. The worst situation is when a gust occurs on the highway, in a deserted place. Driver practice suggests that this does not happen very occasionally.
We carry out what remains to be done for our client without panic and in no hurry. What remains for our client to do is trivial, weakly tightened, strongly weakened. Roller when moving
This is my personal method for tensioning the timing belt.
, I think many people will need this. And if you need it, there will be belts.
Attention! Experts and experienced car enthusiasts advise having a new belt in a spare set in the trunk, although a driver can learn how to correctly tighten the alternator belt on a VAZ 2114 in 10 minutes. And they recommend reading how to remove the alternator belt, so that you can be “savvy” for any occasion
Since the condition of the belt drive
Since the generator is a fundamental problem, monitoring it is the responsibility of the driver. Checking the belt is quite simple - you just need to simply press it with a force of 10 kg to check the deflection. For an electric generator of brand 9402.3701 it is 0.6 - 0.9 cm, for brand 37.3701 - 1.0 - 1.5 cm. Today, you need to inspect the cleanliness of all parts of the drive.
If the driver hears that the generator belt is whistling, then immediately, immediately, you need to check the condition of the belt drive. It exists that if the belt is really loose, it can twist and break at high speeds.
When, if during inspection it is determined that weakening occurs, then it is necessary to tighten the generator belt. For this purpose, you need to perform a number of easy steps and keys from “10” to “13”.
- Place the car on a level surface and set it to speed and handbrake.
- Open the hood and before tightening the
alternator belt on the VAZ 2114, use a key set to “13” to loosen the nut securing
the alternator housing
to the adjusting rail.
Loosening the lower bolt of the VAZ 2114 generator
Using a key set to “10”, tighten the adjusting screw of the tensioner mechanism, while the body of the electric generator should move along the rail towards the front of the machine.
Alternator belt tension
- As the tensioner screw rotates, the belt deflection must be kept under control. If it is within the norm for the type of electric generator installed on the machine, you need to use a “13” key to firmly tighten the nut on the adjusting rail
. - When the fastening nut is tightened, you need to turn the crankshaft twice by hand and check the deflection again. If it turns out to be within the normal range, then, after starting the engine, you need to check the operation of the belt drive in operating mode. During this check, there is no extraneous noise; the belt should spin without bending and without moving to the side.
When is replacement required?
The belt has a resource - a set service life. If this period has expired, the spare part must be replaced even if it looks normal. After all, a break can happen at any moment.
When asked how many kilometers it is necessary to replace the belt so that the belt does not break, experienced car enthusiasts give different answers. Some believe that after 50–60 thousand kilometers. Others clarify: this replacement period is relevant for an 8v (eight-valve) engine. If a 16v (sixteen-valve) engine is installed, then replacement must be done after 30–45 thousand kilometers.
In the video, a practitioner shows what timing belts look like after a long run and whether advertising should be trusted. Filmed by ExpertR channel.
Checking the timing belt
According to the documents that come with the car, the belt synchronizing the movement of the shafts has a service life of 45 thousand kilometers. However, it may fail even earlier due to increased load or insufficient attention to the car engine.
A performance check should be performed every 15 thousand kilometers. To do this, you need to remove the cover from the timing belt drive.
- First of all, check the belt tension adjustment tab: the cutout of the inner roller disk should coincide with the tab located on its rectangular plug. Even if the differences are minor, this consumable must be replaced.
- Then inspect the external part of this Lada Grant component. Make sure there are no signs of wear, oil, sludge, threads.
- At the end, the belt must be integral, without any separation into layers and fibers.
The Lada Granta has an eight-valve engine with 87 horsepower installed in the elevator housing. When the timing belt is damaged on this engine, the valves on the pistons are bent, putting you at risk for difficult engine repairs.
When purchasing the component, please note that Grant uses a 113 tooth belt that is 17 millimeters wide. Replacement
a faulty component with the proper selection won't be needed anytime soon, so examine the new part carefully before purchasing.
Automotive enthusiasts recommend purchasing Gates spare parts from the USA. The good thing is that official support can tell you the address of the nearest store where they sell high-quality spare parts. The price of a repair kit (belt and roller) is about 3,000 rubles. At the same time, you will receive a high-quality product, the resource of which is approximately twice as long as that of stock one (about 80 thousand kilometers).