The alternator belt in the practical station wagon of domestic origin Lada Largus is one of the consumables and is subject to periodic and timely replacement in accordance with the manufacturer's regulations. To correctly select the specified product, if replacement is required, the owner will need to become familiar with the types of belts and methods of performing repair operations.
In our material we will look at the features of these consumable components and the sequence of actions during self-replacement on Lada Largus modifications equipped with 8-valve versions of engines.
What belt is Lada Largus? Dimensions and articles
We must start with the fact that over the entire production period, the Lada Largus has been equipped with 4 types of engines - 8- and 16-valve engines produced by Renault (not currently installed) and 8- and 16-valve units of the AvtoVAZ family.
Renault engines could be additionally equipped with power steering and air conditioning, while AvtoVAZ engines could only be equipped with air conditioning. Accordingly, the belts themselves and their replacement are different.
So, let's start with the analysis of Renault engines.
Alternator belt Lada Largus (K7M Renault 8-valve engine) without power steering and air conditioning - size and article number
The simplest configuration without air conditioning and power steering is the 4PK715 belt, i.e. 4-ribbed belt, 715 mm long.
Alternator belt Lada Largus (K7M Renault 8-valve engine) without power steering with air conditioning - size and article number
Engine 8 valves without power steering, but with installed air conditioning - Renault 117200593R belt (or 6PK837 - 6 ribbed belt 837 mm long).
Alternator belt Lada Largus (K7M Renault 8-valve engine) with power steering without air conditioning - size and article number
The 8-valve Lada Largus K7M with power steering and without air conditioning uses a 5PK1110 alternator belt (5 strands and length 1110 mm).
Alternator belt Lada Largus (K7M Renault 8-valve engine) with power steering without air conditioning - size and article number
Drive belt Lada Largus with power steering and air conditioning (8 cells K7M and 16 cells K4M)
On cars with power steering and air conditioning (8kl K7M and 16kl K4M engines) a 6PK1822 belt is installed - 6 strands and length 1822 mm.
Drive belt for LADA LARGUS equipment (16 cells K4M) with power steering without air conditioning
On a Lada Largus with power steering, but without air conditioning (16kl K4M engine), a 6PK1200 alternator belt (six strands, size 1200 mm) is installed.
As for Renault engines, everything is clear. All that remains now are the engines of the AvtoVAZ family. You can find out more detailed information about belts in our material Lada Largus generator belts for VAZ engines.
Option 3
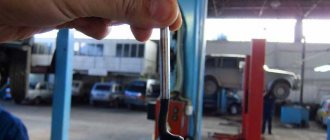
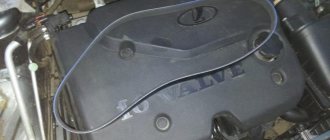
To check the tension of the alternator drive belt on a car without power steering and without air conditioning, press the belt with your thumb...
... in the middle between the generator and crankshaft pulleys.
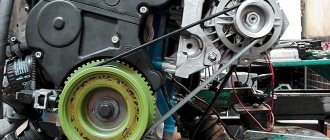
Alternator drive diagram for a car without power steering and without air conditioning
:
2 – bolt securing the generator to the tension bar;
4 – bolt of the lower mounting of the generator;
5 – generator drive belt;
6 – auxiliary drive pulley With pressing force
10 kgf, the belt deflection should be 6 - 8 mm. To tension the belt, remove the right mudguard of the engine compartment (see.
“Removing the engine compartment mudguards”).
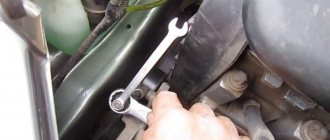
Loosen the tightening of bolt 4 of the lower generator mounting and bolt 2 of the generator mounting to the tension bar. Moving the generator away from the engine cylinder block with a mounting blade, tighten the belt. Tighten the generator mounting bolts.
Do not overtighten the belt! Excessive belt tension leads to premature failure of both the belt itself and the generator bearings. When replacing the belt, loosen its tension (see above) and remove the belt from the crankshaft and generator pulleys. The marking of the alternator drive belt on a car without power steering and without air conditioning is 4РК 718 (four-wedge, 718 mm long). Install the generator drive belt in the reverse order and adjust its tension. To accurately check the belt tension, you must contact a service center.
Replacing the alternator belt Lada Largus 16 valves K4M with air conditioning and power steering
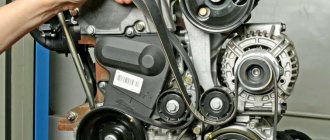
1. First of all, we drive the car onto a viewing hole, overpass or lift and remove the right side of the plastic engine boot.
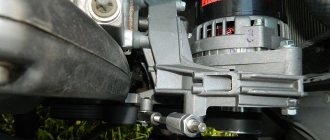
2. Use a 15″ spanner to turn the tension roller bolt clockwise to loosen the belt tension.
3. Remove the belt from the parasitic roller and power steering pulley.
4. Then remove the belt from under the hood.
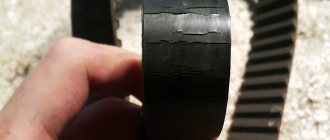
5. When replacing the Lada Largus generator belt, it is recommended to simultaneously change the support and tension rollers, since they are designed for a certain service life and must be replaced. However, due to the high cost of these two rollers, many people neglect the importance of replacing them.
6. Using a 13″ spanner, unscrew the bolt securing the parasitic (support) roller. And remove it along with the lower and upper covers.
7. Using a 10″ spanner, unscrew both bolts securing the automatic tensioner and remove it.
8. Install new parasitic and tension rollers. We lay the new belt in streams and assemble everything in the reverse order. At this point, replacing the Lada Largus alternator belt is considered complete.
Drive belt tightening for Lada Largus
The installation diagram and location of the generator belt suggests that the Largus system automatically, that is, independently, tensions the element. This means that no additional interventions or manipulations are required.
This only applies to trim levels with air conditioning and power steering. You really don't have to do anything here.
If you have a different configuration, then you will still have to tighten the alternator belt yourself.
But first you need to understand that the part generally needs tightening. In general, to check the tension, the official instruction manual states the need to use a strain gauge tester. The only problem is that such equipment is available only at dealerships. There is absolutely no point in looking for and buying it for personal use. Here you can resort to another method. Namely:
- remove the mudguard from the engine;
- move under the car, which needs to be hung on a lift or placed over a hole;
- press on the lower branch of the belt so that it bends by 7-8 mm;
- if the belt moves easily, the tension is weak;
- loosen the 2 bolts securing the tension element bracket;
- turn the adjustment screw counterclockwise;
- achieve the desired tension level;
- tighten previously loosened bolts;
- Try not to tighten the part too much, as this will cause it to fail prematurely.
This completes the tightening. Check the result of the work done in action.
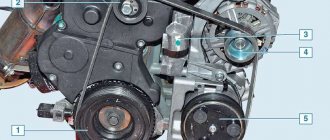
Lada Largus alternator belt installation diagrams
When installing a new belt, problems may arise with its passage through the rollers and pulleys. To avoid such problems, I recommend that you familiarize yourself with the diagram for installing belts on Lala Largus:
Take off777777777ok
Mounting points for the mudguard and fender liner: 1 — screw with a Torx T-27 key for general fastening of the mudguard and fender liner to the wheel arch; 2 — two Torx T-20 screws for general fastening of the mudguard and fender liner to the wheel arch and fender; 3 - Torx T-20 key screw for fastening the fender liner to the wing; 4 — four self-tapping screws “8” for fastening the fender liner to the wheel arch; 5 - four Torx T-20 screws for fastening the fender liner to the front bumper. Mounting points for the mudguard and fender liner: 1 — screw with a Torx T-27 key for general fastening of the mudguard and fender liner to the wheel arch; 2 — two Torx T-20 screws for general fastening of the mudguard and fender liner to the wheel arch and fender; 3 - Torx T-20 key screw for fastening the fender liner to the wing; 4 — four self-tapping screws “8” for fastening the fender liner to the wheel arch; 5 - four Torx T-20 screws for fastening the fender liner to the front bumper.
We install a height-adjustable stop under the engine oil pan so that it takes on the weight of the engine.
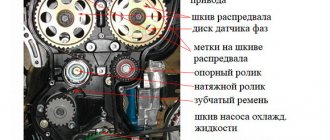
Replacing the timing camshaft on a Renault Sandero
If you are the owner of a Renault Sandero, it will be useful to know how to replace the timing camshaft.
First of all, you need to unscrew the bolt that secures the oil level indicator guide tube bracket to the air exchanger bracket. To do this, take a 10mm wrench head.
We recommend
Then remove the guide tube from the engine oil pan socket along with the oil level indicator. A rubber ring seals the guide tube in the socket of the pan.
Now we take the head of the key 8, with its help you should unscrew the 2 bolts that secure the eye. Remove it together with the air exchanger bracket.
Using the same socket, remove the 24 bolts that hold the cylinder head cover.
A slotted screwdriver can play the role of a lever; with its help you need to pry the cylinder head cover by the bosses. Just rest the screwdriver on the inlet pipe. To avoid damaging it, place a piece of cloth under the screwdriver. Now remove the cylinder head cover. Then remove the two rubber-metal plugs from the cylinder head. Remove the intake and exhaust valve shafts from the cylinder head beds.
To see if the valve lever hydraulic support is in good condition, dismantle the lever and pull it out of the cylinder head socket.
How to check the hydraulic support? Hold it by the body and press the sphere-shaped plunger head with your thumb. If everything is in order, you will have to apply quite a lot of force to press it. However, if it presses easily, then the hydraulic support needs to be replaced.
Before installing a new hydraulic mount, you should pour engine oil into the basin, then put it there and press the plunger 2-3 times. This is necessary to release the air from it. If everything is done correctly, the hydraulic support will become stiffer and will not spring back. Using the same technology, we dismantle the levers and see if the hydraulic supports of the levers of other valves are in good condition.
Note! You should make notes on how the elements are located in the cylinder head, otherwise, when you start putting them back together, it will not be easy to put the part in its original place. When assembling the timing belt, new camshaft seals should be installed.
To remove the pulley, you will need to lay the shaft in the cylinder head bed. Then you need to put a 18mm spanner on the nut that secures the camshaft timing pulley. Insert a strong screwdriver into the hole in the pulley. When you rest it on the pulley spoke, you need to press the shaft of the screwdriver onto the key to turn it (counterclockwise).
Make sure that the camshaft pulley does not rotate, and the nut will begin to unscrew. When it is unscrewed, you can remove the pulley from the camshaft toe and remove the oil seal. We remove the oil seal from the second camshaft in the same way.
2163-13-12-010
...so that it is shifted to the inner edge of the pulleys, and the outer groove of the pulleys remains free.
...so that it is shifted to the inner edge of the pulleys, and the outer groove of the pulleys remains free.
...so that it is shifted to the inner edge of the pulleys, and the outer groove of the pulleys remains free.
We adjust the belt tension (see above). To accurately check the belt tension, you must contact a service center.
[How to save on maintenance of Lada Largus] [Maintenance of Lada Largus at 15,000/45,000/75,000/105,000 km] [Maintenance of Lada Largus at 30 thousand km] [Maintenance of Lada Largus at 60 thousand km of run] [Maintenance of Lada Largus for 90 thousand km of run] [Maintenance of Lada Largus for 120 thousand km of run] [Independent maintenance - general recommendations] [Safety rules for self-carrying out maintenance] [Tools required for carrying out maintenance Lada Largus maintenance] [Lamps used in the Lada Largus car]
Lada Largus: replacing the drive belt for auxiliary units of an 8-valve engine
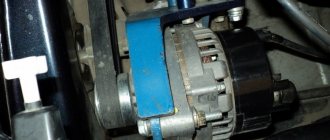
Why does the generator fail?
The generator itself has a simple structure; if you want, it’s a regular electric motor (only made to allow for large current generation), try to spin a regular electric motor and attach a light bulb or LED to it, it will start to light up - and there you have it, an elementary current generator.
Someday I will have an article in which I will tell you what the generator consists of. BUT today it is simple and exaggerated - this is the rotor (moving part), stator (fixed part), brush assembly, relay regulator, and of course the housing in which the whole thing is located.
And now the actual breakdowns.
- The bearings are jammed. This is a fairly common problem with already worn-out generators, the rotor in the housing spins on bearings, from time and moisture (dirt), they wear out and simply jam or wedge. If there is a wedge, then this is one thing - the rod stops rotating. But if wedging occurs, it is difficult to notice; the rod may or may not rotate. In any case, with such symptoms, the belt that turns the generator from the engine is more likely to break. THIS IS THE FIRST CALL.
- The winding on the stator or rotor has burned out. It is there in any case and most likely will be on the stator, so - also from moisture (salt on the roads), it can be corroded and it will simply short out or simply burn out, since copper wires are used there. Accordingly, current generation will stop.
- Failure of the brush assembly. This is also very common, brushes are graphite (often square) rods that run along the stator tracks. So, from time to time they simply wear out and need to be replaced.
- Failure of the regulator relay. This relay prevents the generator from recharging the battery, bringing the voltage and current within the desired range. Often it also fails and the battery does not charge at all! Need to watch.
In general, for these 4 main reasons, the generator may not work, so it must be checked before purchasing a new battery. It's likely that this is what you're dealing with.