In car components you can find many parts that have a complex structure. It is not recommended to disassemble them yourself, but rather seek the help of specialists for repairs.
But there are components in a car that a car enthusiast can disassemble and assemble with his own hands, even without deep knowledge of the structure of the components. These parts include the generator belt tensioner.
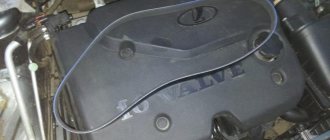
When creating the LADA Granta car, the designers of the Volga Automobile Plant took into account many shortcomings of previous models, many things were improved and finalized, but the unforgivable mistake of the developers of the Granta model with eight-valve VAZ-11183, VAZ-21116 and VAZ-11186 engines was the inability to properly tension the alternator belt.
Why the designers did not install an alternator belt tensioner on the Lada Granta remains a big mystery, but this inconvenience creates a lot of problems for Granta owners and forces them to often contact a car service center.
Photo 789
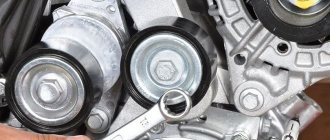
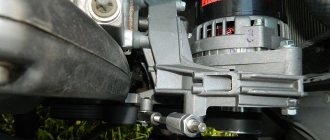
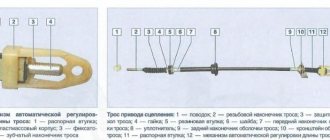
Diagram of the drive of auxiliary units: 1 - drive pulley of the auxiliary units;
2 — tensioner roller; 3 — tension device; 4 — generator pulley; 5 — air conditioning compressor clutch pulley; 6 — auxiliary drive belt; 7 — bracket for the right support of the power unit. Diagram of the drive of auxiliary units: 1 — drive pulley of the auxiliary units; 2 — tensioner roller; 3 — tension device; 4 — generator pulley; 5 — air conditioning compressor clutch pulley; 6 — auxiliary drive belt; 7 — bracket for the right support of the power unit
This is interesting: How often to change brake discs and pads
Snapshot53252323
Marking of the drive belt for auxiliary units 6РК 995 (six-V-ribbed, length - 995 mm).
Marking of the drive belt for auxiliary units 6РК 995 (six-V-ribbed, length - 995 mm).
In order to improve visual control, remove the plastic engine casing. To check the condition of the belt, engage fifth gear in a manual transmission, push the car (or rotate the suspended wheel) and inspect the belt along its entire length. On a car with an automatic transmission, remove the right mudguard of the engine compartment and, by rotating the crankshaft by the bolt of the auxiliary drive pulley, check the condition of the belt.
With any of the gearboxes, the following method is also possible: apply chalk marks to sections of the belt and, turning on the starter for short periods of time, turn the crankshaft at small angles. We inspect the belt along its entire length, checking the areas covered by the marks.
The belt should not have cracks, tears or separation of rubber from the fabric base. A defective belt must be replaced. To do this, from the engine compartment side...
2302-6-01-03_cr
So far we have shown steps that will allow you to change the tension of the accessory drive belt if necessary. But to replace the belt, we need to disassemble the right power unit holder, since it passes through the belt.
Remove the center and right wings of the engine compartment from the bottom of the car. You can see how to do this in the article “Replacing the Lada Granta coolant.” Next, you should remove the wheel arch liner of the right front wheel or, having loosened all the fastenings of the wheel liner in the front and middle parts, fold the wheel liner behind the brake disc of the wheel.
We go out and remove the right front wheel and release the fender liner supports according to the diagram.
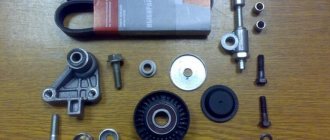
Instructions on how to assemble a tensioner on a grant
Any Grant has space for installing a tensioner. To assemble this you will need:
- generator bracket from Kalina;
- tension roller and its bracket;
- screw tensioner;
- new belt from Kalina;
- bushings and bolts.
Assembly diagram, full list of parts with article numbers, see below:
The tensioner is not installed from the factory in order to save money. SCHEME: Lada.online
in detail here:
General questions about working with the Grant generator
Let's consider general questions: everything except replacement.
Tension check
There are two approaches: visual assessment and physical.
Visual assessment of condition:
- the car is on a flat surface, the gear is in neutral, the handbrake is off, the hood is open;
- We don’t start the car - we put it in 5th gear;
- We opened the hood and found a generator: we push the car back, resting against the bumper;
- We inspect the required part along its entire length: are there any breaks or cracks? It needs to be changed.
Poor quality will lead to unexpected problems on the way.
Physical assessment:
- if you have a tool that measures pressure force: press the belt with a force of 10 kg*s - the deflection should be no more than 10 mm;
- there is no special tool: we try to turn it across - it should turn no more than 90 degrees.
How to tighten the alternator belt on a Grant
This section applies only to machines with a tensioner. No - change the part or see above how to install it.
Subsequence:
- we use ring wrenches 8, 19;
- Throw key 19 onto the lead screw;
- wrench 8 for locknut;
- we touch;
- Now you can turn the lead screw: clockwise to loosen, counterclockwise to tighten;
- got the desired result - tighten the locknut.
It is better to take ring wrenches, since a head with a ratchet or a wrench will not work.
When to change: technical regulations for replacing a VAZ 2190 belt
AvtoVAZ requires checking the condition of this part every 15,000 kilometers .
every 30,000 kilometers, regardless of condition.
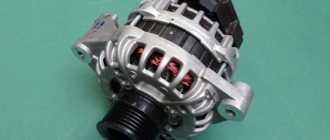
How to remove a generator on a Grant
It needs to be removed for repairs, replacement of bearings or rollers.
The step-by-step process involves:
- remove the negative terminal from the battery;
- working with the generator: disconnect the wiring harness from it;
- remove the cover of the power wire nut, remove the nut and remove the wire from the bolt;
- unscrew and pull out the upper and lower fastening bolts - to work with the lower one, you may need to climb into a hole, throw off the tin protection of the internal combustion engine and dismantle it from below;
- move the part to the right mudguard, remove the belt, and remove it.
You can do without a hole . Example:
To work with the generator and to replace the belt you need:
- set of spanners, Torx t20 and 27, ratchet with heads or wrench, knife;
- if there is no tensioner, you can assemble and install it;
- if there is no air conditioner, replacement is easiest;
- is there air conditioning? To work, you need a pit or a lift with dismantling the engine support;
- They change consumables every 30 thousand mileage according to regulations.
What is needed to replace the Lada Granta
Tool
For work we will need:
- sharp knife (remove old belt);
- a longer flat-head screwdriver;
- wrench to “13”;
- new belt. Catalog number 1118–1041020–07, size – 823 mm.
When going shopping, take the old belt with you.
Options offered on the market (photo)
Finwhale belt Gates belt Rosteco belt Lada belt
Replacement instructions
The belt is replaced as follows:
- We remove the defective belt.
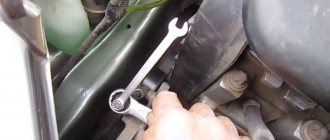
- Using a “13” wrench, loosen the bolt securing the generator from below. You need to loosen it slightly without unscrewing it all the way.
- Unscrew the top mount and remove the nut and bolt.
- Use extreme caution. Rotating the generator until the upper eye is exactly behind the surface of the protrusion on the bracket, we will fix them in this position with ordinary wire.
- We put the belt on the generator pulley (pictured 2), and on the top of the drive pulley (pictured 1).
- Having engaged fifth gear, we push the car back. We need to rotate the drive pulley so that the belt lies in its place.
- We remove the wire and carefully use a screwdriver to move the generator to its original position.
- We return the upper bolt and nut to their place, tighten them, then tighten the lower one.
We put a new belt on the pulleys.
This is how the belt on an 8-valve engine is replaced in a car without air conditioning. Then you can start the engine and load the generator to check - turn on the heating, high beams, and other devices.
The 8-valve valve is installed only on the cheapest configurations - the norm and the standard. The Lux received a 16-valve power plant. Replacing the belt on it is not much different from other models with the same motor.
Video on replacing the alternator belt on an 8-valve Granta
We check the condition of the alternator belt ourselves
To make sure that the belt is in good condition, you need to perform simple steps. Initially, fifth gear is engaged. On it, leaning on the front bumper, we try to push the car back. At the same time, we are trying to conduct a visual inspection of the belt along its entire length.
All the grooves have been cut off, the belt is on the verge of breaking
There, according to the general rule, there should be no cracks, even the smallest ones, as well as ruptures and peelings that occur due to long-term use of rubber products.
This belt is no longer any good.
If such problems are found, the belt must be replaced. The timing belt is checked in the same way.
Take off777777777ok
Mounting points for the mudguard and fender liner: 1 — screw with a Torx T-27 key for general fastening of the mudguard and fender liner to the wheel arch;
2 — two Torx T-20 screws for general fastening of the mudguard and fender liner to the wheel arch and fender; 3 - Torx T-20 key screw for fastening the fender liner to the wing; 4 — four self-tapping screws “8” for fastening the fender liner to the wheel arch; 5 - four Torx T-20 screws for fastening the fender liner to the front bumper. Mounting points for the mudguard and fender liner: 1 — screw with a Torx T-27 key for general fastening of the mudguard and fender liner to the wheel arch; 2 — two Torx T-20 screws for general fastening of the mudguard and fender liner to the wheel arch and fender; 3 - Torx T-20 key screw for fastening the fender liner to the wing; 4 — four self-tapping screws “8” for fastening the fender liner to the wheel arch; 5 - four Torx T-20 screws for fastening the fender liner to the front bumper.
We install a height-adjustable stop under the engine oil pan so that it takes on the weight of the engine.
With him
Using the E-14 head, unscrew the two screws securing the support to the engine cylinder block bracket. Using a 17mm socket, unscrew the two nuts and the bolt securing the support to the body side member (shown by arrows).
Using the E-14 head, unscrew the two screws securing the support to the engine cylinder block bracket. Using a 17mm socket, unscrew the two nuts and the bolt securing the support to the body side member (shown by arrows).
DIY replacement instructions
A Lada Granta 8-valve car requires replacement of the alternator belt in the same way as a 16-valve car after identifying defects or according to the regulations. The procedure can be performed by a driver who does not have much experience in repair work. It is enough to have the necessary tools and basic knowledge of where the components that require replacement are located.
Tools and materials
Before replacing, you need to purchase a new alternator belt. In order not to make a mistake with your choice, you should look at the catalog number in the operating instructions. It should be 1118-1041020-07. The size should be 823 mm.
You should buy originals so as not to buy a fake or low-quality product. The packaging should be marked 6РК 823. You should not save money by buying a cheaper product. A low-quality belt will not last long, and the consumables will have to be changed earlier than required by regulations. High-quality belts are produced by Bosch and Gates.
You should also buy a tensioner pulley if you decide to change it too.
In addition to consumables, you need to prepare the following tools:
- a set of keys;
- TORX E-14 head;
- long screwdriver;
- jack;
- emphasis
Stages
The procedure for replacing the generator set belt on a Lada Granta with air conditioning is complicated by the fact that the belt passes through the support of the power unit. Therefore, before putting on a new strap, it will have to be dismantled.
Replacement consists of the following steps:
- First, using a “19” wrench, you need to loosen the lock nut of the strap tensioner lead screw. While unscrewing the locknut, hold the screw with the head at “8”.
- To loosen the belt tension, rotate the lead screw in the direction of movement clockwise. By following these steps, you can adjust the tension of the accessory drive belt.
- To replace the strap, you need to remove the right engine mount.
- Having moved under the car, you need to dismantle the right and middle protective shields of the engine compartment.
- Then unscrew the fastenings in the middle and front part of the right front wheel arch liner. Next, bend the fender liner behind the wheel brake disc.
- Using a jack, we hang the right front wheel and dismantle it. The fender liner fastenings can now be released.
- At the next stage, we place a stop under the oil pan of the power unit so that it holds the weight of the engine.
- Using a TORX E-14 head, unscrew the screws that secure the support to the cylinder block bracket of the power unit. Using the “17” socket, unscrew the two nuts and the support bolt that secures it to the body side member.
- We dismantle the engine mount with the cushion.
- Now, through the resulting opening, you can remove the strap from the pulleys of the auxiliary units and pull it out of the engine compartment.
- We install a new consumable in place of the worn-out product. In this case, its tension should be adjusted using the tensioner screw. The deflection of the belt in the gap between the air conditioner compressor and the power unit pulley with a force of 10 kilograms should be within 7-8 mm.
- We perform assembly in the reverse order of removal.
This completes the replacement. Now you know how to replace and tighten the generator set belt on a Lada Granta.
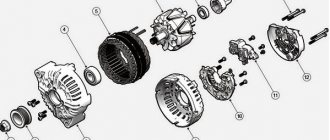
What design features does the tensioner have?
The design of the component we are considering is very simple. There are also simple procedures for its repair or installation. Even an inexperienced LADA Granta owner can install the alternator belt tensioner.
Manufacturers design tensioning devices according to individual projects, implying the subsequent integration of this unit into the overall design of a specific brand and model. But most of these products are equipped with similar components, namely:
- a bracket for the possibility of fixing on the motor block;
- belt tension roller;
- device traction;
- bolt securing the roller.
The bracket is secured to the motor using three or 4 studs.
Remove the Grant rear door trim
Grant's suspension
The bearing is the most vulnerable component. It has been experimentally confirmed that this component is constantly in rotation mode and makes an incredible number of revolutions, prematurely wasting its own resource reserve.
Once the belt is removed, the bearing assembly is fairly easy to diagnose. A serviceable component should not be subject to play. Also, the bracket can cause a couple of disappointments. Over time, this component is subject to slight bending, and therefore the roller moves away from the plane of rotation of the belt drive. This defect is typical not only for cars that already have an impressive mileage behind them. Sometimes the alternator belt tensioner can be found in a bent state on new LADA Granta cars, which raises suspicions of a factory defect.
Note that the tension roller also suffers from frequent breakdowns. This circumstance implies a weakening of the belt tension, causing malfunctions in the functionality of the generator. Diagnosing such a defect is quite simple. To do this, you will need to loosen the belt and rotate the roller idle. The rotation process should be accompanied by ease and absence of noise effect. If other suspicious signs are present, then the designated element is replaced without any doubt.
Signs of generator malfunction, ways to eliminate them
| Sign | Cause/remedy |
| The warning light on the dashboard does not light up | Open circuit in the power supply from the converter to the battery. Check the integrity of the electrical circuit |
| The warning light does not go out after the engine starts | Insufficient belt tension, insufficient tension in the chain. Measure the voltage in the circuit. |
| —/— | Worn brushes, faulty diode bridge. Measure the voltage with a multimeter and replace worn elements with new ones. |
| Short to ground | The insulation of the power cable is damaged. Check the condition of the insulating coating. |
| The converter does not produce the proper voltage of 14 V | Oxidation of terminals, cleaning with a metal brush, replacement |
| —/— | The battery is worn out, replace the battery |
| —/— | Loose belt tension. Adjust the tension. |
| —/— | Diode (rectifier) bridge is unusable, replace with a new one |
| The battery is not receiving a charge | Replacing the diode bridge with a new one |
| —/— | Rectifier failure. Replacement of components |
| Voltage drop in the network (circuit) | Checking the quality of connections of terminals and clamps. Tightening, replacing with new ones |
New Lada: Reviews of the operation of the Lada Granta air conditioner
Checking and prevention
It is possible to prevent the Lada Granta generator belt from breaking. You should make it a rule to check the belt tension before starting your journey. It should not sag or be overtightened. When you press the belt with your finger, it should press down a little, and when you try to turn it over, it should turn onto its edge without effort.
It should not be bent, its teeth should be intact. You need to inspect the seals. Leaking oil negatively affects the wear resistance of rubber. Granta users will have to listen carefully so as not to miss the moment when the alternator belt needs to be replaced. You can determine that the alternator belt will soon break: in wet weather or on a cold engine, it begins to whistle.
If the problem begins to appear in the middle of the journey and there is no opportunity to go to a service station, you need to check the condition of the belt tension. Most likely, the belt can be tightened a little and movement can be resumed. After this, it is necessary to replace it. Additional signals regarding an impending problem will include:
- dim light from headlights and dashboard;
- The interior heating is unstable;
- the sound of car horns has become lower;
- The turn signal and windshield wiper operating intervals have increased.
Signs that replacement is needed
When conducting an inspection, we must pay attention to the presence of the following signs:
Some stripes on the belt are already worn out
- abrasions;
- cracks;
- rubber lags behind the base;
- ruptures.
If there is any of them, the belt needs to be changed.
2302-3-2-13-(Copy)
The belt deflection in the area between the pulleys of the engine and the air conditioning compressor with an applied force of 100 N (10 kgf) should be within 6–7 mm.
The belt deflection in the area between the pulleys of the engine and the air conditioning compressor with an applied force of 100 N (10 kgf) should be within 6–7 mm.
Attention! Do not overtighten the belt. Excessive belt tension causes premature wear of the alternator belt and bearings.
Next, assembly is carried out in reverse order.
However, please note that...
Car with air conditioning: the differences are not only in the presence of a tensioner
Owners of cars with air conditioning will have to stock up on WD-40 or similar lubricant, a “10” key, and also a cylinder one, since the right front wheel will need to be removed.
We do not change the procedure, otherwise the lubricant will not have time to act.
- We wet the bolts securing the cushion and bracket.
- We support the front part of the car on the right with a jack.
- We remove the wheel.
- While lowering the car, unscrew the tension roller.
We work carefully because we only need a little engine lift.
- Then unscrew the bolts that were wetted earlier.
- We move the pillow towards the power unit. A little effort, and the generator belt is in front of us. After replacing the parts, we assemble everything in the reverse order. Be sure to monitor the position of the pillow, as well as the alternator belt.
Note that to work you will have to lower the car without the wheel.
An attempt to reduce the cost of cheap Grant configurations led to the absence of a tensioner on the alternator belt, which is why the latter can be over-tensioned and, as a result, fail.
Sn323
The upper screw securing the support to the bracket is shorter than the lower one - do not mix it up during assembly.
The upper screw securing the support to the bracket is shorter than the lower one - do not mix it up during assembly.
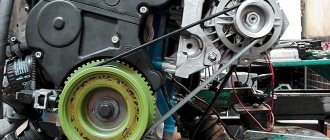
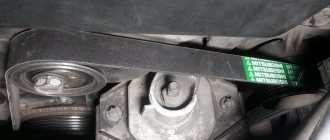
Lada Granta and Kalina: checking and replacing the auxiliary drive belt
Technical regulations Lada Granta
The alternator belt is located under the alternator itself
If you rely on the manufacturer’s technical regulations, then the belt should be checked at least once every 15,000 km. And every thirty thousand kilometers, this belt needs to be replaced.
That is, it turns out to be a cycle with an interval of fifteen thousand kilometers, in which the alternator belt is alternately checked and replaced.
And, given that the tensioner, as such, is not used, the belt is focused solely on one-time stretching during installation.
There are options for reusing the belt, but this practice is highly discouraged.
Signs of wear on the RPM
Before you start replacing the RPM, conduct your own diagnostics and evaluate the actual condition of the parts and mechanisms. Perhaps the cause of the malfunction is in another unit adjacent to the generator.
- We open the hood, the engine must cool down so as not to damage the skin of the hand and fingers.
- We put the gear in neutral and turn the alternator belt. Rotation occurs quite easily, by hand, without special equipment.
- We inspect each area one by one.
Signs of wear on the RPM
The following will indicate the need to replace the RPM:
- fraying, side abrasions;
- peeling of rubber, thread fiber;
- other mechanical damage;
- teeth tears;
- the presence of oily traces and streaks on the surface of the belt.
If there are no comments on the RPM, we proceed to inspect the tensioner roller. Often the reason for the appearance of third-party noise is precisely this, worn-out roller bearings. We loosen the structure with our hands and check that it is working properly.
It is important to know!!!
If the belt breaks on the way, it is allowed to travel on the battery's reserve energy, but not more than one hour. In practice, experts recommend no more than half an hour of free movement.
Technical regulations for Lada Granta cars
In order to be sure that the car will not fail on the road, you should monitor its technical condition and comply with technical regulations. Maintenance consists of diagnosing vehicle systems and components, identifying and troubleshooting problems. But even if everything is in order with the car, it is necessary to carry out the routine operations provided for in the vehicle’s operating manual.
Experts recommend doing a technical inspection when purchasing a used car and every 15 kilometers. During a visual inspection, you should check the systems and components for leaks, check the reliability of fasteners, the generator voltage regulator, belt tension, and their condition. If necessary, change filters, oils, working fluids, and consumables. In order to bring the car into good working order, you need to buy all the necessary consumables in advance so that they can be replaced during inspection.
The accessory strap is a consumable item that needs to be replaced periodically. In the Lada Granta manual, the manufacturer recommends replacing the belt every 30 thousand km. Experienced drivers advise checking the condition of the belt drive at intervals of 15 thousand km.
The frequency of replacement of consumables is influenced by the following factors:
- terms of Use;
- driver's driving style;
- quality of consumables;
- serviceability of components and mechanisms;
- climatic conditions.
If the machine is operated in difficult conditions, then diagnostics should be done more often. It is recommended to do a technical inspection before a long trip so that the car does not fail along the way.
This is interesting: Ground clearance of the Lada Granta sedan - photos and videos
Addresses of companies providing services for replacing RPMs
| № | Name | Address |
| 1. | Service | Eastern Autonomous District 1st st. Izmailovsky Menagerie, 8 st. Amurskaya, 3 building 32 (Golyanovo) st. Montazhnaya, 11 building 2 |
| 2. | —/— | Southern Autonomous District Kanatchikovsky proezd, 13 building 3 Kashirskoe highway, building 10, building 3 st. Dubininskaya, 76 |
| 3. | —/— | Western Autonomous District Kutuzovsky prospect, 36, building 15 Vernadsky Avenue, 12d Skolkovskoe highway, 31 building 9 st. Krylatskaya, 30 building 3 st. Marshala Timoshenko, 17 building 1 |
| 4. | Car service "Autotechnical center Garage+" | Moscow, Matrosskaya Tishina street, 1Ас8 weekdays: from 10 to 21, weekends: from 11 to 21 |
| 5. | Auto service "Open" | Moscow, 2nd Nagatinsky proezd, 2с1 • daily from 9 to 21 8 (495) 241-28-70 |