The Lada Priora, created on the basis of the VAZ 2110 sedan, belongs to the family of Russian small cars. The model was produced in various configurations with different drives for auxiliary units.
For example, the base model has a conventional alternator belt tensioning mechanism. At the same time, in cars equipped with air conditioning or power steering (power steering), the trajectory of the alternator belt is slightly different.
Accordingly, replacing the alternator belt on a Priora without air conditioning is a little easier than on a Priora with air conditioning. Let's consider the algorithm for replacing a belt with different types of drive.
When the alternator belt needs to be changed: signs
So, before choosing a belt for a Priora, you must take into account that this element transmits force from the crankshaft to the generator and other attachments. A belt drive is a method of transmitting the rotation of the crankshaft to the generator shaft, while the belt has the form of an elastic band (like a ring). The belt is located under the hood of the car on the left side of the internal combustion engine.
Let's move on. The alternator belt, like any other part, can fail over time. If the belt is worn or damaged, it must be replaced. The main signs of belt malfunctions:
- the appearance of a characteristic whistle when there is a load on the vehicle’s on-board network, for example, the headlights are on (loose belt);
- the appearance of constant noise without load and with load (damage or wear of the belt).
To understand when you need to change the alternator belt on a Priora as planned, just study the manual. According to the regulations established by the manufacturer, it is recommended to inspect and assess the tension of the alternator belt every 15 thousand kilometers, and replace it every 60 thousand kilometers.
It is important to understand that the alternator belt can fail much earlier than the deadlines established by the regulations; from time to time it is necessary to monitor its condition. Cracks, abrasions, oil particles may appear on the belt, rubber deformations may occur, etc. These defects serve as the basis for replacement.
Symptoms of malfunction and their elimination
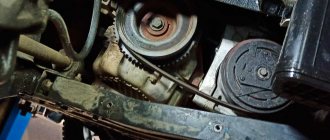
You can determine whether a replacement is needed or whether you can simply tighten the power steering belt with air conditioning on the Priora 16 valves only after inspecting this component. To do this, just open the hood and examine the belt; it is located next to the right front wheel. There are signs that indicate it's time to check the alternator belt: something whistling and squeaking from under the hood.
The reasons may be the following:
- Antifreeze, oil or other working fluids have come into contact with the generator pulley or belt.
- The belt is worn out - you can tell by its appearance.
- The tension has dropped - in this case, the component must be tightened.
- The bearing in the generator is worn out.
When the belt whistles in a Priora with 16 valves, it’s time to carry out diagnostics. If there are cracks, tears or other serious damage on its surface, then replacement is required. If the generator component with hydraulic booster and air conditioning looks normal, you should check its tension; the optimal level of deflection is 6-8 mm - you need to press the component in the middle between the generator and the pulleys.
Are there visible coolant or engine oil stains on the surface? If the contamination is not significant, they can be cleaned. If the liquid has penetrated into the material, cleaning will not bring any results; replacement is needed. If the component is well tensioned and no damage or stains are visible, then you should move on to checking the bearings. They may need to be changed.
Lada Priora without air conditioning: replacing the alternator belt
Replacing the belt on a Priora without air conditioning is not difficult, since the generator belt in this case is only needed to drive the generator. You can replace such a belt yourself in a regular garage, since the replacement diagram and algorithm are quite simple.
Required materials and tools:
- new alternator belt for Priora;
- wrench “17”, head “13”;
- tension roller wrench;
- jack, screwdrivers.
Replacing the Priora alternator belt, algorithm of actions:
- place a jack under the front right side of the car and remove the wheel;
- remove the right mudguard and disconnect the fastening of the shield to the mudguard of the power unit (Torx T-30 keys, unscrew the two screws securing the shield to the body, use a Phillips screwdriver to unscrew the self-tapping screw securing the shield to the fender liner);
- place a support under the engine crankcase of the car;
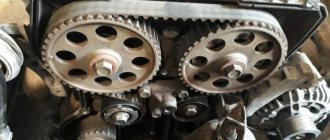
- inspect the belt for breaks, peeling of rubber, etc.;
- check the belt tension by pressing your thumb on it in the middle between the crankshaft and generator pulleys;
- if necessary, adjust the tension and tighten the generator mounting nuts to a torque of 15-24 Nm;
- in case of damage, loosen the generator mounting nuts and rotate the adjusting bolt counterclockwise to reduce the belt tension;
- move the generator to the BC and remove the belt from the generator and crankshaft pulleys;
- After installing the new alternator belt in reverse order, adjust its tension.
We also recommend reading the article on how to replace the timing belt on a Lada Granta with your own hands. From this article you will learn about the features of replacing the timing belt on a Grant, as well as what you need to pay attention to during this procedure.
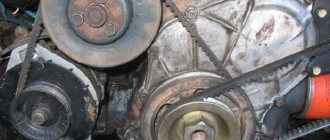
Adjusting the tension of the generator belt:
- Using a key set to “13”, loosen the nut securing the generator to the upper bracket;
- use the “13” head to loosen the bolt nut (lower mounting of the generator);
- tension the belt by turning the adjusting bolt clockwise with a “10” wrench.
Please note that the alternator belt should not be overtightened, as this may lead to failure of the alternator bearings. Also, with strong tension, the service life of the belt itself decreases; it stretches, cracks and even breaks faster.
Sn9shimo4
To tension the belt, use a 17mm spanner to loosen the bolt securing the tension roller and use a special wrench to turn the roller counterclockwise.
To tension the belt, use a 17mm spanner to loosen the bolt securing the tension roller and use a special wrench to turn the roller counterclockwise.
Having adjusted the belt tension, tighten the tension roller mounting bolt to a torque of 34–41 Nm.
To replace the belt, place an adjustable stop under the oil pan through a wooden block.
How to replace a Priora alternator belt with air conditioning
The process of replacing a belt on a Priora with air conditioning is slightly different from replacing a belt without air conditioning. It will take longer, but you can still carry out the replacement yourself, without going to a service station.
Necessary tools and materials: belt code 6PK 1115, set of keys and sockets, jack. General procedure:
- spray WD-40 liquid onto the bolts of the cushion to “bounce”;
- Unscrew the tension roller of the Priora generator clockwise using the “17” key;
- unscrew the engine mount mounting bolts using a TORX E10 head;
- place a jack under the front right side of the car and remove the wheel;
- remove the side mudguard by unscrewing the screws and place the stop under the engine crankcase;
- slowly lower the car on a jack (until the engine is raised above the body) to gain access to the belt;
- remove the old belt by loosening the fastening nuts;
- install a new alternator belt, check whether it is seated on the air conditioner pulley;
- screw the tension roller and tighten the alternator belt;
- raise the car and remove the support from under the engine crankcase;
- screw on the engine mount of the car and check the quality of the drive by starting the engine and turning on the air conditioning;
- return the plastic mudguard and the removed wheel to their place;
- lower the car from the jack.
At this point, the belt replacement can be considered complete. The only thing is that experts recommend checking the belt tension again after 2-3 thousand kilometers. If the belt is slightly slack, the alternator belt will need to be tightened.
Snapshot441
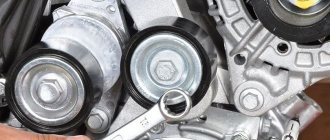
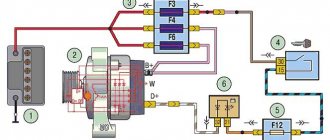
Drive of auxiliary units on a car with air conditioning: 1 - drive pulley of auxiliary units;
2 - tension roller; 3 — bracket for the right support of the power unit; 4 — generator pulley; 5 — air conditioning compressor pulley Drive of auxiliary units on a car with air conditioning: 1 — pulley of the drive of auxiliary units; 2 - tension roller; 3 — bracket for the right support of the power unit; 4 — generator pulley; 5 - air conditioning compressor pulley
Let's sum it up
The service life of the alternator belt on a Priora, as on any other car, is limited. For this reason, it is important to monitor his condition. In case of damage or wear, the belt must be replaced and then adjusted.
We also recommend reading the article on how to replace the Lada Kalina alternator belt tensioner. From this article you will learn when you need to change the tensioner, as well as how to replace the belt tensioner on Kalina with your own hands.
At the same time, on different versions of the Priora, when replacing the alternator belt, it is necessary to separately take into account the design features. The fact is that on models with and without air conditioning, the replacement will be slightly different, as discussed above.
Finally, we note that a correctly selected, installed and adjusted Priora generator belt will allow the generator to operate normally and charge the battery, and there will also be no problems or malfunctions in the operation of other equipment.
Stretching and checking
To tension and check, follow these steps:
- First you need to loosen the nut that secures the roller, and the clip should be secured with a wrench.
- Rotate the wrench to turn the roller cage, after which its nut should be tightened.
- Now you need to check the tension on the longest section of the belt, between the pulleys.
- If you press on this section, the installation belt will bend; no more than 1 cm of deflection is allowed. This is true for models without power steering and air conditioner.
- As for a car with power steering, in this case the tension should be stronger; insufficient tension will be accompanied by a whistle. If it is too strong, there will be a hum from the bearing devices.
Sn9shimo
The belt should not rotate more than 90°. Otherwise, the belt tension needs to be adjusted. To tighten the belt, turn the tension roller counterclockwise, and to loosen it, turn it clockwise. To do this, insert a special key into the holes of the tension roller in the form of two rods with a diameter of 4 mm, welded to the base of the key (the distance between the rods is 18 mm). You can use the key for the old-style timing belt tension roller, installed on all front-wheel drive VAZ cars. If you do not have a special key, you can insert two pins (screws) with a diameter of 4 mm into the holes of the tension roller. Using the screwdriver shaft located between the pins, turn the roller.
Generator characteristics
The VAZ 2170, or Lada Priora, is equipped with a classic alternating current device, supplemented by a diode bridge for rectifying electricity and a voltage regulator. Works in parallel with the battery in all modifications of Lada Priora with engines operated at temperatures from -40 to +45 degrees.
The Priora factory generator 5102.3771 is produced by the Russian brand “Pramo”.
Its main feature is the increased current output parameters at low speeds (at 300 rpm up to 6 Amperes). Undoubtedly, this is a significant advantage, especially when operating a car in winter at subzero temperatures. Moreover, the use of such a unit allows the use of an automatic transmission.
Generator device
The standard Priora device has the following characteristics:
- weight 5410 grams;
- gear ratio 1/2.4;
- power 205 watts;
- current strength at maximum values 80 Amperes;
- voltage range 13.8–14.4 V.
The peculiarity of the generator connection involves power supply using the fuse box, which means that the chain then leads to the battery and the ignition switch. The generator is also connected to a lamp indicating low battery. When the propulsion system starts, power is supplied to the device winding through three diodes of the rectifier unit. The correct operation can be easily monitored by the lamp indication. When the ignition key is turned to the first position, the warning light lights up on the instrument panel. The engine starts - it goes out (if the generator is working). If the lamp is on, the device has obvious problems.
Structurally, the generator consists of a drive pulley, bearings, covers, tie rods, rotor and stator, rectifier unit and voltage regulator. The rotor is the moving part of the device; it rotates on bearings installed in the covers at the front and rear. As the rotor rotates, the brushes rub against the contacts. The alternating current thus generated passes through the diode bridge (rectifier unit), where it is transformed into direct current.
Differences in the design of the generator of different modifications
Non-interchangeable generators are often installed on the Lada Priora. This is due to the presence of additional equipment (air conditioning, power steering). This is reflected in the difference in fastenings. In addition, a special roller can be used to tension the belt.
On Priors with engines 21116 and 21126, the tension pulley is not used.
To protect the on-board network from voltage surges, a capacitor is provided with a capacity of 2.2 μF. It is located on the rectifier block. The capacitor is also used to eliminate interference between the positive and ground of the generator.
B2vu82nv_inettools.net_rotate_image
Using a Phillips screwdriver, unscrew the self-tapping screw securing the shield to the fender liner and remove the shield.
Using a Phillips screwdriver, unscrew the self-tapping screw securing the shield to the fender liner and remove the shield.
Using a Phillips screwdriver, unscrew the self-tapping screw securing the shield to the fender liner and remove the shield.
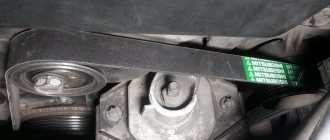
We inspect the belt. There should be no cracks, tears, or detachments of rubber from the fabric base.