Purpose
The rain sensor is designed to communicate signals to the body control unit (multifunctional unit) that indicate the presence of precipitation in the form of icing, drizzle, rain, or snow on the windshield.
The presence of only the word “rain” in the name of the sensor is rather a historical fact. Modern sensors can independently adapt to the situation when the windshield wipers need to be turned on. More advanced rain sensors react to the density of precipitation and can control the speed of the wipers, even the activation of the washers. Based on their design, the sensors are divided into:
- with built-in signal processing system;
- without internal electronic signal processing module;
- rain sensors in systems of additional (non-standard) equipment.
Principle of operation
A prototype of a rain sensor was first installed on American cars sometime in the 60s. It was a sensor type and was controlled by a vacuum tube. The sensor was so capricious that it could be triggered by the touch of small insects. The sensors were abandoned and forgotten for a couple of decades.
They remembered the precipitation control system again after optical devices such as optocouplers began to be used. An optocoupler represents a pair of electronic devices operating in a single module: an LED and a photodiode. An LED emits a beam of light when current flows through it. A photodiode produces an electrical signal when exposed to light.
The principle of operation of the sensor is demonstrated in this diagram.
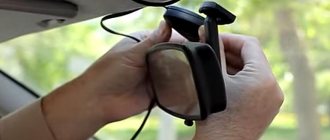
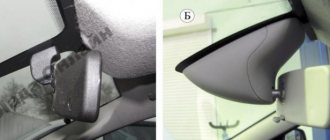
The rain sensor is attached to the inner surface of the windshield. Most often, a zone is selected that does not obscure the view and is located in its upper part. Usually this is in the area of the interior rearview mirror. LEDs direct the beam onto the windshield in such a way that, as a result of reflection from the dry outer surface of the glass, it returns to the photodiode.
If raindrops, which have a different refractive index compared to the material from which the windshield is made, fall on the surface of the windshield, the rays will be reflected at a different angle (or even pass through the drops). In any case, the intensity of the signal reaching the photodetector will decrease (in some designs it will increase). The electronic information processing unit will conclude that precipitation is occurring and will signal the wipers to operate. The rain sensor response level is usually adjustable. Thus, you can change its sensitivity to different precipitation.
Precipitation in the form of snow must first turn into droplets of water for the sensor to trigger. To do this, the glass must first be heated. Some sensors have their own local glass heating filaments built into them to speed up the response. In order to reduce interference and lack of reaction to light emitters, the sensors operate in the infrared range (similar to television control panels).
Main causes of malfunction
During operation, rain sensors relatively often fail. Main reasons:
- Replacing a windshield after a traffic accident or crack. Aftermarket and OEM glass is usually not equipped with a rain sensor. As a rule, the old sensor is removed from the damaged glass and transferred to new glass. During dismantling or an accident, cracks may form on the working surface. In addition, dried gel or glue may remain on the surface of the sensor, which changes the trajectory of the reflected beam. The sensor becomes inoperative. There are workshops that can grind the working surface of the sensor, but this operation is not always successful. The new sensor should also be attached using a special optical gel.
- Faulty built-in electronics. Repair in this case is practically impossible, since specialized microcircuits are used inside the sensor.
- Installing the sensor on glass of a different design, made of other materials. Technological parameters of glass, especially triplex, change the reflection coefficient and can lead to theoretical inoperability of the sensor, no matter how you install it.
- Application of spraying and films on the windshield. If foreign particles get into the working area of the rain sensor, it will not work correctly.
Functionality check
If you suspect that the sensor has stopped working, you can check its functionality using any spray gun. The functionality of the rain sensor should be checked with the engine running, as it can only be activated automatically while driving. The time for “spraying” the glass area in front of the sensor should be at least 10 seconds. Rain sensor failure can be diagnosed using computer diagnostics. Some cars produced before 2005 do not allow diagnostics of the sensor. If you purchase a car from the secondary market, a faulty rain sensor means a possible serious accident with damage to the windshield.
How to install a rain sensor as an option
Universal sensors can be found in car dealerships as additional equipment. For example, the DDA-15 rain sensor is designed for installation on some models of domestic VAZ cars. The ease of installation is amazing: the sensor must be mounted on the windshield. From it comes a wire with a relay connector, which is switched on in place of the standard windshield wiper relay.
The sensor has switching operating modes and sensitivity adjustment. According to clear instructions, the DDA-15 rain sensor can be installed by any driver. The cost of the sensor is about 1500 rubles.
The universal rain sensor DDA-55 has wires for connecting to the vehicle's electrical equipment. To connect it, you need to have experience in electrical installation work and a car electrical diagram.
The rain sensor (on Priora) is an element of the automotive system that records and transmits information about the presence or absence of precipitation on the windshield of the car. Depending on the results of such fixation, a decision is made on whether to turn on or off the windshield wipers, the intensity of their operation, as well as the degree of brightness of the headlights.
Operating principles of a rain sensor on a Priora
If we talk about how the rain sensor on the Priora works, the principle of operation is as follows. In fact, the device is a set of photosensitive elements that are located in the product body directly on the board. The sensor itself is attached to the windshield with a photosensitive element. Determination of the presence of precipitation by the device is achieved through the principle of reflecting light pulses. In other words, the LED sends the required amount of light beam to the front glass, then it is reflected, received and recorded by a photodiode. If there is no moisture or dirt on the glass, the light is reflected back in almost the same quantity and the wipers are not used. And, conversely, in a situation where precipitation begins to fall on the glass surface, the amount of light reflected and captured by the LED changes. Due to this principle of operation, the controller determines the level of precipitation and accordingly starts one or another mode of operation of the windshield wipers.
Device
The entire system consists of the following elements:
- engine, wipers and their blades;
- relay in the mounting block;
- switch for operating modes and switching on;
- the sensor itself;
- wiring.
The device itself has the following components:
- the sensor body itself;
- operation sensitivity regulator;
- special fastening bracket;
- wire connection chip (connector);
- fastening ring.
Main functions and purpose
Having understood what a car rain sensor is, you need to understand the purpose and main functions of the device:
- identification of rain and snow;
- analysis of windshield contamination;
- control of windshield wipers, as well as adjustment of their operating mode;
- automatic switching on of the light in low light conditions (in the case of a combined sensor).
The precipitation sensor also has significant disadvantages, including false alarms when water enters the analysis area or failure to operate when the glass is filled with dirt or water from neighboring cars. Also, the car's control circuit may not turn on the washers, which will lead to dirt smearing on the glass and poor visibility. Any automatic system does not exclude flaws and errors. For example, the brushes usually turn on with a slight delay, and during this time the driver can clean the glass on his own.
Manufacturers are constantly working to improve the functionality and reduce errors of the rain sensor.
Replacing rain sensor priors
To carry out the work you will need: - a key to “10”; - flat-head and Phillips-head screwdrivers.
The removal process consists of 4 steps: 1. Place the car in a convenient place. Disconnect the negative terminal from the battery. 2. Remove the interior lighting lamp. 3. Using a Phillips screwdriver, remove the rear view mirror. 4. Disconnect the terminal block with the wires connected to the device. Carefully remove the product from the windshield.
The reinstallation procedure includes 6 steps:
- Before you begin installing a new part, you will need to thoroughly clean it, remove any adhesive residue, fingerprints, and dust from the surface of the glass. To do this, you will need a handy tool (for example, a scraper) with which you need to remove traces of contamination. To ensure the greatest adhesion of the sensor to the surface, you will need to degrease the area where it is intended to be installed.
- Apply a special polyurethane glass adhesive to the ring that will be in contact with the surface.
- Place the mounting ring directly against the surface of the windshield. Press the surface of the ring and wait 30 seconds.
- Installation of the sensor housing itself should begin only after the glue has completely dried (wait 1-2 hours).
- Next, remove the protective plate from the new product and install it in the mounting ring. Mount the bracket, connect the contact wires, attaching the block to the sensor.
- Install the pad together with the sensitivity regulator. This completes the installation.
Now you know what actions to take in cases where the Priora rain sensor does not work. In addition to a malfunction of the measuring device itself, in some cases the cause of problems may be a failed relay. In other words, carry out comprehensive diagnostics of all components that are involved in the operation of the sensor.
How to turn on the Priora rain sensor?
To start the device, you must perform the following steps: switch the wiper handle to the first operating position. It is better to set the sensitivity of the device to the third position.
The rain sensor (on Priora) is an element of the automotive system that records and transmits information about the presence or absence of precipitation on the windshield of the car. Depending on the results of such fixation, a decision is made on whether to turn on or off the windshield wipers, the intensity of their operation, as well as the degree of brightness of the headlights.
This system is very convenient because it makes driving a car much easier and frees your hands from unnecessary manipulations. For example, when driving in rainy weather on a highway or highway. In situations where there is a need to switch the wiper operation intensity from lower to higher, or vice versa. Unfortunately, the element is not standardly installed on all priors, but only on those that have a luxury package. However, this circumstance does not prevent the installation of the kit on your vehicle.
Review of Manufacturer Prices
| Name / catalog article | Price in rubles |
| Lada / VAZ 285356725 (original) | From 2000 |
| Fram 2458753 (analogues) | From 2000 |
| Otex 3697412 (analogues) | From 2000 |
| *prices are current as of 05/01/2019 | |
Conclusion
The process of replacing a rain sensor yourself is not at all difficult, but it requires care on the part of the repairman. Do not violate the manufacturer's regulations. When laying the wiring, be extremely careful not to damage the insulating layer. A short circuit to ground will damage the digital controller.
Related link:
What is better than Lada Vesta and Hyundai Solaris? Comparison of the main characteristics of competing cars
Replacing rain sensor priors
To carry out the work you will need:
- flat-head and Phillips-head screwdrivers.
The removal process consists of 4 steps:
1. Place the car in a convenient place. Disconnect the negative terminal from the battery.
2. Remove the interior lighting lamp.
3. Using a Phillips screwdriver, remove the rear view mirror.
4. Disconnect the terminal block with the wires connected to the device. Carefully remove the product from the windshield.
The reinstallation procedure includes 6 steps:
- Before you begin installing a new part, you will need to thoroughly clean it, remove any adhesive residue, fingerprints, and dust from the surface of the glass. To do this, you will need a handy tool (for example, a scraper) with which you need to remove traces of contamination. To ensure the greatest adhesion of the sensor to the surface, you will need to degrease the area where it is intended to be installed.
- Apply a special polyurethane glass adhesive to the ring that will be in contact with the surface.
- Place the mounting ring directly against the surface of the windshield. Press the surface of the ring and wait 30 seconds.
- Installation of the sensor housing itself should begin only after the glue has completely dried (wait 1-2 hours).
- Next, remove the protective plate from the new product and install it in the mounting ring. Mount the bracket, connect the contact wires, attaching the block to the sensor.
- Install the pad together with the sensitivity regulator. This completes the installation.
Now you know what actions to take in cases where the Priora rain sensor does not work. In addition to a malfunction of the measuring device itself, in some cases the cause of problems may be a failed relay. In other words, carry out comprehensive diagnostics of all components that are involved in the operation of the sensor.
How to turn on the Priora rain sensor?
To start the device, you must perform the following steps: switch the wiper handle to the first operating position. It is better to set the sensitivity of the device to the third position.
Modern foreign cars are equipped with a huge number of various sensors and auxiliary systems that can brake “correctly”, notice obstacles in time, and also save our lives in the event of an accident. It should be admitted that cars have become significantly smarter over the past 10-20 years; some models are sometimes even smarter than some newcomers. All of the above advantages and know-how, unfortunately, are only partially found in domestic cars, so lovers of “folk tuning” have, so to speak, where to accelerate. Today in the “VAZ Tuning” section we will continue to improve the “Taz” and this time you will learn how to install a rain sensor on a Lada Kalina at home. But first, as always, a few words about what it is, why, etc.
A rain sensor (RS) is a device designed to improve traffic safety by improving and automating the windshield cleaning system. The rain sensor is located on the windshield and reacts to moisture that falls on the “forehead”, after which the wipers turn on automatically. Some more advanced models of rain sensors can detect the intensity of rain and control the side windows and sunroof. That is, if you left the car, forgetting to close the windows and sunroof, in case of precipitation, the DD will automatically do this for you. It should be noted that the sensor reacts to any manifestation of moisture (rain, snow, fog, splashes from under the wheels, etc.).
Someone is now reading all this skeptically and thinking: “Another invention for the lazy. “But in vain, because this is not at all true, a rain sensor actually improves traffic safety and prevents accidents. How? But it doesn’t matter whether you are driving along the road fast or not; suddenly, from under the wheels of an oncoming car, a large amount of water or splashes will fall on your windshield. The fact is that those who have been in such a situation know that it will take time to quickly turn on the wipers and clean the glass, and you will also have to be distracted, but what if you are moving in heavy traffic or driving on a wet road and overtaking? In general, the probability of an accident is very high, while you feel the button or lever of the wipers, you can catch up with the car in front, which began to slow down at that very time, or slide into a ditch while overtaking. There are many situations that can be simulated, the point is that there is a benefit from DD and it is very difficult to overestimate it. The most important thing is that thanks to the rain sensor, the driver does not need to be distracted while driving by turning the car on or off, or adjusting the wipers.
- High sensitivity to moisture. Even the slightest moisture in the form of imperceptible droplets will trigger the wipers, which could be done without. The fact is that if there is no rain as such, and you are driving fast enough, and even in the summer, then minor moisture under the influence of air flow and temperature will evaporate on its own without any participation from the wipers. With such a “false” operation, wear occurs on the windshield wiper blades, as well as on the drive (the wiper motor).
- It's not uncommon for the rain sensor to turn on the wipers after the glass became covered in dust or simply wasn't clean enough.
Myths and reality: about the advantages and disadvantages of the device
- There is a misconception that the rain sensor reacts to the impact force of water drops, or other vibrations caused, for example, by a tree branch or insects, and therefore the wipers begin to work both in place and out of place. Nothing like this! A mechanical impact on the windshield, say a fly, will not start the glass cleaning mechanism. Remember that the operating principle of this simple device for determining moisture is optical.
- The second misconception is that at night the rain and wind sensor on the window is useless. It's a delusion. The device uses an infrared emitter (LED), the operation of which is not affected by day or night. Take your TV remote control - it also works using infrared radiation - and use it at night. Happened? Works? It's the same with a rain sensor in a car.
- The third misconception is that if there is a need to replace the windshield, the rain sensor will have to be thrown away. In reality, if you choose the right glass and install it correctly, then no. The fourth misconception is that the rain sensor does not function in winter. Actually everything works. But provided that the car has heated glass. Snow falls, melts, turns into water, and the moisture meter continues to perform its functions.
Watch also the video: Rain and light sensor in a car. Principle of operation.
Connection
The most important process is connecting the device. The reliability of the rain sensor depends on how you do this. You should start by connecting to ground:
- To do this, a wire is connected to the corresponding terminal of the sensor, which is brought to the body in the most convenient place;
- Next, connect the positive wire and pull it to the control unit. It is desirable that it can be turned off with a button to switch to manual mode for controlling the wipers;
- Connect the block to the “minus”;
- Pull the wires to the mounting block and connect them together with the standard ones going to the windshield wipers.
This is a wiring diagram for a self-assembled sensor. This is how both types of such sensors are connected.
If you decide to install a ready-made assembly, the connection will be similar, only the control unit will be installed instead of the fuse going to the wipers. Please note that on some models several different devices can be connected to one socket. In this case, this scheme will not work. Since the fuse is removed from the circuit, for greater safety it should be additionally embedded in the wires.
Conclusion
. As a rule, when buying a car, people think first of all about saving. And only later do they think about comfort. Therefore, many people want to know how to make a rain sensor for a car with their own hands. In fact, it is not difficult, and self-assembly will be much cheaper than the factory version.
In the pursuit of perfection, you choose the best. AS8 Club - those who have made their choice.
- Unanswered topics
- Active topics
- Search
- our team
Reviews
| № | Positive |
| 1 | Vasily (autodrome): the car is two years old, the mileage is 26,000 km, there are no comments, the equipment is working normally. |
| 2 | Kirill (autotopic): in general, there are no complaints about the functionality of the windshield wipers, but in winter, in severe frosts, the rubber catches, the work is delayed. |
| 3 | Vitaly (Autoreview): there are no comments on the work of DD. The car is three years old, the mileage is over 50,000 km. |
| 4 | Vladlen (Avtoria): I bought a used Vesta, good condition, fourth year. Comprehensive diagnostics at the service station did not reveal any comments. |
| 5 | Konstantin (Drom): I have a budget package, there was no sensor by default. I installed it myself, and it turned out to be much easier than I expected. |
| 6 | Sergey (Driving): In winter, the brushes work late, but in general, there are no comments. |
| 7 | Vladimir Stepanovich (“5th wheel”): in four years of driving the car, I replaced the fuse (No. 38) once. In all other respects, no comments, the equipment is operating normally. |
| Negative | |
| 8 | Dmitry (autotopic): at 28,000 km the windshield wiper relay went off. I ordered a service from a service station and paid about 1,800 rubles. |
| 9 | Vitaly (otzovik.net): in the third year the digital sensor failed, replaced it with a new one. |
| 10 | Konstantin (ProAvto): dissatisfied with the quality of assembly and manufacturing of parts on the Lada Vesta. They wear out prematurely and fail. The car needs some work, even after the showroom. |