Do-it-yourself noise and vibration insulation of VAZ 2115
Sound insulation and vibration insulation of a car are very important for getting rid of acoustic discomfort. Constant noise, both airborne and structural, interferes with good acoustics, does not allow you to hear your interlocutor well, quickly tires you, that is, deprives the trip of any comfort. Noises penetrate the cabin from everywhere: through the doors, underbody, engine compartment, roof, trunk. Noise and vibration insulation not only absorb vibration and prevent outside noise from entering the car interior, but also act as insulation, preventing cold from penetrating inside and keeping heat out of the car. Even foreign cars, not to mention domestic cars, including VAZ, need sound insulation (or “Shumka”).
Soundproofing a VAZ 2115 with your own hands is a fairly simple procedure, for which you will need material, a spacious room, time and, of course, knowledge. It is best to completely soundproof the car, but if you decide to do only certain sections, the result will certainly make itself felt.
As a rule, the fight to reduce noise in the cabin begins with the doors. Next, the engine compartment is soundproofed to eliminate the noise of a running engine. Soundproofing the hood of the VAZ 2115 will enhance this effect and inside the cabin, the engine at idle speed will be completely silent. The most complete sound insulation is achieved by laying vibration and noise insulating materials on the bottom, wheel arches and trunk.
Today, manufacturers of not only budget cars for some reason ignore vibration and sound insulation of the roof. There are several simple tricks to check whether your car has sound insulation or vibration insulation in the ceiling.
Sound insulation of the interior of VAZ 2113, 2114, 2115
A lack of sound insulation can be recognized if a hum and rattling is heard from the ceiling while driving, or music is hard to hear during rain. In winter, if the snow on the roof of a running car melts, there is no sound insulation or does not provide the desired effect.
Soundproofing the ceiling is the simplest procedure, which is easiest to do yourself.
Before you start soundproofing your roof, you need to buy:
- vibroplast (3 sheets 2 mm thick, good quality, for example, Noico), splen (2 sheets 4 mm thick).
General information about the process
The initial one is provided by the manufacturer at the stage of assembling the machine. But gradually, due to temperature changes, any material loses its beneficial properties.
Before you start carrying out the “Shumka” on your own, it is recommended to dismantle the seats, door trims, mats and free the car from the old standard insulation.
Note : Only by carrying out a complete and thorough soundproofing procedure can one hope for a significant reduction in noise from the outside. Only in this case will the cabin be perfectly quiet and comfortable.
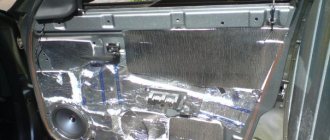
Soundproofing panel VAZ 2114
It is especially important to treat doors, as they often become the main installation location for speakers. It is clear that this place should be well protected not only from noise penetration, but also from plastic vibrations and other negative phenomena.
Acoustic speakers in the doors
Along with sound insulation, the interior will also receive high-quality insulation. In Russian conditions this is extremely important. To achieve this effect, you need to combine vibration and sound insulation.
Soundproofing for VAZ 2114
“Shumka” carried out on a VAZ 2114 is often called tuning. This is true, because a real modernization of the car is being carried out. Operational parameters are increased and comfortable conditions are created when the vehicle is moving.
The driver is no longer oppressed by engine noise, his nervous system is not irritated by the strumming and vibration of plastic elements. All this cannot but have a positive impact on overall driving safety.
As mentioned above, the standard “Shumka” will not be of good quality; relying on it is the last thing. The process of carrying out “Shumka” on cars with high mileage is especially relevant. In general, such cars are very difficult to drive, since the noise penetrates everywhere, interferes with the normal operation of the acoustics, creates complete discomfort, and the trip turns into a very tedious task.
On sale today you can find a sufficient amount of high-quality materials for carrying out “Shumka”. There are a lot of them and making the right choice can sometimes be extremely difficult. One of the main indicators of a good material is not only the ability to absorb sounds, but also to be light in weight (details about materials in the table below).
Note. If the material itself is heavy, making noise will be difficult. As a rule, good and proper insulation involves laying several layers of material, a kind of sandwich consisting of layers of vibration and noise absorbers. Heavy materials will create excess weight that is dangerous for the car and its body, which will inevitably affect fuel consumption and the overall dynamics of the car.
Splen with foil
Among other things, you also need to lay out materials skillfully. The fact is that if you don’t pay attention to this, the materials will simply turn into a time bomb for the metal component of the car.
Poorly laid material creates gaps through which air, moisture, etc. will penetrate. And all this will inevitably lead to the appearance of the most terrible enemy of the body - corrosion.
Correct installation of the material always means following the instructions in a step-by-step sequence, using the right tools, using a hair dryer and much more.
In some cases, especially when carrying out the noise yourself, partial sound insulation is also appropriate. In this case, the target is the most noise-producing parts of the machine. Definitely the doors, then the trunk, the rear parcel shelf, and so on.
It is important, when working on your own, not to damage the upholstery. Unfortunately, this often happens due to the inept actions of the car owner who is carrying out such an operation for the first time. In general, conducting a “Shumka” is a painstaking and lengthy process, but it’s worth it.
Before carrying out soundproofing, it is recommended to carry out a partial or complete inspection of the machine. The causes of all vibrating and knocking sounds produced by suspension elements or other vehicle components must be eliminated. They may be loose or need to be replaced. The body and its parts must also be checked.
The work to replace the sound insulation of the VAZ 2115 ceiling takes place in several stages
Remove the trim, visors, handles, and lampshade in order to provide access to the iron base of the ceiling.
Degrease the ceiling with white spirit.
Proceed with vibration isolation, preferably with outside help, since it will not be very convenient to do it alone.
The process consists of cutting off the required piece of vibroplast and removing the protective film. Afterwards, the pieces of vibroplast are applied to the ceiling and carefully rolled out with a roller for more reliable gluing.
Apply splen on the layer of vibroplast, glue it and also roll it out with a roller. If everything is done carefully and thoughtfully, one sheet will be enough for the entire ceiling.
Then, upon completion of the vibration and noise insulation work, everything is assembled in the reverse order and secured in place.
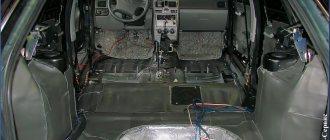
But soundproofing the floor of the VAZ 2115, in contrast to soundproofing the ceiling, is one of the most difficult procedures. Firstly, everything that is in the cabin must be dismantled, and secondly, there are a lot of different shaped elements for which it is necessary to prepare patterns for patterns.
Try to protect yourself from noise and you will certainly feel how much more comfortable it has become in your car. Quiet music, a calm conversation with your interlocutor will bring pleasure, and rain knocking on the roof will no longer irritate you while driving.
Other interesting materials:
Based on materials from the site: https://videovaz.ru
To save fuel, our readers use Artem Abramov’s method. After carefully studying it, we decided to offer this method to you too...
Sound insulation of car doors VAZ 2114, 2113 and 2115 plays an important role in increasing driving comfort. It allows you to solve the following problems:
- significantly reduce the level of noise entering the interior from the street;
- eliminate knocks and creaks produced by internal parts and parts of the door trim;
- improve the sound quality of music in the cabin, especially if the speakers are built into the doors.
Soundproofing the doors of VAZ 2114 , 2113 and 2015 can easily be done with your own hands. The materials used are relatively inexpensive and can be purchased at almost any auto store.
The recommended standard sound insulation of the front doors of VAZ 2114, 2115 and 2113, which, as practice has shown, gives a fairly good result, consists of the following steps:
Useful tips
Today, many owners of the VAZ 2114 install new acoustics in the car, more powerful and productive. They buy an expensive subwoofer (see 1000-watt subwoofer and a review of the best models), a powerful amplifier (see The best amplifier for a subwoofer and how to choose it) and a lot of other useful things that significantly increase the level and quality of sound. But imagine their disappointment when all the money spent turns out to be thrown down the drain, since the sound still leaves much to be desired.
It turns out that the whole point is insufficient insulation of the car body panels, through which noise penetrates from the outside. It’s no longer possible to enjoy clear sound: rattles, vibrations, knocks - all this degrades the quality.
As mentioned above, car doors are very important in this regard.
Here's what you need to focus on:
- They must be insulated on both sides, although excessive zeal should not be shown either. Heavy doors mean they may sag over time;
Sound insulation for VAZ 2114
- In addition, we must take into account the fact that the doors of the VAZ 2114 are often covered with cellophane. The latter makes unpleasant sounds and creaks in the cold season in the frost;
- It is advisable to lay materials on the door in large pieces (as much as possible). The materials used should not be visible beyond the edges of the sheathing.
It’s not difficult to learn how to carry out “Shumka” with your own hands. Step-by-step instructions, photos, materials, and videos will help in this matter. The factory standard insulation must be completely stripped off so that new materials can be installed efficiently.
Do-it-yourself noise insulation of VAZ 2115
Removal of the casing and subsequent disassembly must be done extremely carefully. It is important to remember (or better yet, write down) the sequence of operations, the correspondence of the unscrewed bolts and screws to their holes. For convenience, you can lay out the parts on a large surface in order of disassembly. The door closing mechanism and the window lift do not need to be removed - they will not interfere with the work, but putting them back is quite difficult.
Cleaning the inside surface of the door. It is necessary to remove the factory sound insulation and other coatings that may peel off (anti-corrosion coating, etc.), but it is important not to scratch the paint. The surface of the metal must be thoroughly cleaned and degreased - for this it is recommended to use White Spirit solvent; the very bottom of the door does not need to be degreased.
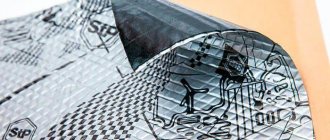
Sticker of the first layer of soundproofing material. The inner surface of the panel (the wall of the door facing outwards) is pasted over with vibration-damping material (self-adhesive Vibroplast Gold STP or its equivalent is recommended) - pieces are cut approximately in the shape of the contours to which they will be glued.
This work, of course, is not easy - you need to contrive to stick “Shumka” through the openings of the technological holes, which is quite inconvenient, especially in the far corners. To avoid cutting your hands, it is advisable to work with gloves, using available means for pressing the material to the surface - a rolling roller (where it can be reached), flat tools, wooden blocks, etc. Where it is impossible to glue whole pieces, you can glue individual pieces overlapping each other, you need to cover as much surface as possible. When sticking Vibroplast, it is important not to close the drainage and ventilation holes so that condensation does not accumulate inside the door. If a circle cut from Bitoplast is glued behind the speaker on top of Vibroplast, the sound quality will improve, since the speaker will not resonate with the door.
Elimination of knocking and creaking of parts of the internal “stuffing” of the door. It is advisable to wrap all kinds of wires, rods, etc., located inside the door body with Madeline so that they do not knock when shaking; we pay special attention to the places where they come into contact with the body - here they can be wound in two layers. It is also very useful to make a Madeleine gasket along the contour of the door where the trim is attached.
Vibration isolation of technological openings. Factory-made holes are sealed with the same Vibroplast (pieces in the shape of the holes with an allowance of material along the contour for gluing).
Then it is recommended to cover the metal surface of the door on the trim side with Accent sound absorber or at least Bitoplast 10 mm thick. You should try to cover this surface completely, bringing the wires out (if any) and leaving the speaker exposed. Before this stage, it is necessary to check the serviceability of the lock mechanisms and window regulators, tighten the fasteners and, where necessary, apply lubricant.
Soundproofing of the casing. To reduce vibration and sound resonance of the casing, it is recommended to stick pieces of a vibration damper on it (preferably Vibroplast Gold) - not necessarily on the entire surface, so as not to unnecessarily weigh down the door - it is enough at the joints of the casing parts and on wide, flat areas.
Door assembly. Assemble the door, observing the correct sequence of operations. When installing the casing, replace the pistons with new ones or fasten it with self-tapping screws, where possible.
Soundproofing of doors 2114, 2115 and 2113 (rear doors and doors without audio system speakers). The technology described above is recommended for soundproofing doors that have powerful speakers installed. For doors without speakers or with low-power speakers, this procedure can be significantly simplified - just stick a layer of Vibroplast onto the panel and door trim, and also wrap the sealant around the wires and rods inside the door body.
When installing sound insulation, it is not recommended to use heavy materials - they increase the load on hinges and locks, which can lead to their deformation and problems with closing doors in the future. To increase the effect of sound insulation, it is also recommended to improve the door sealing - update the door seals or replace them with higher quality analogues.
In conclusion, it should be noted that sound insulation of the doors of VAZ 2115, 2114 and 2113 will give the desired effect only with an integrated approach, that is, if other parts of the interior are modified accordingly: hood, roof, floor, trunk, etc., otherwise on its own this operation does not make sense.
How to pay TWICE LESS for GASOLINE
- Gasoline prices are rising every day, and the car's appetite is only increasing.
- You would be happy to cut costs, but is it possible to live without a car these days!?
But there is a completely simple way to reduce fuel consumption! Don't believe me? An auto mechanic with 15 years of experience also didn’t believe it until he tried it. And now he saves 35,000 rubles a year on gasoline! Read more about this at the link.
Preparing for work
- The first thing you need to do is choose clothes. Take something you don't need. You will 100% get stuck in bitumen from the edges. It's hard to peel off. I advise you to do all this in slippers, for the convenience of jumping in and out of the car.
- Tools. You will need a roll of fabric towels and a solvent (White spirit) to degrease surfaces. Set of keys: Heads for 10, 13, and a slotted Zhiguli key for removing seats. Choose from a screwdriver or screwdriver. Table spoon, for smoothing vibration-absorbing materials. A sharp construction knife, preferably 2 at a time if a group of people will be working. Rubber gloves for working with solvents. A friend spilled it on his hands, after about 20 minutes there were minor burns from it. Double sided tape. If desired, buy phosphoric acid with zinc. The price is 200 rubles at the construction site. Rust remover. Works great. It is better for her to remove the found spots during her work to avoid the germination of rot under the insulation.
- A bunch of bags. Do not be surprised. Place each interior section, screws, nuts, washers in a separate bag and label it. Better yet, take a photo of where it’s coming from on your phone. Believe me, this will cut the interior assembly process in half, or even three. Be sure to take pictures of connecting all the connectors to the buttons and so on. Otherwise, you’ll get yourself a bunch of hemorrhoids if you don’t understand wiring.
Do-it-yourself noise insulation using the example of a VAZ 2114 - photo report
In order to make sound insulation for a VAZ 2114 you will need the following material:
- Vizomat MP (StP);
- Stroyizol SD 90;
- Splen 3004 (StP);
- Accent 15 LM KS (StP);
- Vibroplast Gold (StP);
- Adgilin.
Work tool:
- Ruler;
- Roulette;
- Square;
- Household hair dryer;
- Installation;
- Screwdriver Set;
- Awl;
- A set of keys;
- Scissors.
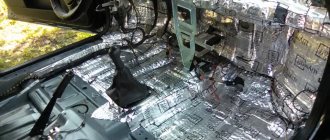
1. First of all, you need to remove everything from the interior that could get in the way - that is, everything, including upholstery, panels, etc., do everything as in the photo.
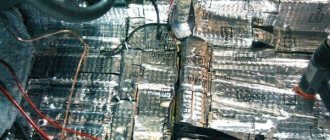
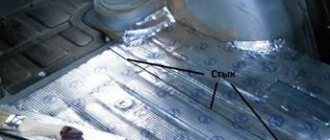
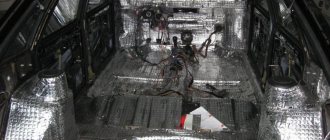
Using vibration-absorbing Vizomat MP, it is necessary to seal the entire surface of the trunk floor, see photo.
This is done in order to remove excess noise and vibration, as well as increase the rigidity of the structure. This causes a decrease in vibration levels and also shifts noise waves to the lower, low-audible frequency range. In addition, the material promotes heat retention and maintains the interior microclimate in the summer heat, keeping it cool longer than in conventional cars. To glue Vizomat MP you need a household hair dryer. Gluing occurs after the material softens and becomes soft and elastic. The adjustment of the material to the curves of the body should occur immediately, and quite quickly, but not at the expense of quality; if you delay, the material will “stiffen” and the fit will not be tight. Simply put, you will have to heat it again, in this case directly at the gluing site. In order to stick the material, you will need special rolling rollers; if you do everything yourself, the sound insulation of the car may not work or its quality will be very low.
It was not always possible to use large sheets for gluing, so I had to overlap them (15-20 mm). Remember that when gluing, you cannot seal technological holes, parts fastening elements, hatches, etc., that is, things that will need access after soundproofing.
Vibration insulation should be maximum, that is, cover the floor and ceiling with the obligatory entry under the dashboard. The sound insulation is glued on top of the vibration-proofing layer, and the end result is also good thermal insulation of the interior.
Let's summarize what the sound insulation of the VAZ 2114 gives us
1. The noise coupled with vibration isolation completely justified themselves, in addition, owners of not new cars will have the opportunity, in the literal sense, to get to know their car, or rather, its body better. As the work progressed, minor defects were discovered and eliminated: rust, anti-corrosive coating, etc.
2. Soundproofing is a very real undertaking that even the most “distant” car owners can do; there is no need for “super” skills, expensive tools or anything else, all you need is patience, desire and a lot of free time.
3. The maximum reduction in noise levels coming from outside has been achieved in the cabin. The ride has become more comfortable, the sound of the audio system has become much clearer, and now you don’t need to turn up the volume to maximum to hear words.
This material will be devoted to the topic of noise insulation, which is carried out inside the trunk and doors on a VAZ 2114 car. For the domestic “fourteenth” this is a useful measure that can significantly reduce the noise level inside the cabin, as well as in the luggage compartment. Consequently, sound insulation has a positive effect on the comfort of the driver and passengers of the car.
Photo of a door glued with Shumka on a VAZ 2114
Sheet selection
You must immediately understand that for different parts of the interior, it is necessary to use different materials. And that vibration isolation is not the same as heat and noise insulation. The noisiest part of the VAZ 2114 is, of course, the engine compartment and the gearbox tunnel. This also includes the wheel arches, namely the pillars. It was chosen to glue StP Bimast bomb Premium on them. I got 4 sheets. iSilver 30 was placed on the floor of the cabin. It took 12 sheets. iSilver 30 10 sheets were used for the doors and ceiling and hood. A Barrier 8 x 2 sheets for the ceiling was purchased. and BiPlast 10K to eliminate crickets. There is the same material, but with tape. It turns out more expensive. It’s easier to take one leaf and have someone cut it into strips 1-1.5 cm wide. The most Jewish part of the purchase! As a heat and sound insulating material, we chose a simple roll on the construction market. Its price is 1000-1200 rubles. Moreover, there are 30 square meters. In the end, it was left for gluing the roof))) According to the receipt 6725 materials StP + 1100 rubles market.
Doors
Sound insulation of doors has a direct impact on the level of comfort inside the VAZ 2114 car. If you carry out similar work, you will simultaneously solve several problems:
- Get rid of some of the noise that comes into the car from the outside;
- You will be able to eliminate squeaks and knocks that are typical for the VAZ 2114 due to the peculiarities of the skin and the location of internal parts;
- Improve the sound quality of your audio system. Sound insulation of VAZ 2114 doors is especially important if speakers are built into the doors.
As in the case of the trunk, door processing includes several stages:
- Disassembly. First, remove the door trim. Just do it carefully, be sure to write down or very carefully remember the dismantling sequence. This is the first and most important condition for successful reassembly.
- Surface cleaning. After removing the factory noise and other elements, clean and degrease the metal. Be careful with the paint and do not damage it with tools. The bottom of the doors does not need to be treated with degreasing compounds.
- Applying the first layer of sound insulation. To cover the walls that go outside, I use vibration damping material. The elements are cut along the contour of the compartments and glued. The work is quite difficult, since you need to manage to paste the surfaces through small holes. Wear gloves when performing noise to avoid injuring your hands on metal components. If you are gluing not a solid piece, but small pieces, do it overlapping.
- Fighting knocks and squeaks. Wrap wires, rods, and other parts that are possible using Madeline. This will avoid knocking noises when the car is shaking. Pay attention to the areas where the parts come into contact with the body. A double layer of material is allowed here. It would not be superfluous to make a continuous gasket of the same material along the entire contour of the doors where the trim is attached.
- Vibration isolation protection for technical holes. Technological holes should be treated with pieces of Vibroplast. A useful measure that gives good results in protecting against vibrations and their consequences for a comfortable ride.
- The metal surfaces of the door on the trim side are treated with Accent. This is a sound-absorbing material. If it is not there, use Bitoplast. Only the thickness of such material should not be more than 10 millimeters.
- Sheathing processing. To prevent the casing from resonating and vibrating, apply Vibroplast Gold vibration damping material to its surface. It is not necessary to cover the entire surface, since this will make the doors noticeably heavier. The most important thing is the joints of the sheathing elements and wide, even elements.
- Assembly. Before you begin assembly in accordance with your instructions, make sure that the window regulators and other elements located in the door are in good condition.
The best sound insulation is comprehensive. Therefore, it is still recommended to protect your VAZ 2114 from internal and external noise. Start small, gradually working on the roof, hood, fender liners and other elements. By doing this, you will be able to achieve amazing comfort and silence in the interior of your car.
Pasting materials
Vibro
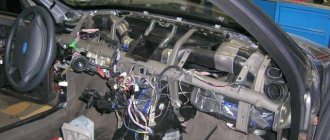
The work is painstaking. Since the vibration isolator is placed first. And it should follow the shape of the body. This is where you need a spoon. It's very convenient for her to iron everything. Advice! Immediately where you see, cut technical holes. Then you simply won’t find it. All surfaces are first wiped with a solvent in order to clean them and degrease them. The most difficult part was pushing that same Bimast under the standard insulation in the engine compartment area. Since we did not remove the torpedo. Two of them were holding their native Shumka, my friend and I were ironing it. They also placed bimast on the box tunnel, since it produces a lot of crunches and vibrations. It is better to work with it by pre-heating it with a hair dryer. It will become much softer and more pliable. There were no problems with the rest of the cabin. I would like to note that it is simply not even necessary to paste over absolutely everything, without small gaps between the sheets. This material acts as a vibration dissipator. And based on the physics course, if you take a square sheet and paste it 80%, you will not see the difference from 100% pasting. In the photo below you will see that in some places we neglected accuracy.
Thermal noise
It's much easier here. It doesn’t matter at all whether this material will lie perfectly following the shape of the body, or whether you throw it away, securing it with double-sided tape. Again, let's call on physics, air dampens sound and retains heat. So the gaps between the heat noise and the vibration are even useful. Remember about technical holes!
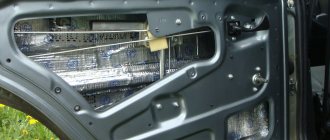
Separate doors
The most convenient way is to glue exactly 1 sheet of iSilver 20 to each door, then use the trimmings on the trunk, for example. I advise you to invite a friend with thin long arms. To glue doors through technical slots. Give him gloves, otherwise he will cut all his hands with the edges of those very holes. We carefully glued only the driver's and passenger's doors from the inside. They glued them inside the rear ones as best they could. The anti-corrosion coating on the doors will still have to be thoroughly wiped off. Don’t be afraid where you erase it, cover it with bitumen. Therefore, nothing will start to rot there.
A few words about the hood
Vibra should be glued only according to the shape of the slots. And cover the top with one sheet of Shumka with double-sided tape.
Third layer
We completely cover the technological holes on the inside of the door with vibration insulation. At the same time, using Madeline, we “hide” all the contact points of the parts (wires, boundaries for attaching the speakers and trim to the door);
vote
Article rating
Description
Soundproofing with work and materials for VAZ from 12,000 rubles.
VAZ cars: Kalina, Priora, Granta very quickly won the favor of many people, however, they, like 2109, 2110, 2111, 2112, 2113, 2114, 2115 and Niva, are quite inferior to foreign cars of a similar class in terms of comfort, as well as noise and vibration stock cars are significant. Therefore, sound insulation of the VAZ is a mandatory additional option. Moreover, it is necessary to carry out complete sound insulation of the car, paying special attention to the treatment of plastic elements of the interior (sound insulation anti-creaking). The specialists of our specialized noise insulation center will completely disassemble the interior in one working day and treat every problem area, doors, engine compartment, interior and luggage compartment, using the most modern professional noise and vibration damping materials Standardplast STP.
Soundproofing of vases price. The cost of installing sound insulation on a VAZ is significantly less than that of official dealers and service centers, and the quality is much higher. We offer exclusive conditions for installing sound insulation on VAZ cars (sound insulation for classics). Full or partial sound insulation of a VAZ car will reduce the noise level in the cabin from 30% to 70%, compared to a car that has not undergone sound insulation.
Sound insulation of a Lada (VAZ) car in Moscow, in a day, or rather within a few hours, in your presence, with a photo report, with a guaranteed result.
We present to your attention our photo reports, examples of our work on maximum sound insulation “Olympus” of Lada (VAZ) cars.
Please select topics you are interested in to view
- All photo reports on sound insulation of other car models Please > > >
- I would like to read in more detail about the Olimp sound insulation Please > > >
- I would like to get acquainted with all the options for complete sound insulation Please > > >
- I'm interested in reviews from people who have already done soundproofing. Please > > >
Soundproofing of Lada cars
Photo reports will be issued soon
Lada Priora Lada Largus Lada Vesta Lada (VAZ) 2115 Lada (VAZ) 2110
We specialize in sound insulation of VAZ models:
- Sound insulation of a VAZ 2101 car (sound insulation 2101, sound insulation VAZ 2101)
- Sound insulation of a VAZ 2102 car (sound insulation 2102, sound insulation VAZ 2102)
- Sound insulation of a VAZ 2103 car (sound insulation 2103, sound insulation VAZ 2103)
- Sound insulation of a VAZ 2104 car (sound insulation 2104, sound insulation VAZ 2104)
- Sound insulation of the VAZ 2105 car (2105 sound insulation, sound insulation of the VAZ 2105, sound insulation of the car 2105, sound insulation of the VAZ 2105 car, VAZ 21053 sound insulation)
- Sound insulation of a VAZ 2106 car (sound insulation 2106, sound insulation VAZ 2106)
- Sound insulation of the VAZ 2107 car (sound insulation 2107, VAZ 2107 sound insulation, sound insulation of the car 2107, sound insulation of the VAZ 2107 car, VAZ 21074 sound insulation, sound insulation 21074, sound insulation VAZ 2107, Shumka VAZ 2107)
- Sound insulation of a VAZ 2108 car (sound insulation 2108, sound insulation VAZ 2108)
- Sound insulation of the VAZ 2109 car (sound insulation 2109, sound insulation of the VAZ 2109, sound insulation 21099, sound insulation of the VAZ 21099, sound insulation of the car 2109, sound insulation of the VAZ 2109, sound insulation of the car 21099, sound insulation of the VAZ 21099, sound insulation of the VAZ 2199, noise insulation 21093, sound insulation VAZ 21093, Shumka 2109 , VAZ 2109 Shumka, Shumka 21099)
- Sound insulation of the VAZ 2110 car (sound insulation 2110, sound insulation of the VAZ 2110, sound insulation of the trunk 2110, sound insulation of the VAZ 2110, sound insulation of the VAZ 2110 car, Shumka 2110, Shumka VAZ 2110)
- Sound insulation of a VAZ 2111 car (2111 sound insulation, VAZ 2111 sound insulation)
- Sound insulation of the VAZ 2112 car (sound insulation 2112, sound insulation of the VAZ 2112, sound insulation of the car 2112, VAZ2112 sound insulation, sound insulation of the VAZ 21124, sound insulation installation of the VAZ 2112, Shumka 2112, Shumka VAZ 2112)
- Sound insulation of a VAZ 2113 car (sound insulation 2113, sound insulation of a VAZ 2113, sound insulation of a VAZ 2113 car)
- Sound insulation of the VAZ 2114 car (VAZ 2114 sound insulation price, sound insulation 2114, sound insulation VAZ 2114, sound insulation of the car 2114, sound insulation VAZ 2114, 2114 Shumka, Shumka VAZ 2114)
- Sound insulation of the VAZ 2115 car (sound insulation 2115, sound insulation VAZ 2115, sound insulation of the car 2115, sound insulation VAZ 2115, Shumka 2115, Shumka VAZ 2115)
- Sound insulation of VAZ 2120 NADEZhDA car
- Sound insulation of the VAZ 2121 4X4 car (sound insulation 2121, sound insulation 21214, Niva 2121 sound insulation, sound insulation VAZ 2121, sound insulation VAZ 21214, sound insulation 21213, Niva 21214 sound insulation, sound insulation 21124, VAZ 21213 sound insulation, sound insulation Niva 21213)
- Sound insulation of a VAZ 2123 car
- Sound insulation of a VAZ 2129 car
- Sound insulation of a VAZ 2131 car (sound insulation 2131, sound insulation Niva 2131, sound insulation VAZ 2131)
- Sound insulation of a VAZ 2328 car
- Sound insulation of a VAZ 2329 car
- Sound insulation of a VAZ Niva car (sound insulation of a Niva, sound insulation of a Niva car, Shumka Niva)
- Sound insulation of the car GRANTA (Granta sound insulation, sound insulation of Lada Granta)
- Sound insulation of the KALINA car (sound insulation Kalina, sound insulation of the Lada Kalina, sound insulation of the Kalina station wagon, sound insulation of the Kalina car, sound insulation of the Lada Kalina station wagon, Shumka Kalina)
- Sound insulation of a car LARGUS (sound insulation Largus)
- Sound insulation of the PRIORA car (sound insulation of the Priora, Lada Priora sound insulation, sound insulation of the Priora station wagon, sound insulation of the Priora sedan, Lada Priora station wagon sound insulation, sound insulation of the VAZ Priora, complete sound insulation of the Priora, sound insulation of the Lada Priora car, sound insulation of the VAZ 2170, sound insulation of the VAZ 2171, installation of sound insulation on the Priora, Shumka Priora, Lada Priora Shumka)
- Car soundproofing REVOLUTION
- Sound insulation of the car 1111 OKA (sound insulation oka)
- Sound insulation of LADA car (Lada sound insulation)
Table
Materials for vibration and noise insulation:
| Vibration isolation | Sound absorbers | Sound insulators | Anti-creak |
| Designed to reduce the level of vibrations emitted by the most important components and assemblies of any car. These include the engine, transmission, and wheels. The most important places for vibration isolation of a car are the wall of the engine compartment and wheel arches. The listed elements must be especially carefully glued with vibration-absorbing materials. | Provide excellent noise absorption performance. Figuratively speaking, they “absorb” all sounds and “destroy” them, preventing further propagation of the sound wave. The materials have an adhesive layer and an open porous structure, and are glued directly to the vibration. The main effect in car sound insulation comes from materials in this category. | A material used when carrying out soundproofing work on a car, the main task of which is to isolate it from external sounds. The distinctive ability of a sound insulator from a sound absorber is that the insulator, simply put, reflects the sound wave (that is, sends it back), and the absorber “absorbs” and “destroys” it. | This type of material, as the name suggests, is designed to successfully combat sources of squeaking - parts rubbing against each other. |
| Materials: | Materials: | Materials: | Materials: |
| Bimast Bomb STP | Bitoplast | Splen | Bitoplast 5-10 mm |
| Bimast Super | Accent | Noiseblock STP | Madeleine |
| Bimast Standard | Isotone | ||
| Vibroplast Gold STP | |||
| Vibroplast Silver STP | |||
| STP Aero | |||
| Vizomat PB-2 | |||
| Vizomat MP |