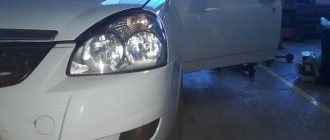
The standard sound insulation of the Priora car leaves much to be desired. Car enthusiasts strive to correct this deficiency with their own hands, since extraneous sounds irritate and distract the Lada Priora while driving.
They make noise on the doors, floor, arches, ceiling, engine compartment, hood, trunk, panels, dashboard - after this the Priora becomes a quiet car. The source of extraneous sounds can be a malfunction of the engine, its components, malfunction of suspension parts, brake system, steering, etc. Unpleasant sounds occur when driving on gravel roads due to vehicles passing by, especially heavy vehicles. To get rid of unpleasant sensations, it is necessary to modify the standard sound insulation. You can do this yourself. Depending on the body type: hatchback, sedan, or station wagon, the Shumka technology is slightly different. Read the article to the end and we will tell you how to do it correctly!
It is necessary to purchase materials and acquire tools in advance.
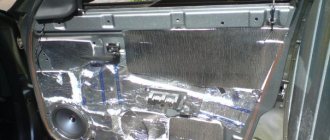
How to soundproof doors
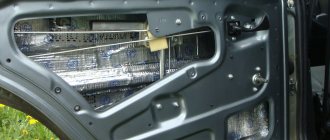
To perform soundproofing of Lada car doors, you need to remove the handles and trim material. Eliminate the stock version. Then clean the surface from dirt and degrease. Before use, warm up with a hair dryer. It is applied to the surface in separate elements. Make sure all wires fit freely into the holes. Next, you can apply vibration insulation and sealant to them. A noise absorber must be placed on top. Glue anti-creaking on the border of the material. Reinstall the trim and handles. Start soundproofing the Priors from the front doors, then the rear ones. The anti-corrosion coating should not be damaged.
Replacement of carpet flooring on VAZ 2108, VAZ 2109, VAZ 21099
Unfortunately, during the life of the car, most parts wear out and require replacement. Today we will renew the floor covering, and as an addition we will describe in detail the procedure for replacing soundproofing material. Operations will be carried out on Samara family vehicles.
Note! You will need the following tools: several types of screwdrivers, an extension cord with a socket head, a wrench and thin pliers.
Removal
1) Remove the front seat together with the slides installed on it (instructions are described in the article: “Replacing front seats”)
2) Remove the floor tunnel lining. (explained point by point in the note: “Replacing the floor covering”)
3) Using a screwdriver on both sides, pry out the decorative plugs covering the seat belt bracket lower mounting bolts.
4) After removing the plugs, unscrew the two belt mounting bolts on each side.
5) Remove the brackets from both sides, taking them out together with the unscrewed mounting bolts.
Note! There is a metal sleeve on the bolts, be careful not to lose it!
6) Next, unscrew the 2 screws securing the middle pad to the stand and remove the pad.
7) Now move to the side front doors. On each side, unscrew the three screws securing the upper sill trims.
 Remove the screws from the car.
9) Using a screwdriver, remove the four screws securing the front lower sill panels.
10) Remove the covers from the machine.
11) Go to the rear doors of the car and use a screwdriver to remove three screws at the rear sills on each side.
10) Remove the pads and use your hand to pick up the carpet, lift it up and remove it.
Installation
This is done in the reverse order of removal, taking into account the following nuances:
1) Check the sound insulation for moisture, dry if necessary.
3) There is no need to tighten the cover screws too much to avoid damage.
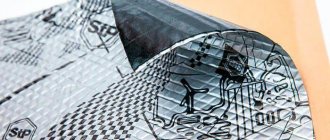
First layer of vibration isolation
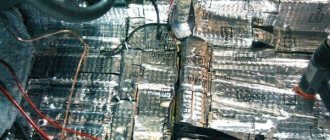
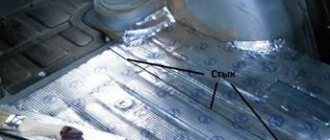
It is necessary to prepare the surface. Determine the required sheet size. The larger it is, the fewer joints you will end up with. Before use, the material is heated with a construction hair dryer on the side where it is treated with bitumen. Then the layer is applied to the base, fixed and straightened using a roller. To obtain a better result, it is recommended to use another layer. Lay it out overlapping. Depending on the quality of the chosen substance, the area that needs to be covered depends. On average it is 50-100%.
Also check out
- Remove dirt from the floor and degrease it with white spirit. Thereby preparing the surface for gluing sound insulation .
- Place “Bimast Super” in the area of the front arches behind the pedals, “Bimast Bombs” - behind the glove compartment. You can use a hairdryer to heat it, but everything can be done faster using a blowtorch.
- We lay the 2nd layer of Splen 8 mm and 2 mm near the center console and sills; it is better to put Splen 2 mm on the console itself.
- Put back the carpets and upholstery and reassemble the center console.
Roof
The roof and hood of the Lada Priora are the easiest elements to start working with. The standard sound insulation of the ceiling of a Lada Priora car consists only of upholstery. The work begins with preparing the base by dismantling the factory cladding. One can be removed through the rear door or through the luggage compartment. The adjacent plastic covers are also removed. The surface is cleaned of dirt, dust, and treated with a solvent or degreaser. Allow the surface to dry. Prepare a piece of insulating material of the required length, a hair dryer, a knife, and a roller. Try to minimize the number of segments. Preheat the sheets with a hairdryer. When the surface warms up and becomes sticky, fix it on the ceiling. Roll with a roller. Next, apply a layer of material that absorbs sound waves. Splen is most often used. It retains heat well and has an adhesive backing. It is not difficult to fix it on the ceiling of the priors. Splen is applied to the entire surface. To consolidate the insulating effect, you can supplement the cladding with a layer of bitoplast.
After finishing, the upholstery is installed in the reverse order. Keep in mind that the thickness of the layers of noise-absorbing material of the Prior should not be too bulky. Otherwise, the bolt holes for the passenger handles will not line up. In general, for a prior you will need 2 sheets of splen, 2-3 sheets of bitoplast, 2.5-3 sheets of insulating material.
Damp carpet in the back of a Priora
Yes, nothing gets wet after washing. when there is heavy rain in the car there is a flood
Not enough information ! what was done to find where the water comes from
priora 050, August 5, 2011, 11:34 pm
Yes, nothing gets wet after washing. when there is heavy rain in the car there is a flood
sedan or hatchback in general?
pgs42, August 5, 2011, 11:28 pm
I took apart the plastic in this place
pgs42, August 5, 2011, 11:40 pm
Not enough information ! what was done to find where the water comes from
Like I filled my mouth with water.
Koss, August 6, 2011, 08:43
In general, you need to disassemble all the plastic from the side, it’s better to remove the seat so that nothing gets in the way, look at everything, if it doesn’t work visually, although there should at least be some smudges. Then put a hose with water on the roof and sit there pretending to be heavy rain, maybe somewhere it really is rotten or poorly welded, or the seals don’t hold. It would be nice to see the bottom too.
In short, you need to watch it, and it’s better not to be alone.
ps: on my 21090 there was a leak in the trunk, I removed the plastic, sat in the trunk with the seats unfolded, and a friend methodically doused the car with a hose, it turned out that there were a couple of cracks near the headlights, a little sealant, and everything was fixed.
priora 050, August 5, 2011, 10:06 pm
Tell me what to do when it rains, the carpet on the passenger side gets wet. and seat belts. Lada Priora
This is the norm for VAZ. Forget it and live with it.
priora 050, August 5, 2011, 11:34 pm
Yes, nothing gets wet after washing. when there is heavy rain in the car there is a flood
Can't be! I do not trust you.
Lada is completely waterproof!
there are nylon plugs under the bottom and water gets in through them
Tail Gunner, August 6, 2011, 3:47 pm
This is the norm for VAZ. Forget it and live with it.
Well, I don’t know... in Kalina I have dry wood. maybe that's it for now.
Tell me what to do when it rains, the carpet on the passenger side gets wet. and seat belts. Lada Priora
under warranty, a repair engineer came to the salon and showed how loosely the upper part of the door fits against the arch seal and said that this happens to every tenth person (so we are both “lucky”) and the only way out is to bend and press the door or it’s easier (but more inconvenient) to stick another cut seal along the edge of the door itself like this
Actually, it's a marriage. They must replace the MACHINE if they cannot fix it. I would look for a lawyer, not the source of the flood. And he would have bent over the engineer right at his workplace.
Are you missing Bunny?
No, morally. So I’m not interested in guarantee providers in this regard.
There are several reasons and they are all at the door:
1. It leaks from above, then water can be seen on the rugs, seats, and door trim.
You need to move the top hinge of the door closer to the body.
2. This option is more common.
Water gets inside the door onto the upholstery, then onto the rubber seal (it is pressed against the door, there is nowhere to stick) from it under the plastic threshold under the rug and carpet and it is not visible. Although, if you opened the door and saw a little water on the rubber seal at the bottom (the rest of the water is already in the cabin), that’s it.
I put it in the place where I added it and put it inside the door because the seal is below the door trim. Now get hurt
By the way, on foreign cars the doors are completely sealed with cellophane to prevent water and dust.
Thank you in advance for your detailed answers.
| Sergio | 11.07.2013 14:42 |
| TER | 11.07.2013 15:11 |
| Sergio | 11.07.2013 15:16 |
| moydodyr | 11.07.2013 15:24 |
| Vitalek_93 | 11.07.2013 15:30 |
| Vovan the Harsh | 15.07.2013 17:07 |
Patriot, not worth selling, just needs to be disassembled and dried! Take off the seats and carpet and just dry it, at the same time you’ll spill Movil on the sills and underbody, you’ll need two cans! If there is no Shumka, then at the same time you will glue vibration and noise insulation, instead of the cotton wool that is there, it is better to put splen because The cotton wool that stands there serves like a sponge after winter, it absorbs moisture and as a result the floor rots, it’s better to get rid of it!
Good luck with your drying!
| Sergio | 15.07.2013 17:25 |
| Vovan the Harsh | 15.07.2013 18:11 |
| Vitalek_93 | 15.07.2013 18:16 |
How many years does it take to do something to a car for the floor to rot? But all this crap, thoroughly spilled, carpet, upholstery, etc. Spilled with who knows what, sushi or not sushi, it will still begin to mold and rot, with a corresponding smell.
By the way, is another important point the headlights are flooded?
| Vovan the Harsh | 15.07.2013 18:31 |
How many years does it take to do something to a car for the floor to rot? But all this crap, thoroughly spilled, carpet, upholstery, etc. Spilled with who knows what, sushi or not sushi, it will still begin to mold and rot, with a corresponding smell.
By the way, is another important point the headlights are flooded?
| Vitalek_93 | 15.07.2013 18:41 |
| Vovan the Harsh | 15.07.2013 19:02 |
| Vitalek_93 | 15.07.2013 19:06 |
| Vovan the Harsh | 15.07.2013 19:09 |
| YURII.N | 15.07.2013 23:55 |
| Jenek62 | 16.07.2013 00:12 |
Patriot, not worth selling, just needs to be disassembled and dried! Take off the seats and carpet and just dry it, at the same time you’ll spill Movil on the sills and underbody, you’ll need two cans! If there is no Shumka, then at the same time you will glue vibration and noise insulation, instead of the cotton wool that is there, it is better to put splen because The cotton wool that stands there serves like a sponge after winter, it absorbs moisture and as a result the floor rots, it’s better to get rid of it!
Good luck with your drying!
| Vovan the Harsh | 16.07.2013 01:00 |
| 0_Mikhail_0 | 14.04.2015 00:05 |
| Current time: 18:46. Time zone GMT +4. |
Hi all. Where could water be coming from under the rear left carpet?
Will the forged disk 15×6 fit normally?
by Adminrive · Published 04/16/2013
Which companies should I buy a melted filter from?
by Adminrive · Published 04/03/2015
Has anyone encountered this problem?
by Adminrive · Published 06/04/2017
42 comments
- Comments 42
- Pingbacks 0
the plug in the bottom probably fell out or dried out
The same crap, most likely through holes in the floor, there are plugs there. There is water under both, who knows how to dry it out
Alexey, I’ve been in the wind for two days with the doors open
Yes, it seems to me that we need to take it apart, there seems to be a Shumka (rag) lying under the carpet, it will dry out like hell, but the smell is not pleasant
Alexey, the whole interior will have to be dismantled (((
Pavel, the bitches made holes in the body
There’s a lot of water, even if you think logically, that much water won’t get through the ventilation hole, the seal is most likely leaking somewhere
it'll rot like hell. I have less under my driver's license after winter. just kind of wet. newspapers put absorb moisture
Ilya, the mat itself is dry, there are no smudges
Artemy, I have both under the driver and under the rear passenger
Alexey, that’s for sure, there’s water there and it’s also blowing through the belt
damn the same crap(((I dried it for 2 days(and got wet again(((
Pavel, damn, there’s a lot here, it’s impossible to push so much through the hole
Ilya, Idk, I think I looked at everything
Pavel, you have to do whatever you like, start with less, remove the back seat, fold the carpet as far as possible, maybe something will become clearer)
Ilya, I’ll do it at work tomorrow
Here from the plug, I’ll put it on the sealant for the hell of it
Denis, are there any plugs on the front?
Pavel, my front is dry
Pavel, I put the gun on, I’ll dry everything and get to work
Denis, it’s right under my front seat. It may have spread
fucking even worse, I'll have to take everything apart
Pavel, or try putting a sealant plug on the bottom
Denis, thanks, I'll try it
Pavel, but if you put it on the bottom, the plug will fit onto the black piece of garbage, I cut it out where the plug is so that it fits snugly
Soundproofing stages
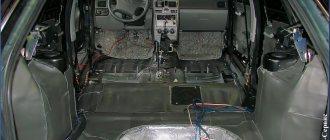
The front and rear row of seats are removed. The central tunnel is being removed. Remove plastic trim and floor covering. Clean the surface from dirt and treat the interior with solvent. The first layer is a heated vibration-isolating layer. Roll over the top. The next layer of material is overlapped. Instead of this material, mastic made from bitumen is suitable. There is no need to cover technical recesses in the floor. Application of splen or bitoplast. They are applied to the entire surface of the floor by priors. To avoid rattling, it is recommended to weigh down plastic elements with pieces of noise-absorbing composition. Cover the joint area with anti-squeak. Install factory sound insulation on the Prior floor.
Rear left locker with noise insulation for Lada Priora (Lada), from 2007 to 2022. Article number NLS.52.16.003
- Manufacturer : Novline
- Brand : Autofamily (Novline)
- Parts : 1 pc.
- Technology : sound insulation is soldered into the locker
- Profile : Current
- Material : HDPE with Shumka
- Note : Soundproof fender liner LADA Priora, 2007-> (rear left)
Delivery
- Delivery in St. Petersburg from 300 rubles (we deliver on the day of order or the next day for most goods).
- Delivery throughout Russia - SDEK. Del.Line. Energy. PEC and others. Prompt dispatch!
- Free pickup st. Kyiv 5t. 2 more points for some products
Payment
- By card on the website (instant payment)
- Cash (only at Kievskaya 5T)
- Bank card. By translation (only on Kievskaya 5T)
*Prepayment is possible for some products
- Presentation of fender liner description
Characteristics and description of the product
Locker with noise insulation for MAZDA CX-5, (rear right). The noise-insulating locker is made of HDPE material (low-density polyethylene) with a non-woven fabric, which has high strength and retains its physical properties in the temperature range from –60 to +80° C.
Tests carried out by the noise and vibration laboratory of Federal State Unitary Enterprise NAMI have officially proven a noise reduction of up to 3 times in the frequency range from 63 Hz to 16 kHz and are recommended for installation on cars. The locker effectively helps protect the car's wheel arch from the effects of aggressive environments, sandblasting, flying small stones, and snow accumulation. The soundproofing material integrated into the plastic will not come off or come off. Precise mounting points and good geometry allow you to install the locker (fender liner) quickly without damaging the paintwork of the body.
Advantages of HDPE material:
- Impact and abrasion resistance
- Neutrality to aggressive chemical environments.
- Not afraid of temperature changes in the range from -60C to +80C.
- Low thermal conductivity (which prevents snow from sticking).
Modern design and manufacturing methods ensure that the mounting locations and product geometry are precisely matched to the vehicle. Each unit of goods is equipped with branded fasteners.
Question answer:
1. WHY DO YOU NEED FENDERS - to protect your car from the abrasive-sandblasting effect, from stones and gravel, from reagents, which allows you to preserve the anti-corrosion and paint layer of the car!
- Wheel arch liners protect the wheel arch from abrasive sandblasting and dirt!
- They improve noise and vibration insulation, which will allow you to enjoy comfort!
- Protect the car from excessive snow accumulation and ice formation, which affects driving performance and driving safety!
2. Cost determines quality - NOVLINE fender liners are designed for the entire service life of the car and reliably protect it from corrosion. It is important to note that the fender liners are designed individually for each model, which ensures the tightest fit to the wheel arch and an exact match with the standard mounting locations, i.e. allows you to avoid additional drilling of the body and not damage the anti-corrosion layer and paintwork.
3. The quality of the material is determined by the quality of the raw materials. The fender liners produced by NOVLINE are made of HDPE - low-density polyethylene, a material resistant to mechanical stress (abrasive-sandblasting effect), the material has the property of not being subject to the adhesion of excessive amounts of dirt and snow, which is important in our climatic conditions. The benzene material is oil-resistant and is not exposed to reagents, thereby the fender liners reliably protect the car body from corrosion. Environmentally friendly material, resistant to temperature fluctuations -60°C to + 80°C.
Trunk
Particularly relevant for Priora hatchbacks and station wagons. Soundproofing the trunk begins with removing the flooring of the interior space and the trunk lid. The surface of the body is cleaned, washed, treated with a degreaser and solvent. Soundproofing of the Lada Priora trunk is carried out according to the standard scheme. A vibration-insulating base is applied in two layers, which is preheated to a sticky state. Then splen and bitoplast are laid. The layers are rolled with a roller.
It is especially important to perform high-quality sound insulation of the luggage compartment arches. It is worth paying attention to plastic elements. The holes must be left open. The wires are insulated with anti-creaking, and the plastic parts are made heavier.
Hood and engine
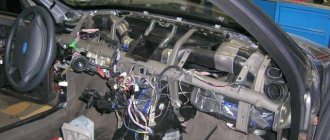
Sound insulation of the engine compartment of the Lada Priora
— the front instrument panel is removed;
— we also remove the factory insulation;
— use a photograph to record the position of all wires and bearings;
— wash the surface, clean it with sandpaper, treat it with a solvent;
— heat the first layer of the vibration isolator to a sticky state and fix it;
- rolled out with a roller;
- second layer - splen, bitoplast;
— insulate the wires with anti-squeak;
- Reassemble the panel in reverse order.
Sound insulation of the hood
In addition to the standard set of materials and tools, you will need factory insulation with clamps. Clean the surface, treat with solvent, and dry. The first vibration-isolating layer, preheated. Roll it out with a roller, then lay the splen. The next layer is standard insulation.
Lada Priora is not a good Shumka. This is easy to fix on your own. The procedure will not take much time and money - if you do it yourself, it will take a couple of weeks and 5 thousand materials. If you do it in a hotel, the price will be from 25,000 rubles.
Manufacturers' recommendations (different methods)
Floor soundproofing installation diagrams with materials:
| Shvi layer | Material | STP (thickness, mm) | Shumoff (thickness, mm) |
| 1 | Vibration isolation (vibration damper) | StP Aero Plus (3mm) Bimast Bomb Premium (4.2mm) | SHUMOFF L3 (3mm) Shumoff Mix F (6.2mm) |
| 2 | Sound-absorbing Thermal insulation | Accent Premium (8-10mm) Barrier (10 mm) or Splen (10 mm) | Shumoff P8V (8mm) |
| 3 (optional) | Soundproofing (soundproofing membrane) | NoiseBlock (2mm) | Germeton A30 (3mm) |
Approximate price of materials:
- Budget option (2 layers, thin vibration damper and heat insulator), up to 4,000 rubles.
- Popular option (2 layers, vibration damper and sound absorber), about 4,000 rubles.
- Maximum effect (3 layers of vibration damper, sound absorber and sound insulator), more than 4,000 rubles.