The exhaust system of many budget cars and middle-class models is not durable in practice. As a rule, the following system elements are the first to fail: muffler, resonator. Unfortunately, the popular models VAZ 2114, 2115 and many others were no exception.
In general, the exhaust system 2114-2115 is a weak point and may require attention after 2-3 years of active use. In turn, the mufflers are usually the first to fail. In such a situation, the owner can immediately replace the muffler on a VAZ 2114 or the muffler on a 2115, as well as repair an existing element.
Next, we will look at the example of model 2114, how to replace or repair the exhaust system of a VAZ 2114, it is better to immediately change the muffler of this system or carry out repairs, in which cases it is advisable to make this or that decision, etc.
Exhaust system design
All parts of the gas exhaust system of the VAZ-2115 car can be easily disassembled, which allows you to replace them yourself, without the involvement of specialists. Main parts of the gas outlet unit:
- Bracket mounting of the exhaust pipe.
- A gasket located between the pipe and the intake manifold.
- The clamping part of the bracket (represents a plate).
- Pipe for receiving gases from the engine.
- Metalgraphite gasket in the form of a ring.
- Catalyst.
- Rubber mounting pad.
- First (additional) muffler.
- Main muffler.
- Rear mounting cushion.
- Fastening clamp (often called brackets).
The location of most of the listed spare parts is under the bottom of the car, which makes them vulnerable to mechanical damage.
The cause may be not only external damage (most often caused by falling into holes or difficult to navigate places), but also exposure to chemical reagents or the influence of climatic conditions.
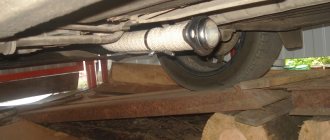
Where is it located?
The VAZ 2115 muffler is located under the bottom, at the rear of the car. It is the last element of the system. There is only a pipe at the back, and even then, it is welded to it.
Directly in front of it is a resonator. Due to the fact that its functions are similar to the element in question, it is called a pre-silencer. In front of the resonator there is a receiving pipe, which is connected to the exhaust manifold.
This is the original configuration, but it may be different. Quite often, the manifold and pipe are replaced with pants, which are also called spiders. This is done in order to reduce power losses of the internal combustion engine due to the presence of the system itself for removing the by-product of fuel combustion in the internal combustion engine. With the correct selection of spider, it is possible to increase engine power from 3 to 10%.
How to notice a node malfunction
It is not difficult to determine that it is time to change parts of the exhaust system on a VAZ-2115 with an 8-valve engine.
Even a novice car enthusiast can cope with this, since the main signs are the appearance of a strong smell of exhaust gases in the cabin and an increased noise level. Most often, faults are hidden in the additional or main muffler, as well as in the gaskets between the connections, which can burn out over time. The classification of the most frequently occurring faults is as follows:
- mechanical damage to the muffler;
- burnout of gaskets;
- corrugation burnout;
- loosening of connections at joints;
- cracks in the system pipes.
Problems can be spotted by visual inspection. Experienced specialists recommend removing gas exhaust units for these purposes. This way you can examine them from all sides and notice the slightest damage. After you conduct a visual inspection of the system, you need to buy spare parts and begin repairs. It's easy to do it yourself.
If there are no external problems, you can try replacing the internal resonator. This repair method will only help those who know how to handle welding equipment.
Small burns and holes can be covered with sealant. Just pay attention: it must easily withstand temperatures up to 1000 degrees. Before applying the composition, it is necessary to thoroughly clean and degrease the surfaces.
Muffler replacement
Using the example of replacing this component, we will show that it is not difficult to repair the exhaust system and dismantle its components. To work, you will need to install the car in the garage above a pit or drive it onto an overpass. Disassembling this node is not so difficult:
- disconnect the main and additional muffler;
- bend the hooks of the hanging straps;
- remove the brackets;
- remove the main muffler, which is mounted on the cushions.
After this, you will need to reassemble in the reverse order, only instead of the old spare part, hang the new one on the cushions. If the fastenings of the clamp connecting the resonator and the muffler pipe are dirty, clean them with a metal brush.
Before assembling the system, clean the gasket ring thoroughly. You can coat it with heat-resistant sealant to reliably seal the exhaust gases inside the system. The above method of replacing a muffler can also be used in cases where you want to tune your car.
Many car enthusiasts install sports mufflers on their VAZ-2115, which have a qualitatively different sound. In this case, you don’t have to wait for a malfunction to appear. Also, the new muffler can improve the environmental characteristics of the car, that is, after replacing this component, it will release less exhaust gases into the atmosphere. Remember that sport or upgraded mufflers will cost more than the stock replacement part.
If you want to tune your car, get ready to spend a lot of money. Buy only new imported spare parts. You should not try to turn an ordinary spare part into a sports modification using welding. This homemade product will not last long. For the same reason, we recommend replacing entire parts of the exhaust system rather than trying to repair them if malfunctions occur.
Source
Reasons for part failure
The muffler is affected by several different factors that can lead to failure, these are:
- Atmospheric precipitation, dirt. Precipitation means the occurrence of rain and snow. A mass that periodically falls on a hot pipe causes temperature changes, destroying the strength of the metal. Unfortunately, it will not be possible to protect the muffler in any way; moisture will in any case affect the metal. A smart solution would be to avoid driving through deep puddles and drive slowly on contaminated sections of the road. If the muffler and pipe are dirty, it is necessary to clean it with water (you can use a pressure jet from a hose). After cleaning, it is recommended to start the engine so that any water that has entered the muffler evaporates.
- Condensate. When the unit is idle for a long time, condensation forms in the muffler, causing a corrosive process. This leads to inevitable destruction of the internal parts of the muffler. This happens extremely rarely, but before the trip it is recommended to increase the operating speed by pressing the accelerator several times. The flow of exhaust gases removes moisture from the silencer.
- Chemical influence. As a result of the release of exhaust gas, a lot of toxic chemical particles settle on the walls of the muffler, destroying the metal, and allowing road reagents to get into the muffler.
- Physical influence. Hitting stones and blows from the muffler when driving on roads also lead to a lot of damage.
The chemical and physical effect on the muffler metal is a natural process. It will not be possible to disassemble and clean the muffler, since the container cannot be opened, and only the attention and professionalism of the driver on the road will help protect it from impacts and stones. Diagnosing and repairing minor damage at the initial stage will help avoid serious problems in the future.
The influence of various negative factors can lead to damage to the corrugation or other parts of the muffler
Extraneous sounds in the jammer
The causes of various noises and knocks in the muffler can be:
- Fastening the muffler to wire or ties. You should not wrap the muffler on a wire, otherwise rattling and knocking will occur. Use only rubber cushions.
- Foreign objects entering through the exhaust pipe. When driving over rough terrain, deep puddles, or driving in reverse, you should not forget that the exhaust pipe is literally 20 cm from the road surface, which means that various masses and stones can be thrown into the muffler. They often knock and rattle.
- Peeling of burnt metal inside the muffler. As a result of chemical exposure, a layer of soot forms on the walls of the silencer. For this reason, over the years, rattling noises can be heard inside the muffler due to peeling metal.
- Condensation also affects the exhaust sound. Condensation forms as a result of prolonged idling while the engine warms up. Ringing and gurgling are signs of accumulated moisture in the muffler. By increasing the speed several times, the condensate comes out and the signs of the malfunction disappear.
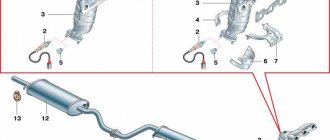
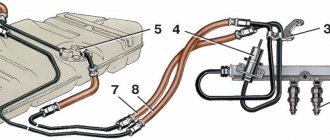
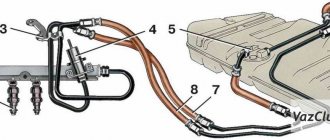
Gas exhaust system (muffler diagram)
For 1.5l engines
- Reception pipe connection bracket.
- Pad.
- Bracket seal.
- Secondary muffler. (Muffler resonator)
- Muffler suspension cushions.
- Main muffler.
- Muffler pipe connection clamp.
- Hinge O-ring.
- Neutralizer.
- Connecting ring.
- Oxygen concentration sensor.
For 1.6l engines
The exhaust system on 1.6-liter engines is distinguished by the absence of a converter (a metal corrugation is installed instead) and the presence of a catalytic manifold (installed immediately after gasket number 3).
For information, the toxicity standard for VAZ 2114, 2113, 2115 is R 83.
All about the exhaust system of the VAZ 2115. Design, breakdowns and repairs
Design features and modern exhaust system on the VAZ 2115. Perhaps the topic is not very relevant, but many drivers do not really know what it consists of and how it can be repaired in the event of a breakdown.
Agree that speeding through the city with a wild exhaust from behind is not to the liking of many. The volume of sound from the muffler depends on how smoothly it works. The main purpose of the system is to remove exhaust gases from the car engine through pipes and channels. Most often, malfunctions occur due to mechanical damage, due to wear or negative influence of weather. Let's look at what it consists of and what are the main ways to fix breakdowns below.
Exhaust system structure
The exhaust system on the VAZ 2115 consists of:
- Bracket for fastening the exhaust pipe;
- Asbestos gasket, which is installed between the pipe and the exhaust manifold;
- Mounting plate;
- Reception pipe;
- Graphite gasket;
- Catalyst;
- Rubber cushion;
- Secondary muffler;
- Main muffler;
- Rubber back cushion.
- Clamp.
- Various mechanical damage;
- Burnout of asbestos gasket;
- Fatigue and wear of the metal and, as a result, burnout;
- Defects at the joints;
- Cracks.
Considering the above, first of all, the driver must determine the source of infection and work out a schematic way to eliminate it. Let's imagine that the muffler on your car has burned out.
. This is the most common phenomenon on many cars and the VAZ 2115 is no exception.
- We must drive the car onto a viewing hole or a stationary overpass;
- We turn off the engine, squeeze the handbrake, wedge the wheels with boots or put it in first gear, you can choose any option;
- Let the exhaust system cool down a little, as it heats up under the influence of exhaust gases. You can easily burn your fingers. We always carry out all work wearing gloves.
- After making sure that the pipes have cooled down, using capes we unscrew the connecting clamps between the muffler and the resonator, otherwise known as the secondary muffler.
- From the rubber clamp-holder, remove the hook with which it secures the muffler to the bottom of the car;
- There will be an O-ring between the connections, be careful not to damage or lose it. Carry out visual diagnostics and replace with a new one if necessary. As a rule, the negative impact affects a short service life;
- Having removed the muffler, we put it aside so that it does not interfere with the process.
- We pre-lubricate the new ring with heat-resistant sealant, in this way we extend the service life;
- Install the system components in reverse order.
- After installation, be sure to start the engine and test the system. Pay attention to ensure that there are no gas leaks, otherwise your work will be down the drain.
- If everything is fine, you can continue on your way. If not, eliminate the shortcomings.
Schematically the exhaust system looks like this:
A flow of gases emerges from the combustion chamber through the exhaust manifold, exhaust pipe, neutralizer, resonator, and the muffler itself.
Burnout of the gasket can also be a weak point or “sore”
between the cylinder head and the exhaust manifold. Despite the tight pressure around the perimeter with the help of four stud bolts. The asbestos gasket still burns out, and the engine emits an unpleasant and loud sound.
Modern cars, including the VAZ 2115, use a neutralizer to significantly reduce emissions into the atmosphere, these are oxides of nitrogen, carbon, and hydrocarbons. Structurally, it consists of two parts with catalysts made of platinum and palladium. Passing through these plates, gases react, resulting in a low-toxic oxide, the harmfulness of which to the environment is minimal. According to experts, purification is about 85-95%.
Monitoring the performance of the neutralizer
carries out an oxygen sensor that scans the content of lead oxide in the gas environment. Cars equipped with such a device are strictly prohibited from using leaded fuel.
Faulty ignition or incorrect adjustment can cause premature failure of the converter. Unburnt gasoline coats the ceramic plates, which makes it difficult for gases to flow out and clogs the system. The first sign may be a sudden loss of engine power. Accordingly, repair or maintenance work is just around the corner.
OUR CENTERS ON THE CITY MAP
Do you want to inexpensively buy and replace a muffler resonator for a VAZ 2115? "MSK Silencer" - urgent replacement of Lada 2115 resonators with a 1-year warranty. What is a muffler resonator?
The resonator is a closed metal module with perforated partitions, the main function of which is to slow down the speed and reduce the pressure of the exhaust gases.
As a result, acoustic pollution of the surrounding space is reduced. The resonator chambers are offset relative to each other, which makes it possible to level out strong gas pulsations, increasing the service life of the exhaust system and the engine as a whole.
Causes and symptoms of VAZ 2115 resonator failure
The main reason for the failure of the resonator is a heavy load on the infrastructure from the inside (high temperatures and pressure) with the influence of external factors (moisture, reagents, cold, etc.) from the outside.
Being under such a double attack, this device often fails, which requires qualified repair work. A malfunction of the muffler resonator can be determined by the following symptoms:
- increased noise when the engine is running;
- metallic rattling in the corresponding section of the exhaust system;
- reduction in engine power due to strong pulsation of exhaust gases
We are ready to eliminate any defects by purchasing the necessary parts ourselves. As a result, you will receive a car with a fully functional muffler, the characteristics of which correspond to the standard parameters.
“Doctor Silencer” is a network of specialized service stations for professional replacement of VAZ 2115 resonators. Service stations are located in all districts of St. Petersburg.
Signs of a resonator malfunction: decreased engine power, unusual sounds (popping, ringing) under the body, the smell of exhaust gases in the cabin. It is possible to repair the resonator if the areas of damage (burnouts, cracks, corrosion) are small. But more often a faulty resonator has to be replaced.
We offer options for replacing the Lada 2115 resonator:
- replacement with a new standard resonator,
- replacement with a new universal resonator.
It is profitable to replace the VAZ 2115 resonator with us:
- Experienced, competent mechanics and professional diagnostic equipment will quickly diagnose and determine the cause of the resonator malfunction.
- Careful replacement, welding in neutral gases followed by anti-corrosion treatment.
- If necessary, we will replace the exhaust system hangers.
By contacting us to replace the resonator, you will receive correct operation of the exhaust system for a long time at a low price.
Replacing a muffler on a VAZ 2115 is not at all as simple as some people think. This will require time and a lot of money. But you can always independently carry out such a pleasant procedure as replacing the muffler of a VAZ 2115. The owner himself will decide what type of this part to install and will monitor the process with his own eyes
The muffler is one of the car parts that attracts the most attention. Although it is located under the car, being the main element of the exhaust gas cleaning system, a lot of effort and time is devoted to tuning it. It’s worth looking at a few successful replacements on domestic cars, and everything becomes clear
An attractive muffler is the calling card of the entire car.
It’s worth looking at several successful replacements on domestic cars, and everything becomes clear. An attractive muffler is the calling card of the entire car.
Tuning the muffler VAZ 2115
But the muffler performs not only functions that are responsible for an attractive appearance. The roar and power emitted by a sports car are no less impressive and attract the attention of many. So:
- A good muffler increases the power of a car engine several times.
- A faulty muffler not only prevents the engine from breathing normally, but also forces others to cover their ears tightly when the owner drives his car.
What is the VAZ 2115 exhaust system and how to replace the muffler
Welcome, friends, to the DIY car repair website. The exhaust system of the VAZ 2115 consists of many components and connections.
In today's article we will look at what it is and how to change the VAZ 2115 muffler yourself in your own garage.
Exhaust system VAZ 2115
First of all, you first need to figure out what the exhaust system is for, what parts it consists of, so that later it would be easier to understand which part of the node connections needs to be changed.
So, I think everyone understands that the VAZ 2115 exhaust system is designed to remove exhaust gases from the engine, which in turn pass through all components and are released into the atmosphere.
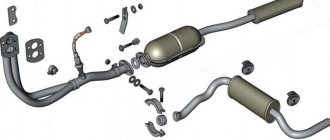
What does the exhaust system consist of:
- Fastening the exhaust pipe connection (bracket).
- Gasket between exhaust manifold and pipe.
- Bracket pressure plate.
- Reception pipe.
- Metal-graphite gasket (ring).
- Catalyst.
- Rubber mounting pad.
- Additional muffler.
- Main muffler.
- Rear mounting cushion.
- Fastening brackets (clamp).
Having understood the device, you can now understand that all parts of the VAZ 2115 exhaust system are easily separated, which means it is not difficult to change them without the involvement of specialists.
All car enthusiasts know that the muffler is located under the bottom of the car, so it is exposed to various mechanical, atmospheric and other influences, which can lead to its malfunction.
We also recommend that you familiarize yourself with the materials on our website, which will help you replace the VAZ 2115 ball joints yourself.
Many people have probably been in such situations when an increased level of noise appears in the car, the smell of exhaust gases, all these reasons are possible due to damage to the additional and main muffler, burnout of the gasket between the connections.
- Mechanical damage.
- Gasket burnout.
- Burnout of the muffler itself.
- Loose connections at the joints.
- Cracks in exhaust pipes.
So, having identified a malfunction of one or another part of some unit, we begin to eliminate it. Of course, before doing this, it must be purchased at a spare parts store. Using the example of replacing a muffler, we will analyze the entire repair process step by step.
Inspection
It is worthwhile to carefully inspect the muffler before starting repairs. And it would be better if the muffler was removed from the car so that it was all visible. After all, when working suspended, bending over in an inspection hole, a person quickly gets tired and may not notice all the defects. So:
- if no damage was found during the inspection, then the cause is most likely hidden in the internal resonator (in this case, you will have to arm yourself with a welding machine, cut out the resonator and replace it with a new one);
- If small holes or burnouts that were formed due to corrosion are discovered during the inspection, then a special sealant with an operating temperature range of 1000 degrees will help (before applying this sealant or, as it is also called, cold welding, you need to thoroughly clean surface);
Cold welding for mufflers
- if large holes are found that cold welding will not help, it will be necessary to use fiberglass (it can be bought at any auto store along with epoxy resin, which is used for gluing).
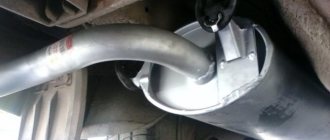
Corrugation repair
Corrugation, in the process of replacing the muffler on a VAZ 2115
It also happens that during the inspection process the unsuitability of the muffler corrugation is discovered. This is a flexible connection that serves to secure the exhaust pipe to the engine. There may be several reasons for the failure of this part:
- a faulty catalyst, which, if clogged, creates excess pressure that negatively affects the corrugation;
- the walls of the corrugation are corroded by exhaust gases, since the rubber mounting of the muffler was damaged or the engine mounts were damaged;
- the corrugation braid has been mechanically damaged by chemical reagents or gravel.
It is believed that the corrugation is one of the weak points of the vehicle exhaust system. First of all, experts recommend paying attention to it. Its design is an elastically tied knot that is capable of absorbing vibrations coming from the machine’s engine. The corrugation is usually replaced with a three- or two-layer braid. The corrugation installation process is not complicated:
- We cut off the old corrugation using a grinder;
- clean the cut;
- welds a new corrugation in this place;
- check the tightness;
- We cover the joints with a layer of paint (this is done to ensure a long service life).
Needless to say, this type of work requires simple skills in handling tools and welding.
Complete muffler repair (replacement of exhaust pipe)
As mentioned above, there may be several reasons for the failure of the muffler. Accordingly, its repair will involve various solutions. So, if the reason is a failure of the exhaust pipe, and exhaust gases break through under the bottom of the car, you need to arm yourself with a set of keys, a new clamp with an internal diameter of 46 mm and a new sealing gasket. First, it is recommended to watch this video, which presents a repair kit of necessary parts.
- we lift the car onto an overpass or inspection hole;
- take a 13mm socket wrench and unscrew the nut of the tie clamp (during the process you need to hold the bolt from turning with a second wrench of the same size);
- move the clamp towards the additional muffler of the system;
- take the lubricant and apply it to the junction of the exhaust pipe and the additional muffler (it will help loosen the rust and the connection will “get wet”;
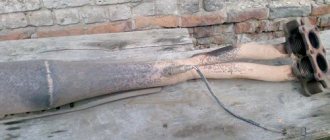
- take a hammer and strike through a wooden block on the surface of the front additional muffler;
- we move it from the exhaust pipe (photo below);
Front additional muffler VAZ 2115
- use a 13mm wrench to unscrew the bolt that secures the exhaust pipe to the bracket (it is sometimes located on the gearbox);
- take a flat-blade screwdriver and bend the edges of the locking plates of the nuts that secure the exhaust pipe to the exhaust manifold;
- take a 13mm socket wrench and unscrew the nuts (there are four of them);
- with our own hands we remove the locking plates, as well as the exhaust pipe flange from the exhaust manifold studs;
Exhaust manifold of a VAZ disassembled
- we find the seal gasket under the studs;
- extract it;
Manifold seal gasket
- we bring the exhaust pipe down so that it is between the crankcase and the steering rod;
- treat the junction of the additional muffler and the exhaust pipe with a graphite-containing lubricant;
- replace the old sealing gasket and install a new one;
- install new parts;
- We assemble the exhaust pipe in the reverse order.
I would like to note that the new nuts securing the exhaust pipe to the manifold must be locked.
Complete muffler repair (replacement of main muffler)
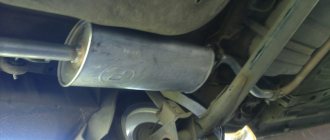
In this case, in addition to exhaust gases breaking through under the bottom of the car, the bottom itself will rattle. You can replace a faulty main muffler with a new one, the price of which is not so expensive. So:
- the car rises onto the pit;
- the additional and main mufflers are separated;
- the hooks of the suspension straps are bent;
- detached from the brackets;
- the main muffler attached to the pillow is removed;
Dismantling the main muffler VAZ
- Installation of all parts is carried out in reverse order.
We hope this article will help you repair your muffler. On our website you can find a lot of material on many types of repairs.
How to replace a VAZ 2115 muffler on your own
We drive the car into a pit or overpass, use a metal brush to clean the bolts on the clamp connecting the muffler pipe to the resonator and unscrew it.
Once the clamp is unscrewed, pull out the O-ring gasket that is located between the connections.
Next, remove the muffler from the rubber pads on which it is suspended. Before installing a new muffler, clean the ring thoroughly; you can even coat the gasket with a heat-resistant sealant, which will allow you to avoid the passage of exhaust gases between these connections.
Assembly is carried out in the reverse order, we hang the new spare part on rubber cushions and connect the resonator to the muffler with a clamp. If other units become unusable, they are changed in the same way.
VAZ 2115 – repair and tuning of the exhaust system
The exhaust system of the VAZ 2115 car is a complete analogue of the exhaust system of the VAZ 2114 car (Repair of the VAZ 2114 exhaust system). The main elements of this system are: a downpipe, a catalytic converter, an additional muffler and a main muffler.
Like the VAZ 2114, the exhaust system of the VAZ 2115 is equipped with an oxygen sensor, which is installed in the exhaust pipe of the exhaust system. With its help, automatic adjustment of the composition of the fuel-air mixture supplied to the engine cylinders is ensured.
To minimize the influence of vibrations on the car body, the main and additional mufflers are suspended due to rubber suspension cushions.
What to choose?
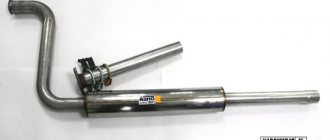
Stinger exhaust systems
There are several options for muffling devices that can be used as a replacement for the old element on the VAZ 2114.
- From the factory, VAZ vehicles are equipped with an aluminum muffler, the service life of which is up to 6 years. Inexpensive, fairly reliable solution.
- More expensive variations made of heat-resistant stainless steel. They cost more than factory ones, but are distinguished by reliability and an extended service life of up to 10-15 years.
Unfortunately, it is not uncommon that replacing a given device does not give the expected result, because instead of the expected high-quality stainless steel element, buyers are faced with counterfeits. They are made from ordinary low grade black iron. The service life of such products is no more than a year.
To give the appearance of expensive products, low-quality mufflers are coated with special paints. Therefore, we recommend purchasing parts from trusted, certified auto parts stores.
Replacing the main muffler on a VAZ 2115 car
To complete this work we will need two “13” keys and a metal brush. We drive the car onto an overpass or inspection hole. Be sure to wait some time until the system elements have completely cooled down.
Using a metal brush, thoroughly clean the mounting clamp, with which the inlet pipe of the main muffler is connected to the outlet pipe of the additional one. Then we treat the bolts holding the clamp together with a substance that corrodes rust. For example, VD-40 can be used as such a product.
Now you can unscrew the bolts: with one key we hold the nut from turning, and with the second we “influence” the bolt itself. It should be noted that in case of severe sticking and corrosion, it may not be possible to unscrew the bolts. In such a situation, they can be cut using a grinder. Such dismantling must be carried out with extreme caution so as not to damage the flanges of the exhaust pipe of the additional muffler.
Replacing an additional muffler
As practice shows, the additional muffler fails (“burns out”) much less often than the main one. Nevertheless, this happens, and therefore we consider it necessary to describe the process of replacing it. To complete this work we will need two keys for “13” and two keys for “17”.
First of all, unscrew the bolts securing the resonator to the catalytic converter. We pull out the bolts and disconnect the pipes.
Then we need to disconnect the additional jammer from the main one. To do this, unscrew the two bolts of the tightening clamp using two “13” keys. Remove the clamp and disconnect the pipes. Next, lifting the resonator, remove it from the rubber cushion and pull it out from under the car. If manually removing the muffler from the rubber clamps is problematic, pry them off with a screwdriver.
Installation of the new part is carried out in the reverse order: we fix the new resonator on suspensions, attach it to the catalyst and the main muffler. When installing a new part, it is advisable to replace heavily worn clamps, bolts and nuts.
Removing and installing the catalyst
Removing and installing a catalytic converter on a VAZ 2115 is a relatively simple task. The procedure itself is carried out in several stages:
1. Using keys “17”, unscrew the fastening of the catalyst to the exhaust pipe of the exhaust manifold. We take out the bolts and spring washers;
2. Place a suitable stand under the catalyst. The fact is that the catalyst on the VAZ 2115 car is not fixed with the help of any rubber hangers, and therefore, in order for it not to fall on your head, after unscrewing the fastening bolts, it must be secured somehow. This can be done either by installing a stand under it, or by temporarily securing it with wire;
3. Now unscrew the catalyst from the inlet pipe of the additional muffler and carefully remove it.
We install the new catalyst in the reverse order.
Waja for lagman
This is a dish made from meat and dough. The meat part is a kind of thick gravy, mainly made from mutton, lamb and vegetables. The Uzbeks and Tajiks - the peoples who figured out how to cook lagman - never ate pork, as well as fatty poultry, for example, such familiar geese and ducks. Even chickens rarely made it to their table.
Read more: Replacing the driveshaft crosspiece of a VAZ 2107, how to remove it, change which one is better, put instructions with photos and videos
But game was very popular. Well, veal and beef also enjoyed culinary success. This feature must be taken into account if you not only want to know in detail how to prepare traditional lagman, but also want to observe these traditions. By the way, in the Uzbek dialect the gravy is called vaja.
Vaja gives food that very colorful aroma and taste for which the dish is so valued in Central Asia. The noodles must be very tender to complete the culinary delight. That’s why it rolls out very thinly. And it is sliced just as thinly. So, how to cook Uzbek lagman? Let's start with the test.
Roll the prepared dough into a ball and let it rest for 15-20 minutes, covered with a linen towel. Then cut small pieces from the ball and roll out the dough so that it is as transparent as possible. Sprinkle well with flour while rolling, otherwise the dough will stick to the rolling pin and cutting board and tear.
You need to further roll up a roll from each layer and cut it into thin long strips with a wide, very sharp knife. Boil the noodles in small portions in salted boiling water, rinse well, place on a sieve to drain, and season thoroughly with vegetable oil so that you don’t get a solid lump of dough.
Since we are introducing you to the national Central Asian cuisine, we are talking about how to cook lamb lagman. For this you need: meat - 500-600 g, lamb fat - 200-300 g, several large potatoes, 2 carrots, also quite large. And also radishes, beets (1 piece each), a pod of pepper (sweet), about 100 g of cabbage, 3-4 onions (if small, then 5).
This moment is no less important than making noodles. Chop the radish, tomatoes and potatoes into small cubes. Cut the carrots and cabbage with beets into strips, peppers and onions into rings, finely chop the garlic. Melt the lard and calcine it in cast iron, put chopped meat into it and fry until crusty.
Then add the onions and tomatoes and simmer for a few minutes, reducing the heat slightly. After this, add the remaining vegetables, salt, garlic and spices. Pour in one and a half glasses of the water in which the noodles were cooked and simmer, stirring, over very low heat for another half hour. The second stage of the sacred ceremony at the stove is over!
Bon appetite!
Tuning the exhaust system of VAZ 2115
Direct flow installation
In this case, everything depends on the financial capabilities, preferences and wishes of the car owner. If we talk about the most common option, it looks like this:
1. First of all, the exhaust manifold is replaced with a tuned “spider”;
2. Next, the drain resonator is replaced with a direct-flow one. As a rule, direct-flow resonators have a much higher throughput, which significantly increases the rate of exhaust gas exit;
3. Instead of the standard main muffler, a modernized one is installed - specially designed for the construction of direct-flow exhaust systems.
If you believe the statements of car owners, this kind of improvement allows you to increase the car’s power by about 7-10 hp.