Print this article Font size 16
There is no need to worry; replacing a muffler on a VAZ 2110 is not at all a regular job that will have to be done systematically. Replacing the exhaust system is performed in several situations:
- The muffler begins to make a loud noise;
- Muffler elements burn out;
- Connecting pipes break.
The sound of a burnt out muffler.
On a VAZ 2110, you can replace the muffler with your own hands, which will allow you to significantly save on the services of a service station.
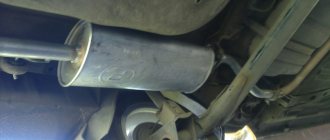
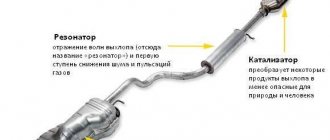
The exhaust system of the VAZ 2110 includes a downpipe (pants), a neutralizer, a resonator and a main muffler.
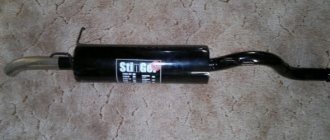
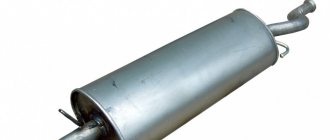
Photo of the new muffler on the VAZ 2110
Today we will tell you about replacing the muffler, as well as the resonator.
Exhaust system VAZ 2110
Replacing the muffler on a VAZ 2110
VAZ 2110 owners are quite lucky, since replacing the muffler is quite simple and does not require special skills or extensive experience. But you definitely need an inspection hole.
The replacement procedure sequence is as follows:
- The muffler is connected to the resonator through an O-ring on the pipe flare. Plus, the connection is compressed with a clamp, which consists of two parts.
- The clamp must be dismantled, so remove the ring. Since the O-rings used here are graphite, they should not stick to the metal.
- Now the old muffler can be dismantled quite easily.
- Be sure to check the condition of the suspension rubber bands located on different sides of the muffler body. They often end up stretched or covered with cracks. Rubber bands are quite cheap, so buy new ones and replace the old ones with them.
- The new muffler is first mounted on rubber bands, after which it is inserted into the same new graphite sealing ring between the flares. Use a clamp to compress the connection. Ready!
Car muffler tasks
Pipe. Exhaust, but a pipe. It’s a simple device at first glance, but a lot depends on the exhaust system. Not only the aesthetic sound of the exhaust, but also the dynamics of the car, fuel consumption, comfort in the cabin, and the presence of vibrations. Therefore, if someone asks in the middle of the night why a muffler is needed in a car, every self-respecting motorist will answer without hesitation:
- to reduce the noise level of the engine;
- to reduce the temperature of exhaust gases;
- to remove exhaust gases outside the vehicle;
- to reduce the level of harmful emissions into the atmosphere.
Although the last point is rather conditional.
The exhaust pipe works in hellish conditions. The temperature of the exhaust gases at the outlet of the exhaust manifold can reach 800 degrees, or even more. Therefore, the metal from which the muffler is made must not only be durable, but also have some heat-resistant qualities. In addition to temperature, enormous pressure acts on the walls of the exhaust system, and the high speed of movement of exhaust gases causes significant sound vibrations.
Changing the resonator
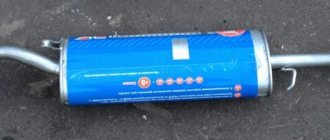
It is also advisable to replace the resonator on a VAZ 2110. This is done after changing the muffler.
New resonator for VAZ 2110
The work of replacing the resonator is performed in the following sequence:
- The resonator is secured to the muffler with a crimp clamp with an O-ring.
- It is attached to the neutralizer using a floating flange consisting of two bolts and a flare.
- On the opposite side of the element there is a so-called fist.
- Removing bolts is often quite difficult. So that you don't have to suffer, just cut them off with a grinder and buy new bolts. This is the simplest solution to the problem.
- If you couldn’t get a grinder, use a liquid key. This is a popular product among motorists - WD40 or its analogues. Treat the bolt attachment points with this compound, wait a while, after which the bolts should come off.
- After removing the bolts, remove the muffler clamp.
- Remove the resonator from the suspension rubber bands. Check the condition of the rubber bands. If they are worn out, replace them with new ones.
- Take a new resonator, secure them to rubber and connect them to the muffler so that the pipe leading to the muffler from the resonator is parallel to the ground.
- If you notice wear, burrs, or traces of rust on the neutralizer fist, be sure to coat the connection with sealant. Moreover, it must be a high-temperature sealant.
- Armed with new bolts and nuts, tighten the catalytic converter and resonator flanges.
- The neutralizer is fixed to the resonator with two bolts using a flange connection. The fastening occurs to the states, but there is a receiving pipe, using a spring-loaded connection and two flares. The space between them contains a sealing ring made of graphite or metal asbestos.
Exhaust system of VAZ- and VAZ-21124 engines
20.2.5. Exhaust system of VAZ-21114 and VAZ-21124 engines
Exhaust system VAZ 2114
Design description
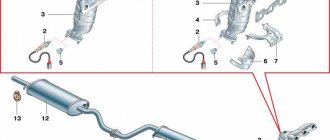
Exhaust systems for vehicles with VAZ-21114 and VAZ-21124 engines
On VAZ-21114 and VAZ-21124 engines, catalytic converters are used, made integral with the exhaust manifold (cat collectors).
There are threaded holes in the upper and lower parts of the collector for installing oxygen sensors. On engines designed for exhaust gas toxicity in accordance with Euro-2 standards, the oxygen sensor is installed only in the top hole, and in this case a plug 5 is screwed into the bottom hole. If the engine is made in accordance with Euro-3 standards, a second one is installed in the bottom hole an oxygen sensor similar to the first one.
| Cat collectors for VAZ-21124 (A) and VAZ-21114 (B) engines |
The junction between the catalytic collector and the engine cylinder head is sealed with a metal gasket.
An intermediate pipe flange is attached to the lower flange of the catenary collector through a metal-reinforced gasket. The other flange connects the intermediate pipe to the flange of the additional muffler using a spherical joint. A metal-graphite ring with a spherical surface is placed between the flanges, and an internal spherical surface is made in the flange of the additional muffler.
The additional muffler, which is installed on cars with VAZ-21114 and VAZ-21124 engines, is interchangeable with the additional muffler installed on cars of the “tenth” family that do not have a neutralizer in the exhaust system.
The main muffler is the same for cars of the “tenth” family with one body type.
Removal of exhaust system elements is shown on a car with a VAZ-21124 engine.
Removing the intermediate pipe
We carry out the work on an inspection ditch or on a lift.
Install the removed parts in reverse order.
Removing the catenary collector
There are two ways to remove the cathode collector from the engine compartment: up or down. The first method is more convenient when working on the site, the second when working on an inspection ditch or on a lift.
To remove the catalytic converter upward, disconnect the throttle assembly from the intake pipe and disconnect the vacuum supply hose to the vacuum brake booster from the intake pipe.
Remove the oxygen sensor and disconnect the intermediate pipe from the collector.
The photographs show work being carried out from underneath the vehicle. If there is no inspection ditch or lift, all the operations shown can be performed from above, from the engine compartment.
To remove the catalytic collector downwards, remove the oxygen sensor, engine mudguard and intermediate pipe.
We carry out the operations shown in photographs 1–9, and take out the collector downwards, and then remove its gasket.
Install the removed parts in reverse order.
Removing the additional muffler
We carry out the work on an inspection ditch or on a lift.
|
- Similarly, unscrew the nut of the second bolt.
- We take out the bolts...
| ...and remove the clamp halves. |
|
| ...and remove the additional muffler. |
Install the removed parts in reverse order.
We replace torn pillows with new ones.
Replacing the neutralizer
As you can see, the exhaust system of the VAZ 2110 car is designed quite standardly, its repair is not difficult even for a motorist with little experience.
When changing the muffler and resonator, it is likely that you may need to replace the converter. This operation is simple and can be done in a few steps.
The neutralizer serves to dampen vibrations from the engine and prevent them from occurring in the exhaust system of the domestically produced VAZ 2110 car.
If it needs to be replaced, it is done like this:
- If the old springs and bolts are intact and have no obvious damage, you can continue to use them. They show characteristic signs of wear, be sure to buy new elements.
- The ring should be replaced in any case, no matter how well the old one is preserved. If gases begin to leak through the old ring, this will lead to very rapid wear and damage to the converter flare and the exhaust pipe.
- After installing the neutralizer, new bolts are put on, they are carefully but firmly tightened. Moreover, the first thing you need to do is tighten the bolts that secure the resonator.
Principle of operation
Before you begin repairing a car muffler or assembling it yourself, you need to understand the basic principles of its operation. If you look at the device in section, you can see many metal or ceramic partitions, heat-resistant wool, and the presence of perforated pipes. The presence of these elements in the muffler design slows down the speed of gas flows. When doing DIY repairs, it is important to replace worn-out elements with high-quality analogues.
In turn, their reduction allows you to smooth out the operation of the motor, taking into account each stroke.
There are no standards for the production of the exhaust system and its individual elements, so mufflers from different car manufacturers can differ significantly from each other.
If you decide to upgrade individual elements of the exhaust gas removal system with your own hands, then you need to take into account some nuances:
- powerful car engines must have a resonator of sufficiently large volume, which will provide the necessary level of exhaust smoothing;
- the number of partitions inside the chambers that smooth out the unevenness of the volume of discharged flows.
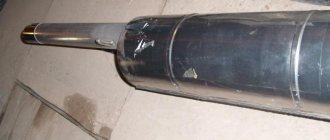
Replacing pants
Trousers
The exhaust pipe, also called pants (due to its appearance), is attached to the manifold using studs and nuts. Its fixation with the neutralizer is carried out by a spring-loaded connection.
- Remove the exhaust pipe, paying special attention to its attachment to the manifold. Studs are used here, not bolts. They are screwed into the manifold, and connecting nuts are screwed onto them.
- If the pin is damaged, it will be extremely difficult to replace it. Therefore, it is important to try to keep the old one intact and safe.
- Treat the nuts with WD40, a product we all know. This will allow you to avoid using excessive force and keep the studs intact. If that doesn't work, the studs are drilled out. The process is complex, lengthy, and requires experience and skill.
- There is a gasket between the manifold and the pants that needs to be replaced. Also install a new converter o-ring.
- Now firmly press the exhaust pipe using the nuts. To do this you will need to compress the gasket.
- Then tighten the bolts of the spring-loaded connection with the neutralizer of your VAZ 2110.
As you noticed, there is nothing complicated in this work. Each element is quite easily dismantled and a new one is installed in its place. Just be careful, act carefully and consistently. Plus, of course, do not forget about the importance of the quality of new parts. Buy only good spare parts that will ensure long-term and efficient service of the exhaust system on your VAZ 2110.
Types of noise-absorbing elements
Silencers in cars can be active, which is a fairly simple device, or reactive. In the first case, vibration-resistant materials that can withstand high temperatures are used for their production. Active devices are the most popular because they are easy to use. Their significant disadvantage is their rapid contamination. Silencer reactive devices consist of complex elements of resonator chambers.
As for the rear noise-absorbing chamber of the car, its structure contains many compartments that contain a special filler. It is necessary to reduce the sound of exhaust gases when the car engine is running. Modern car mufflers can use several technologies for absorbing background noise and purifying emitted gases at the same time. They can contain many different materials that provide maximum reduction in the sound of exhaust gas flows, their toxicity level and temperature.
Car muffler diagrams
A cross-section of a car muffler allows you to see exactly how the sound reduction function is implemented in each specific muffler. In direct-flow mufflers, for example, the method of changing the direction of gas movement is never used, and a standard muffler uses turns from 90 to 360 degrees. The change in the amplitude of sound wave oscillations is realized by perforating the internal pipes. It is these internal pipes, their diameter, diameter and frequency of holes that can drown out noise in almost the entire frequency spectrum.
But only the integrated use of these methods can guarantee high efficiency of the entire exhaust system as a whole. Therefore, modern cars use from one to six different mufflers. The main ones are the resonator and the main muffler.
Exhaust system diagnostics
To draw a conclusion about the need to replace a particular part of the exhaust system, diagnostics should be performed. You can do this yourself, using a viewing hole or a lift. For novice car enthusiasts, it would be useful to familiarize yourself with the system diagram in order to know the correct name of a particular part and its location.
As you can see from the diagram, the muffler is the last link in the flue gas emission system. Its main task is easy to determine from the name: to muffle the loud sound of the engine, bursting from the cylinders along with the products of fuel combustion. The muffler and the previous link in the chain - the resonator - most often fail and must be repaired or replaced.
The appearance of exhaust pipe malfunctions is characterized by a whole range of different sounds, from humming and growling to unpleasant rattling. They are united by one feature: sounds come from under the bottom of the car, its middle and rear parts. It is worth noting that not all sounds indicate a direct malfunction; sometimes it is enough to inspect the car from below and remove the cause of the noise. Recommendations for diagnosing exhaust system faults.
- After the car is placed on the inspection pit, it is necessary to prevent it from rolling, since diagnostics will have to be performed at idle engine speed while in the pit. Therefore, if you are not confident in the hand brake of the VAZ 2110, then it is better to place stops under the wheels. Start the engine and go down into the inspection hole.
- It happens that traces of a muffler burnout are immediately noticeable, and a growling sound is heard from the hole. But the hole is not always located on the bottom of the assembly; it can be located on the top and on the sides, especially in those places where pipes are welded to the muffler. It is necessary to carefully inspect the unit and identify the location of the gas breakthrough.
Replacement of resonator and muffler VAZ
- The nasty rattling sound characteristic of VAZ cars coming from the muffler indicates that you need to prepare to replace it. The noise comes from a burnt-out partition, which, due to vibration, dangles inside the case and knocks on the walls. In this case, no breakthrough of flue gases is observed, the malfunction is not fatal, and the operation of the car can be continued. But this sign indicates that the muffler is nearing the end of its service life.
- Stretched or torn suspension rubber bands of the exhaust pipe allow it to dangle with a large amplitude, hitting elements of the car body. This is characterized by dull knocking sounds; being in the inspection hole, it is easy to determine their source. Such a small malfunction is not difficult to fix; you just need to replace the rubber bands.
- A hum with vibration transmitted to the car body indicates that the exhaust pipe is in contact with the bottom directly or through a foreign object. This may be the result of impact and deformation of exhaust system components. In this case, you need to take measures to straighten the pipe so that there is a gap of at least 1 cm between it and the body parts. Another reason is dirt that has accumulated between the pipe and the bottom after driving on a wet dirt road. The issue can be resolved by simply cleaning the bottom from dirt.
- After driving on various forest or field roads, it is recommended to always inspect the underbody of the vehicle for the presence of stuck foreign objects, such as branches. A stick stuck between the exhaust system pipe and the underbody element very well transfers the hum and vibration from the engine directly into the interior of the car.
Repairing the muffler yourself
To make it easier for you to inspect the muffler, you should disconnect it from the car. This will help you complete the job faster and better. If during a visual inspection you do not see any serious damage, then most likely the damage is internal.
It is very important to remind you that without sufficient experience, it is better to contact a car service, where experienced technicians will help eliminate all muffler defects.
If during a visual inspection you find damage (a hole made by a stone), then you will need a welding machine. But if burnt, rusted holes are visible, then it is not recommended to cook such a muffler, since it will soon lose weight again; the muffler needs to be replaced, preferably from high-quality material. It often happens that a breakdown occurs at the junction of the engine and the exhaust pipe. This element is called corrugation.
How else can you reduce the noise level of the muffler?
You can also install a mirror muffler to reduce noise. Such models work on the same principle as acoustic mirrors. Most often, mirror mufflers can be found in the exhaust systems of two-stroke engines of motorcycles and scooters. The muffler device in this case consists of an exhaust elbow and a resonator jar in which the exhaust gases are “calmed down”. In this case, the resistance level will be significantly lower, and the engine power will not be consumed. However, it is worth considering that due to the mirror effect, the temperature of the exhaust pipe will increase.
A similar principle is used in the systems of VAZ 2107, Niva, 2115 and many others.
In addition, there are absorption and limiting mufflers, which also reduce noise.
Do-it-yourself muffler tuning.
Having dealt with the purpose, structure and types of mufflers, let’s move on to the most painful debate, in which many copies have been broken.
Is it possible to increase the power of a stock car by replacing only the muffler?
Our opinion is definitely not. If you put the most expensive straight-through "can" from the most famous manufacturer on a stock engine that has not undergone tuning of the intake and exhaust manifold (etc.), there will be no increase in power. However, this does not mean that installing a tuning muffler is meaningless.
And so, let’s assume that on the difficult path of tuning, for one reason or another, you still decided to replace the stock can. What principles should be followed?
2. Low resistance = minimizing power loss.1. A light weight. A light car is a fast car.
3. Reducing noise levels (otherwise we would have abandoned it altogether).
4. Cost and simplicity of design.
5. Compact size (will simplify installation).
It turns out that based on our tasks, a forward flow muffler is best suited for us. The simplicity of the design allows you to think about making a direct flow with your own hands. It can be welded into a new housing, or a stock can can be used as the housing.
The design of a homemade direct flow is as follows: a sound-absorbing material (for example, basalt wool consisting of long fibers) is laid between the outer metal casing and a pipe with holes, and a barrier made of a very fine metal mesh is placed between the pipe and the wool so that the wool fibers are not blown out. . The lifespan of the forward flow is determined by the fiber retention period, after which the muffler stops performing its functions and begins to ring. Mineral wool absorbs high frequencies well, but not low frequencies, so you will most likely get a low, growling sound.
Main elements of the exhaust system
The muffler resonator is installed immediately after the exhaust pipe and the catalyst, and its task is to level out pulsations of the gas flow. In cross-section, it looks like a perforated pipe placed inside a metal chamber of a larger diameter. The pipe can change its cross-section on the way from the inlet to the outlet of gases.
The main muffler may have a more complex design and has the main function of noise reduction. Modern systems can have almost all noise reduction schemes in the rear muffler can. The chamber through which the main pipe passes can have several sections, each of which has noise reduction at its own level. Typically, these chambers are filled with heat-resistant fiber material, which further dampens vibrations and absorbs sound vibrations.
The design of a car muffler is constantly evolving, and we try to follow the news from the design bureaus of the most progressive automakers and tuning studios. Stay with us, and let your mufflers only please the ears of avid motorists. Happy travels to everyone!