Articles
Sound insulation of Priora doors
Soundproofing of Priora doors is done in many cases only for the following reason: this car is domestically assembled, which a priori affects the silence of the cabin and silent driving at speed. Knowing how to soundproof doors on a Priora, you can also improve the situation with acoustic systems with your own hands, which will sound completely different after the operation.
Hood and engine
Sound insulation of the engine compartment of the Lada Priora
— the front instrument panel is removed;
— we also remove the factory insulation;
— use a photograph to record the position of all wires and bearings;
— wash the surface, clean it with sandpaper, treat it with a solvent;
— heat the first layer of the vibration isolator to a sticky state and fix it;
- second layer - splen, bitoplast;
— insulate the wires with anti-squeak;
- Reassemble the panel in reverse order.
Sound insulation of the hood
In addition to the standard set of materials and tools, you will need factory insulation with clamps. Clean the surface, treat with solvent, and dry. The first vibration-isolating layer, preheated. Roll it out with a roller, then lay the splen. The next layer is standard insulation.
Lada Priora is not a good Shumka. This is easy to fix on your own. The procedure will not take much time and money - if you do it yourself, it will take a couple of weeks and 5 thousand materials. If you do it in a hotel, the price will be from 25,000 rubles.
Sound insulation of Priora doors
Soundproofing of Priora doors is done in many cases only for the following reason: this car is domestically assembled, which a priori affects the silence of the cabin and silent driving at speed. Knowing how to soundproof doors on a Priora, you can also improve the situation with acoustic systems with your own hands, which will sound completely different after the operation.
Recommendations from manufacturers
Installation diagram for additional sound insulation in doors from Shumoff:
Here are instructions on how to properly soundproof doors from STP:
Result
Is it worth soundproofing the doors? According to the results of a survey among VKontakte users, about 70% of car enthusiasts noticed a positive effect. About 16% saw little benefit from the intervention, and 14% noticed no difference at all.
The same ratio of votes can be seen in the poll on the website Lada2111.rf.
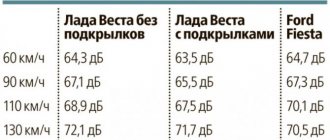
According to the results of popular research, the effect of soundproofing doors will reduce wheel noise by only 1-2 dB (depending on the car). The only noticeable difference will be in the sound of the acoustics.
To reduce the noise level in the cabin by 2-4 dB (a difference of 1 dB is barely noticeable or not noticeable at all), it is necessary to take a comprehensive approach to car sound insulation, work on all parts of the body (floor, doors, roof, trunk, etc.). ), wheel arches and fender liners. It would also be useful to install additional door seals on LADA cars (instructions for XRAY, Vesta, Granta/Kalina/Priora, Largus and Lada 4x4).
What do you think about the soundproofing of doors on the Lada? Help us also evaluate the standard sound insulation of the Lada Granta or Lada Largus.
Keywords: Lada Granta doors | Lada Priora doors | Lada Kalina doors | Lada Largus doors | doors 4x4 | soundproofing of Lada Granta | sound insulation of Lada Priora | sound insulation of Lada Kalina | sound insulation of Lada Largus | soundproofing 4x4 | Lada Vesta doors | sound insulation of Lada Vesta | doors lada xray | sound insulation lada xray | Niva doors | soundproofing Niva | universal article
8
Found an error? Select it and press Ctrl+Enter..
Task: installing sound insulation for a Lada Priora car in the “Gold” configuration
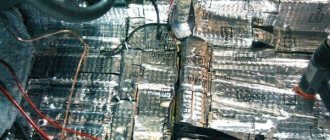
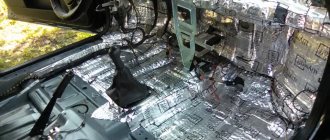
The first thing we decided to do for complete sound insulation was to cover the roof of the VAZ car. We carefully remove all unnecessary elements from the roof, including the sheathing on the roof of the vase. Now you can make the first layer of sound insulation on the car ceiling. We install a high-quality damper from SGM Alumast Alfa to neutralize vibration on the vase roof. How much work does this cost us? You yourself can guess by the appearance of the roof in the photo and the effect achieved. The roof of the Lada Priora is not only protected from vibrations, but has also become stiffer. The use of vibration on the roof significantly reduces the overall sound background in a hatchback car. Then you need to make another layer on the roof. For this purpose we use a thick layer of Violon WELL sound insulator. It eliminates unwanted sounds. After installing it, it is almost impossible to push through the roof of the car, and raindrops will definitely not cause any discomfort to anyone. After assembling the upper part of the interior and hatchback of the car, all we have to do is take on the lower part to achieve a similar effect.
Work order
In Lada Priora, sound insulation is performed in the following order:
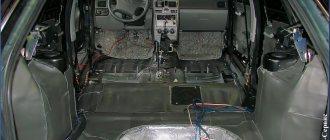
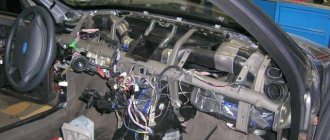
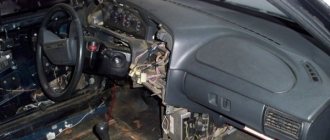
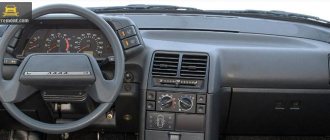
To perform soundproofing of the interior, it will be necessary to remove all the front seats, as well as the center console, remove the steering wheel and dashboard
Interior with the above items removed
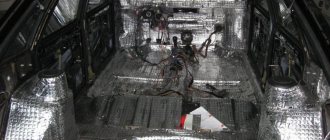
- As soon as all the disturbing elements are removed from the interior, we remove the carpet and remove all the factory sound insulation of the engine shield, located on the interior side, photo above
- Then we apply Bimast Bomb to the engine shield in the cabin.
- Accent or Splen of your choice can be applied over this to absorb sound waves from the engine, stereo speakers and other sources.
Engine shield treated with vibration absorber from the interior
We remind you that before applying the vibration-absorbing material, the entire surface is thoroughly wiped from dust, dirt and preservation, then thoroughly degreased with a solvent or alcohol
- Before installing the material in place, it is cut out, then the carefully prepared pieces are heated with a hairdryer, only after that they are applied to the surface
- And after applying the material to the desired surface, it is rolled with a roller (roller) from the center of the attached part to the edges in order to expel all the air, and our material is more tightly attached to the surface
- Inside the engine compartment, soundproofing material is glued to the hood, in addition, to the front shield, all planes that do not have stiffeners, as well as in places that can be glued without removing the engine and dismantling its components
- We cover the motor shield on the engine side with insulation from the top to the point where the shield connects to the floor of the car, in this case we use the material Bimast Bomb or Bimast Super;
- The hood cover is insulated with bimast, and on top there is splen for thermal insulation
- After the soundproofing materials have been applied, we put all the removed parts back in their places, and the work can be considered complete
- Additionally, you can watch the training video
After such a small modification, the noise level inside the car is noticeably reduced, and the ride becomes much more pleasant and much more comfortable. And when all the work is done yourself, this means money saved for more pressing purposes, plus you will be absolutely sure of the quality of sound insulation of your favorite car.
The standard sound insulation of the Priora car leaves much to be desired. Car enthusiasts strive to correct this deficiency with their own hands, since extraneous sounds irritate and distract the Lada Priora while driving. They make noise on the doors, floor, arches, ceiling, engine compartment, hood, trunk, panels, dashboard - after this the Priora becomes a quiet car. The source of extraneous sounds can be a malfunction of the engine, its components, malfunction of suspension parts, brake system, steering, etc. Unpleasant sounds occur when driving on gravel roads due to vehicles passing by, especially heavy vehicles. To get rid of unpleasant sensations, it is necessary to modify the standard sound insulation. You can do this yourself. Depending on the body type: hatchback, sedan, or station wagon, the Shumka technology is slightly different. Read the article to the end and we will tell you how to do it correctly!
It is necessary to purchase materials and acquire tools in advance.
First layer of vibration isolation
It is necessary to prepare the surface. Determine the required sheet size. The larger it is, the fewer joints you will end up with. Before use, the material is heated with a construction hair dryer on the side where it is treated with bitumen. Then the layer is applied to the base, fixed and straightened using a roller. To obtain a better result, it is recommended to use another layer. Lay it out overlapping. Depending on the quality of the chosen substance, the area that needs to be covered depends. On average it is 50-100%.
Soundproofing Priora is performed in the following order:
- after all interfering elements of the interior have been dismantled, the carpet is removed and all factory sound insulation of the engine panel on the interior side is removed;
- Bimast Bomb is applied to the engine shield from the passenger compartment, and Splen 3004 can be additionally applied on top of it for additional thermal insulation and absorption of sound waves from stereo system speakers and other sources;
- before applying the noise-vibration-absorbing material, the surface must be thoroughly wiped from dirt and dust, and then thoroughly degreased with a solvent or anti-silicone;
- before installation in place, the material is cut out, then the prepared pieces are well heated with a construction hairdryer, after which they are applied to the surface to be insulated;
- after applying the material to the surface with a rolling roller, all air is expelled from the center of the part to the edges, and the material is carefully rolled to the installation surface;
- in the engine compartment, sound-proofing material is applied to the hood, as well as to the front shield on all planes that do not have stiffeners, and in places that do not require removal of the engine and major dismantling of its components;
on the engine side, the motor shield is insulated from above to the point where it connects to the floor of the car; the material used in this case is also Bimast Bomb or Bimast Super;
- the engine compartment cover is insulated with Splen 3008;
- After applying soundproofing materials, all dismantled parts are installed back in their place, and the work can be considered completed.
So, after this small modification, the noise level inside the car will significantly decrease, and the ride will become much more pleasant and comfortable. And since all the work will be done by yourself, you will also save money on the work of a master, being completely confident in the quality of the sound insulation of your own car.
- Matrix LCD display with wide viewing angle;
- Working with a USB drive;
- Built-in microphone, Bluetooth and wireless voice communication system (can connect up to 2 phones);
- Compatible with Android, iPod/iPhone;
- Maximum output power: MOSFET 50W x 4.
Source
Roof
The roof and hood of the Lada Priora are the easiest elements to start working with. The standard sound insulation of the ceiling of a Lada Priora car consists only of upholstery. The work begins with preparing the base by dismantling the factory cladding. One can be removed through the rear door or through the luggage compartment. The adjacent plastic covers are also removed. The surface is cleaned of dirt, dust, and treated with a solvent or degreaser. Allow the surface to dry. Prepare a piece of insulating material of the required length, a hair dryer, a knife, and a roller. Try to minimize the number of segments. Preheat the sheets with a hairdryer. When the surface warms up and becomes sticky, fix it on the ceiling. Roll with a roller. Next, apply a layer of material that absorbs sound waves. Splen is most often used. It retains heat well and has an adhesive backing. It is not difficult to fix it on the ceiling of the priors. Splen is applied to the entire surface. To consolidate the insulating effect, you can supplement the cladding with a layer of bitoplast.
After finishing, the upholstery is installed in the reverse order. Keep in mind that the thickness of the layers of noise-absorbing material of the Prior should not be too bulky. Otherwise, the bolt holes for the passenger handles will not line up. In general, for a prior you will need 2 sheets of splen, 2-3 sheets of bitoplast, 2.5-3 sheets of insulating material.
How to make a banner with your own hands
There is no need to give the car to the service center technicians. Reupholstery is not complete without:
- fabrics;
- glue;
- set of screwdrivers;
- degreaser;
- fine-grained abrasive;
- hard sponge;
- rollers for leveling the surface;
- masking tape;
- hairdryer (preferably a construction hairdryer, with the ability to adjust the temperature).
To hide the fasteners of decorative elements, you will have to break out the plugs. So buy them in advance.
Step-by-step instruction
A complete reupholstery consists of ten stages.
- Dismantling.
- Removing the old coating and cleaning the base with a hard sponge.
- Removing old adhesive residues with a degreaser.
- Sanding the frame with abrasive sandpaper.
- Applying a strip of adhesive to the central part. The length of the strip is up to ten centimeters.
- Smoothing the center of the fabric with a roller.
- Apply similar stripes on the left and right sides at a distance of 10-15 centimeters from each other.
- Stretching and smoothing the fabric.
- After completing the application of the fabric, re-align with a roller.
- Folding and gluing the edges of the fabric. The rest must be trimmed.
The repair is considered complete after reinstallation along with lighting and decorative elements. The naked eye will see how well the interior will be transformed.
Basic mistakes
The main mistake is using Moment glue instead of the compositions indicated earlier. In summer, the car gets very hot, which is why the glue will not be able to hold the fabric on the frame.
You need to start from the center. If you start re-upholstering from the edges, it will be difficult for the owner to align the fabric in places with sharp transitions.
Lada Priora Hatchback ☁️White smoke › Logbook › 17. Additional door seals
When driving more than 70-80 km/h. the wind begins to blow from all the cracks, a roar from the road is heard, passengers look around trying to find an open door, the driver-owner accordingly has an unpleasant feeling for his car, it’s all due to the “wild” gaps in the doors and not only that are present on a car with the plant itself. Many people solve this problem by gluing various seals on the doors, hood, sills, etc. I went the same way:
Consumed: -Z-shaped seal 2.5 m. Could not be found in stores, so I had to order from AliExpress. Price: 350₽ 3 m. -D-shaped seal about 3 meters. As for this sealant, they are available in any hardware store. 120₽ m. -Gasoline/Galoshes 50 gr. As a surface degreaser I use only this or industrial alcohol, since they are less dangerous for paintwork.
The noise and air blowing into the cabin has decreased by about 60%, then I also plan to stick a D-shaped seal around the entire perimeter of the doors or use a seal from some foreign car (to be continued in the same post), who will advise?
Rules for applying sound insulation
The instructions for applying sound insulation are the same, no matter what kind of car you treat:
- Preparing the surface for processing begins with removing the casing, factory sound insulation and anything that will interfere with your work.
- Then, the surface must be washed, if there is rust, clean it and prime it
- After this, you need to degrease the surface
- Now you can cut out the vibration material, it is always placed first, remove the protective film, heat it with a hairdryer, apply it and roll it with a roller to expel air bubbles
- Vibromaterial is placed overlapping, so the protection will be more effective
- A noise absorber or a noise reflector is glued on top of the vibration insulation, it all depends on the place of treatment
- It is self-adhesive, sticks in sheets on all 100 percent of the surface, it does not require heating (vibrating material is enough to stick on 80-90 percent of the entire area)
- Anti-squeak materials are glued in places where the skin comes into contact with the metal, and in places where the skin elements come into contact, around the handles
Roof treatment
It is recommended, especially for beginners, to start from the ceiling or hood, where gluing is much easier:
- Soundproofing a Priora roof begins with removing the sheathing
- Then wash and degrease the surface, after which vibration insulation is applied
The nuances here will be as follows:
- It’s more convenient to glue with an assistant so that he warms up and feeds the pieces, then holds while you roll the material to the roof
- The thickness of the vibration absorber on the roof should be 2-3 millimeters, and the thickness of the sound absorber - 5 millimeters, otherwise it may bend from the weight
Priora roof vibration isolation
After soundproofing, return the roof sheathing to its place
Hood
Hood processing nuances:
- Vibration insulation is placed only in the recesses (photo below), covering the whole thing is just a waste of material and time, you won’t notice the effect
- But the sound-reflecting material is glued in one piece to the entire surface, it will also serve as insulation
- A material with a foil layer is recommended for the hood, as this will protect it from the effects of temperature
This is how the vibration insulation is glued to the hood, there is no need to glue it anymore
Under the hood there is a partition between the engine and the passenger compartment (engine shield), it is treated with vibration isolation, then with a sound deflector, through it the hum and vibrations from the engine are transmitted to the passenger compartment, so its treatment cannot be skipped
Salon
Sound insulation of the trunk of a Priora hatchback is carried out in conjunction with interior treatment, for this:
- All rugs and chairs are removed, as well as all floor coverings.
- If there is any semblance of sound insulation, remove it and throw it away.
The interior is treated at the same time as the trunk
- Then, wash the surfaces, the floor of the cabin is the most contaminated place
- Don't forget to degrease the surface
- Here, a minimum 5mm vibration absorber is used, and a 10mm sound absorber is placed
- Priora hatchback trunk soundproofing has one nuance; the niche for the spare wheel should be glued with thinner materials, otherwise the wheel may not fit back in
- Wheel arches, front and rear, are glued with a double layer of vibration insulation
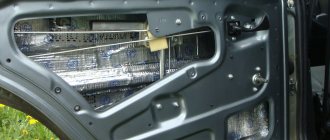
Doors
Doors are treated in three layers:
The first layer of vibration insulation is placed on the door panel, inserted in small pieces through the technological holes, and glued overlapping
Vibration insulation treatment of door panels
With the second layer, the outer surface is treated with vibration insulation, while all technological holes are sealed to create a closed box for the speakers
We close the technological holes to create a closed box
- Glue the sound absorber as the third layer
- You can additionally glue the door trim with a sound absorber from the inside
- Places where the trim comes into contact with the metal of the door are glued with Madeleine, and also Madeleine is glued around the door handles so that squeaks disappear
Where to start processing
Of course, completely soundproofing a car is a costly undertaking in terms of time and money, so you can do it gradually, starting with the simplest areas, for example the hood:
- The hood (see Soundproofing the hood without problems) does not need to be unscrewed for processing, just open it
- Remove the factory insulation from the cover and engine shield, if present.
- Then you need to thoroughly wash (with water and detergent) the surfaces to be treated.
- After washing, allow to dry and degrease the surfaces with a solvent.
- After this, cut out the vibrating material according to the shape of the hood cavities and, after pre-heating, apply and roll with a hard roller
The vibrating material is glued only to the recesses, between the stiffening ribs
Then, on top of the vibration absorber, a noise absorber, or better yet a sound reflector, is glued in a solid piece, covering both the depressions and stiffening ribs
This is how the sound absorber is glued
- Treat the trunk lid in the same way.
- Cover the partition between the engine and the passenger compartment (engine shield) with a continuous layer of vibration insulation, glue a sound absorber on top, or better yet, a sound reflector, the effect will be better
Roof
With the roof (see Soundproofing the roof of a car is part of the package of actions to reduce noise in the cabin), there is more fuss with removing the trim than with processing:
- Removing the interior headliner
- Washing, removing rust and degreasing metal
- Then lay the vibration insulation in large overlapping pieces, photo below
Roof treatment with vibration absorber
- The only inconvenience here will be your arms constantly raised up, which is tiring, so it’s better to work with an assistant
- Glue a sound absorber on top (a sound reflector in the cabin is not suitable, it reduces the sound quality of music)
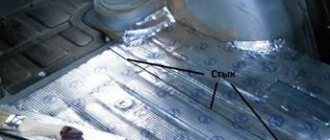
Cabin floor
Lada priora soundproofing the floor in the cabin, the longest procedure:
You'll have to tinker with disassembling the interior, removing all the seats, mats and upholstery
- After disassembly, wash again, remove rust, factory noise, if present, then degrease the surfaces
- Then lay the vibration absorber in overlapping pieces; it is enough to treat 80 percent of the entire surface
- Here a vibration absorber is used that is 5 millimeters or thicker; it is better to insulate the wheel arches in two layers
- But it’s better to cover up to 100 percent with a sound absorber for the best effect.
- Sound absorber applied 10mm
Sound insulation: Floor panels.
Sound insulation of LADA Priora doors
Soundproofing or soundproofing of the VAZ 2170 is often done for one simple reason: since the car is Russian-assembled, it is not famous for its quiet interior and silent ride. In addition, one of the main sources of noise is the noise from the wheels when driving, so the issue of sound insulation of Priora doors is currently the most pressing. The technological process of sound insulation is almost the same regardless of the make and type of car. But each individual case has its own subtleties and nuances.
Soundproofing Priora doors begins, first of all, with removing the upholstery material from the doors. Under the upholstery there is standard sound insulation, which must be carefully removed. After this, you should thoroughly wipe the metal door frame, for example, with White Spirit, degreasing and cleaning the surface. It is worth noting that the anticorrosive agent located at the bottom of the doors must under no circumstances be removed!
The most optimal and simplest option for installing sound insulation is considered to be the option in which sound insulation is made using layers. Soundproofing Priora doors with your own hands of this type will take you no more than 10 hours of work. You will also need about 7 sheets of vibration-absorbing material, 4 sheets of Splen, 3 sheets of bitoplast and the same amount of modelin.
The first layer of sound insulation of Priora front doors is the installation of vibration-proofing material inside them:
- First, you need to cut out several sheets of suitable shape and size from the vibrating material (the larger the sheets, the better).
- Next, using a technical hair dryer, you need to heat the bitumen side of the resulting sheets.
- Then heated pieces of vibration insulation should be glued to the inside of each door and rolled out with a hard iron or plastic roller over its entire area.
- Then the next sheet is taken and overlapped over the first one according to the algorithm described above.
The coverage of vibration-proofing material on the inside of the doors depends on the material itself, so its percentage (percentage of coverage) can vary from 55 to 100%.
The next layer of sound insulation for Priora doors means sticking sound-absorbing and heat-insulating materials onto the vibration-proofing layer. Experts recommend using materials such as Splen or Accent at this stage. They have a self-adhesive base, so their installation does not require any specific skills or a lot of time. In this case, the entire surface (100%) of the inside of the doors is covered.
A third layer of sound insulation can be installed upon request. The essence of this layer is to cover all technological holes in the doors with vibration-isolating material or the like. If you make a third soundproofing layer, then in case of repair of the window regulators it will need to be dismantled. As practice shows, sound insulation of doors made in three layers is considered the most effective.
Discomfort inside the car when driving also occurs due to squeaks. Therefore, an equally important step in soundproofing doors is soundproofing the door skins. To do this, the upholstery material is first made heavier with vibration material, so it will vibrate less and make fewer squeaks. And then bitoplast (sound-absorbing material) or modelin is glued on top of the vibration material in the places of their contact.
The rear doors of the Priora are soundproofed in the same way. Then the door is assembled in the opposite sequence. It is recommended to use new clips for door trim.
It is worth paying attention to the fact that high-quality sound insulation implies a set of measures that are aimed not only at eliminating external noise from the wind, wheels and road, but also at minimizing crickets and squeaks inside the car dealership. Only in this case will the driver be able to achieve absolute silence and comfort when moving in the car.
Processor radio Pioneer MVH X580BT for 2990 rubles!
- Matrix LCD display with wide viewing angle;
- Working with a USB drive;
- Built-in microphone, Bluetooth and wireless voice communication system (can connect up to 2 phones);
- Compatible with Android, iPod/iPhone;
- Maximum output power: MOSFET 50W x 4.
Find out details
Materials
There is no need to invent sound insulation or use building materials, even if their price is lower; today special sound insulation materials have been developed specifically for cars:
- Vibration-absorbing materials (vibroplast, bimast) - serve to dampen body vibrations
- Sound-absorbing materials (accent) - serve to dampen sound waves, their porous structure causes sound attenuation
- Soundproofing materials (Splen) - completely reflect sound waves
- Thermal insulating materials - maintain the temperature inside the car interior (here you don’t need to look for separate materials, sound absorbers and sound reflectors, they will additionally serve as insulation)
- Anti-creaking materials (Bitoplast and Madeline) - to eliminate squeaks, crickets and rattling
Removal
When you have purchased the required number of seals, you can begin to work.
Article on the topic: Do-it-yourself noise insulation of VAZ 2110 (Video)
The first step is to remove the old rubber elements, after which the installation of new parts begins.
Let's tell you more about the dismantling procedure.
- Remove the plastic trim panels installed on your vehicle's door sills. To do this you will need a thick screwdriver. Remove carefully, being careful not to damage the plastic caps. But it’s better to buy new ones in advance if you can’t carefully dismantle the threshold.
- Now remove the old pieces of rubber from the seats. Simply tear off the sections that are torn off by hand.
- Remaining rubber can be cleaned off with any available tool. Only be careful with sharp objects so as not to damage the metal and paint layer.
- Very small residues and traces of glue are removed using solvents. Make sure that the solvent you choose will not damage your paintwork.
- Go over the doorway with a vacuum cleaner, remove all dust and dirt. Take special care to clean the bottom part. If wet cleaning was used, wait until everything is thoroughly dry.
Upcoming work
Installation
This process cannot be called complicated. You are not required to have any special training or extensive experience. Although you should at least be able to handle glue.
Working with the back door
Each stage is performed consistently and carefully to achieve the desired result and create comfort inside the cabin.
- Even if you have already measured the required length of the seals for your doors, we advise you to do it again. Anything can happen.
- Cut the required length, plus leave a couple of centimeters of reserve. Although if we are talking about a ready-made set of rubber bands, you won’t have to cut or leave anything. Skip the first two points.
- Insert a tube made of silicone or polymer inside the sealing tape. They are sold everywhere, so there should be no problems finding them.
- The length of the tube must match the length of the rubber. This tube will serve to create the necessary elasticity and allow the elastic to press more tightly to the door. This way, ventilation gaps will not appear, and the cabin will become much quieter.
- A shaped side rubber seal is glued to the bottom.
- If the tape is solid, you can start putting it on from either side, as is more convenient for you.
- If it is a measuring rubber band, then start from a point between the door overhangs, or 30 centimeters from the bottom of the threshold. Moving up or down is a personal choice for each master. There is no difference here.
- Push the figured profile all the way down. To do this you will need a rubber or wooden hammer. He's a mallet.
- When the seal is installed around the entire perimeter, an extra piece will be revealed. Cut the tube straight and end-to-end, and make the elastic itself seem slightly deformed. It's like you tore it off by hand. This will avoid the unpleasant phenomenon of siphoning through the joint.
- Replace the pistons; if some were damaged during removal, replace them with new, intact ones.
- Replace the plastic cladding removed from the threshold.
- The second contour of the seal is glued along the edges carefully, but as tightly as possible, after which time is given for the glue to dry completely.
Article on the topic: Self-replacement of the crankshaft oil seal on a VAZ 2114
Almost immediately you will feel the difference between the old and new seal. This is a useful exercise that allows you to get rid of unpleasant sounds, knocking, whistling and cold air flowing directly onto your feet.
Sound insulation of Priora doors
The driver should feel comfortable and comfortable during the trip. This makes the trip safer. The domestic auto industry does not yet have a level of quality at which there is no need to make any modifications to the manufactured products. For example, the sound insulation of the Lada's interior needs to be improved. It makes sense to improve the acoustics in your car immediately after purchasing it.
Improving comfort in the car
Additional soundproofing of the cabin will add comfort
Interior noise insulation is usually done by specialists who work at service stations. However, due to the fact that such work is not particularly difficult, it is often carried out by the car owner himself in his own garage. Lada Priora is significantly different in terms of comfort from its predecessors. For example, the VAZ 2110 and VAZ 21099 models, which have significant noise in the cabin while driving. The Lada Priora has much less noise, but is still sufficient to get on the nerves of the passengers in the cabin. The main source of noise is metal vibration. This sound comes into the car interior from the doors.
Vibration material is installed in the Priora as sound insulation. It is not expensive and absorbs sound well. Sound insulation of the doors relieves the driver of additional sound pollution. This allows him to be more attentive and control the vehicle better. Good quality sound insulation allows the driver to get less tired during the journey, as a result of which he can cover long distances.
When soundproofing the interior is done, vibration material is also installed on the inner surface of the hood and trunk. This absorbs vibration from the sheet metal. The metal sheets from which the hood and trunk of the Lada Priora are made have a large area.
The larger the area of the body part, the greater the vibration that occurs on it during movement.
However, first of all, attention should be paid to noise reduction of the Priora doors, because they are the main source of noise in the cabin
Causes of unpleasant sounds
Noise in the car - loud extraneous sounds, vibrations that distract and irritate the driver:
- They arise as if from external sources - the hum from cars passing by, music and screams from the street
- So in the car itself - the roar of the engine, the vibrations of the body and the rustling of tires, the sound of rain on the roof and pebbles on the bottom of the car.
- The cause may be internal malfunctions of the engine, transmission units and their mountings (pillows), steering and even brake discs or drums
- This noise and vibration can only be eliminated by repairing units, tightening fasteners, and turning discs (drums)
- Therefore, for Priora, sound insulation begins with car maintenance
- The remaining noise is dampened by comprehensively applying sound insulation to the machine