Washer nozzle
This article describes step by step how to correctly replace washer nozzles on a VAZ 2112. The features of maintenance and adjustment of these devices are also fully disclosed. Some measures have been proposed to improve the performance of injectors in general. Many car enthusiasts and professionals quite often encounter such a problem as incorrect operation of the windshield washer nozzles. In adverse weather conditions, any defect in the washer nozzles can cause a lot of trouble. Impaired visibility of the road is a very serious issue and all problems associated with it must be eliminated in advance. In this case, replacing the VAZ 2112 washer nozzles is not a panacea for the above problem. It would be appropriate to consider it in conjunction with such activities as maintenance and adjustment of this unit.
Other situations
What other reasons do wipers squeak? The sound also occurs due to the presence of dirt under the rubber band. Moreover, this dust accumulates on the upper side of the brush. When turning on the windshield wiper, the car owner does not even suspect that the glass will soon become covered with micro-scratches, and the rubber band will fail due to the abrasive effects of road dust.
Even after a short stay, a layer of dirt accumulates under the wipers. Therefore, to protect the glass from minor scratches and the rubber from damage, periodically clean this area with a dry soft cloth.
Another reason is poor quality fastening. The wiper should not play. If this is the case, you need to select a new mount, or use pliers to press the metal part of the wiper (where the plastic clip is installed). Deformation of the “arch” itself is also unacceptable. The element must adhere to the glass at a right angle.
Why do wipers squeak on glass?
There can be several reasons for squeaking windshield wipers on a car:
You may have purchased a low-quality product. The mechanism for fastening the part is not fully latched. This often happens if the installation was rushed. Wipers may make an unpleasant sound if they are installed on dirty glass. Loose fit of the part due to dust is the main cause of squeaking. Think about the last time you changed your wipers. The part may already be worn out. Check for squeaks on wet and dry glass. If the unpleasant sound is observed only in the second case, everything is fine with the wipers
This is explained by the force of friction. Pay attention to the fastening of the part itself. Perhaps the cause of the problem lies precisely in poor quality material or incorrect installation. Creaking can occur at a small angle of inclination of the wiper blade.
The angle should be no more and no less than 90°. Take note of this. The last common option is that the windshield wiper mechanism squeaks. In this case, you need to completely disassemble it for diagnostics.
Increasing the volume of washer fluid on VAZ 2112, 2111, 2110
The windshield washer reservoir on domestic cars does not have a very large volume and in the autumn or summer three liters is clearly not enough.
This problem is easily solved by installing an additional fluid reservoir. If we compare the barrel from a VAZ 2110 with the barrel on a Lada Samara, then the latter has a volume of 5.2 liters, and in this case it is the barrel with this volume that will serve as an additional one. In this case, it will be installed next to the adsorber, and having moved it in advance. In addition to the barrel, you will also need a motor, a fluid level sensor, a washer hose, three wires, corrugated protection, mounting brackets, bolts, nuts, washers, electrical connectors, tips and a brake pipe. It is impossible to immediately install the barrel after the right wing, because the adsorber is installed there; it needs to be moved in this case. It is best installed on the front pillar cup. Fastening is carried out on 2 studs, which are found on the mounting holes for the standard washer reservoir of VAZ 2112, 2111, 2110, as well as the optics hydraulic corrector tubes. The mount will need to be slightly adjusted to the new location; we cut out the bracket at the top and bottom in those places where there is resistance welding. Then you need to make several holes and secure everything.
After the adsorber has been moved, the next problem arises - the brake pipe. You cannot bend it to the side, because it has a certain size. In this case, it is necessary to replace it with a long one. After the new tube has been installed, you need to bleed the brake system to remove air from there. You need to connect the previously moved adsorber. The two adsorber wires must be disconnected from the wiring harness, which is located under the power unit.
After this, you need to put on the previously prepared corrugated tube. The tube that goes from the tank to the adsorber needs to be relocated; now it will pass at the bottom along with the brake pipes. The excess length of the rubber hose that goes from the adsorber to the throttle pipe must be carefully cut off. So, the adsorber has been moved, but in the old place there are studs that secured it, and they need to be carefully cut off.
To attach the tank you need to have two holes with a diameter of 6 mm. Then the installed additional barrel needs to be connected. The negative wire must be installed near the electric motor, and 2 wires from the motor and from the sensor must be inserted into a plastic corrugation. The new bundle of wires must be connected to all the wires that pass there and everything must be carefully installed in the engine compartment of the VAZ 2112, 2111, 2110. After this, you need to make a hole for the harness in the soundproofing of the engine shield.
Now the wiring will go into the car interior along with all the wires from the stove. To simplify the task as much as possible, you can completely remove the windshield wiper trapezoid. In the cabin, the wiring will appear under the dashboard above the mounting block. The wires need to be connected to 13-pin connectors, which can be found on the left side of the mounting block. The red wire must be connected to the BSK unit. The signal in this case is the wear of the front brake pads. The additional fluid reservoir will be connected automatically when the fluid is mostly empty.
What to do if the wipers stop working due to electromechanics
If the wipers on a VAZ 2110 do not work, the problem may lie in failed gearmotor elements.
The following elements of the electric motor can fail:
- Limit switch;
- Motor anchor (it could burn out);
- Contacts (oxidized);
- Springs on motor brushes;
- Gears in the gearbox (worn out);
- Collector (burnt or dirty).
Repairing wipers on a VAZ 2110, if the cause is correctly identified, will not be difficult.
To do this you need to do the following:
- Remove the dashboard;
- The relay is screwed to the left of the car body; if it is faulty, replace it;
- Check the fuse;
- We disassemble the steering column and study the switch. If the insulation is damaged or other problems are present, change the steering column switch;
- We take out the electric motor and, if the damage is minor, we carry out repairs. If it requires replacement, feel free to replace it along with the relay.
The wipers on the VAZ 2110 may not work due to mechanical faults.
Quite simple things can prevent the wipers from working properly. For example, such as loosening the nut that secures the electric motor and brush holder. Or weakening the springs of the leashes. The cause may also be the destruction of gears, which is associated with the fragility of the material. As a rule, they are made of plastic.
As a result, we can say that the reasons for the breakdown of wipers are quite simple.
Among the “frivolous” breakdowns, the following can be distinguished:
- The fuse in the mounting block died;
- The wires are worn out;
- The gears are worn out;
- The connecting terminals have loosened;
- Contacts have oxidized;
- The mechanism is dirty.
Such breakdowns are not difficult to repair, and they will not cause significant costs when replacing parts.
Approximate prices for parts:
- Relays - from 285 rubles;
- Geared motor - from 1650 to 2200 rubles;
- Windshield wiper trapezoid - from 1,700 rubles;
- Assembled windshield wiper - from 3050 rubles;
- Windshield wiper lever (left) - from 435 rubles;
- Windshield wiper lever (right) - from 330 rubles;
- Brushes from 165 rubles per piece.
All these reasons why the wipers on the VAZ 2110 do not work can be eliminated quickly enough, without extra effort and expense. Of course, the car will let you down if something serious breaks down. For example, combustion of an electric motor, oxidation of contacts that now need to be replaced
It is very important to take care of your car. You need to check the condition of elements such as wipers at least once every couple of days or before getting into the car.
It will be very sad if you notice that your wipers break down during a rainstorm on the highway. Remember: if the brushes freeze to the glass, the electric motor will burn out, then you will have to replace it. Therefore, in winter, be sure to move the blades away from the windshield if you leave your car.
In good weather, no one remembers the car wipers. If there is precipitation, you won’t get far without windshield wipers.
Let's look at the structure of the windshield wiper mechanism of the VAZ-2110 car and dwell on the main reasons for their failure. We will also consider the nuances of repairs and alternative solutions to increase the efficiency of wipers.
↑ Electronic relay 524.3747
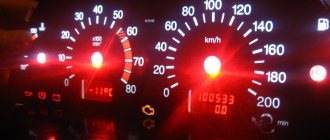
The purifier has three operating modes, they are activated by the right steering column switch. Intermittent mode is provided by an electronic relay K2 type 524.3747 installed in the mounting block. This relay also turns on the wiper motor at low speed when the windshield washer is turned on. The relay must ensure that the electric motor is turned on with a frequency of 14±4 cycles per minute at a gearmotor shaft speed of at least 20 min -1, a temperature of 20±5°C and a supply voltage of 14±0.2 V.
When the cleaner operates at low speed in constant mode, the supply voltage is supplied to diametrically opposed brushes. When the cleaner operates at maximum speed, “+” power is supplied to the brush located on the side.
To relieve the load on the contacts of the ignition switch, the cleaner is connected through an additional relay K6 in the mounting block.
It is recommended to replace a faulty gearmotor with a new one (cleaning the commutator, limit switch contacts and replacing gears is possible). Bent levers are straightened. When the hinges wear out, they are replaced.
The design of the windshield wiper on the VAZ tenth model
What components does the electrical circuit of a windshield wiper consist of, what are the dimensions and length of the blades, how do you modify the drive mechanism yourself?
First, let's look at what elements are included in the circuit:
- Motor or gear motor. An electric motor moves the wiper blades across the glass. If the motor fails, the wipers will not be able to operate.
- Trapezium wipers. By means of a trapezoid, force is transmitted from the electric motor to the wipers themselves, which facilitates their movement.
- Expansion tank with liquid. The reservoir is used to store water or a special liquid for washing glass.
- Windshield washer pump. Using a pumping device, liquid from the expansion tank is supplied directly to the windshield. If the pump breaks down, the wipers will continue to work, but liquid supply will be impossible.
- Hoses through which water flows from the expansion tank to the glass.
- Hood mounted injectors. The nozzles function as a liquid diffuser, thanks to them 2 or more jets of water are formed. Depending on the design, one nozzle may be capable of distributing the flow of water into 3-4 jets.
- And the windshield wiper blades themselves, connected to the trapezoid by means of leads.
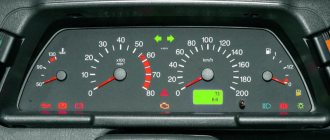
In accordance with the operating diagram of the electric motor, the wiper blades can operate in several modes:
- Intermittent mode, in this case the switch control is in positions 2 and 3.
- Constant. When activated, the speed of movement of the wipers will be average. The switch is set to position 4.
- Fast constant, characterized by the rapid movement of brushes across the glass. Using this mode is important when driving in heavy rain and bad weather. The regulator is set to position 6.
↑ Windshield washer device
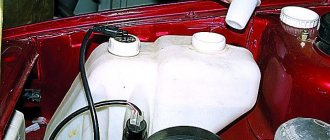
Windshield washer
consists of a polyethylene reservoir with an electric pump installed on the left in the engine compartment, washer nozzles located on the hood, and flexible connecting hoses.
The washer is activated by the right steering column switch, and power is supplied to the pump motor and windshield wiper relay, which turns the wiper on at low speed if it has been turned off or was running intermittently.
If the pump malfunctions, it is replaced. Clogged nozzles can be blown in the opposite direction or cleaned with fishing line.
Replacing wipers
Replacing windshield wipers, visibility in the car For the first successful replacement, it is recommended to consider the types of windshield wipers. Following detailed instructions, the work is completed within half an hour.
Replacing the windshield wiper motor of a VAZ 2110
First you need to look at the old brushes. You can try to get them out of the levers. Often, special springs are installed that make it possible to bend these levers. Next, you need to determine how the brush is attached to the lever (screws, needles or clamps can be used).
The length of these brushes is measured with a ruler or, for example, tape measure. Required tools for replacement:
- round nose pliers;
- screwdrivers included in the set;
- paper napkins and a small towel.
Necessary materials to complete the work:
- a set of new brushes;
- special liquid for glass.
The required materials can be purchased in stores specializing in the sale of spare auto parts.
If the car was produced earlier, it is almost impossible to find brushes for it. The only thing that can be done is to change only the rubber part attached to a thin metal base.
It is recommended to replace brushes in the following sequence:
- for normal access to the windshield wiper, the car must be parked;
- windshield wipers must be secured in a position that provides unobstructed access to each blade;
- in some certain brands of cars, the windshield wipers are recessed flush, so you need to read the instructions for replacing them specifically for the VAZ 2110;
- You need to spread an unnecessary blanket on the hood of the car, as well as around the windshield wipers. Such measures will prevent glass from breaking and damage to the coating on the hood;
- The old windshield wiper design is removed from the mount.
- At the end of the rubber brush there is a locking device that can be easily opened with round-nose pliers. The functioning of the locking device is checked several times. You need to compare the rubber brush fixed to the machine with the new brush, they should match. It is removed from the mount and lever. A new brush is inserted, and it must pass through all the points, just like the old design;
- On recent cars, T-shaped mounts for windshield wipers are installed; to remove them, you need to use a small flat-head screwdriver. The purchased unit is installed by pressing the lever itself, as a result a click should be heard;
- Another type of fastening involves the use of screws. In such a situation, the unit with the brush will be secured using one or two screws. The screws are unscrewed with a screwdriver, and the new design is screwed onto the lever. The fastening screws must be tightened tightly, and small washers can be used;
- The new L-shaped design of the fastening levers is noteworthy. This unit is equipped with a rounded latch that has a swivel joint. To install new brushes, no tools are needed; just press the special latch, pull the brush slightly towards you and remove it from the lever. To fix the new structure, you need to press on the latch until it is installed in its place; you should hear a click.
When the manipulations with the first brush are completed, it’s time to start the second, the sequence of actions is the same.
It often becomes necessary, especially on modern modifications of the VAZ 2110, to replace the motor. It is he who is responsible for the normal operation of the windshield wipers.
Replacing the windshield wiper motor on a VAZ 2110
Replacing the windshield wiper motor of a VAZ 2110 can also be done with your own hands. In addition, it may be necessary to replace the windshield wiper mechanism of the VAZ 2110 or replace the wiper arms of the VAZ 2110. Sometimes, simply replacing the windshield wiper drive on the VAZ 2110 leads to normal operation of the blades. A detailed video, of which there is a lot on the Internet, will tell you how to do everything without errors. It is also useful to use photo materials and pictures during the work process, especially if everything is done with your own hands. The detailed instructions for replacing windshield wipers presented above are an opportunity to save a lot of money, because the price for services of this kind in services is high, and the result is not always pleasing to the car owner. You can also find out on our website how to replace washer nozzles.
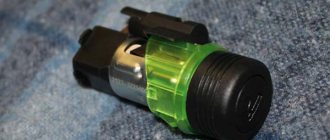
Removing the nozzle
In order to carry out high-quality maintenance, restore the functionality of the nozzle or replace it, first of all, it is necessary to disconnect the wind pad or, as it is popularly called, “jabot”. Or rather, its upper part. To do this, you will need a 10-mm head, a flathead and a Phillips screwdriver.
How to remove the upper part of the windshield
Wind lining
So:
- Using a 10mm socket, unscrew the two nuts located along the edges of the cladding.
- Next, unscrew the four self-tapping screws that secure the cladding. The screws are located under the plugs.
- Then you need to disconnect the sound insulation, which is attached to the wind window trim with six self-tapping screws.
- Carefully remove the top part of the windshield.
Having thus gained access to the washer nozzles, we proceed directly to dismantling them.
Attaching the washer nozzles
To dismantle the injectors you must:
- Disconnect the washer tube from the tee.
- Unscrew the screws securing the injectors, as shown in the photo above.
- Remove the injectors.
Now you can perform all further operations with the injectors. Assembly is carried out in reverse order.
Why do wipers squeak on the glass?
The reasons vary. An unpleasant sound occurs due to the following:
- The angle of the elastic band is set incorrectly;
- the condition of the products leaves much to be desired (Chinese fakes);
- the windshield wiper is poorly fixed;
- products are damaged or worn out;
- the glass is too dirty, the rubber does not fit tightly to it;
- there is no liquid in the windshield wiper reservoir;
- The wiper blades are installed on the wrong side;
- A protective compound (“anti-rain” or wax) is applied to the windshield or rear window.
There are mechanical reasons for squeaky brushes:
- nozzles are broken - an unpleasant squeak is heard when moving on the glass;
- the drive mechanism has failed;
- the spring in the holder has stretched;
- The axial bushing that secures the holder is worn.
The malfunction can be eliminated by properly adjusting the mechanisms, lubricating the rubber band, or by properly cleaning the glass. If these methods do not work, you should simply replace the windshield wipers.
Cause of failure due to electrical
Electrical causes may be:
- The fuse may have blown. It is located in the fuse box;
- Check the leads that are equipped with the VAZ 2110 washer motor; it is quite possible that they have oxidized. It happens that the terminals completely fall off;
- The windshield washer switch located on the steering wheel does not work. Its performance can be easily checked with a multimeter;
- Wiring faulty. The wires may need to be replaced;
- The windshield washer relay does not work. The best treatment is also replacement.
You can read about the reasons why wipers fail in this material:
Replacing injectors (full technology)
Before replacing injectors on a VAZ-2114 of any generation, it is necessary to relieve the pressure in the power system.
To do this, remove the rear seat cushion, open the hatch and remove the contact block from the fuel pump. Now it is de-energized and will not build up pressure.
We start the engine and wait a few minutes until all the fuel in the system is used up. The pressure has been relieved, now you can safely remove the old injectors and replace them with new ones. We proceed according to the following algorithm:
We de-energize the car by removing the negative terminal from the battery.
Disconnect the negative terminal from the battery
Remove the air filter and hose from the pressure regulator in the power system.
Remove the hose from the pressure regulator
We press the plastic latch and remove the connector from the throttle position sensor.
Disconnect the electrical connector of the throttle position sensor
In the same way, remove the connector from the idle air regulator.
Disconnect the connector from the idle air regulator
Disconnect the connector block from the injector wiring harness.
Disconnect the connector block from the injector wires
Unscrew the fuel rail mounting bolts.
Unscrew the fuel rail mounting bolts
We move the fuel rail so that each of the injectors comes out of their seat.
We dismantle the fuel rail with injectors
We release the spring clip and remove the wires from each injector.
Squeeze the spring clip and disconnect the electrical connector of the injector.
We remove the injector from the ramp and replace it with a new one.
Rock the injector and remove it from the fuel rail.
Installation of injectors is carried out in the reverse order. Before installation, it is advisable to check the integrity of the O-rings; if they have lost their elasticity, it is better to replace them with new ones. The injectors are installed and ready for further use. Good luck to everyone!
↑ Removing and disassembling the windshield wiper
- Disconnect the negative cable from the battery.
- Remove the trim and trim of the wind window (see Removing the trim and trim of the wind window).
- Remove the expansion tank (see Removing the expansion tank).
- Disconnect the wiper gear motor connector.
- Using a 10mm wrench, unscrew the nuts on the left and right securing the wiper to the body, as well as one bolt securing the gearmotor bracket.
- Remove the cleaner from the studs and remove it from the air supply box.
- Using a 13mm wrench, unscrew the crank fastening nut.
- Using a 10mm wrench, unscrew the three bolts securing the gearmotor to the bracket and remove it.
- Use a Phillips screwdriver to unscrew the two screws securing the protective cap.
- We remove the cap.
- Using a Phillips screwdriver, unscrew the four screws securing the gear motor cover and remove it.
- If necessary, replace the gear motor gears and clean the limit switch contacts.
Device Features
There are new and old motors. The latter can be found on Soviet cars, or on VAZ 2107, 2108, for example.
Most cars, including the VAZ 2109, 2110, 2114, as well as foreign cars Mitsubishi Lancer, Pajero Sport or Ford Focus, already use new types of washer motors (pumps).
The main components of the washer are:
- nozzles;
- pump (motor);
- reservoir with washer fluid.
Nozzles are used to supply water to the windshield of a car. Therefore, they should be positioned so that the outgoing stream of liquid hits the center of the headplate as much as possible. The pump supplies water to the tank. By the way, on some cars, wash water is supplied not only to the windshield, but also to the main headlights in front and behind.
It doesn't matter what kind of car you have. It could be a Priora, a Hyundai Accent, some Mazda or Toyota. All washer motors work on the same principle.
Although the device, characteristics and appearance may vary
All the washer motors work on the same principle. Although the device, characteristics and appearance may vary.
Pumps supply water or washer fluid. If the windshield washer does not work, most likely the reservoir or the nozzles themselves are broken. They can be replaced or repaired yourself.
If the pump breaks, the task is a little more difficult.
It is important to immediately identify the problem and fix the breakdown. Driving a car, especially in bad weather, when the windshield wiper does not work is dangerous
Causes of malfunctions
Don't rush to blame the engine for everything. It may work, but the windshield wiper does not function for other reasons.
Let's look at the key reasons why our wipers stop doing their job.
- Clogged filter or nozzle. Frequent breakdown. Especially for those who use tap water instead of special washer fluid. To solve the problem, you need to dismantle the devices and flush the system. The work is not difficult, but delicate;
- Supply hoses. They wear out over time, lose their tightness, and burst. Everything is simple here. Remove the old hoses and install new ones. Their price is cheap even on foreign cars;
- Incorrect connection. While carrying out some repair work on the wipers themselves or nearby components, you could disassemble the washer system and reassemble it incorrectly. Check connections and correct errors made during assembly;
- Electric motor and pump shaft. It happens that the connection between them is weak or completely broken. What to do? Right. The element needs to be better secured;
- Motor failure. It doesn’t happen that often, but you shouldn’t rule out this option. Before changing a part, try to clean the motor and its brushes, and get rid of all traces of corrosion. Sometimes it helps. If the repair does not produce results, replacement will help.
Here are the main causes of windshield wiper failure. It is not the most complex mechanism in a car, so you can repair it yourself.
Mechanical reasons for device failure
Conventionally, the reasons why the windshield washer fails can be divided into mechanical and electrical. But most often they are quite simple, sometimes you can even recognize them by sound, or carry out a simple check.
Let's look at the mechanical reasons first:
- It is likely that the mesh of the cup, which is equipped with the washer reservoir of the VAZ 2110, is clogged with dirt or other deposits, which is why the pump cannot pump the liquid. Here, most likely, you will have to remove the tank, and then see whether the glass with the mesh needs a replacement, or a simple rinsing;
- Instead of a special anti-freeze fluid, in the summer they poured ordinary water, and before the onset of cold weather, even after pouring a normal windshield washer, they forgot to remove the water from the hoses. She froze, and accordingly, washing the windshield became impossible. The solution is to warm up the car, leave it in a warm garage with the hood closed and wait until the water melts, then the pump can drive it out;
- In the above situation or under other heavy loads, the windshield washer motor shaft may turn. At the same time, a hum is heard from the motor, but the pump does not supply anything to the windows. If this happens, then only replacing the mechanism will help;
- The hose has just slipped off, and the liquid does not flow through the nozzles, but somewhere past them;
- The hose going to the injectors is pinched;
- The injectors (fittings) are clogged with deposits or dirt. To check this, simply remove the hose from the nozzle and see if liquid flows. Replacing the injectors will help.
Instructions for diagnosing, washing and replacing injectors in VAZ 2110-2112 cars are presented here:
Removing and cleaning VAZ 2110-2112 injectors
Cleaning the injectors of a VAZ 2110-2112 is a job that should be done only if necessary, because the ramp in which the injectors are located and the injectors themselves are practically the very heart of the engine.
That is why they need to be cleaned only if there are problems with the engine - increased fuel consumption, tripping, a significant decrease in power. Only when there is reason to believe that the injectors are clogged can they be cleaned.
Fuel additives are supplied to the market to clean the injector, which must be added to gasoline, but they do not always cope with their job and do it efficiently. And in some cases they can harm the engine, because all the dirt from the injector gets into it, or react with the components of the engine oil.
Removing the VAZ 2110-2112 ramp
Important! All work on removing the VAZ 2110-2112 ramp must be done cold. First of all, we disconnect the wires from the fuel pump, thereby de-energizing it. Then we start the engine and wait until it stalls
Then we start the engine and wait until it stalls.
We start it again and so on - we repeat the procedure until it stops starting. Thus, we remove pressure from the fuel supply system. After this, you can begin to remove the ramp.
The first step is to de-energize it by turning off the power - the general wiring is located on the interior side. Then we unscrew the fuel hoses and all the electrics that are connected to the fuel rail of the VAZ 2110-2112 - idle speed regulator, pressure regulator, throttle position sensor.
Next, unscrew the two hex bolts that hold the fuel rail in place. Essentially, we can now remove the fuel rail. It can be removed in the upward direction, but it will hardly be possible to do without improvised means. The fuel rail sits very tightly and must be removed strictly parallel to the ground, since any distortion will only complicate the task.
Cleaning injectors VAZ 2110-2112.
All work on cleaning VAZ 2110-2112 injectors must be done on a clean surface - for this it is advisable to spread a clean piece of cloth on the ground or work table. In addition, you will need to assemble a simple circuit from a 12 V light bulb, an injector, wires and a switch. We connect the light bulb, nozzle and switch in series, after which you can start cleaning the nozzle.
It is best to attach a 20-30 cm long hose to the injector inlet using a regular plastic clamp and turn it on, supplying carburetor cleaning fluid (Liqui Moly, RunWay, Hi-Gear or others) and observe the change in the jet spray.
The jet can either expand or narrow (this depends on the level of contamination), which will signal that the hole in the nozzle is expanding and washing away dirt. When the jet stops changing the spray angle, the nozzle is clean.
Unfortunately, the quality of fuel in our country leaves much to be desired. Therefore, cleaning VAZ injectors may well become a periodic procedure that needs to be repeated every 40-50 thousand km. So it’s better to learn how to do it yourself - you will not only save your money, but you will be one hundred percent confident in the quality of your work.
https://youtube.com/watch?v=fR9jaFxvnbI
Replacing and removing injectors on a VAZ-2112 16 valves on your own
The injector in a car is almost the most important element in the fuel system. Indeed, in their absence, the operation of the engine will be impossible as a result.
The video below describes in great detail how to remove injectors on a 16-valve VAZ-2112 engine:
Defective injectors
First of all, the car must be installed on a site convenient for work. Defects of the nozzle are carried out by simply turning it on. Using the steering column switch lever, you need to turn on the VAZ windshield wiper and observe the operation of the nozzle.
List of problems with washer nozzles
- Washer fluid does not flow through the nozzle nozzle at all.
- The washer fluid pressure is very weak.
- The jet of liquid supplied is directed to the side and does not provide complete cleaning of the windshield.
- The pump supplying washer fluid or its motor has failed.
- The washer fluid supply tube is damaged.
- The injector has mechanical damage.
- The injector nozzle is clogged with foreign material.
- The nozzle adjustment is incorrect.
Causes of problems
Attention: In order to quickly determine the area where the defect is located, it is recommended to disconnect the washer fluid supply tube from the nozzle and turn on the washer. If the fluid supply pressure is normal, then the problem is in the injector.
Troubleshooting methods
To carry out repairs, you will need a wiper repair kit for the “Ten”; you can find it in almost any car store.
The procedure for diagnosing and troubleshooting is as follows:
First of all, you should diagnose the safety device located in the mounting block. Assess its condition visually, check the integrity of the fusible thread. If the fuse is blown, it must be replaced. If the fuse is intact, then you can begin disassembling the instrument panel. To do this, unscrew the bolts that secure it, and then dismantle the tidy. Having done this, you will need to find the relay responsible for the operation of the brushes; it is fixed on the car body. Check the functionality of the relay; if necessary, replace it with a new one. If everything works, then further actions are carried out in accordance with the breakdown. If the system does not work at all, then you need to dismantle the electric motor and check it; for this it is better to use the services of a qualified electrician. If necessary, the gearbox is changed. In some cases, it is enough to bend the contacts to ensure normal operation of the gearbox. Remove the steering column switch and check its integrity. Make sure that the switch contacts are intact and not burnt. If you notice damage, the switch should also be changed; to do this, you only need to dismantle it and reconnect the block with wires. If the brushes move intermittently, while the motor itself is working normally, then check the trapezoid. If damage is detected, the trapezoid must be replaced. If the wipers move, but no water flows onto the glass, then you should check the operation of the pumping device. If all the hoses are intact and not clogged, but the pump refuses to pump water through them, then the device must be replaced. To do this, you will have to drain all the water from the tank and remove the container from its seat. Disconnect the supply pipes from the pump, then remove the mechanism from the tank. Install a new one, installing a new sealing gasket in advance, and if necessary, treat the installation site with sealant to prevent liquid leakage
Wait a few hours for the sealant to set, and then assemble the entire structure. When replacing the pump, it is also advisable to pay attention to the integrity of the reservoir itself. If there is damage and cracks on the expansion tank, causing fluid to leak out, then you need to either repair the tank or replace it
Repair can be carried out by melting the plastic in the damaged area and then allowing it to harden. If the damage is minor, this will allow you to get rid of it. For more serious problems, the tank needs to be replaced. Also check the condition of the wipers themselves. If, as a result of their work, stains remain on the glass, and the glass itself is cleaned unevenly, then it is better to replace the brushes (author of the video channel Shurik GaikoF).
Cleaning the injectors
Before replacing the injectors, if they are thoroughly clogged, you can try to revive them. To do this, it is necessary to flush the injectors. The service manual for components and assemblies of the VAZ 2112 car does not indicate how to flush the injectors. But, even for a novice car enthusiast, this procedure is not very difficult. To do this you need:
- Soak the nozzle in white spirit for 3-4 hours.
- Clean the nozzle with a thin soft wire.
- Flush the supply channel with high-pressure water.
- Blow out the channel with compressed air.
If necessary, the procedure must be repeated several times. In particular, on a VAZ 2112 car, washing the injectors does not take much time. And it’s not the price that worries us in this case. Much more important is the knowledge and experience that we acquire in the process of performing these works.
Attention: Do not clean the nozzle with a sewing needle. The tip of the needle may break and completely jam the washer fluid supply channel.
Adjusting the nozzles
So, if the fluid is supplied poorly or there are problems with the direction of this fluid, then it is necessary to make adjustments. It's not that difficult and you can do it yourself without any problems, you just need a pin or a needle.
Everything must be done very carefully, as the plastic case can be damaged. First you need to insert the needle into the nozzle hole and then start making adjustments. You need to use careful movements to achieve the correct position so that the stream has the correct direction.
If you have a foreign car, then you need to be more careful here. The fact is that the nozzle supplies several jets in different directions and this should be taken into account when adjusting. The reason is that if you don't take this into account, three or four jets will be sent in one direction and less of the windshield surface will be affected.
In the end, you need to check what you end up with. Is the glass washed well, will visibility be safe in bad weather, if the answers are “yes,” then you did everything right.
Injector maintenance
To ensure uninterrupted operation of the injectors, attention must be paid to them periodically. An extra inspection of the injectors won't hurt. If the injectors have not been turned on for a long time, they must be checked for functionality. Clean and adjust if necessary. In the winter season, it is imperative to use antifreeze washer fluid. Freezing of injectors leads to their wear and premature failure. If you follow the recommendations proposed in this article, then you will not need to replace the washer nozzle on the VAZ 2112 for a long time. And the windshield will be washed as the video shows.
Possible malfunctions of the windshield wiper. VAZ 2110
| Cause of malfunction | Remedy |
| The wiper motor does not work, the bimetallic fuse does not operate and the F9 fuse in the mounting block does not blow. | |
| The power supply wires of the gearmotor are damaged, the wire tips in the connecting blocks are oxidized | Check the wires, replace damaged ones. Strip the tips |
| Wiper switch damaged | Replace the wiper switch in the steering column switch |
| Stuck motor brushes, severe contamination or burnt commutator | Check, eliminate stuck brushes or replace damaged parts; clean the collector |
| Broken wire in the armature winding of the electric motor | Replace the armature or gear motor |
| The wiper motor does not work, the bimetallic fuse trips or fuse F9 in the mounting block blows | |
| The levers of the wiper mechanism are deformed and touch body parts | Check, straighten arms or replace windshield wiper |
| The brushes are frozen to the glass | Tear the brushes away from the glass without damaging the rubber band. |
| A foreign object has entered the wiper mechanism | Check, remove item |
| Short circuit in the motor armature winding | Replace the gear motor or motor armature |
| The wiper motor does not operate intermittently | |
| Wiper switch damaged | Replace the wiper switch in the steering column switch |
| Damaged wiper relay | Replace the relay |
| Wiper motor does not stop intermittently | |
| Damaged wiper relay | Replace the wiper relay |
| Poor contact contact petals of the limit switch to the gear motor gear | Bend the contact tabs of the limit switch |
| Contamination of the limit switch contacts in the gearmotor | Clean the switch contacts |
| The wiper motor is running but the brushes are not moving. | |
| Broken gear motor gear teeth | Replace the gear |
| Weak fastening of the crank on the axis of the gear motor gear | Check and tighten the crank nut, placing it in its final position |
Video about “Possible malfunctions of the windshield wiper.” for VAZ 2110
The windshield wiper does not work. VAZ front wheel drive.
The windshield wiper of the VAZ classic does not work. We are looking for the reason. Part 2.
VAZ2112 malfunction of wipers and heater motor
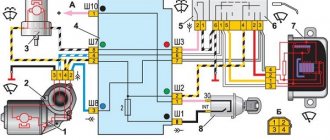
↑ Windshield wiper
1 — rear armature shaft bushing; 2 — felt ring; 3 — electric motor housing; 4 - permanent magnet; 5 – anchor; 6 – collector; 7 — traverse with brush holders, chokes and thermobimetallic fuses; 8 — front armature shaft bushing; 9 — panel with noise-suppressing capacitors and limit switch contacts; 10 — block of intermediate gears; 11 – cover; 12 — gear housing; 13 — driven gear; 14 — output shaft of the gearmotor; 15 — block of intermediate gears
How to remove the washer reservoir on a Lada Vesta
Removing the washer reservoir on Vesta is not difficult; this requires a minimum set of tools:
- Ratchet with 17mm head.
- Torx T20 bit.
- A thin screwdriver or knife.
This is enough to remove the element.
Why is this necessary?
The windshield washer reservoir must be removed if the driver notices extraneous sounds while driving that come from this element, or a puddle has formed under the body, indicating a leak in the washer system tank.
Washer reservoir on Vesta. Photo source: https://xn—-8sbgvj2ayd.xn--p1ai/lada/vse-modeli/bachok-omyvatelya/
Operating procedure
How to remove the washer reservoir on a Lada Vesta (station wagon and sedan):
- Remove the rubber hood seal.
- Pry out the plastic caps on the wiper nuts with a knife or screwdriver.
- Unscrew the nuts.
- Carefully, slightly turning the wipers, remove them. Do not tear the splines off their seats.
- The frill is secured with 6 Torx T20 screws, unscrew them and remove the plastic trim from the engine compartment.
- Remove one Torx screw on the reservoir mount.
- Disconnect the connector at the pump motor by lifting the flag; there is no need to remove the fuse.
- Remove the washer pump hose.
If after these instructions it is not clear how to remove the washer reservoir on a Lada Vesta, then it is better to watch a video or photo of the process to avoid mistakes.
Removing the tank
To remove the windshield washer reservoir, you need to do the following:
- Disconnect the negative terminal from the battery;
- Disconnect the block from the liquid level sensor;
- Disconnect the pads from the windshield washer pump electric motor. When reassembling, remember that a block with a pink wire is connected to the positive terminal, and a block with black wires is connected to the negative terminal;
- If the tank is full, you need to unscrew its cap and remove the cup with the filter mesh;
- Unscrew the fastening nut and bolt. Do not lose sight of the fact that there is a washer installed under the head of the bolt securing the windshield washer reservoir;
- Remove the tank from the studs by lifting it up;
- If there is liquid in it, cover the hole and disconnect the hose from the fitting;
- This liquid is reusable, so it is advisable to drain it into a clean container.