The “six” light acquires special importance when a motorist has to drive in conditions of poor visibility, in difficult weather conditions and at night. However, any driver must remember that defects in the vehicle’s electrical equipment system, one way or another, affect the functionality of the power plant. And this is despite the fact that the main electrical circuits are protected by relay elements, just as the lighting of the “six” is protected, the safety devices of which are routed to the vehicle’s fuse box.
On the VAZ 2106, the headlight relays, along with other main electrical equipment of this vehicle with high current consumption and high voltage, are connected via relay elements. The main purpose of the VAZ 2106 light relays, whose price is low, is to protect the switch contacts from energy overload.
Car enthusiasts often ask where the high and low beam relays are located on the “six” and what they look like. Let us explain that almost all relay devices, as well as the relay - voltage regulator, are located in the power plant compartment. The exception is the turn signal and hazard warning relays, which are located under the instrument cluster in the car interior, covered by a front panel. Both relays are identical in appearance (they can be easily found on the mudguard on the right as the car moves) and are located next to the battery charging indicator relay.
The electrical diagram of the light relay is located below:
On the general diagram of the electrical equipment of the “six” you can see at number 5 the VAZ 2106 low beam relay, and at number 6 the VAZ 2106 high beam relay, which are interchangeable elements. Also here you can see the integration of the main electronic devices of the vehicle into the general electrical supply circuit of the vehicle of this modification.
What headlights are used on the VAZ 2106
Considering that production of the VAZ 2106 finally ceased back in 2006, it is easy to assume that many parts and structural elements of the car, which continues to be actively used by Russian motorists, may require replacement. This fully applies to headlights: the factory optics of the VAZ 2106 in most cases have exhausted their service life, but they are quite easily replaced with new, more up-to-date components, primarily alternative lamps and glass.
Lamps
Standard lamps are most often replaced with bi-xenon or LED ones.
Bixenon
The use of xenon lamps today is considered to be one of the most advanced options for outdoor lighting for both imported and domestic cars, including the VAZ 2106. The bulb of a xenon lamp is filled with gas, which creates a glow after high voltage is applied to the electrodes. Ignition and normal operation of the xenon lamp are provided by special electronic units that generate the voltage of the required value. Bi-xenon technology differs from xenon in that it provides low and high beam in one lamp. Among the advantages of xenon over other types of automotive lighting, the durability of such lamps, their cost-effectiveness and efficiency are most often mentioned. The disadvantage of xenon is its high cost.
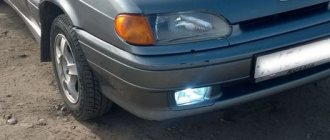
When installing bi-xenon on a VAZ 2106, you can replace both all four headlights and two of them, for example, external ones (i.e. low beam). To feel the difference between standard and newly installed optics, most often two bi-xenon lamps are enough: the level of illumination becomes such that there is no need to buy another rather expensive set.
The use of xenon lamps today is considered to be one of the most advanced options for implementing external lighting for the VAZ 2106
LED bulbs
Another alternative to the standard optics of the VAZ 2106 can be LED lamps. Compared to standard “six” lamps, LED lamps are more vibration-resistant and often have a waterproof housing, which allows them to be used quite successfully in poor road conditions. LED lamps are much cheaper than bi-xenon lamps, and can last the entire service life of the car. The disadvantage of this type of lamp is its high energy consumption.
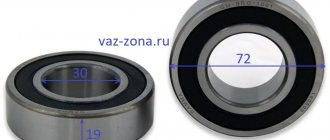
One of the most popular types of light-emitting diode (LED) lamps for the VAZ 2106 is Sho-Me G1.2 H4 30W. The durability and high functionality of such a lamp is achieved through the use of three LEDs fixedly mounted in the device body. In terms of brightness, the lamp is not inferior to xenon, the use of Sho-Me G1.2 H4 30W is environmentally friendly, the generated beam of light does not blind oncoming drivers, since it is directed at an angle.
LED lamps can be a completely acceptable alternative to the standard optics of the VAZ 2106
Glass
Instead of factory glass, you can use, for example, acrylic or polycarbonate.
Acrylic glasses
Some owners of VAZ 2106 cars prefer to install acrylic headlight glasses instead of standard ones. Such headlights are quite often made in private workshops using heat shrinkage. To do this, as a rule, the gypsum matrix is removed from the old glass and a new acrylic headlight (which is nothing more than plexiglass) is cast over it using homemade devices. The thickness of an acrylic headlight is usually 3–4 mm. For a car enthusiast, such a headlight will cost much less than a standard one, but during operation it can quickly become cloudy and covered with cracks.
Polycarbonate
If the owner of the “six” has chosen polycarbonate as the material for the headlight glasses, he must take into account that:
- this material is more expensive than, for example, acrylic;
- the main advantages of polycarbonate compared to acrylic are its higher impact resistance and increased light transmittance;
- polycarbonate has high heat resistance and resistance to precipitation;
- You can only service polycarbonate headlights with a soft sponge; you cannot use abrasive materials to care for them;
- Polycarbonate is approximately 2 times lighter than glass.
Polycarbonate headlights are highly heat-resistant and weather-resistant
Glass
When converting factory headlight units, acrylic or polycarbonate elements are used instead of tempered, heavy glass. When choosing, you should take into account the diameter of the new glass, adjusting it to the size of the standard blocks.
Acrylic headlights are made by heat shrinking using old glass as a matrix. The minimum thickness of a new plexiglass headlight is 4 mm. The advantages of an acrylic block are low cost and the ability to be manufactured in a workshop. The disadvantages include rapid wear of the part. Acrylic quickly becomes covered with microcracks after being hit by gravel thrown out from under the wheels of a vehicle in front, and loses transparency after overheating. It is recommended to additionally protect the headlights with armored film.
Polycarbonate headlights are two times lighter than glass and are characterized by increased resistance to mechanical damage. Compared to acrylic glass, polycarbonate glass does not become cloudy over time, does not lose light transmission, and is resistant to temperature changes.
Rating of LED lamps for VAZ 2106 for low beam
LED lamp C6L H4 H/L COB – fifth place, 110 UAH. a piece
Budget LED lamp for "six" .. Connection occurs to the standard wiring of the car, and the design is distinguished by the presence of active cooling and an aluminum radiator. A color temperature of 5,000K creates a fairly comfortable white light for those who want to buy LED lamps for a VAZ 2016 for a symbolic price.
Advantages of choice:
- affordable price;
- comfortable color temperature;
- active cooling;
- service life is about 30,000 hours.
LED lamp X3C H4 H/L CSP – 4 position and 305 UAH/piece
Another representative of the budget segment, which has become a bestseller in Ukraine due to its affordability. The color temperature is 5000K and provides good visibility to the driver with eye-pleasing white illumination.
LED lamp X3C H4 H/l CSP
Advantages:
- reasonable price;
- famous brand;
- clear shadow border;
- long service life.
AMS Vision-R H4 H/L CSP – third place, 690 UAH/piece
AMS products are the constant flagship on the pages of AAC. The secret of popularity is the honesty of the declared characteristics, which last much longer than the stated warranty period. The lamps are designed for stable operation for at least 20,000 hours. The color temperature is 6,000K with a fairly comfortable white color with a blue tint, and optimal focusing maintains good visibility of the road for oncoming drivers.
Advantages:
- leader in its price segment in terms of performance characteristics;
- brightness 1625 Lumens and efficiency 102 Lux/Watt;
- service life ≈ 20,000 hours;
- dust and moisture protection IP67 and sealed design;
- full-fledged work in foggy headlights;
- resistance to voltage surges and overheating protection.
LED lamp AMS Extreme-F H4 H/L – second place, 1020/piece
AMS has established itself as a leader thanks to the premium level of its LED lamps. The brightness and lighting area have been increased across the entire Extreme-F line. Operating time exceeds 20,000 hours.
A color temperature of 6000K provides the driver with a bright white beam color with a blue tint. Good visibility at night and the ability to react quickly in these conditions are guaranteed by increased brightness levels of +300%. An active dual cooling system will protect the device from possible overheating.
AMS Extreme-F H4 H/L 6000K
Advantages:
- protection from moisture and dust;
- improved brightness by 300%;
- full-fledged work in foggy headlights;
- stable operation during power surges and overheating protection;
- reduced weight.
LED lamp AMS Original-F H4
The real flagship of the rating of LED lamps for the VAZ 2106 with Lattice Power HGL3 LEDs. Operating time is approximately 20,000 hours. A color temperature of 5,500K will provide a bright white color that will cope with illumination of wet asphalt at night. The illumination range will help you react quickly in an unexpected situation, without causing a blinding effect for cars in the oncoming lane.
LED lamp AMS Original-F H4 5500K
Advantages:
- brightness 2000 Lumens, efficiency 88 Lux/Watt;
- protection against moisture and dust IP65;
- full lighting with foggy headlights;
- stable operation during voltage surges and resistance to vibrations;
- sealed and lightweight block;
- overheat protection;
- instant on.
Common problems
Other, more common problems that may cause low beam headlight bulbs to not light even after replacement include the following:
- Damaged fuses - contacts are oxidized or the protective element is melted. In the VAZ 2106 they are located under the dashboard.
- The low beam relay has failed. A continuity check of the electrical circuit with a multimeter is required.
- Poor ground contact on the path from the fuse block to the optics module. It is necessary to clean the oxidized joint.
Recommendation! To double the degree of illumination from the low beam in the VAZ 2106, you can connect the third contact in the high beam module - since a lamp with two filaments is also installed there.
VAZ2107 fuse and relay diagram
The electrical wiring of the machine is protected by fuses, which are mainly installed in the central and additional units, located at the bottom of the instrument panel on the left side next to the steering column. The circuit from the battery to the terminals and connections is closed when the car ignition is turned on.
Owners of 2106 should be aware that the old design of fuses has long become obsolete, since each time they operate they overheat, which affects the density of the cells. Lack of tight contact between the fuse and the connectors leads to their burning. Therefore, replacement of the fuse blocks is necessary. To avoid unnecessary problems with the electrical wiring, you should inspect the safety devices every six months. If the contact part burns, it is necessary to replace the fuses and clean the sockets. Today, many VAZ 2106 owners are modernizing classic blocks, replacing them with modern blade fuses.
Step-by-step instruction
To replace a burnt-out lamp in the low-beam optics on a VAZ model 2106, you will need screwdrivers (flat-head and cross-head) and pliers. The repair procedure itself consists of the following steps:
- Disconnect the vehicle's on-board power supply and, if possible, disconnect the wiring from the battery terminals.
- Use a flat-head screwdriver to remove the trim panel on the outside of the headlights.
- Use a Phillips screwdriver to unscrew the bolts (not completely) securing the rims of the glass cups.
- The headlight is grabbed by hand and turned until the fastening screws fit into the grooves and it can be removed.
- The optics unit is removed from its seat.
- The block with conductors is disconnected from the back.
- Next, the headlight is installed with glass on a flat surface, and a pair of spring-clamps are bent to remove the lamp.
- The burnt-out light source can then be removed from the unit by pulling it up.
- Replace with a new copy.
- Reassemble in reverse order.
- Connect the car's power supply and check that the installed low beam lamp is working properly.
When replacing a low beam lamp on a VAZ 2106 model, do not touch its glass bulb with dirty gloves or bare hands. Fingerprints left on its surface will lead to uneven internal processes, which will quickly lead to its re-burnout.
How to change optics
Currently, many car enthusiasts install alternative optics on the VAZ 2106 as front lights, but this does not always bring an equivalent solution to the problem. Thus, many motorists are replacing halogen lamps on their front headlights with xenon lighting elements, which significantly increases the vehicle’s aggression and luminous intensity, especially in the evening and at night.
However, you should know that updated optics, the price of which is quite high, is by no means a cheap pleasure. Instructions for replacing the front optics with a new one:
- Remove factory optics.
- Try on new products and make holes of the required diameter at the fastening points using a drill.
- Strengthen the updated product, first install mounting springs for installation, which will be required for subsequent adjustment of the luminous flux.
- Adjust the light beam.
However, only the low-beam optics of the VAZ 2106 will operate, and the high beam will be absent, although this drawback in the city and the illuminated highway does not seem to be a big problem. It is much worse if you have to travel long distances, where this disadvantage will cause serious inconvenience.
Replacing the low beam lamp in a VAZ 2106 headlight - text description
Low beam is needed for driving around the city at night. Without him this would not be possible.
Replacing the low beam lamp in a VAZ 2106 headlight can be easily done in a garage. To do this, you need to disassemble the old one and prepare a new lamp.
What we do for disassembly:
- Press the headlight trim and disengage the clips, remove the headlight trim. If necessary, use a screwdriver;
- Loosen the three screws securing the headlight rims;
- Turn the bezel clockwise, and when the screw heads align with the holes, remove it;
- Take out the headlight;
- Disconnect the connector and remove the headlight;
- Unfasten the two lamp mounting springs and remove the lamp;
- Fold back the spring headlight holder, while squeezing it;
- Remove the lamp from the headlight.
To install a new lamp in a VAZ, do the following:
- Insert the light bulb into the headlight socket and fix it, turn it all the way to the right;
- Install the mounting spring and wire connector;
- Check if the light bulb is working correctly;
- Attach the housing to the back of the headlight.
- The new lamp must be held by the body to avoid oiling the bulb and causing it to burn. If greasy marks appear, they must be removed with alcohol.
- Install the headlight with the trim in reverse order.
A replacement must be made immediately as soon as problems arise with the neighbor. The operation is simple, so any car enthusiast without special skills can do it. You can also watch the video.
Preparing to set the headlights correctly
If you decide to adjust the headlights yourself at home, you must do this either at night or in cloudy weather. This will make it possible to significantly better determine the installation angles of the optics by eye. In addition, you will need to perform several preparatory steps:
- carry out diagnostics of the suspension to make sure it is in good condition. It is better to correct all problems immediately in order to achieve the most accurate tuning results;
- check the pressure in the wheels and, if necessary, inflate them to the required level;
- place a load weighing 50-80 kilograms in the driver’s seat;
- dismantle the optics lining;
- fully refuel the car, and also secure the necessary cargo in specially designated places - a jack, a spare tire, tools used when traveling.
In the next step, you will need to mark up the screen. A pre-prepared sheet of plywood 1.7-2 meters long and 1 meter high can be used as it. You can also make adjustments in front of a solid wall or in front of a garage door.
For the most accurate settings, it is advisable to mark the screen as shown in the diagram above. However, you can do without this, but in this case you are unlikely to be confident in the high accuracy of the procedure.
Main conclusions
To replace a burnt-out low beam lamp on a VAZ 2106, it is better to choose standard-installed halogen lamps with H4 characteristics of 12 V and 55 W. Other problems that lead to failure in this optics module include:
- A burnt-out element or oxidized contact in the fuse box.
- Relay failure.
- The ground connection wire is rusty.
When replacing light bulbs, you must strictly follow the instructions provided.
If you want to share your experience on how to choose and replace a low beam lamp on a VAZ 2106, be sure to write about it in the comments.
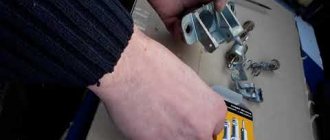
Replacing the "six" light relay
Russian car enthusiasts driving Zhiguli “classics” ask the question of how to connect a light relay to a VAZ 2106 so that it can function without problems in the future. Similar work is carried out when replacing the “six” light relay.
The work is carried out in the following sequence:
- We unscrew the fasteners and dismantle the headlight relay for subsequent replacement;
- We remember the frequency of connecting electrical wiring or mark them with a marker. Remove the wiring from the device connectors;
- We install the updated device in the reverse order.
- How to turn on high beam on a VAZ 2115
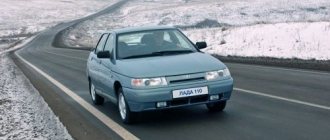
After 30 years of production, in 2006, the last copy of the popular VAZ 2106 car rolled off the assembly line in 2006. The Six, like previous Zhiguli models, was created on the basis of Fiat; the car had a similar optics design, which was located in an updated block. Standard VAZ 2106 headlights are no longer available today; they have been replaced by alternative light sources, new light bulbs and glass.
Tips for choosing headlight bulbs
When choosing a replacement lamp for low beam headlights, the following criteria must be taken into account:
- View. The new light bulb must be the same as the previously installed one, or correspond to the control parameters. For example, xenon and LEDs require a luminous flux controller. Otherwise, equipping headlights with such lamps will be contrary to the rules and will impede the passage of technical inspection.
- Design. Lamps are divided into single-filament lamps - only low beam H7, and double-filament lamps - H4 - low beam and high beam. The choice depends on the headlight itself. They can have one mounting slot (for one lamp) or two compartments – for two lighting devices.
- Power. According to this indicator, when replacing lamps, they must comply with the factory standard, otherwise, in an effort to increase the illumination of the highway, you can blind an oncoming traffic participant and provoke an accident.
- Base. When replacing a lamp, it is best to take the old one with you to the auto shop and use it to compare the dimensions of the seat of the new model.
- Number of copies. With good quality, warranty and reliability of the manufacturer, it is better to buy several copies with a reserve than to be left without low beam in an emergency situation.
- Brand. The most well-known manufacturers with good quality products today are Bosch, Philips, Osram, Koito and others.
In addition to all the above factors, when purchasing a replacement lamp for low beam headlights, you need to take into account the conditions in which they will be used. The degree of moisture protection is a very important parameter when choosing them.
Which lamps are suitable
Low beam headlights are the most frequently used optical element of any passenger car model. Many people use them not only at dusk, but also as daytime running lights. This is why they quickly fail. The VAZ 2106 series model is equipped with a 12-volt H4 lamp with a power consumption of 55 W. The characteristic features of such a lamp are the presence of two filaments - which determines its operation in two modes - far and near.
There are several types of lamps for low beam headlights:
- The incandescent light bulb is an outdated model, burns out quickly, is characterized by low energy efficiency, and is practically not used by modern manufacturers.
- Halogen. The most popular. They have a good service life and sufficient brightness and other lighting parameters for road conditions.
- Xenon. They are distinguished by a good bright white glow that is 3 times stronger than that of their halogen counterparts. Disadvantages - they require additional installation of an ignition unit, and can also blind oncoming road users.
- LEDs. They have the best characteristics - durability up to 100 thousand hours, high brightness, low energy consumption, no overheating. However, they are expensive and require a special reflector design for full operation.
Advice! When replacing standard installed lamps in low beam headlights on a VAZ 2106, it is better to choose trusted manufacturers. For example, it could be the proven Russian brand Mayak.
Types of low beam lamps
- cheap lamps with tungsten filament. They burn out quickly and glow weakly;
- halogen lamps are more expensive, but they have good light output and a long service life;
- Xenon lamps are even more expensive, but they shine even brighter. They are prohibited because they blind oncoming drivers;
- LED ones are even more expensive, but they have a long service life and low power consumption.
The standard lamp in the headlights can be replaced with any of the above, the main thing is to choose one that fits the base. When replacing, it is recommended to change on both headlights so that there is no difference in lighting.
It doesn’t matter what type of lamp you choose, but the power of the light bulb should be no more than 55 watts. If it is more, then the low beam will blind oncoming drivers. The marking on the packaging of the light bulbs will be 12V/55W.
The best manufacturers
Drivers determine the best low beam lamps based on several criteria. The popularity rating does not include the brightest ones, since driving within the city with such lights is prohibited, and high beams must be used on the highway.
Koito
The Japanese company, with a century of production experience, produces halogen and LED headlight bulbs in ten lines. The peculiarity of the models is high build quality and the use of new technologies. The optics provide good illumination of the strip without a blurred left edge. The length of the light beam in the low beams is up to 50 meters. The lamps provide light yellow and white light and do not blind oncoming drivers.
Osram
A car headlight lamp from Osram is mounted on most European cars as standard optics. The brand has established itself as a reliable and high-quality supplier since 1906. The company produces all types of auto lighting from halogen lamps to point electronic laser units.
Each copy is checked for compliance and marked on the base. In production, quartz glass and refractory metals are used for the filament. The optics have the best price-quality ratios.
Philips
Philips headlight bulbs provide comfortable illumination of the road at any time. Options for low beams can be used in PTF, high beam headlights do not exceed European brightness standards for automotive optics.
Models are made from original components and environmentally friendly materials without the use of lead and mercury. One of the few brands whose products are rarely tampered with.
Bosch
remains a leader in the production of automotive optics. In addition to lamps for headlights, the brand produces ECUs, optical systems, flashlights and spotlights for additional lighting. The products are certified and installed on many cars as standard.
Product change process
Anyone can replace a faulty low beam or high beam system component. You will need the following tools:
- awl (thin screwdriver);
- magnet with long handle (optional).
Then follow the instructions:
- Open the hood with the ignition off. Locate the headlights on both sides of the car.
- Unscrew the light source protective cover on the headlight unit from both sides. Having removed the lid of the box, you will see under it a block with three contacts responsible for powering the lighting system, as well as a spring holder.
- Detach the unit and then release the light element using the clamp. You can remove it from its normal mounting location.
Improving low and high beam
#1 AntonSt
- From: Kyiv
- Car: VAZ 21011
Standard lamps and generator installed. Lighting in the evening, I will say this, is not very good. A friend installed xenon. He says that during ignition the consumption reaches 5 kW, the current is about 416 A.
What can be installed instead of standard lamps? Additionally, I include halogen fog lights, but I would like to improve the low and high beam.
#2 Blade
Philips +150 is not xenon, of course, but I’m very pleased. Before them, I had 4 headlights in the low beam at night, now I have 2 again.
#3 AntonSt
- From: Kyiv
- Car: VAZ 21011
Philips +150 is not xenon, of course, but I’m very pleased. Before them, I had 4 headlights in the low beam at night, now I have 2 again.
#4 deredred
- From: Konotop
- Car: VAZ 2101
If there is no relay, then install it and the wires are good. I installed Osram Night Breaker and the dak light relay became an order of magnitude better
#5 DVA
- From: Gostomel-Kyiv
- Car: VAZ-21053->Lanos
#6 debyt
- From: Gaysin
- Car: VAZ 2102
If the car is 2101 (11.13) - I recommend changing the optics to WESSEM (Poland), the light will be much more pleasant, and as mentioned above - Philips bulbs +130 (150), the main thing is to adjust it correctly so as not to catch unpleasant statements afterwards.
- Like this: denis13 and zootechnik
#7 optimus prime
- Where: .
- Auto: 21063
To be honest, I didn’t notice a significant difference between the Nightbreaker and the regular Bilux, what’s the point of paying more and getting lamps with a shorter lifespan?
#8 Blade
I'm sorry +130
#9 AntonSt
- From: Kyiv
- Car: VAZ 21011
The wiring was changed in the fall. Optical elements are “ribbed”, not transparent smooth glass.
#10 Alex_st
- From: From there
- Auto: 2107, FM-4
. He says that during ignition the consumption reaches 5 kW, the current is about 416 A.
Yes, the numbers are impressive: 5 kW and 416 A.
If 416 is divided by 7 (current density in copper), the wire cross-section is 59 mm square. This is already a welding cable. Does it have welding cables for the headlights?
What I mean is that there is no necessary information about the car, what gene, what on-board voltage, power, type of lamps installed. And the information that exists is about nothing.
- Like this: July
#11 [email protected]
- From: Rivne
- Auto: 2101
If there is no relay, then install it and the wires are good. I installed Osram Night Breaker and the dak light relay became an order of magnitude better
Likewise. I installed new optical elements, relays and Osram Knight Breaker +90 lamps. The light is super
#12 AntonSt
- From: Kyiv
- Car: VAZ 21011
. He says that during ignition the consumption reaches 5 kW, the current is about 416 A.
Yes, the numbers are impressive: 5 kW and 416 A.
If 416 is divided by 7 (current density in copper), the wire cross-section is 59 mm square. This is already a welding cable. Does it have welding cables for the headlights?
What I mean is that there is no necessary information about the car, what gene, what on-board voltage, power, type of lamps installed. And the information that exists is about nothing.
I don't know the details. “What I bought for is what I sell for.” I was confused by this number.
#13 denis13
The optics of the Lada from Vessem give normal light.
#14 optimus prime
- Where: .
- Auto: 21063
denis13, Not models 2103, 2101 -Vesem has excellent light
#15 denis13
denis13 , Not models 2103, 2101 -Vesem has excellent light
My 2103 lights up normally. Or maybe I'm not such a demanding user.
#16 Blade
Oddly enough, the new Wesem suite is worse than the Durla optics that were on the car.
#17 Yurec77
- From: Kyiv
- Auto: 21043/lanos.
On the former 2106, the Osvar headlights + good lamps (near Phillips + 60% long range Narva + 50%) = enough light.
#18 optimus prime
- Where: .
- Auto: 21063
#19 Yurec77
- From: Kyiv
- Auto: 21043/lanos.
Yurec77 , Compared to what?
Just new, there is new.
And 2104 light is much more than in Lanos (the problem with Lanos is bad light).
Car lamps for 2106 (Lada)
The VAZ 2106 is considered to be one of the most popular Volzhsky cars, which is the object of modernization of the VAZ 2103 model, left the AvtoVAZ assembly line in 1976 and was produced for exactly 30 years. Reducing the use of chrome finishing materials has made this car somewhat cheaper compared to the more luxurious “troika”. Significant improvements have been made in the finishing and configuration of the VAZ 2106. For example, rich versions of these cars were equipped with a heated rear window and a radio. At one time, the “Six” was the most comfortable and prestigious car in the VAZ line, which ensured a good level of sales.
For the VAZ 2106, an engine from the 2103 was provided with an increased cylinder diameter (79 mm instead of 76 mm). This modernization made it possible to obtain 12 Nm more torque, but the planned power was 80 hp. The engineers were unable to “squeeze” it out of this power unit the first time. However, by reducing the gear ratios in the gearbox, the VAZ team successfully adapted the transmission, as a result of which the VAZ 2106 engine was able to fully demonstrate its potential. By the way, this internal combustion engine formed the basis for the domestic SUV “Niva” (VAZ 2121). An interesting fact is that in 1986 the cost of a VAZ 2106 was 9,100 rubles, which is 100 rubles more. more expensive than the Niva, which is more complex in terms of design, and, accordingly, should be more expensive. This is explained by the fact that the demand for the VAZ 2121 was lower due to its modest capacity
Purpose of lamps in the rear light
First of all, let's figure out what kind of light bulbs are in the rear lights of the VAZ 2106 and what they are responsible for. Each lantern has five light bulbs:
Purpose of the rear light bulbs of the VAZ 2106
The numbers in the photo indicate:
- Turn indicator.
- Side light.
- Reverse indicator.
- Stop signal.
- License plate light.
In addition, the VAZ 2106 has a rear fog lamp installed under the bumper. Naturally, there is only one lamp, and it is responsible, as you might guess, for the rear fog light.
Important! Many people dismantle the rear fog light - they say it spoils the appearance. Let's not do this - this lighting device helps drivers behind us to see our car in the fog.
Fog light for VAZ 2106
Rear lights
The rear light on a Zhiguli consists of four lamps located in one housing:
- turn indicator;
- size;
- reverse light;
- stop signal.
The block is covered with glass or plastic with separate cells for each headlight. It is necessary to change the lamps in the rear headlights after the trunk trim has been removed, since the lens fastening nut is located in the passenger compartment. The license plate lamp socket is located near the rear headlights. The process of replacing light bulbs in the rear unit goes through stages.
- Holding the diffuser with one hand, unscrew the nut located in the trunk.
- Remove the diffuser.
Regardless of which lamp needs to be changed, clearance or stop, all lamps are removed from the VAZ 2106 taillight in the same way.
- Lightly press the lamp.
- Turn counterclockwise.
- The protrusions on the base must match the gaps in the cartridge.
- Pull out the light bulb.
- Replace in reverse order.
The diffuser, before it is tightened with a nut, is always installed into the headlight unit from below and only then pressed by hand over the entire area.
The VAZ-2106 car was produced from 1976 to 2008. This guide provides color-coded wiring diagrams (for the injector and carburetor) with a description of all elements for various modifications. The information is intended for self-repair of the six. Electrical circuits are divided into several blocks for ease of viewing via a computer or phone; there are also circuits in the form of a single picture with a description of each element - for printing on a printer. All electrical equipment of a car can be divided into the following components:
- engine starting system;
- battery charge elements;
- fuel mixture ignition system;
- elements of external and interior lighting;
- sensor system on the instrument panel;
- sound notification elements;
- fuse block.
Headlights VAZ 2106: installation and operation rules
The VAZ 2106 car, which stood on the assembly line for no less than 30 years, is one of the most popular vehicles among once Soviet and later Russian car enthusiasts. Like most of the first VAZ models, the “six” was created in close collaboration with Italian designers. The sixth VAZ model was an updated version of the 2103, as a result of which it had optics close to it: the only external difference was the modified headlight frames. What are the features of the front optics of the VAZ 2106 and how to make the headlights of the “six” more relevant?
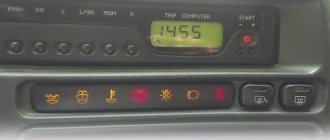
Setting up automatic headlight switching
The Lada Six is not provided with daytime running lights. Since 2010, every car in the Russian Federation can only be driven with DRLs on or low beam headlights if they are not present. If the DRL turns on automatically when you start the engine, then you need to turn on the low beam yourself. Many motorists carry out minimal re-equipment of the electrical circuit so that the low beam turns on automatically after starting the engine and turns off when the engine is running after the handbrake is raised.
There are several ways to automate low beams. You can include a low beam relay in the electrical circuit of the generator; for this, additional relays are used that open and close the circuit depending on the operation of the generator. There is an option to install an additional connector that is triggered by the oil sensor.
Headlight faults and repairs
During operation, the owner of a VAZ 2106 does not always notice that the headlights are gradually becoming paler, forcing the driver to look closely at the road. The reason is the inevitable clouding of the lamp bulb after a certain time, so experts recommend getting into the habit of regularly replacing the lamps of the front lighting devices. If individual lamps or lights in the car do not light up, this may be due to:
If the high or low beam does not switch, then most likely the high or low beam relay has failed or the contacts of the steering column switch have oxidized. In both cases, as a rule, replacement is required - respectively, a relay or a switch. It is also necessary to replace the three-lever switch if its levers do not lock or switch.
Experts recommend getting into the habit of regularly replacing headlight bulbs on your VAZ 2106
How to disassemble a headlight
To disassemble a VAZ 2106 headlight (for example, to replace the glass), you need to heat the sealant around its perimeter with a hairdryer, then remove the glass with a thin screwdriver or knife. A hairdryer is a convenient tool in this case, but not necessary: some people heat the headlight in a steam bath or in the oven, although this risks overheating the glass. The headlight is assembled in the reverse order - a layer of sealant is applied and the glass is carefully installed in place.
Replacing light bulbs
To replace a VAZ 2106 headlight bulb, you must:
- Remove the plastic cover using a flat-head screwdriver.
- Use a Phillips screwdriver to loosen the fastening screws of the rim holding the headlight.
Use a Phillips screwdriver to loosen the fastening screws of the rim holding the headlight.
- Turn the rim until the screws come out of the grooves.
The rim must be turned until the screws come out of the grooves
- Remove the rim and lens.
The diffuser is removed along with the rim
- Remove the headlight from the niche and disconnect the power cable plug.
The headlight should be removed from the niche, and then disconnect the power cord plug
- Remove the clamp.
To replace the headlight bulb on a VAZ 2106, you will need to remove the special lamp mounting clamp
- Remove the lamp from the headlight.
A failed lamp can be removed from the headlight
Reassembling the structure after replacing the lamp is performed in the reverse order.
I installed frankly Chinese Philips 10090W light bulbs, 250 rubles. for one. I've been driving for three days - until nothing bursts or burns. It shines better than the old ones, without any deviations. It hits oncoming traffic in the eyes a little harder in a loaded car, but does not blind. The light began to shine better after replacing the reflectors - I bought the unnamed ones, 150 rubles. thing. Combined with the fogs, the light has now become quite tolerable.
Headlights corrector
A device such as a headlight range control is not used every day, but it can be useful, for example, when driving at night with an overloaded trunk. At the same time, the front part of the car “lifts up”, and the low beam is more like high beam. In this case, the driver can use the corrector to lower the beam of light down. In the opposite situation, when the corrector is configured for a loaded trunk and the car is empty, you can perform the opposite manipulation.
If the car is not equipped with a corrector, you can install this device yourself. Based on the type of drive, correctors are divided into hydraulic and electromechanical. The hydraulic one consists of the main cylinder and headlight drive cylinders, as well as a pipe system and a manual regulator, which is installed on the instrument panel. Electromechanical - consisting of a servo drive, wires and a regulator. The headlights are adjusted using a hydraulic corrector by changing the pressure of the working fluid (which must be non-freezing) in the cylinders. The electric corrector changes the position of the headlights using a servo drive, which consists of an electric motor and a worm gear: after applying voltage to the electric motor, the rotational movement is converted into translational motion, and the rod connected to the headlight by a ball joint changes its angle.
Video: operation of the electromechanical headlight range control on a VAZ 2106
Cleaning the optics
Periodic cleaning is required not only on the outside, but also on the inside of the VAZ 2106 headlights. If you need to get rid of dirt and dust accumulated during operation, you can use one of the many special cleaning products. It is important that the product does not contain alcohol, which can damage the coating of the reflector and the optics will have to be changed. In some cases, toothpaste or cosmetic micellar nail polish remover may be sufficient to clean the surface of the headlight. To wash the inside surface of the headlight without removing the glass, you need to remove the lamp from the headlight, pour water diluted with a cleaning agent inside and shake well several times, then rinse the container with clean water and dry.
I also have a six with headlights that likes to be capricious, rarely, but it can: everything is clear, but sometimes the left one, then the right one, sometimes it’s completely dark... I’m treated by cleaning the fuse contacts, replacing the fuse contacts with others, you can wave with the neighboring places, by amperage, of course. The new ones are a mess, on my far one it wasn’t the jumper itself that was melting, but the plastic body was shrinking and the light went out, you look - it’s intact, but when you pull it out, it’s crumpled and there’s no contact. Now I found old ones, ceramic ones, the problem went away.
Electrical diagram
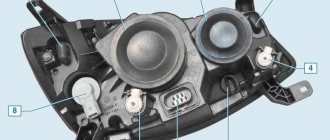
The wiring diagram for VAZ 2106 headlights includes:
- Actually the headlights.
- Circuit breakers.
- Indicator of high beam headlights on the speedometer.
- Low beam relay.
- Mode switch.
- High beam relay.
- Generator.
- External lighting switch.
- Battery.
- Ignition.
The wiring diagram for connecting VAZ 2106 headlights is simple in design and reliable in operation.
Understeering's shifter
The driver can turn on the low and high beam headlights using the steering column switch. In this case, it is necessary that the external lighting switch button is pressed. However, even if this button is not pressed, the driver can briefly turn on the high beam (for example, to give a light signal) by pulling the steering column switch lever towards him: this is possible due to the fact that the steering column light signal contact is powered directly from the ignition switch.
The steering column switch itself (which is also called the tube) on the “six” is three-lever (high, low beam and dimensions) and is attached with a clamp to the steering shaft bracket. If repair or replacement of the tube is required, then, as a rule, it is necessary to disassemble the steering column, and the most typical malfunctions of the steering column switch are failure of its contacts (as a result of which, for example, the high or low beam does not work) or mechanical damage to the tube itself.
The steering column switch on the “six” is a three-lever switch (high beam, low beam and dimensions) and is attached with a clamp to the steering shaft bracket
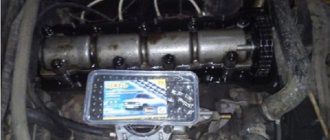
Headlight relay
The VAZ 2106 car initially used headlight relays of the RS-527 type, which were later replaced by relays 113.3747–10. Both relays are located in the power unit compartment on the mudguard on the right in the direction of travel of the vehicle. In terms of their technical characteristics, the low and high beam relays are identical:
- response voltage - 8 V (at 20–30 °C);
- gap between contacts - 2 mm;
- winding resistance - 85 Ohm (at 20 °C).
In normal condition, the headlight relay contacts are open: a closure occurs when the low or high beam is turned on using the steering column switch. Repairing relays when they fail is most often impractical: due to their low cost, it is easier to replace them with new ones.
Automatic headlight switching
The relevance of turning on headlights in automatic mode is due to the fact that many drivers forget to turn on low beams during the daytime (as required by traffic regulations) and as a result receive fines. In Russia, such a requirement appeared for the first time in 2005 and initially applied only to traffic outside populated areas. Since 2010, all drivers have been required to turn on low beams or side lights when driving: this measure is designed to improve road safety.
Those drivers who do not trust their own memory perform a simple modification of the VAZ 2106 electrical circuit, as a result of which the car’s low beam turns on automatically. Such an upgrade can be carried out in different ways, and most often the point of the upgrade is to ensure that the low beam turns on after the engine is started. This can be achieved, for example, by including a low beam relay in the generator circuit: this will require two additional relays, thanks to which it will be possible to control the headlights when the engine is on.
In order not to strain my memory and not to forget to turn on the neighbor, I installed a machine for myself)) This “device” looks like this. Operating principle: Started the engine - the low one turned on, turned it off - went out. I raised the handbrake with the engine running and the headlights went out; I released it and they came on. Disabling the low beam when the handbrake is raised is convenient during autostart. That is, turning off the lights using the handbrake has been removed and a power switch has been added, respectively, one relay has been removed. The low beam switches on after starting the engine and switches off when the ignition is turned off. The high beam is turned on by the standard steering column switch, but when it is turned on, the low beam does not go out, so the high beam shines into the distance, and the low beam additionally illuminates the space in front of the car.
Those drivers who do not trust their own memory perform a simple modification of the VAZ 2106 electrical circuit, as a result of which the car’s low beam turns on automatically
There are other options for automatically turning on the headlights, for example, through an oil pressure sensor, and any car enthusiast can choose the most suitable method for themselves.
Light vs Dark
Work at the Dmitrovsky Automotive Test Site begins as usual. While the photographer is looking for good angles in the gathering twilight, the team is placing a grid of cones on the asphalt. The distance between them is 10 meters. At each pole we will measure the illumination given by the headlights of each car with a lux meter, and based on the measurement results we will draw the light beams of each headlight. We draw the line between light and darkness based on the illumination value of one lux - everything below this value is perceived as darkness from the driver’s seat.
Mazdas with halogen and xenon in low beam mode performed predictably: the range is not the most impressive. The light “exhausted” at about 70 meters
Pay attention to the difference in the shape of the beam: with gas-discharge optics it is more shifted towards the right side of the road
If both cars were new, the superiority of xenon would be more impressive. His lamps already noticeably decrease in brightness by the age of three, and our experimental CX-5 was five years old. It is for this reason that gas-discharge lamps are recommended to be replaced in pairs. This does not happen with halogens.
Bi-LED lenses Luma | Standard Bi-LED |
Standard bi-xenon | Standard halogen |
As soon as the crossovers with LED lamps reached their starting position, the cone “walker” had more work to do. The car with standard lights reached the 150-meter mark. And the LED lenses we installed in the fourth car exceeded this achievement by 40 meters! Don’t rush to accuse them of being merciless towards the eyes of oncoming drivers: the farthest illuminated cones, according to the light meter readings, are located on the two lines to the right in the direction of travel - in fact, on the right side of the road and on the side of the road.
Directly in front of the car and to the left, where there is a chance of blinding oncoming people, the factory LED headlight shines even more than the tuning one. For example, on the left center line at a distance of 60 meters from the car, in the first case we measured two luxes, and in the second - one. Interestingly, for the human eye the picture is different. This can be seen in the photographs: the non-original LED headlights shine brighter and more evenly than the stock ones. The advantages of standard ones include a wider beam at a short distance from the bumper, which helps when maneuvering on unlit roads at low speeds.
Bi-LED lenses Luma | Standard Bi-LED |
Standard bi-xenon | Standard halogen |
Having studied the measurement protocols in the low beam mode, we already guessed what to expect from the high beam: in most cases, the established hierarchy is preserved. This is what happened in the dispute between cars with LED optics. The second generation CX‑5 reached up to 240 meters with its LED light, the old car with installed LED lenses — up to 280 meters. In both cases, this is an excellent result with which you can feel confident on the track.
The halogen light “shot” further than xenon: a quarter of a kilometer versus 220 meters. In addition to the already mentioned reduction in the brightness of gas-discharge lamps, another factor played a role. In a simple Mazda, low beam and high beam operate from different lamps. The second one rarely comes into play, and its reflex section is ideally preserved for many years. And the xenon light on the CX‑5 comes from one lamp and through one lens. That is, the resource of the lamp and lens is consumed mostly by the low beam, but at the same time the high beam also suffers. Here is the result: a Mazda CX‑5 driven with halogen lights gave a more effective high beam.
Replacing absolutely all light bulbs on a VAZ 2106
Welcome! Lamps. thanks to them, the road is illuminated, the interior lights are turned on, and much more. But there are times when a light bulb becomes unusable, for example, a low beam lamp stops burning, and then you have to look for information on how to replace this lamp. In order not to look for information anymore, we have specially collected all this for you in this article, so to speak, in one, and now, when you need to change this or that light bulb on a VAZ 2106, after reading this article, you will learn how to do it.
Replacing the glove compartment lamp:
The note! The glove compartment or, as it is also called, the glove compartment uses an A12-4 type lamp, which is located inside the upper left.!
1) To replace the lamp, first open the glove compartment, and then disconnect the wire from the back of the lamp, I also call it the socket.
2) Then remove this socket along with the lamp from the socket.
The note! If the lamp socket does not come out of the socket, carefully remove it with pliers.!
3) Then press down on the bulb and rotate it counterclockwise, removing the bulb from the socket and inserting the new bulb into the socket.
The note! All parts are installed in reverse order!
Replacing the lamp in the turn signal repeater:
This lamp is very easy to replace, but in some cases, if you have fenders in front of you, you will have to remove them. (For more information on how to replace a lamp, read the article: “Replacing a light bulb in a turn signal”)