There are cases when, when the engine of a VAZ classic is running, extraneous sounds appear, similar to the operation of a diesel engine; one of the reasons for the appearance of such a sound is a torn damper. Needs replacement. What are the signs, how to determine that this is a break in the damper and how to replace the timing chain damper on a classic, see the video using the example of a VAZ 2106 car.
In addition, the instructions will be useful in that they show the complete process of adjusting valves on a VAZ 2106 with your own hands in a garage. Therefore, to find out the correct order of how to adjust the valves on a VAZ 2106, watch the video to the end, the master will tell you many important and interesting points, since in this case the valves were adjusted after the engine was running on gas, so car owners who find themselves in a similar situation, watch this instructions will be very helpful. Additional information on adjusting valves on classics can also be found on the page: how valves are adjusted on a VAZ 2105.
Timing chain tension
If a loud knocking and grinding noise begins to be heard from under the hood of a VAZ 2106 when starting the engine, the most likely reason for this is a failure of the timing chain tensioner shoe.
As a result, the chain sags and begins to hit the cylinder block cover. The tensioner shoe should be replaced promptly. Otherwise, the timing chain may break and the engine will be seriously damaged. The tension shoe is designed to reduce the amplitude of timing chain vibrations when starting the engine. If these vibrations are not suppressed in a timely manner, the crankshaft and timing shaft, connected by the timing chain, will rotate in different phases. As a result, the synchronous operation of the cylinders will be disrupted. This, in turn, will lead to failures in engine operation and its inadequate response to pressing the accelerator pedal, as well as to a sharp increase in fuel consumption.
The timing chain tensioning system of the VAZ 2106 consists of three elements:
- timing chain tensioner shoe;
- tensioner oil fitting;
- timing chain damper.
Each of these elements has its own purpose.
- The timing chain tensioner shoe is a curved steel plate that periodically puts pressure on the timing chain and reduces the amplitude of its vibrations. The surface of the shoe in contact with the chain is coated with a particularly durable polymer material. This material is quite durable, but when it wears out, loud knocking noises from the chain beating against the cylinder block begin to be heard from under the hood.
- The tensioner oil fitting is the device that the shoe is attached to. Because of this fitting, the shoe extends and puts pressure on the timing chain if it becomes loose, and retracts when the chain is tightened. A high pressure oil line with an oil pressure sensor is connected to the fitting. If the chain slackens when starting the engine, the sensor detects a decrease in pressure in the line. This reduction is compensated by the supply of an additional portion of oil, which puts pressure on the piston in the fitting. As a result, the shoe extends and dampens chain vibration.
First, a mechanical system was developed in which the tension shoe was driven by the elastic force of a conventional spring. Since the springs with shoes pressed continuously on the chain, such a system quickly wore out.
The mechanical one has been replaced by a hydraulic calming system, which is used on the VAZ 2106. Here, the movement of the shoe is ensured by a special hydraulic fitting, into which oil is supplied as needed. Such a system lasts much longer, and the driver has noticeably fewer problems with its maintenance.
To replace the fitting and tension shoe you will need:
- a new tension shoe for the VAZ 2106 (costs about 300 rubles);
- set of socket wrenches;
- ratchet;
- set of open-end wrenches;
- steel wire with a diameter of 2 mm and a length of 35 cm;
- flat blade screwdriver.
Before starting work, it is necessary to remove the air filter - without dismantling it it is impossible to get to the tensioner shoe. The work is performed in the following order.
- Use a 14mm socket to unscrew the five air filter mounting bolts. The filter is removed.
To tension the VAZ 2106 timing chain you will need:
- set of open-end wrenches;
- flat screwdriver;
- socket wrench 19.
Procedure
The VAZ 2106 timing chain is tensioned as follows.
- Using the above algorithm, the air filter, fitting and tensioner shoe are removed.
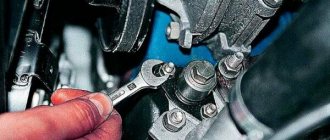
- A 19 mm spanner is put on the crankshaft nut.
- Using a wrench, the shaft is turned clockwise until the chain tension under and above the crankshaft is the same. The tension level is checked manually. To fully tension the chain, the crankshaft must make at least two full revolutions.
Causes of damper failure
The timing chain tensioner, like any other engine part, can fail. Here are the main reasons why this happens:
- loosening of fasteners. The chain damper operates under very dynamic alternating loads: the chain constantly hits it. As a result, the bolts on which the damper is held begin to slowly weaken, the damper begins to dangle more and more, and with the next blow of the chain, the mounting bolts simply break;
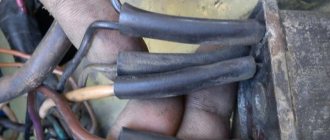
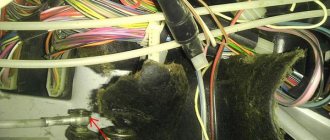
The mounting bolts on the timing damper can become loose and break over time. - fatigue failure. As mentioned above, the damper plate is subjected to severe shock loads. These are ideal conditions for metal fatigue failure. At some point, a microcrack appears on the surface of the damper, which cannot be seen with the naked eye. This crack can remain stable for years, but one day, when the chain hits the damper again, it begins to spread, and the speed of its propagation in the metal exceeds the speed of sound. As a result, the damper instantly breaks down, and the VAZ 2106 engine instantly jams.
Timing chain guide broke due to internal fatigue stresses
Required tools:
- keys from the standard set;
- universal pulley clamp;
- special key for “36”;
- empty, clean container for draining antifreeze.
Replacing the timing chain on a VAZ 2106 as well as a damper, tensioner shoe, and sprockets
- Remove the air filter housing from the carburetor.
How to replace the timing chain on a VAZ 2106 with your own hands
- Unscrew 3 nuts with a “10” wrench, and 4 nuts with a “8” wrench. All actions must be performed carefully so that nothing falls on the carburetor. If this is neglected, it will be necessary to remove this unit, possibly the intake manifold.
Do-it-yourself replacement of the timing chain on a VAZ 2106
- Remove the distributor cap and remove the pipe used to supply fuel.
- Using a “10” wrench, remove the 8 nuts securing the valve cover and remove the washers with plates.
- Disconnect the choke cable and throttle valve drive.
- Remove the valve cover with gasket (ideally it is better to replace it).
Changing the timing chain on a VAZ 2106
- Remove the protection from below, drain the antifreeze into the container that was prepared initially.
- Using a wrench set to “19”, loosen the generator mounting nut.
- Loosen the clamp of the lower water pump pipe and remove it.
How to replace the timing chain on a VAZ 2106, stabilizer, tensioner shoe, and sprockets on your own
- Turn off the power to the fan, as well as the power to the temperature sensor on the radiator.
- Remove the radiator with pipes and thermostat.
- Loosen the generator chain tensioner nut. Use a pry bar to move it forward.
Read more: How to choose and replace antifreeze on a Peugeot 308: step-by-step instructions
Replacing the timing chain on a VAZ 2106 with your own hands
- Disconnect the VAZ 2106 alternator belt.
- Using the “36” key, turn the crankshaft by the pulley until the marks of the cover and pulley, the sprocket and the casting in the camshaft bed coincide.
Timing chain VAZ 2106
Also check out
Timing chain VAZ 2106
- Unscrew the “36” nut securing the crankshaft pulley. Use a special key to lock the pulley and unscrew it. If there is no special key, you need to engage fifth gear, depress the brake pedal, and unscrew it using the key.
Replacing the timing chain on a VAZ 2106, as well as a damper, tensioner shoe, and sprockets
- Remove the pulley. Unscrew 6 bolts and 3 nuts with a “10” wrench, then 3 more bolts of the camshaft drive cover, remove the cover.
We change the timing chain on a VAZ 2106 damper, tensioner shoe, and sprockets with our own hands
- Unscrew the 2 nuts securing the chain tensioner and remove it.
The photos show an automatic tensioner.
- Loosen the bolt that secures the camshaft sprocket, after which you can remove it. The position for centering is worth remembering, or better yet, marking.
In the photo you can see the result.
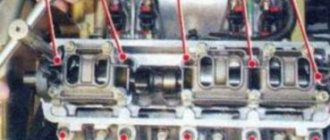
- A fuse to prevent the circuit from jumping.
- Fastening the timing chain tensioner shoe.
- Crankshaft sprocket.
- Using a “10” key, disconnect the fuse, the tensioner mount, and the bolt that secures the auxiliary drive sprocket.
Replacing the timing chain on a VAZ 2106 at home
- Remove the sprockets and old timing chain. The crankshaft key and the casting on the cylinder block must match.
- Install new sprockets, crankshaft and auxiliary units to the drive. Install a carefully lubricated new chain.
- To prevent the chain from falling down, you need to place some kind of tool under it.
Changing the timing chain of a VAZ 2106 at home - The sprocket is installed in the chain so that the descending branch of the chain is tensioned and all its marks coincide. Next you need to turn the camshaft from right to left and go back behind the crankshaft. Thanks to these actions, the chain is tensioned, and you can check the correct installation of the marks. If the marks do not match, you need to throw the chain over the tooth and then repeat the procedure.
- Return the tensioner to its place and activate it. Tighten all mounting bolts and secure them. Turn the crankshaft 2 turns, make sure that the marks match and that the valves and pistons do not collide.
- Lubricate the crankshaft cover gasket with sealant and install it in place.
- Place the pulley, make sure that the marks match, and tighten it.
- Unscrew the distributor nut to “13”, remove the distributor itself, turn the slider to the contact of the 4th cylinder.
- Return the distributor to its place.
- To complete the procedure for installing a new VAZ 2106 timing chain, be sure to turn on the ignition.
- Reassemble in reverse order and add antifreeze.
- At this point, the replacement of the timing chain on the VAZ 2106 can be considered complete.
How to correctly replace a chain guide on a VAZ-2107
To correctly carry out the procedure for replacing the timing chain guide, you need to prepare the tools for the job:
- Screwdriver Set;
- a set of keys;
- set of socket heads;
- long tweezers (you can use a wire hook instead).
In addition to tools, you will need a new damper, engine head cover gasket and special sealant for cars.
This procedure can be performed independently in a garage. In this case, the following conditions must be observed:
- spacious room;
- bright lighting;
- absence of dust (it should not get on the parts of the gas distribution mechanism when the cover is removed).
The first step is to remove the chain guide. This process consists of several steps (with the car in running mode at neutral speed):
Remove the engine head cover by first unscrewing the eight mounting bolts (note: the gasket must not be damaged, otherwise it will need to be replaced). Align the camshaft sprocket (the mark on it should coincide with the boss on the camshaft housing). Partially unscrew the tensioner cap nut for the timing chain structure (it should be loosened slightly without unscrewing completely). Press the tensioner shoe using a suitable screwdriver to loosen the tensioned timing chain structure. Screw the cap nut into place to secure the chain in the loose position. Hook the tensioner with tweezers or a hook (the hooking tool must be inserted into the technological hole) so that the dismantled part does not fall into the engine oil pan during dismantling. Unscrew the chain guide mounting bolts (there are two of them). Dismantle it.
If the damper breaks, it can be removed with tweezers or a stiff wire hook. If during dismantling this part fell into the engine crankcase pan, it will be necessary to remove this pan to remove the damper.
The second stage is the installation of a new chain guide. The procedure is the reverse of that described above. When performing this, several important points should be taken into account:
- Be sure to tension the chain structure to the required level.
- The location of the engine shaft marks - crankshaft and camshaft - is monitored.
- All seats for bolted fastenings are coated with automotive sealant (this measure is necessary to prevent engine oil from seeping through).
If it is difficult for a car enthusiast to carry out the procedure for replacing the chain guide on his own, he can always seek help from qualified car mechanics at a service center for the repair and maintenance of cars of this model.
This section presents spare parts for the VAZ-2101, -2103, -2104, -2105, -2106, -2107 or, as people say, “classics”. From body hardware to electronics, the range of auto parts for classic VAZs is very wide and allows you to choose everything you need for any task related to repair or modernization.
Loved by domestic car enthusiasts for their maintainability, good maneuverability, high ground clearance and a spacious trunk, VAZ cars of the 2101-2107 model line have long been the most common cars in the vastness of our homeland. Over time, the seemingly decent driving performance and interior comfort of your car may no longer look so impressive against the backdrop of new products from the Volzhsky Automobile Plant, and the wear and tear of the main components and electronics does not add optimism to the car owner. Replacing worn parts, repairing faults of any severity or tuning - in this section you will find all the necessary spare parts to return your “swallow” to its former agility and improve comfort.
The AvtoALL store offers spare parts for all “Classics” - both for the old “Kopeyka” VAZ-2101, and for the VAZ-2107 “Seven” that has been in production for thirty years. At the same time, we offer not just spare parts, but only high-quality parts, components and mechanisms of known origin. And the prices of spare parts will pleasantly surprise you and will allow you not to spend too much on repairing your favorite car.
AvtoALL: all spare parts for “Classics” at the best prices!
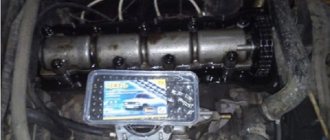
Instructions for disassembling the mechanism
The first thing to do is remove the engine valve cover. Here you can see some signs of wear, for example, a chain dangling on the camshaft gear or a torn damper (or rather, its absence). It even happens that in the place where it stood, the chain selected a groove in the material of the head itself. For convenience, it is better to immediately align the round mark on the camshaft drive gear with the protrusion on its bed.
This is done by rotating the crankshaft with a 38mm wrench. For further disassembly, it is better to remove the radiator, first draining the antifreeze from it. There are craftsmen who replace the VAZ 2106 chain without removing the radiator, but this makes access to the timing mechanism very difficult, which will take up extra time. It is better to spend it on dismantling and installing the radiator, creating conditions for normal operation.
Once access to the front of the engine is open, you need to loosen and remove the generator drive belt. Then, using a 38mm wrench, loosen the pulley nut in this way: engage 4th gear, and ask an assistant to press the brake, and then unscrew the ratchet. This method will save you from the need to insert various pieces of hardware into the engine to stop the rotation of the crankshaft. Further disassembly is carried out according to this scheme.
- Remove the pulley from the crankshaft, clean the turnkey bolts on the 10th front cover of the cylinder block from dirt, and unscrew them. Three of them are located at the bottom and connect the cover to the oil pan. Remove it, clean off any remaining gasket, as well as the mating flange on the cylinder block.
Replacing the timing chain of a VAZ 2106
- Unlock the bolts of the two gears, loosen them and unscrew them. Remove these gears, then use a 10mm wrench to unscrew the travel stop (located to the left of the crankshaft axis), and then remove the old chain. The crankshaft gear is removed last; be careful not to lose the key.
- Use a 13mm wrench to loosen the chain tensioner nut, use a pry bar to gently press the chain tensioner shoe so that the plunger goes in, and then tighten the nut again. This is done because previously the chain tension was greater; the tensioner will not allow you to install a new one.
- Replacing the chain tensioner consists of unscrewing its working part (shoe) and replacing it with a new one, which is done in the next step.
- The chain damper is replaced in the same way. You need to unscrew 2 bolts with a 10mm wrench, remove the old element, and install a new one in its place and screw it on.
This photo report shows how to replace the timing chain of VAZ 2106, 2107 cars. Also, this method is suitable for all VAZ (Classic) car models, except for the VAZ 2105 engine, since it uses a belt drive.
Read more: Master brake cylinder VAZ 2101 repair replacement bleeding the brakes instructions with photos and videos
To drive the VAZ 2106/2107, a double-row roller chain is used. It transmits force from a sprocket mounted on the crankshaft to another sprocket mounted on the end of the camshaft.
The chain is a structure that develops large inertia, so a chain drive requires vibration damping.
Even a well-tensioned chain retains the property of “playing” in those places where there are no sprockets or tensioners.
The chain has virtually zero ability to stretch and compress, and fairly limited flexibility. Therefore, in order to provide it with constant tension while working in its place at any speed, it has to be literally shackled, using a system of tensioners and dampers.
This problem on the VAZ 2106/2107 is solved by a damper - an additional spring-loaded clamping bar. They have a steel frame covered with a layer of durable rubber. Tensioners and dampers dampen vibration and noise quite effectively. The chain is prevented from falling off by a stop pin that is screwed into the block or cylinder head. During normal operation the chain does not touch it.
The performance and durability of the timing chain drive depends on the material and quality of heat treatment of the chain and sprockets themselves. Manufacturing accuracy and cleanliness of working surfaces are of great importance. The main advantage of a timing chain drive is its long service life.
On engines of the VAZ family, the chain life is from 100 to 200 thousand kilometers. If high-quality materials were used in the manufacture of components, and proper tension and abundant lubrication of the drive were ensured during operation, then the chain will last no less than the engine itself. A broken circuit is a rare occurrence.
The deterioration of its condition can be monitored by increased noise when the engine is running.
For engines 2101 and 21011, where the block is lower, the number of chain links is 114, and for 2103/2106 the number of links is 116.
Replacing the timing chain on a VAZ is necessary when its critical wear has occurred, its service life has been exhausted, and tightening it with all sorts of “cunning” methods no longer gives results. These methods include:
- increasing the length of the working part of the tensioner by pressing on a piece of tube of a suitable diameter;
- “addition” of an additional bracket to the shoe and other “bullying” of the engine.
An extended timing chain no longer ensures accurate valve timing, which negatively affects engine performance.
In addition, she wears out the shoe and constantly “beats the head off” the pacifier. In addition, engine noise increases, fuel consumption increases and engine starting becomes worse.
It is also worth saying that the chain sometimes breaks with all that it entails.
- To remove the timing chain, you do not need to remove the crankshaft sprocket!
- For work we will need: keys “10”, “13”, “17”, a special wrench for the crankshaft pulley nut (or a “36” head), a screwdriver, a mounting blade, a hammer, and a bit.
- After removing the sprocket, do not turn the drive shaft, because this may disrupt the initial ignition setting!
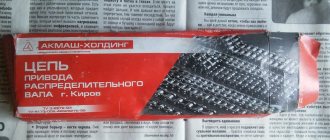
- The original timing chain number is 2103-1006040, the average price is 380 rubles.
- Analogues:
- Fenox PC2103C3 — 519 rub.
- Kraft KT 017736 — 620 rub.
The original number of the timing chain tensioner is 2101-1006060, the average price is 364 rubles.
Analogues:
- TSN 671 — 254 rub.
- Riginal RG2101-1006060 — 230 rub.
- Trialli MT 151 — 407 rub.
Replacement frequency: every 200 thousand km.
First, remove the block head cover.
Now we turn the crankshaft until the mark on the camshaft sprocket aligns with the mark on the housing.
The mark on the crankshaft will also need to line up with the mark on the camshaft cover.
Next, bend the lock washer of the camshaft sprocket bolt. Then we engage fourth gear and put the car on the handbrake.
Then loosen the camshaft sprocket bolt.
Using a 10mm spanner, unscrew the two nuts of the studs connecting the parts of the casing. Using a 10mm socket with an extension, unscrew the bolt securing the upper casing to the bracket. We remove the casing. Using the “10” wrench, unscrew the “propeller”.
Using a 10mm wrench, unscrew the three nuts and six bolts securing the camshaft drive cover to the cylinder block.
Remove the camshaft drive cover.
Using a 17mm wrench, unscrew the bolt securing the tensioner shoe...
Using a chisel, bend the edge of the lock washer on the oil pump drive sprocket bolt.
Using a 17mm wrench, unscrew the bolt securing the oil pump drive sprocket.
We remove the star. We take out the camshaft drive chain. Then, lifting the chain, remove the camshaft sprocket.
Using a 10mm wrench, unscrew the chain limiting pin and remove it.
Before installing the chain, align the mark on the crankshaft sprocket with the mark on the cylinder block.
Using a 13mm socket, loosen the cap nut of the chain tensioner. Turn the crankshaft clockwise one and a half to two turns. In this case, the tensioner spring, acting on the tensioner shoe, will automatically adjust the chain tension. Tighten the tensioner cap nut.
What you need to have and how to replace it
To carry out repairs you need to prepare:
- a new damper, identical in markings to the old one and purchased specifically for the VAZ-2107 model;
- a set of socket and open-end wrenches;
- long flat-head screwdriver;
- a piece of strong wire with a bent hook.
When you purchase products to repair your engine, you should worry about consumables: don't forget about the sealant and gasket for the cylinder block cover.
Replacing a part with an unworn one is carried out according to the instructions:
- Remove the air filter by unscrewing the 5 mounting screws with a 12mm wrench.
- Then take a 13mm socket with a ratchet and unscrew the screws securing the cylinder block cover.
- Loosen the tensioner cap nut with a 13mm spanner.
- Push the shoe to the side with a long screwdriver.
- Now you need to, without releasing the shoe, screw the cap nut back.
- Insert a wire hook into the technological hole of the damper.
- Hold the damper and unscrew its bolts. Be sure to fill in the correct location as the lengths of the fasteners vary.
- Turn the timing shaft a third of a turn clockwise, using a spanner to help.
- Once the chain is loose, carefully pull the guide up.
- Install the new part and reassemble in reverse order.
If you got a car with a classic engine, then after dismantling the air filter you need to remove the carburetor. After assembling the timing block, be sure to monitor the chain tension - it should not be excessive.
To prevent oil loss, before installing the damper mounting bolts, lubricate their seats with sealant. Each time after disassembling the cylinder block, it is necessary to change the cover gasket. This will ensure that the operation of the gas distribution unit is not disrupted.
Chain replacement — Lada 2106, 1.3 l., 1991 on DRIVE2
205 rubles)— Calculator (Iron Price: 175 rubles)— Gear assembly (Price 850 rubles) Unfortunately, I don’t attach a photo of the gears because I didn’t have time to take a photo. The process of replacing the chain is quite labor-intensive for me, so I decided to entrust it to a trusted specialist, but still I will describe the steps for this replacement, as I read forums and websites
Read more: Timing belt for Hover H5: choice, replacement with your own hands || Self-replacement of the timing belt on Hover H5 petrol instructions with photos
Cost of work and parts
The cost of replacing a chain at a service center is around 700 rubles, and the price of complex replacement of a chain, sprockets, tensioner and chain guide is about 1,800 rubles.
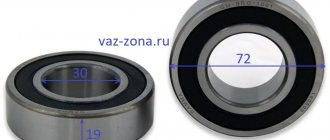
The cost of a chain is from 350 to 600 rubles, a set of sprockets (crankshaft sprocket, camshaft and oil pump) is about 400 rubles, a classic tensioner shoe (with a rubber lining) is about 100 rubles, a modernized one with a sprocket on a bearing is about 1,400 rubles, a chain guide is about 80 rubles.
Installing the VAZ 2106 timing chain by marks
The timing chain drive of the VAZ 2106 lasts quite a long time, but there comes a time when the noise of the drive turns into knocking, and another attempt to tighten the chain leads to nothing. If there is a continuous knocking sound in the front part of the engine, the mileage of which is more than 50 thousand km, the timing chain needs to be replaced.
Replacing the timing chain
Preparing for work
Usually, during such a long mileage for a classic engine, not only the chain itself is subject to wear, but also other elements associated with it.
The process of such a replacement is simple, but labor-intensive, since you need to unscrew a lot of bolts and nuts, remove some components and parts, and this takes time.
Therefore, it is recommended to change the VAZ 06 timing kit, which includes the following main and additional parts:
- new timing chain;
- gears - 3 pcs.;
- chain tensioner shoe;
- chain damper;
- front crankshaft oil seal;
- cylinder block front cover gasket;
- crankshaft pulley key.
Very often, when removing the crankshaft gear, the key falls out and is lost, especially if there is debris or just an earthen floor at the bottom of the inspection hole. Without this part, gear installation and assembly are impossible, and given that it is cheap, it is better to purchase it in reserve.
To work you will need an inspection hole and a set of tools and keys. You definitely need a 38 mm wrench or socket, which will have to be used to unscrew the ratchet. If there is no inspection ditch, the operation can be performed without it, but for convenience it is better to remove the car hood by unscrewing the 4 bolts with a 13 mm wrench.
Operation, maintenance, replacement and repair of the chain tensioner in a VAZ 2106 car
The camshaft drive mechanism on the “six” operates using a chain-type transmission. However, the device is imperfect and requires periodic tightening. The required degree of tension is achieved with the help of a tensioner, which, with its front protrusion, rests against the VAZ 2106 chain tensioner shoe, which creates the necessary conditions for this.
You need to know that the chain tensioner is a component of the gas distribution mechanism of a car, which is constantly exposed to friction, which negatively affects the degree of wear of the associated parts. As a result, such a VAZ 2106 timing chain tensioner should be made only from high-quality materials, which are used mainly in factory production.
Of course, the price of the “six” chain tensioner, which is used during factory assembly, is slightly higher than analogues offered for sale by auto parts stores, but you should know that here the experiment with replacing the part with a cheaper one is very dangerous, and calls into question the reliability of the gas distribution mechanism in in general.
At the same time, you can see how the chain tensioner shoe and other components of this unit work. If the product cannot provide the correct tension of the chain drive when changing the position of the cap-shaped nut or does not function as a chain clamp in a tensioned position, it must be repaired, and if this is not possible, replaced.
Types and design of tensioner shoes
On VAZ-2101, 2103, 21213/21214 engines of all modifications, sliding tensioner shoes are used - the chain slides along their surface, which has an anti-friction coating. Today you can find two types of shoes, differing in materials of manufacture:
- Old-style shoes - metal with anti-friction coating; — The new type of shoes are solid plastic.
The old style tensioner shoes have an extremely simple design. The basis of the part is a bent steel plate, at one end of which there is a loop for mounting on the engine. On the outer (convex) side, a layer of plastic is applied to the plate, with which the shoe slides along the chain. On the inside, closer to the end of the shoe, a bracket is attached with the help of two rivets - a stop for the tensioner.
The new style shoe is a one-piece plastic part that has an arched shape with a molded bracket for the tensioner stop and a loop for mounting on the engine. To increase strength and reliability, stiffening ribs are made in the body of the shoe.
According to their applicability, tensioner shoes are divided into several groups:
— Shoe type 2101-1006090 — used on VAZ 1200 and 1300 engines. A distinctive detail of this shoe is a semicircular recess in the upper part of the bracket (pusher stop); — Shoe type 2103-1006090 — used on VAZ 1500 and 1600 engines. A distinctive detail of this type of shoe is a semicircular recess in the lower part of the bracket (from the hinge side); — Shoe type 21213-1006090 — used on the VAZ-21213 (1700) engine. It has no marks and is larger in size; — Shoe type 21214-1006090 is a modern plastic shoe used on VAZ-21214 and some other 1700 engines.
There was also a universal tensioner shoe available in the 1970s, but it is impossible to find today.
The tensioner shoe is installed under the timing cover; it is mounted on the engine using one complexly shaped bolt, which also acts as an axle. Such a bolt ensures reliable installation of the shoe, but at the same time prevents excessive tightening and jamming of the part during operation.
Typical chain tensioner defects
Such malfunctions include:
- A collet-type clamp is not able to fix the product rod, which interferes with adjustment work on the correct tension of the chain drive.
- Wear of the main spring element (looks like this: the spring element is deformed in one plane, which becomes noticeable after dismantling the chain tensioner, which shines on one side).
- Damper spring failure.
- Limit wear of the product rod at the point where the collet-type clamp is attached.
- Defects in threaded connections on the installation fasteners (studs) of the product.
Automatic chain tensioner
Recently, as an alternative, an automatic chain tensioner has been used in the gas distribution mechanisms of such vehicles, which operates according to the following principle. The hydraulics of the system operate under the pressure of the motor lubrication and help to maintain the required tension mode of the chain drives in the required position, at which the need to manually install the VAZ 2106 chain tensioner practically disappears.
In the body of the chain tensioner, the price of which is slightly more expensive, there is an oil hole, coaxially located with the analogue in the power plant block. In the internal cavity of the body part of the product there is an adapter device with a ball, which is under high pressure, regulated by a pressure-reducing valve.
Timing chain tension for VAZ 2106
One of the main reasons for the occurrence of malfunctions in the tensioner unit is considered to be the characteristic knock of the chain drive from the front section of the over-valve casing, where the VAZ 2106 chain tensioner sprocket is located, mounted on the camshaft axis. Creating a certain degree of tension in the chain drive and then installing the chain tensioner is not very difficult, even for a novice car enthusiast. So:
- Remove the air purification filter element with the housing and the over-valve casing.
- We begin this type of repair of the chain tensioner, for which we unscrew the tensioner not completely, video instructions for dismantling which are on the Internet.
- Using the starter handle or another method, we make 2-3 circular rotations of the crankshaft, after which the chain drive is engaged.
- We check the tension of the chain drive by pressing on its links.
- If the timing chain has received sufficient tension, you need to tighten the timing chain tensioner tightly and reassemble the attachment in the reverse order.
How is the replacement carried out?
In order to replace an element yourself, you need to purchase and prepare the following elements:
- A new damper for your brand of car (costs about 500 rubles).
- A piece of steel wire: length – 20 cm, diameter – 1.5 mm.
- Open-end wrenches.
- Socket wrenches and wrenches, ratchet.
- Flat screwdrivers.
You need to perform the following repairs:
- Remove the air purification filter. Using a 12mm wrench, unscrew the 5 bolts that secure it.
- Using a 13mm socket, unscrew the bolts that secure the cylinder head cover and remove it.
- Loosen the shoe fastening with a key set to “13”.
- Using a flat-head screwdriver, you now need to press the shoe to the side.
- Use a screwdriver to hold the shoe in this state and tighten the cap nut.
- Make a hook out of wire to hold the tranquilizer. Otherwise, it will fall inside the motor.
- Unscrew all the bolts that secure the damper.
- Rotate the camshaft approximately 1/3 of a turn clockwise.
Next, you need to remove the damper using a wire. The new one is installed in place of the old one, and assembly is carried out in the reverse order.