Description of replacing the timing chain Niva Chevrolet
specific timing for replacing the timing chain on a Chevrolet Niva . The stretching of the part is indicated by the corresponding engine noise after the car has traveled 100 thousand km or more. If it is impossible to tighten the chain using the usual method or it simply pulls away from the sprocket by approximately one-half the height of the tooth, this also indicates the presence of problems.
A phase check can also serve as a criterion for replacement. If the mark on the camshaft sprocket coincides with the mark on the bearing housing RV, and the mark on the crankshaft pulley at this moment is 1 cm below the mark on the front cover of the engine, the chain will have to be changed. The same must be done if the bushings are chipped or cracks are detected in the cheeks of the Niva chain.
Due to the increase in the pitch between the chain links, the engine will idle unevenly even with proper ignition and normal compression.
That's why the part needs to be changed. A weak tension allows it to “fall” between the teeth of the sprockets, creating that corresponding engine noise. If the chain oscillates, it can break the guide, the corner of the boot, or the stop pin.
See:
If a loose timing chain slips a couple of teeth, the best news today will be a stalled Chevrolet Niva engine. Or the meeting of the valves with the pistons will lead to severe engine damage. It is precisely because of this that it is recommended to adjust the chain tension on the Chevrolet Niva more often and replace it, as normal tension becomes impossible.
What is needed for the work?
Internal structure of the tensioner
The chain on a Chevrolet Niva wears out the timing mechanism more than the belt, so you will have to change the sprockets as well. Old gears will wear the new chain unevenly, leading to slippage and breakage. Naturally, this is hard mechanical work. But replacing the chain is done quite occasionally, so you can at the same time change the seals and gaskets, as well as all related worn parts.
First you need to purchase the latest timing chain (timing chain) for the Niva Chevrolet. To ensure its quality, lay the part flat and hold it suspended. If the ends sag by more than 1 cm or the sagging is uneven, it is better to refuse the purchase - most likely, the chain has already worked.
Product added to bookmarks!
APPLICABILITY: VAZ 21214 (Niva), 2123 (Niva-Chevrolet) engines.
Automatic chain tensioner "RUSMASH" "PILOT"
The automatic chain tensioner (ANT) “Pilot” is designed for installation instead of the standard chain tensioner on VAZ cars of the classic family. ANC “Pilot” does not require maintenance after installation and fully automatically tightens the car chain as it stretches. It differs favorably from its analogues in that it does not require an oil line, which eliminates its chafing and loss of oil pressure. There are no plunger elements in the design, which eliminates jamming of the tensioner! The tensioner moves in increments of only 1 mm, allowing optimal chain tension monitoring. Due to the adjusted spring tension force, the ANC “Pilot” practically does not wear out the chain tensioner shoe. As a result of the installation, engine noise is significantly reduced, and the service life of all timing components is increased due to correct chain tension.
Service
During operation, the Pilot operates automatically and does not require adjustment operations or maintenance.
Guarantee
The warranty period for the product is set for the entire service life of the vehicle.
The result of using an automatic tensioner
– The service life of all timing drive parts is increased several times due to constant monitoring of chain tension and eliminating the possibility of increasing parasitic loads in free chain branches. – Improved engine performance due to precise valve timing. – The chain is tensioned regardless of whether the engine is running or not.
Replacing the timing drive and installing an automatic tensioner “pilot” in a Chevrolet Niva (VAZ 2123)
Equipment in the form of a special wrench for 38 for VAZs
Wrench for 38 VAZ for pulley nut
Which didn’t fit due to the special shape of the pulley, so a 32x38 balloon was bought at a truck store for 650 rubles
Truck balloon
And a mega head for 38 was made
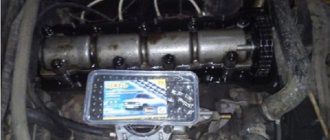
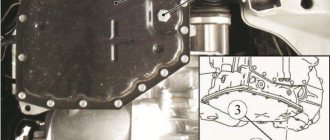
PREPARATION I removed the radiator with fans according to the manual. He didn’t pull him out, but took him forward. I took off the alternator belt. I removed the pump. I removed the air duct. I removed the tension roller. I removed the bypass roller by snapping off the cap with a screwdriver and unscrewing the bolt. I disconnected all the connectors, pipes, and throttle cable from the valve cover to free up working space. I removed the engine boot and protection from below. Unscrewed the valve cover
Timing cover
I dismantled the hydraulic tensioner, for which I first removed its oil line using a brake pipe wrench.
Hydraulic tensioner oil line
Using a 22 key, I unscrewed the emergency oil pressure sensor from the tee. I unscrewed the tee with a spark plug wrench.
In place of the tee, I screwed in the emergency oil pressure sensor (I immediately screwed in a new one).
I unscrewed the two nuts of the hydraulic tensioner, there was a problem with the top nut, first I tore it off with a small 10 socket, then I put on a 10 socket wrench and twisted the tube with pliers.
Hydraulic tensioner and removal tool
I removed the hydraulic tensioner, unscrewed the shoe bolt, and removed it. I removed the camshaft sprocket, chain and the remaining 2 sprockets.
Preparatory work
In order to create the necessary space to carry out work, you will have to perform a number of actions.
- Remove the air filter and close the carburetor neck with a plug.
- Disconnect the choke cable, electrical wire, and hoses. We move them to the side.
- Remove the fan, pump pulley and generator belt.
- We remove the sump protection and the engine boot, and clean the front engine cover.
- Now you need to put the Chevrolet Niva on the parking brake and place wheel chocks under the wheels. Then engage fourth gear. Now let's start the analysis.
- Loosen the ratchet nut by striking the wrench sharply with a hammer.
- Remove the valve cover, bend the lock washer of the camshaft gear bolt, loosening it by hitting the wrench with a hammer. Turn off transmission.
- Rotate the crankshaft pulley, align the marks on it and the front engine cover, and then align the marks on the camshaft gear and bearing housing.
Mechanism characteristics
Tighten the tension and idler rollers; if necessary, they can also be replaced. Using sealant, install a new gasket on the pump, and then put the pump in place.
Put the car on the parking brake and engage 4th gear, tighten the pulley nut. Connect all hoses, pipes, connectors, install the fan and radiator.
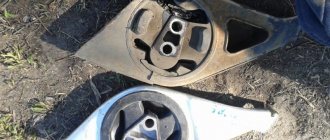
The plastic shoe itself or the sprocket, if there is one, and the damper also wear out. This element is located in the engine compartment on the left side.
Hydraulic chain tensioner. The genuine pain of the domestic auto industry
You need to find the cooling pipes in the front of the cylinder head - it is under them that the hydraulic chain tensioner is located. If the symptoms described above are observed, an urgent replacement of the hydraulic chain tensioner is necessary.
To do this we need a new element, as well as a set of heads. Using a 10mm wrench, unscrew the fitting of the cylinder head cooling tube and move it upward. Next, we find two fastening nuts for the tensioner itself. We unscrew them with the same key.
We take the protruding part of the mechanism with our hands and remove it from the seat. It is worth noting that the hydraulic chain tensioner has its own gasket, which also needs to be replaced. Before installing a new element, carefully coat the seats with silicone sealant.
how to TENSION a CHAIN on a VAZ 2101-07, NIVA
Install the gasket and tighten the bolts. By the way, before installation you need to remove the transport stopper.
To compensate for chain stretching, the system is equipped with a hydraulic tensioner. But over time it wears out and requires replacement when the chain weakens to half the sprocket tooth.
How to identify a malfunction in time. You can detect a loose tensioner in a Chevrolet Niva by pulling the chain away from the sprocket. To check, it is necessary to remove the protective cover from the timing chain.
What is needed for the work?
After installation, the operation of the motor and the tension of the new chain are checked. Another article will tell you how to replace the chain.
Now the owners of the Chevrolet Niva can, without doubt and without errors, correct the existing problem with weakening the chain tension. Remember that if your car has driven more than a thousand. If you are reading these lines, it means you have an interest in doing something yourself in the car and really saving money, because you already know that:
Installing new parts
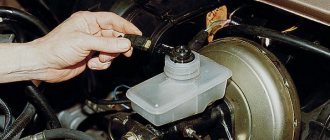
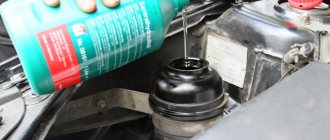
First we change the crankshaft front seal. We remove the old one and clear the space for the new one. Lubricate the new oil seal with engine oil and install it using a mandrel. You can use an old oil seal as a mandrel.
The fastening bolt on the shoe is hammered with light blows of a hammer. It is not recommended to adjust it so that it is inserted by hand - there will be a slight backlash, which will cause the shoe to move on the axis. Place the bolt in place and tighten.
Install the new crankshaft, camshaft and oil pump gears in place so that the marks match.
The hydraulic tensioner is designed to adjust the chain tension in the Niva Chevrolet. Since this part plays an important role, the engine cannot operate without it.
Over time, any part can wear out, especially for those parts that constantly rub against each other or rotate, and the timing chain can stretch during operation. Chain stretching, experts say, is normal. That is why a hydraulic tensioner is installed on the car.
Mechanical chain tensioner. Main manufacturers.
The photo shows three main options common in Russia. The first product is made by the people and on the forums of the ANC “auto pilot”. The second product is manufactured by Rusmash, usually called the pilot. The third tensioner belongs to the designer Isaev, colloquially Isay. My team and I personally have installed several dozen of each type of tensioner on cars, so I have the right to talk about statistics and operating features. Something from behind the scenes. The first two tensioners belong to the pen of one person. Designer Igor Medvedev. On motor forums under the nickname Rhodes-M. As far as I know, patents for these inventions or utility models are registered in his personal name. I work together with this person on other projects, so the information about the designs and manufacturing features is first-hand.
Autopilot. Principle of operation. Rack. Of the three, this is the undisputed leader. I have not noticed any shortcomings in operation. Cars with mileage of more than 150 thousand have already arrived where I installed autopilots from the very first batches. It is very convenient to work when replacing the camshaft; it does not need to be removed from the cylinder head. Flaw. It is difficult to find an “original” that has passed quality control. Medvedev left and the quality of input immediately dropped greatly. The cost of production has become cheaper.
Pilot. The operating principle is a toothed rack. Good quality tensioner. The big brother of "autopilot". Stable quality. It is also possible to work without removing it from the cylinder head. The main disadvantage is the huge percentage of fakes on the market. This tensioner was the first successful design, and the Chinese grabbed it. If Autopilot is completely impossible to find, then Pilot is very difficult to find “original”. Based on the St. Petersburg market, I estimate the prevalence of counterfeits for this tensioner at 70%. I work with Rusmash directly, so this as a “minus” is insignificant.
Isaiah. The operating principle is a clock spring. To avoid questions and insinuations, I contacted the designer directly and in 2015, we installed several dozen of them. The main disadvantage of the product, which the designer passes off as its advantage, is that there are no precision parts. When the rod doesn't move out too much, everything is fine. When the chain is worn out and the rod goes beyond half, it “walks” quite a lot. If we are talking about a production engine without “pretensions” for tuning, this may be acceptable. If the engine is “more serious” this is unacceptable. The tolerance for axial “walking” of the chain and sprockets in the timing tract is only 0.3 mm.
Replacing the hydraulic chain tensioner on a Chevrolet Niva with a manual one
If the chain stretch is large, then the hydraulic tensioner should be changed. It is also important to simultaneously replace the chain, gasket and oil seal. Replacement is carried out in this order :
- Using a key set to “10”, unscrew the tube through which fluid flows into the hydraulic tensioner.
Using a 10mm socket, unscrew the two nuts securing the tensioner to the cylinder head.
The old hydraulic tensioner can no longer be repaired.
Assembly order
- The new device is inserted into its seat.
- Screwed with two bolts to the engine housing.
- A tube is connected through which fluid flows to the tensioner.
If the car has already traveled 100,000 kilometers, but there is no extraneous noise from the chain in the engine compartment area, then you still need to inspect it for damage and stretching.
Video about replacing the timing chain hydraulic tensioner Niva Chevrolet
Purpose
The first gear on the gearbox is engaged, allowing you to avoid spinning when unscrewing the crankshaft gear bolt. The fastener is removed with a lock washer.
To prevent the bolts from falling into the engine sump, use a deep-head wrench or unscrew the bolt by hand. Remove the chain tensioner using a screwdriver. It should be replaced in case of tension or tension, during scheduled maintenance, after a thousand km.
To do this, you need to loosen the fastening of the lock washer, and then remove the bolt from the camshaft sprocket using a 13mm wrench. After this, the gearbox must be set to speed 1 so that the bolt securing the crankshaft gear does not turn.
conclusions
As you can see, to carry out this work you do not need to have any special knowledge or tools. Therefore, you can handle this kind of work yourself if necessary . If you follow these recommendations, it is impossible to carry out such repairs incorrectly.
The gas distribution system of any engine must work correctly. If problems occur in its operation, this leads to premature wear of the motor and numerous breakdowns. To accurately adjust the timing, special marks are used, according to which the shafts in the engine are aligned. We will tell you about the correct placement of marks on a Chevrolet Niva car in this article.
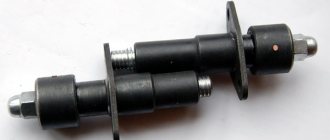
Components and principle of operation of the hydraulic tensioner
1 – tensioner body; 2 – valve unit; 3 – check valve ball; 4 – limit pin; 5 – tensioner plunger; 6 – volume limiter; 7 – plunger spring; B – working cavity; C – installation groove; D – hole; E – reserve cavity.
Oil from the lubrication system through tube 3 (see Fig. 2-11) enters cavity “E” (Fig. 2-46) of the tensioner, then through hole “D” and valve assembly 2 enters working cavity “B” and presses onto plunger 5. In tensioner body 1 there is a hole with a diameter of 1 mm for bleeding air from cavity “E”.
The diametrical gap between body 1 and plunger 2 should be 0.018–0.024 mm and is measured as the difference between the maximum measured diameter of plunger 2 and the minimum measured diameter of body 1.
During repairs, the tensioner body and plunger form a pair in which replacing one part with another after selecting the gap is not allowed. Plunger 2 must move in body 1 without jamming by a stroke of 16 mm.
When installed on the engine, the tensioner must be free of oil, pin 4 must not protrude from the housing.
As can be seen in the figure, the device has a cylindrical shape; it is screwed on the outside with a lid with a small hole through which oil flows. Inside the device there is a small ball and a spring, which ensures free flow of oil in one direction and does not release it in the opposite direction.
Inside the device body there is a cylinder with rings. On the inside of the housing walls there are spiral notches that have an inclined shape. When the chain is loosened, the piston, under pressure in the housing, moves to a certain notch on the housing wall. When the tension occurs, the body notches do not allow the piston to take its original position. It is carried out by engaging the piston rings with one-sided notches. This is how the tension device works.
Why are timing chain marks set?
The engine of any passenger car has 2 shafts: camshaft and crankshaft. In most cars they are connected by a belt drive. On a Chevrolet Niva car this is a chain transmission, and a single-row chain is used there. The advantages of such a system are obvious: the chain, unlike a belt, never slips on the pulleys and lasts much longer. However, the chain can stretch over time, and the teeth on the shaft sprockets can wear out or even break. This will lead to desynchronization of the camshaft and crankshaft. Their work will not be coordinated, so the engine may fail. Therefore, when adjusting or replacing the timing chain, it is very important to align the engine shafts in accordance with the marks on the pulleys and timing case. This is not easy to do, since, firstly, the marks are located in hard-to-reach places, and secondly, they need to be set very accurately, since the chain, unlike a traditional belt, cannot be slightly tensioned if necessary.
When is it time to change?
As you know, the timing chain is a more reliable element of the gas distribution mechanism than the belt. Unlike a belt, it does not wear out so quickly and the likelihood of it breaking is quite low. However, sooner or later, every owner of a Niva Chevrolet faces the question of the need to replace the chain and set the marks according to the standard.
Niva Chevrolet car
As for the timing, the manufacturer does not regulate the frequency of replacing the mechanism chain on a given car model. As a rule, this happens no earlier than after 100 thousand km. But if, during operation of the internal combustion engine, a sound appears that was not there before, this may cause the chain to stretch. If the chain cannot be tensioned using the usual method, this may indicate the need to replace it.
Phase diagnostics may also indicate the need to change the chain. If the mark on the camshaft sprocket does not match the one on the bearing housing, the element should be replaced. Likewise, if chips have formed on the bushings.
In addition, if you find cracks directly on the chain itself, then this, of course, also indicates the need to replace the component.
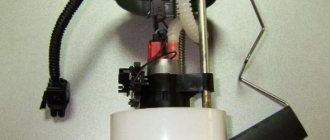
How to install an injector on a Chevrolet Niva (with photo)
- The car is installed on the inspection hole. Wheel chocks are placed under the rear wheels and the hand brake is applied.
- The car hood is opened, unscrewed and the fan is removed. The radiator is also unscrewed and carefully moved to the side (it is not necessary to drain the coolant from there).
- Access to the engine valve cover is provided. Its fastenings are unscrewed with an open-end wrench, then it is carefully removed. There is access to the timing chain and the upper camshaft sprocket. The shaft pulley is rotated with a special wrench until the mark on the camshaft sprocket aligns with the protrusion on the timing case.
The mark on the timing case is aligned with the mark on the camshaft sprocket
The tension roller is removed, the chain can be removed
The mark on the crankshaft sprocket is precisely aligned with the DPKV core
Selecting tools and spare parts for replacement
Replacing the timing chain on a Chevy Niva is impossible without an inspection hole or a lift . Therefore, before you decide to carry out such repairs yourself, you need to find a suitable place. Convenient access from below is necessary to remove the engine protection and conveniently unscrew the auxiliary pulleys. You will have to remove the radiator with fans and drain the coolant. On average, the entire replacement operation will take from 3 to 5 hours.
Necessary tools for repair:
- set of keys and heads from 8 to 21;
- spark plug key;
- flat screwdriver;
- pliers;
- torque wrench (preferably, but not required);
- brake pipe wrench (for unscrewing the oil line);
- a special 38mm wrench for the crankshaft pulley nut or a suitable socket;
- hammer, mounting tool, rags.
With spare parts for repairs everything is also simple . Buy them only from trusted stores and well-known brands. The abundance of spare parts for VAZ engines in stores does not always mean a quality product. Timing units from factory manufacturers and official conveyor suppliers have proven themselves to be the best.
Important! Parts for different VAZ engines may differ in design. The Chevrolet Niva has the VAZ 21214 engine model, while the classic Niva may have the VAZ 2106, 21213, 21214, 21218 engine and their modifications.
We will need:
- valve train chain;
- crankshaft, camshaft, oil pump gears;
- plastic shoes for chain tensioner and guide;
- tensioner mechanism (mechanical or hydraulic);
- a set of gaskets for the front and valve covers;
- front cover crankshaft oil seal.
Advice. It is convenient to combine such a labor-intensive operation of replacing the chain with other work on the engine. For example, replacing the pump, radiator, leaking oil seal, drive belts of mounted units and other minor repairs.
Consequences of incorrect installation and adjustment
- Characteristic extraneous clicks appear in the engine, which become louder as the vehicle speed increases.
- The engine is unstable even at idle speed.
- The car's acceleration time increases significantly because the engine does not respond well to pressing the gas pedal.
- Acceleration occurs in jerks, during which clouds of black smoke may fly out of the exhaust pipe.
- Valve wear accelerates many times over, and if the shafts are out of synchronization too much, the valves become deformed and their seats break.
- Incorrect adjustment can also lead to a broken timing chain. This, in turn, can puncture the radiator, break the fan and other engine parts.
- The engine constantly overheats, and the consumption of engine oil and antifreeze can increase significantly.
As can be seen from this article, correctly set timing marks are the key to long and uninterrupted engine operation. There is nothing complicated about this; even a novice car enthusiast can do it. It is important to take your time, follow the above sequence of actions, and also try not to drop the sprocket lock washers into the engine sump. Because it will be very difficult to get them from there.
VAZ 21213 | Adjusting chain tension | Niva
Service and operation
Manuals → VAZ → 21213 (Niva)
Chain tensioner section
| 1 – cap nut; 2 – tensioner body; 3 – rod; 4 – spring ring; 5 – plunger spring; 6 – washer; 7 – plunger; 8 – spring; 9 – cracker; 10 – spring ring |
Diagram of the camshaft drive mechanism and auxiliary parts
| 1 – camshaft sprocket; 2 – chain; 3 – chain damper; 4 – oil pump drive shaft sprocket; 5 – crankshaft sprocket; 6 – limit finger; 7 – tensioner shoe; 8 – chain tensioner |
Loosen nut 1 (Fig. Section of the chain tensioner). In this case, rod 3 is released and the chain is tensioned by shoe 7 (Fig. Diagram of the camshaft drive mechanism and auxiliary parts), on which spring 8 acts through plunger 7 (see Fig. Section of the chain tensioner). Turn the crankshaft by 1–1.5 revolutions in the direction of rotation. In this case, the tensioner spring acting on the shoe will automatically adjust the chain tension. Tighten the cap nut 1, due to which the rod 3 is clamped by the collets of the block 9, and when the engine is running, only the spring 5 acts on the plunger 7. This spring presses the plunger away from the head of the rod 3, and oil flows into the gap between them when the engine is running, playing the role of a shock absorber when shocks of the chain.
Thanks to the guaranteed gap of 0.2–0.5 mm between rod 3 and plunger 7, when the chain hits hard, spring 8 comes into action.
Timing belt 21213, specifics
single-row timing belt 21213
The photo shows a single-row timing belt 21213, which has already been checked and run-in. Set contents:
I'll try to explain why the new kit is better. The difference in losses between the SAME single-row and double-row circuits in terms of efficiency (efficiency) is relatively small. According to theory, about 4-5%. But we have an “ace of trumps” in our pocket. The double-row chain in timing belt 21213 is bush-type, that is, the roller does not rotate, the so-called “heavy chains”. The single-row chain that goes to this timing belt is a bush-roller chain, the rollers rotate, these are “light chains”. But in this case, the difference in friction losses is no longer a few percent, but tens of percent. There is a separate article about this bushing-roller chain. And of course, friction losses on the rubber and plastic shoe of the tensioner are clearly not in favor of the old design. Now about the chain tensioner for this unit. I recommend installing “Rusmash”. The point is this: the tensioner shoe 21213 has an iron base, and the shoe 21214 is plastic, and the TZA tensioner, with its sharp nose, will slowly break it. Mechanical tensioners were discussed in more detail earlier.
Replacing the chain drive
7. Then remove the casing covering the motor. To do this you will have to remove several bolts. We remove the sedative. Unscrew the screw securing the oil supply pump. There is no need to remove the screw. It should only be loosened and left in place.
8. We begin to remove the tension element mechanism. We remove the MM line, remove the pressure sensor, after which you can remove the tensioner itself. 9. Remove the screw on the camshaft gear. We remove the gear. After this, remove the timing chain. At this point, the parsing process can be considered complete. Now let's assemble the mechanism. 10. We take the purchased oil seals and begin to install them in place of the old ones. First of all, we change the crankshaft oil seal. After removing the old component, clean the installation location and install a new oil seal. First, it is recommended to lubricate the new oil seal with engine fluid, for example. 11. Now we take the chain in our hands and also begin to lubricate it. After this, we put the drive on the crankshaft gear, the oil pump and then the camshaft. This sequence must be followed. When tensioning the chain, you need to ensure that the alignment of the marks is not disrupted.
12. Install the tensioner and carefully tighten the nuts securing it. We tighten the screws on the sprockets and check the alignment of the marks again. To do this, turn the crankshaft to the right again. 13. Replace the alternator belt. If the old belt is in good condition, then it is quite possible not to change it. 14. Lubricate the gasket that we will install on the cylinder head and install it. Don't forget to clean the seat from traces of the old gasket. We put the head in place and carefully tighten all the fasteners. We install all other parts in reverse.
Now let's check the operation of the mechanism. To do this, start the engine and listen to how the engine operates. By hearing it is quite possible to determine whether everything was done correctly or something went wrong. If the sound is familiar, rustling, then everything is done correctly. If there is a characteristic grinding sound, the procedure must be repeated.