The feasibility of installing a VAZ 2110 thermostat on a VAZ 2109
With the onset of cold weather and a corresponding drop in temperature, it becomes cold in the car.
In addition, much more time is spent on warming up the engine and coolant to turn on the heater and heat the interior. In this regard, many drivers in the cooling system of the “nine” (VAZ 2109) replace the standard thermostat with a six-hole thermostat from the “ten” (VAZ 2110). Thanks to the modernization compared to the factory one, this thermostat has many advantages, and the main ones include the following.
First of all, it ensures more stable temperature maintenance.
In addition, there are much fewer connections on the clamps. Moreover, the thermostat is attached to the outlet pipe using a rubber connecting tube.
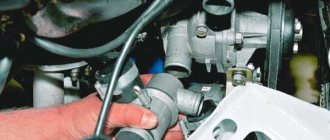
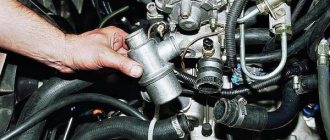
Please note that this thermostat is collapsible, so replacement of thermoelements is carried out separately from the body, and due to the shorter (5 cm compared to the factory) new thermostat, there is much more space. To remove the thermostat without spilling antifreeze, first the pipe on the throttle assembly is released and everything that can spill out is poured into a container prepared in advance.
Then you need to very carefully and carefully disconnect the hoses from the stove without spilling the antifreeze. The six hole thermostat is connected as follows:
First, you need to install a tube through which the antifreeze will be redirected back to the pump, the so-called “saxophone”. This tube is shorter than (VAZ 2109). Although newer cars are equipped with such a tube at the factory. In addition, you need to stock up on: clamps, hoses and gaskets for the new thermostat.
It is also advisable to try on the thermostat at the installation site to make sure that the pipes need to be replaced and, if necessary, to determine their exact length. Usually this is how a six-hole thermostat is connected according to the standard circuit, and there is also another modernized circuit.
The peculiarity of this connection is that after the heat is transferred, the coolant is directed back to the heat-sensitive element, cooling it, preventing the large circle from opening until the antifreeze supplied from the stove heats up.
As a result, the thermostat also takes into account the temperature of the antifreeze from the stove radiator, making the car warmer, and the temperature regime is much more stable, and a special tee is required for connection.
Finding high-quality traction batteries is quite difficult. Therefore, the best option is to order them from a reliable and trusted seller at affordable prices.
Is it worth the bother?
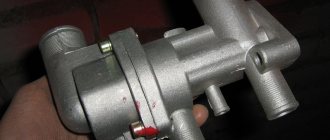
Thermostat 21082 is a one-piece design, securely attached to the cylinder head. Fewer connections on clamps, no intermediate hoses - less chance of leaks.
In the future, replacing the thermoelement will require less manipulation - unscrew 3 bolts and disconnect 2 hoses. You can even get by by disconnecting one hose if you get creative. Replacing the thermoelement becomes much more convenient.
Another advantage is the reduced diameter of the bypass hole, which (as they say) affects the engine warm-up speed and increased flow through the heater, although logically the increase in flow is unlikely to be significant.
Well, the size of the thermostat frees up space in the area above the gearbox.
In addition, in the circuit with thermostat 21082, the expansion tank is included in a small circle, and not in a large one as in circuit 2108.
Installing a thermostat from a VAZ 2110
Along with the drop in temperature due to the gradual arrival of winter, it began to get colder in the car. It began to take more time to warm up the engine, then wait for the coolant temperature to rise to 60 degrees to turn on the heater and warm up. In this regard, I remembered the modification of the cooling system of the VAZ 2109, when instead of the standard thermostat, a 6-hole thermostat from the VAZ 2110 is installed. It is improved in comparison with the standard one and has the following advantages:
— the thermostat has been modified to ensure a more stable coolant temperature; — fewer connections on clamps. The standard thermostat is attached to the outlet pipe through a rubber connecting tube; — the thermostat is made collapsible for the possibility of replacing the thermoelement separately from the body; — the new thermostat is 5 cm shorter than the standard one — there is more space.
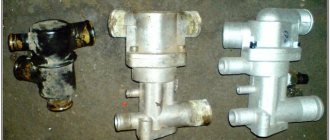
Types of thermostats from left to right: old style, 5-hole, 6-hole
What do we get?
The warm-up duration is approximately the same, no significant difference was noticed. At 60 degrees, warm air is already subjectively felt.
After modernization, a constant stream of coolant appears, flowing through the steam removal hose into the expansion tank (in the standard version it is only present when the speed increases). This jet appears due to the fact that the diameter of the bypass hole in the new thermostat is smaller than in the old one. With increasing speed, as before, the jet increases. Closing the heater tap has almost no effect on the coolant pressure. There are no problems with pressure or leakage.
We install the thermostat from VAZ 2109 to 2110. Location, replacement instructions.
The VAZ 2109 car received an old-style 5-hole thermostat. This unit does an excellent job of cooling the power plant, but with the arrival of winter, the interior of the Nine becomes cool - there is not enough standard heating. The solution to the problem is to replace the VAZ 2110 thermostat, since the more modern model has a 6-hole version. This material contains instructions for installing a thermostat from the “ten”, which is also suitable for other cars of the “Samara” series. After studying this article, novice car enthusiasts will be able to find out what a thermostat is and where it is located in the design of the VAZ 2109.
The purpose of the thermostat, its location and malfunctions
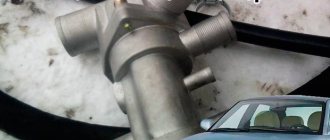
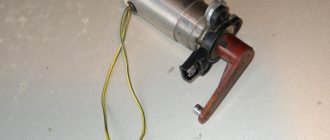
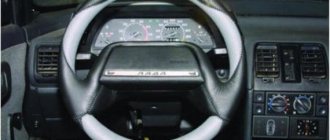
In modern cars, including the “nine”, the power plant is cooled using liquid (antifreeze, antifreeze). To regulate the temperature of the antifreeze, a thermostat is installed between the radiator and the VAZ 2109 engine. The main functions of this unit are maintaining the desired thermal conditions and warming up the power plant of the VAZ 2109. This is a small cylinder with a valve, which is located under the hood near the cylinder blocks. It is quite easy to find as there are several hoses included in the housing.
Advice! To check whether the device is working or not, you should warm up the VAZ 2109 engine so that the temperature arrow does not reach the limit. After this, you need to turn off the unit, lift the hood and find under it the upper and lower hoses extending from the radiator (about 5 centimeters in diameter, black rubber). You need to carefully touch the hoses; if the lower one is cold and the upper one is hot, then most likely the thermostat is jammed.
There are two main malfunctions: the valve is stuck in a fully or partially open position, the valve is stuck in a fully closed position. In the first case, the engine will take a long time to warm up to normal temperature, and in cold periods the engine may not warm up at all. If the valve does not open completely, then the operating temperature of the power plant will not be higher than 70 degrees. When the valve is stuck in the closed position, the motor can overheat in any operating mode.
Procedure for replacing the thermostat on a VAZ 2114
Having established that the coolant flow regulator is faulty, it is necessary to resolve the issue of replacing it. Before starting work, you need to prepare a new device, screwdrivers, keys for “12” and “13”, a sealing gasket, silicone sealant, antifreeze to replace the old one, a container for draining used coolant, new cooling system pipes.
When choosing a new regulator, you need to find out which thermostat is better for the VAZ 2114 and how much the thermostat for the VAZ 2114 costs. You need to choose a device based on the price-quality ratio. Where to install the on-board computer of the VAZ 2109, VAZ 2115. As on the VAZ 2109, VAZ 2115 p. The price of a VAZ 2114 thermostat ranges from 280 to 500 rubles.
To replace it, it is best to go to the inspection hole in the garage and give time for the engine to cool down before changing the thermostat on the VAZ 2114. Antifreeze should not be hot, otherwise you can get burned during operation.
- Open the hood and remove the air filter. Take this opportunity to check the condition of the filter element and replace it if necessary.
- Open the cap of the expansion tank and, opening the antifreeze drain plug on the radiator, drain the liquid into a specially prepared container.
- Loosen the clamps on the cooling system hoses that go to the flow regulator, including on the thermostat itself.
- Using wrenches, unscrew the studs and fastening nuts on the device body, removing the ground wire.
- Disconnect the hoses and, shaking slightly, disconnect the thermostat.
- Before installing a new device, you need to clean the mounting points and check the hoses. During operation, they crack and begin to leak antifreeze and air. Replace damaged hoses.
- Before installing a new thermostat, it is necessary to coat the pipes on its body with sealant and allow it to dry slightly.
- Install a new one in place of the old gasket, fasten the studs with nuts and put on the pipes. Now we will discuss the topic of insulating the interior of a VAZ 2114 and a VAZ. How to make a VAZ 2114 on a VAZ 2114. Carefully tighten the clamps and be sure to check the tightness of the connections.
- After first checking the closure of the drain plug, add fresh antifreeze in the required quantity.
- Start the engine and check that the valve of the newly installed thermostat opens at the desired temperature.
- Check the functionality of the heater radiator. If hot air flows evenly, then the antifreeze is filled correctly and there are no air pockets.
Reasons to install a thermostat from “ten”
The 6-hole unit has been modified, when compared with the device installed in the “nine”, its advantages over the 5-hole version from 2109 are as follows:
- The device from the “ten” is 5 cm shorter than the standard version of the “nine”, so there will be more space under the hood.
- A more modern 6-hole thermostat works more stably, as a result, the temperature remains unchanged.
- In the event of a breakdown, you do not have to change the entire device, since it is dismountable, and if necessary, you can only change the thermoelement.
- When servicing, you won’t have to struggle with a large number of clamps, since the 6-hole version is secured with a rubber tube.
- It should be noted that until 2003, VAZ 2110s were also equipped with a device with five holes, so you need to buy a version from later releases.
Installation
In addition to the thermostat, you need to purchase a new pipe through which the coolant can return to the pump. Among motorists it is called a “saxophone”. You can find it by number: 2110-1303055-10. The following tools and materials should also be on hand:
- Clamps 15-28 mm (it is better to take about 7 pieces).
- New gasket.
- Replacement hoses.
- Screwdriver Set.
- Special hose puller (needed for old-style cars).
- Rags.
- Antifreeze.
There are two installation options: standard and alternative. In the first case, the 6-hole thermostat opens for additional cooling. In other words, it monitors the temperature coming out of the engine, not the temperature of the already cooled antifreeze. An alternative option is to check the temperature lower than the motor reading. The installation proceeds according to the following scheme:
- Part of the coolant must be drained; to do this, you need to unscrew the plug from the drain hole;
Thermostat replacement diagram
- The negative terminal must be removed from the battery, after which the clamps securing the pipes to the thermostat body should be loosened;
- By disconnecting them, the device can be removed;
- The next step is to add a new tube; for this it is best to take the VAZ 2110 operation and maintenance manual;
- After this, you can install the 6-hole unit and secure it with new clamps;
- The last step is to add coolant to the expansion tank. Done, replacement complete.
Dismantling
First, remove the old thermostat, exhaust pipe (part 2108-1303014-10) and 2 short intermediate hoses - all this will no longer be needed. Next you need to deal with the pump supply pipe. The 2108 has a pipe “with a hook”, and the 21082 thermostat requires a shorter pipe, “without a hook”. You can replace the standard pipe with a pipe from either a VAZ-2110 or a VAZ-2112 (part 1303055). It was not possible to find out exactly which model the pipe was needed from - there is a fair amount of confusion in stores. When purchasing, you should carefully look at the correspondence of the fasteners and pipes on the pipe, incl. long heater pipe on the right - their presence and direction may differ.
But there is another option: shorten the standard pipe without even removing it. To do this, you need to cut about 45 mm from the pipe. This can be done with a metal file (namely, a piece of a file, without a handle), without removing the pipe. This will be the most time-consuming operation, but quite feasible. To simplify this procedure, it is worth removing the expansion tank and adsorber. This is the option we will use. Looking ahead, I note that the option with a cut pipe works perfectly, including leaks. no in winter.
This completes the dismantling. You can clean the connections and check the hoses.
Check and replacement
If the thermostat fails, it should be replaced immediately. It is impossible to say that the device has failed only on the basis of an initial check.
If the engine overheats during operation or does not warm up to operating temperatures quickly enough, the condition of the unit is checked. Based on the results obtained, replacement or repair is carried out.
The most effective way to check the thermostat is to remove it. The procedure is performed as follows:
- Unscrew the crankcase protection mounting bolts, after which the protection must be removed and placed aside for a while.
- Remove the cap from the expansion tank where the coolant is located.
- Place a clean container under the drain hole (if you plan to pour the same coolant back into the system), unscrew the drain plug from the cylinder block and remove all coolant from the cylinder block.
- Place a container under the drain hole of the cooling radiator, unscrew the plug and drain the antifreeze or antifreeze.
- Loosen the clamps holding the hoses.
- Disconnect the three hoses that are connected to your thermostat housing.
- Loosen the tension on the clamps and remove the thermostat along with the hose. The short hose is disconnected from the thermostat.
- Place the dismantled device in a container of water, which must be preheated to 78-80 degrees Celsius.
- Start heating the water, stirring the liquid occasionally. The water needs to be heated to approximately 87 degrees Celsius.
- If the thermostat is working properly, when the temperature reaches 87 degrees with an error of plus or minus 2 degrees, the main valve should open. If this does not happen, the device is faulty and requires replacement.