If the stove on your car suddenly stops blowing warm air, then one of the reasons for this may be the failure of the gear motor, which is installed on all VAZ 2110, 2111 and 2112 models. That is, when you switch the temperature knob, the motor stops moving the damper, which is what happens. leads to a similar result.
It is noteworthy that the option to change the direction of the heater dampers is used in all cars of the “tenth” family. “Chetyrki” and other “Samara” cars cannot boast of such an innovation. However, you have to pay for all the options, so the instructions for repairing and replacing the heater damper gearmotor will be useful to many.
How to change the gear motor of a VAZ-2112 stove with your own hands
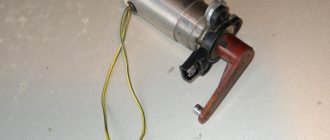
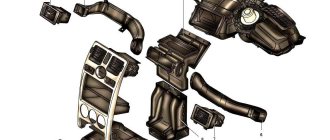
The main malfunction that completely paralyzes the operation of the heater in VAZ-2112 cars is the failure of the heater gear motor. The purpose of this element in the system is to control the heater damper, that is, the gearmotor (MR) is responsible for opening and closing it. The movement of the damper can be monitored using appropriate signals from the control module of the machine's stove. It is worth noting that in the VAZ-2112 the temperature in the cabin can be maintained automatically, that is, the air is either heated or cooled if necessary.
If the heater gearmotor fails, before purchasing and replacing it, you need to pay attention to one important point: there are two types of gearmotors (old model and new), which are fundamentally different in their design. In view of this, it is very important to know what type of element is installed on the car, so as not to waste your time and not make unnecessary purchases.
Weak warm air supply
The air flow is warm enough, but the pressure is insufficient. In such a situation, the following malfunctions are possible:
- The cabin filter is dirty. In this case, you need to clean it from dust with a vacuum cleaner. If this cannot be done, then it is better to replace it.
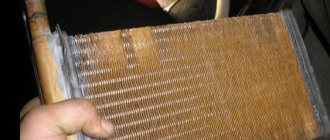
- The stove radiator is clogged. In addition to dust, both insects and leaves create plugs. Small particles can be blown out using compressed air. To remove large dirt, you need to remove the grill and wash it.
Insufficient air pressure may be due to a leaking radiator
This problem is determined very simply - if you constantly add antifreeze or antifreeze, then pay attention to the condition of this unit in the car. To eliminate this malfunction, you will need to gain access to the radiator and remove it along with the heater
The practice of soldering the heatsink is unreliable. It is better to install a new part so as not to disassemble half of the front end later.
Reasons why a gearmotor fails
If this element malfunctions, it is completely impossible to control the car's heater. You can check its functionality after setting the heater regulator to the middle position and applying voltage from the vehicle battery to the terminals of the gearbox electric motor. In good condition it should work. If the opposite is observed, it means that the gearmotor controller, which is responsible for regulating the temperature inside the cabin, has failed. Its serviceability is checked by analogy with a gearbox.
MR often breaks down for the following reasons:
- A defective place has arisen in the electrical network of the car, due to which the electric motor of the gearmotor of the VAZ-2112 stove no longer receives voltage, and it cannot function as before.
- The autonomous heater control unit received any damage during operation, as a result of which the MR can no longer correctly regulate the air supply in accordance with the temperature set by the driver.
- The gear motor shaft position sensor has failed.
Causes of failure
If the gearmotor is out of order, then you will not be able to regulate the temperature inside your car by controlling the heating system.
To check the operation of the element, you can supply electricity from the battery directly to the gear motor in the middle position. The functionality of the controller is checked in a similar way. If it breaks, then it also becomes impossible to regulate the temperature.
Failure of a gearmotor (MR) may be due to the following reasons:
- The integrity of the electrical circuit has been compromised. This means that there is no voltage supplied to the motor, and therefore the gearmotor is not able to work properly;
- A defect has occurred in the autonomous control unit of the stove. Because of this, the gearbox does not provide air at the temperature required by the driver.
Old sample
Sequence of actions when installing the VAZ-2112 heater micromotor gearbox
Replacing a faulty element is within the capabilities of every car owner. The sequence of all stages of work is quite simple; the necessary tools for this are included in the standard set of the machine’s first aid kit, so there is absolutely no need to contact a service workshop. So let's get started:
- dismantle the frill;
- to get to the micromotor gearbox, you need to remove the pedal block and the vacuum brake booster;
- remove the faulty micromotor gearbox and its plastic block;
- a serviceable element is installed in the damper sector socket.
That's all. As you can see, there is nothing complicated in replacing a micromotor gearbox, but still, careful execution of all stages of the work will not be superfluous. Things are more complicated with the installation and adjustment of the micromotor gearbox damper. You can’t manage this alone; you’ll need the help of a friend. The sequence of actions is as follows:
- It is necessary to apply voltage to the electric motor of the new micro-gearbox, that is, connect a contact pair.
- Provide a supply of cold air. To do this, the heater damper must be turned from right to left.
- After turning on the ignition, the heater control unit sensor should be turned so that it is opposite the blue mark of the regulator.
- You can do it differently: set the heater damper to the final position by turning it clockwise, and rotate the micromotor gearbox so that the sensor is opposite the red mark.
- Since the micromotor gearbox is constantly turning, it is more advisable to lubricate the square. This will help to install the element correctly and prevent accidental damage.
- It is necessary to install the electric motor so that the mounting holes completely coincide.
- At this stage, you will need the help of a friend, who will need to carefully push the electric motor inside while turning the temperature regulator.
- The installation of a micromotor gearbox is considered correct only if the squares match. In this case, warm air enters the car interior, the heating of which is regulated by the driver.
- If the square of the element does not completely fit into the square of the damper, there is no need to worry. It is quite normal when only a third of the gearmotor fits. This will not affect the operation of the heater in any way.
- All that remains is to fix the housing using self-tapping screws and rotate the micromotor gear shaft several times from the red mark to the blue one, and vice versa. This is necessary in order to fix the operating range of the installed element. There should be no complaints about the operation of the device in the future.
If all steps are completed correctly, when rotating the micromotor reducer regulator, the heater dampers will not occupy the required position. Their adjustment takes place automatically when the device is turned on to position “A”. The error of this adjustment is approximately 2 degrees.
Principles of interior ventilation
Before you understand the causes of the malfunction, you should know the principle of the device and the rules by which ventilation is carried out. So:
- Air is supplied to the passenger compartment through the holes in the trim on the windshield : when the car is moving voluntarily, or forcibly with the help of a heater fan.
- Air escapes through the gaps between the inner door panels and between the upholstery, then through the holes located at the ends of the doors. The thermal insulation of the interior is improved by valves built into the openings, which allow air to pass out and prevent it from entering the inside of the car.
- The main part of the air is directed to the windshield; flows are directed to the central part and side windows through deflectors blocked by flaps.
- Air is supplied to the driver’s feet and the passenger sitting next to him through two pairs of deflectors: one pair is located near the floor, the other at knee level.
- Through a lining located on the floor tunnel and two air ducts built under the front seats, air is supplied to the feet of passengers in the rear.
- To prevent the entry of outside air, especially if the road section is polluted, smoky or very dusty, there is an air recirculation system. When the recirculation button is recessed on the instrument panel, the electro-pneumatic valve opens. In this case, under the influence of the vacuum that occurs in the intake pipe, the access of outside air is blocked by the recirculation system flap into the vehicle interior.
- The air temperature is regulated by the controller handle from 16°C to 30°C.
- Information about the temperature is read from its sensor by a unit with a microfan located on the ceiling. The unit turns on the micromotor when a temperature difference occurs, which controls the heater dampers. When the damper reaches the desired position, a signal is sent from the sensor to the control unit, which turns off the micromotor.
Replacing the heater gear motor
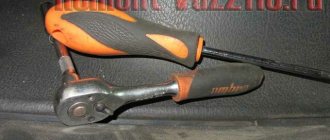
To perform this procedure, you will need wrenches and a shaped screwdriver. Installing a new part is not very difficult, so a novice car enthusiast can easily handle it in a personal garage.
- remove the windshield wipers, unscrew the locknut and release the frill;
- Now we have free access to self-tapping screws;
- At this stage, you need to remove the rubber seal from the electric motor compartment. To do this, you need to unscrew the nuts on both sides of the frill;
- the damper pipeline must be disconnected so that it does not interfere;
- Unscrew the screws holding the gearbox thermal radiators;
- near the vacuum brake booster in the left niche of the gearbox compartment there is a motor that must be removed by unscrewing the screw securing it from below;
- The damper is assembled in the reverse order immediately after installing the heater gearmotor.
Testing the functionality of the installed element is carried out by measuring the resistance on contacts X1.1 and X1.4 with the controller turned off and the left regulator set to the blue mark position. If there is no resistance or remains constant during the test, this indicates a faulty shaft position sensor. Unfortunately, it is not sold separately, so you will have to change the gear motor.
Source
Replacing the radiator of a Priora stove with Halla air conditioning
Introduction
With the onset of cold weather, car owners begin to use the interior heater. Lada Priora is a fairly warm car with a well-designed interior heating system. But there are times when, with the onset of cold weather, the interior is cold and the culprit for this is the heater radiator, which is what will be discussed in this article.
Priora is a car with an increased level of comfort. In the “luxury” configuration it is equipped with a climate control system with Halla air conditioning. This installation is quite reliable and easy to maintain.
It is necessary to monitor the condition of the heater and keep it clean. To do this, you need to change the cabin filter in a timely manner to protect the heater radiator from contamination. You can read how to properly replace the cabin filter here.
Where is the radiator
The heater radiator is located in the engine compartment near the exhaust manifold. Replacing the heater radiator with Hall air conditioning is quite simple and not complicated compared to a Priora without air conditioning, where to replace it you have to disassemble the interior heater and remove the frill.
The culprit is the radiator
There are a huge number of malfunctions of the interior heater, but the main one is a malfunction of the heater radiator. The reasons why the stove does not heat in winter may be a clogged radiator, both outside and inside.
The cost of a heater radiator with a hall air conditioner is from 1,500 to 2,500 rubles.
If the radiato is clogged from the outside:
It happens that when using a car without a cabin filter, excess debris may fall onto the radiator of the heater, which under the influence of the heater fan can clog it.
In order to eliminate this ailment, it is enough to remove the radiator and wash it.
The heater radiator is clogged from the inside:
There are cases where the radiator becomes clogged from the inside due to old coolant. Corrosion products accumulate on the thin walls of the radiator and clog it, which prevents antifreeze from entering and passing through. Therefore, if the coolant cannot circulate normally through the radiator, then it will not be able to heat up and give off heat.
Eliminated by removing the radiator and flushing.
Heater radiator leak:
When the radiator leaks, an unpleasant odor appears in the cabin, the car windows begin to fog up and become covered with a greasy coating. Driving such a car becomes uncomfortable; if there is a large coolant leak, there is a chance of losing a large amount of antifreeze and overheating the engine, which can lead to expensive repairs.
Radiator replacement
The first thing you need to do before replacing the heater core is to prepare the tool.
Required tool:
- Screwdriver “+” or “-”;
- Ratchet with a “13” head or a “13” spanner;
- Sealant;
- Antifreeze 5l;
- Container for draining antifreeze;
After preparing the tool, you can start working
Step-by-step instruction
- For convenience, it is necessary to remove the intake receiver corrugation from the throttle valve, as well as remove the air filter box along with the mass air flow sensor.
- To do this, you need to: loosen the corrugation clamps from the air filter, loosen the low crankcase ventilation clamp, remove the mass air flow sensor chip and remove the air filter box from the rubber clips.
- We drain the coolant by unscrewing the plug in the cylinder block (if the coolant does not flow, you need to open the expansion tank cap).
- Next, remove the rubber hood seal from the frill.
- We remove the hoses from the sound insulation of the engine compartment (attached with latches).
- We bend the sound insulation of the engine compartment downwards after unscrewing 3 screws on top, 2 bolts of the air filter cover and 1 bolt near the brake cylinder.
- Remove the foam seal
- Loosen the radiator clamps and remove the hoses from the radiator and bend them down.
- Unscrew the three screws of the radiator cap and remove the radiator by pulling it towards you.
- We remove debris and wipe the radiator seat.
- Install the new radiator in reverse order.
After replacement, you need to let the car warm up to operating temperature and check the coolant level, top up if necessary.
Replacement of the heater radiator with Halla air conditioner is complete. We hope our article was useful to you.
Video on replacing the heater radiator of a Lada Priora with air conditioning
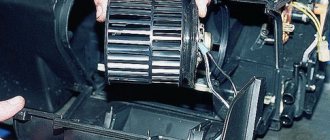
How to replace the heater fan on a VAZ 2110-VAZ 2112?
Note! These instructions for replacing the heater motor are suitable for many cars of the tenth family, but not for all, because dozens were produced in very different configurations and designs throughout the entire time, some VAZ 2110 even had an engine from Opel installed from the factory, such a car is marked VAZ 21106, so we won’t be able to write about everything (since it will be a very long article), we’ll just take the most common tenth family and use its example to show how to replace a stove motor through descriptions and pictures!
1. First of all, you will need to get to the motor, it is hidden under a trim that is located under the windshield, and inside this trim, the motor is still placed in a casing, so you will have to remove a lot of decorative elements, in more detail how to do this is described in the article under title: “Replacing the cabin filter on a VAZ 2110” and by the way, the trim that is located under the windshield cannot be removed without removing the brush, and when you lift it, pay attention there will be a tee under it (see the location where it is located on the large photo), disconnect the hose from it that is connected at the bottom (see small photo) and the trim can then be removed from the car.
Life hack: gear motor and other components of the Priora car heater
If the windshield of a Lada Priora car is fogged up and looks as if it was smeared with greasy hands after eating pirazhki - driver, beware, your heater is leaking! Maintaining normal temperature in the cabin at different times of the year is necessary in order to feel comfortable behind the wheel. In winter, the stove on the Priora saves you from freezing, which provides the heat a person needs. But you need to take care of it and prepare it for winter in the summer, because being left without heating in winter is not the greatest pleasure. The sore spots in the system that break down more often than others are the gear motor and the heater damper. Priora is a warm car - the original DAAZ is very good, it warms, and is warm in winter, because its radiator has the correct structure and fluid circulates inside. If you install the Chinese Luzar, you will freeze at -20 - I checked it personally. I put this luzar on, then took it off. The heater radiator is available for cars with and without air conditioning. The structure of the node is slightly different.
The stove block of the Priora car is indicated below in the figure. As you can see, in addition to the block, the entire assembly consists of many spare parts. On the Priora, the stove has a conventional design - having taken the time to diagnose, you need to completely check the entire system in order to make an “investment” in the future - in winter you will need to look for a heated garage for repairs. If the Priora blows cold air or does not heat well, these are signs that something is wrong inside, and this malfunction needs to be sorted out.
The principle of operation of the stove - what it consists of on Priora, article numbers
For the VAZ-2170 restyling, two types of heaters were installed - with a Panasonic control controller or with an NSS control controller. The last type contains the following parts:
- air recirculation damper gearmotor (21700-8127300-10);
- Priora car heater fan (motor) (21700-8118020-10);
- air filter (21700-8122090-00);
- motor speed controller (2170-38127025-10);
- heating system damper motor (21700-8127200-10);
- heater radiator (21700-8101060-10);
- outlet hose (21700-8101208-00);
- outlet pipe (21700-8101200-10).
As for the second option from Panasonic, the device around the radiator of the heating system on the Priora is slightly different:
- recirculation valve (21700-811908-00);
- fan (stove motor) (21700-8118020-10; 21700-8118020-00);
- vacuum hoses with check valve (21700-8119100-00);
- solenoid valve (21700-8119130-00);
- air filter (21700-8122020-00);
- inlet pipe (21700-8101200-00);
- damper gear motor (21700-8127200-00);
- radiator temperature sensor (21700-8101250-00);
- radiator (21700-8101060-00);
- outlet hose (21700-810120800).
The pre-restyling car has a lot of parts from the “tens” - even the gearmotors are different. Much was inherited from the VAZ-2110, and the first cars before restyling were almost completely equipped with its heater. The assembled stove for the VAZ-2170 Priora pre-styling received catalog number 2111-8101012-10, a more updated version – 2170-81010-12. Price from 5500 rubles.
The device is as follows:
- air flow reducer (2170-81271-00);
- air temperature sensor (inside the car) (11186-81280-50);
- control unit (switches that are built into the central console to set operating modes) (21703-81880-20);
- resistor for setting the motor speed (2123-81180-22);
- heater motor (2111-81180-20);
- damper gear motor (2110-81272-00);
- air filter (2110-81220-20);
- radiator (2110-81010-60).
The heating radiator of the Priora car can operate in two modes: automatic and manual.
- The manual mode is performed when a person independently sets the desired temperature in the cabin on the control unit.
- The automatic mode operates almost constantly - the required and actual air temperature is checked and the control controller issues a command to change the damper angle, supply hot or cold air to bring the temperature to the set level.
When the driver adjusts the settings on the control unit, the resistor sends a signal with the necessary data to the motor. The fan can produce maximum power, although the resistor will not be used to its maximum. The same process with the direction of air - the driver sets it, and the gearmotor sets the desired position of the damper.
By its principle, the heating device “lies next to” the engine cooling system. When the driver turns it on, the heater tap opens, and hot coolant moves through the pipes, which passes through the radiator of the Priora car’s heater and returns back. This increases the distance over which the coolant circulates.
Therefore, turning on the heating is one of the ways to cool the engine. It will really become hot in the cabin, because all the heat will be directed there, and the engine will give off this heat more and more, the temperature of the coolant will drop.
Malfunctions
For normal operation, the heating system needs: tightness, integrity of parts and normal antifreeze. The first step is to check the relay and fuse - after all, this unit contains electrical appliances inside. If the unit's electrical network is not in contact with the ECU, there is no point in turning the controls on the heater control unit.
The heater fuse on Priora has the number F9. In order to get to it, you need to remove the plastic plug above the driver's left knee (under the headlight switch) by unscrewing three bolts around its perimeter.
Once the fuse has been inspected and no deficiencies have been identified, further diagnostics can begin.
Perhaps the most annoying thing in any car is the situation when, even at the hottest summer temperatures, the heater does not turn off. This happens because the damper does not block the air flow. The heater damper on the Priora is controlled by a gear motor, which stops after its operating life has expired - it will have to be replaced.
While driving a VAZ-2170, you should carefully look and listen to what you see and feel. If heat should come from the cracks, but it doesn’t, then something is wrong with the seal or the damper gear motor. For example, if the glass becomes greasy, as if it was smeared with your hands, it means that the heater radiator is leaking. However, these are not the only signs of a heater failure.
Drive problem
Most often, owners of the domestic “ten” are faced with situations regarding the stove when the regulator does not respond to user manipulations. That is, the regulator does not work. Whatever position you choose, either cold or only hot air comes from the air ducts.
There are different reasons for damper failure.
| Causes of failure | Characteristic |
| Micromotor gearbox jammed | This element is responsible for controlling the damper drive |
| Problem in the control unit | It should be checked in order to understand whether the micromotor gearbox, the damper, or the control unit is at fault |
| The plastic dampers have moved from their seat and are jammed, making it impossible to control the stove. | This is typical for the old-style VAZ 2110 heater damper, when plastic was still used for this component. |
When the gearbox is functioning, but the damper still does not turn, you can hear characteristic sounds - clicks. This indicates that a square shaft rotates inside the socket.
There is only one way to cure such a malfunction - remove the old damper made of plastic with foam insulation, and replace it with a new, modern one. The new type of damper is made of metal, and the seal for it is made of rubber.
When changing the damper, do not forget to check the functionality of the actuator.
Principle of operation
First of all, you need to understand the principle of operation of the Priora heating system.
The SAUO unit, which controls the heater, receives appropriate instructions from the temperature sensor located in the car's interior lamp. After that, it compares these readings with the temperature set by the driver. If this difference is significant, the ACS sends a control pulse to the heater micromotor reducer, which controls the rotation of the damper. The direction and power of the flow of air supplied from the heater radiator to the passenger compartment depends on the magnitude of this rotation.
Signs of malfunction
If the air distribution damper does not work, this can lead to the following malfunctions in models without air conditioning:
- Only hot or cold air enters the car interior (regardless of the position of the heater control knobs);
- Instead of hot air, cold air enters the cabin.
In cars with Panasonic air conditioning, these cases are compounded by improper distribution of cooled air flows.
Diagnostics, repair and replacement
You can check the gearmotor immediately after dismantling. You need to apply 12 volts to the contacts of the power connector. The easiest way is to take this voltage from the battery. We put two wires on the battery and connect them to the connector contacts. The gearmotor shaft should begin to rotate. When the polarity changes, the shaft movement must be reversed.
If this does not happen, disassemble the gear motor. If the servo drive operates, then the problem is in the control unit or wiring.
You can only disassemble the micromotor gearbox of a new type on your own. The plastic case is held on by clamps and can be easily separated into two halves with little effort.
After disassembly, we try to rotate the worm of the electric motor shaft with our fingers. If it rotates easily, then the mechanical part is working properly. Inspect the gear teeth. The recesses in the top cover for the gear shafts must be intact, without chips or ellipsoidal wear.
We try to apply voltage to the motor directly, past the chip. In some cases, a break is observed precisely in this area. If even after applying voltage directly nothing happens, the repair of the gear motor of the VAZ-2110 stove can be stopped at this point. The motor is faulty. It will be necessary to install a new motor or completely replace the gear motor, which is usually done due to the lack of suitable electric motors on sale.
Video: The stove on the VAZ 2110 does not heat up? Replacing the heater damper gearmotor
Replacing the gear motor of the VAZ 2110 stove of the new model, like the old one, is carried out in the reverse order of dismantling.
The only recommendation at the installation stage is to check the functionality of the new part. There are cases where even new spare parts had defects. And if you purchased a used servo drive, checking is required.
The test scheme is the same as at the diagnostic stage: we simply apply voltage to the windings of the gearmotor and change the polarity. The motor spins, the rod turns - we install the gear motor in its place.
Functionality check
If you do not want to spend a lot of money on repairing and replacing the device, you need to first check whether such manipulations are required. To do this, you can try to return the displaced damper to its rightful place.
- Turn on the ignition;
- Switch the regulator to different positions;
- Manually move the flap;
- This way it can be returned to its original position.
Of course, you first have to dismantle the deflector to gain access to the damper. If this method works, the damper will be able to work again as before, which means it will respond to the regulator.
But this cannot be considered a full-fledged measure for restoring the functionality of the damper, since if the socket is already loosened, the unit will no longer be able to work normally. At first, you will apply the half-measures described above over and over again, but over time you will still have to replace the heater damper on the VAZ 2110.
Pay attention to the conditions under which the damper can be operated. If this happens only manually with the ignition on and the regulator turned to the extreme position, then the cause of the breakdown lies in the micromotor gearbox. Other suspects are the microfan with temperature sensor and the control unit.
If any of these components stops working normally or is completely out of order, then the heater damper will not work on the VAZ 2110. Only its replacement is required. Ignoring the problem will result in even greater repair costs in the future.
Main Culprits
Let's try to find the culprit that may be causing the stove to not work.
temperature sensor
Key to 19
If the sensor works well, the damper will move depending on the value set on the regulator. You can check this by removing the deflectors and observing the movement of the damper.
Checking the operation of the coolant sensor at home with a multimeter
Stove controller
To check the operation of this element, you need to pull it out of its socket. Next, you need to turn on the ignition and turn the temperature switch knob. In this case, you should measure what voltage is on the wires in different positions of the regulator (these are brown and pink wires).
Disassembled stove controller
If everything works properly, then voltage on the wires will appear depending on the position of the switch itself. This voltage should subside on its own within 10-15 seconds after turning the regulator knob. If this does not happen, then the controller is acting up. It can only be completely replaced.
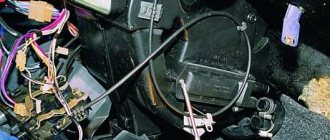
Gearmotor
Gear motor diagram with explanation
Due to the fact that it is out of order, the stove on the VAZ-2112 can also malfunction. It is quite difficult to check the operation of this unit. To do this you need to get into the engine compartment. After removing the sound insulation and frill, you will need to remove the wiper drive. There will be two connectors. The connector to which the brown and pink wires fit will be the connector of the gearmotor.
Initially, you need to check if the wires themselves are broken. To do this, you will also have to check the voltage at the gearmotor connector. If the wires are not broken, then there will be voltage.
To check the condition of the gearbox itself, you need to apply a voltage of 12 V to the connector. When it starts to spin, then everything is in order. If this does not happen, the part will have to be completely changed. If the gearbox spins, but the stove does not work, then the reason must be looked for in the wires and connectors. They may be oxidized.
The heater only works in one position
There are several options here. We'll have to check them all.
- Test the wires in the controller. They may break or burn out.
- The wires in the relay may have come loose. You need to look for the relay block in the engine compartment.
- An additional resistor on the heater housing may burn out. It is he who regulates the speed of the fan.
Replacement of micromotor gearbox
To replace an element, you will need to perform several not particularly complex activities. Therefore, it is not at all necessary to go to a service station and pay a lot of money for their services.
- First of all, remove the frill.
- Next, the vacuum brake booster is dismantled.
- After this, you still need to remove the pedal assembly.
- Now we begin to dismantle the old micro-gearbox along with the plastic component.
- A new micromotor gearbox should be installed in place of the damper sector. There you will see a similar square.
Article on the topic: How to change the heater tap on a VAZ 2109 yourself
Device location
Practice shows that replacing a micro-gearbox does not require special skills, a lot of time or excessive effort. However, never forget to be careful.
But in order to install the damper of your micro-geared motor, you will need to invite an assistant.
- First, the contacts are connected to the new micro-gearbox, that is, the motor.
- By turning the damper counterclockwise, you turn on the cold air supply.
- Turn on the ignition and turn the heater control system (SAUO) sensor to the position directly opposite the blue dot of the regulator.
- Or you can do the opposite, that is, check the micro-gear motor by installing the sensor opposite the red dot, and turn the damper all the way clockwise.
- The micro-gearbox rotates slightly more than required, so for proper installation it is recommended to use a special lubricant for the square.
- Install the motor so that the holes for the screws match.
- Now you need the help of your friend, since his task will be to turn the temperature regulator and at the same time press the motor inward.
- If the squares match, the replacement of the micromotor reducer can be considered successful. Now the air should flow to the desired temperature inside the cabin.
- Don't worry if the square doesn't go the full length of the flap you're using. This is normal when the gear motor goes about a third of the way. This installation will not affect the performance of the system in any way.
- Now all that remains is to return the screws to their place and twist the micro-gearbox several times - from the blue mark to the red one, and in the reverse order.
- These manipulations will allow the stove to remember what operating range the new gearbox has. Therefore, there will be no problems with its performance in the future.
If everything is done carefully and in accordance with the instructions, when you turn the damper, the micromotor reducer of your stove will not move to the required position. By turning on the device in mode with the “A” icon, control and adjustment will be carried out automatically - with an error of no more than 2 degrees.
Article on the topic: Do-it-yourself repair of the steering rack on a VAZ 2110 (video)
Installation
To install the gearmotor, you will need a certain set of tools, which include:
- Open-end wrench 10 millimeters;
- Crosshead screwdriver;
- Spanners.
Don't worry if you're new to doing car repairs yourself. There is nothing complicated about replacing a gearmotor.
- Remove the windshield wipers from the fuse to gain access to the device. To do this, you need to dismantle the contact nut and then release the frill.
- You will have access to the screws.
- Two nuts are unscrewed on the sides of the frill, and then the rubber seal is removed from the electric motor compartment of the gearbox.
- Disconnect the damper jabot pipeline by disconnecting it.
- Remove the screws that hold the gearbox thermal radiators.
- The motor is located on the left in the damper gear box, right next to the brake booster.
- Next, you need to unscrew the lower mounting screw and remove the electric motor.
- The damper assembly should be carried out strictly in the reverse order. Moreover, do this only after the gearmotor has been installed.
Important practical points
Some difficulties may be associated with the installation of the micro-gear damper. For this work you need to hire an assistant. First you need to connect the contacts to the new motor. If the heater damper is turned against the clock, cold air is supplied. This means that you need to turn on the car’s ignition and switch the sensor on the heater control system so that it is located opposite the blue dot. Checking the micromotor gear can be carried out according to the opposite scheme, which involves turning the damper along the clock mechanism and installing the sensor near the red mark. The micromotor gearbox must turn more than it normally does. The square can be treated with a special lubricant, which will facilitate installation.
When installing the motor, you need to pay attention to the alignment of the holes for the screws. The invited assistant must turn the temperature regulator and press on the electric motor. If the squares coincide, we can talk about a successful replacement of the gearbox, the operation of which will be carried out at a high level.
In some cases, you can observe incomplete insertion of the square along the length of the damper. You shouldn’t get upset ahead of time, because even if the micromotor reducer is only a third of the way in, its functioning will still be at a high level. The gearbox will need to be turned several more times from one mark to another so that the heating system fixes the operating range.
Dismantling
To replace the device, you will have to perform a series of sequential steps. The work is not particularly simple, but doing it yourself is more than possible:
- Drain all coolant from the heating system;
- Disconnect the battery. To do this, simply remove the negative terminal;
- Remove the trim, windshield trim and sound insulation;
- Remove the fan from the stove;
- Disconnect the vacuum pipe clamps from the heater housing;
- Remove the front heater air intake housing. There's definitely no need to rush here. To facilitate dismantling, we recommend removing the dashboard. Inside the cabin, the fasteners that hold the heater are unscrewed, and then raised;
- Remove the spring clips, mounting nuts, and front housing;
- Disconnect all hoses from the radiator;
- Disconnect the rear casing from the heater;
- Remove the radiator from the stove.
After these manipulations, you can finally replace the damper.
Assembly
When installing a new damper, be sure to make sure that the fork located on its axis is clearly engaged with the lever. If the flap is in the raised position, you did everything right. Otherwise, it will be impossible to control the device, so you can forget about restoring the functionality of the stove.
Damper location
After this, reverse the assembly procedure according to the dismantling steps. Refill the system with coolant and check that the new damper is in place. It is important to ensure that there are no leaks and that the hose connections are not tight.
Turn on the stove and check how the heater behaves. If everything is normal, you have carried out competent and successful work, for which we congratulate you.
Preparatory stage
Troubleshooting the heater should begin provided that the power unit and engine cooling system are in order to eliminate their influence. To do this, you need to make sure that the antifreeze is poured in the proper amount, the engine is in good condition and is functioning normally. And after that, find out why the stove on the Priora does not work. First, check the coolant level in the expansion tank. Next, you need to start the engine and warm it up to operating temperature. After this, you need to check the serviceability of the thermostat - feel the thick hoses that go from it to the car radiator.
The top one should gradually become hot. If the rubber hose is still cold, the thermostat is faulty. In this case, you can continue working only after replacing this element. Fortunately, its cost is low.
Another reason why the engine may not warm up to operating temperature is a leaky expansion tank cap. It should keep excess pressure in the system. Often, simply replacing this cover can completely eliminate the problem.
On the Priora, unlike the Tens, the cooling system is organized differently. And the formation of an air lock there is practically excluded. It can occur when the system is leaking or when antifreeze is poured into a completely empty expansion tank. This can be fixed quite simply. You need to drive your front wheels up some hill in a warm car and vigorously apply the gas in place. The expansion tank cap should be removed.
Dismantling
When the work to restore the functionality of the MMR is completed, install it in place. For this:
- Insert the pin of the micromotor-reducer lever into the slot of the lever. It is located on the damper drive;
- If the lever is not turned properly, apply 12V voltage to the motor connector pins using two wires. We are talking about yellow wires here. This way you can return the lever to the correct position;
- Having installed the micromotor-reducer, check it for operability, plus watch how the damper drive of your heater moves, whether the heater control lever “plows” properly to regulate the temperature.
We will repair or replace the damper and heater drive, you will be able to return the heater to its previous functionality and independently determine what temperature regime will be set inside the cabin of your VAZ 2110.
How to replace the gear motor of a new VAZ 2110 stove
- It is more convenient to work with the windshield wiper removed, but it is not necessary to dismantle it.
- Disconnect the two connectors from the gear motor, which is located on the right side of the brake booster.
- Remove the three mounting screws.
- Remove the gear motor from the heater housing; the heater damper will fall to the “cold” position.
- To install a new gearmotor, turn the shaft slightly toward “warm”; to do this, with the ignition off, set the temperature to “hot” and turn on the ignition for one second.
- Check whether the shaft fits and whether the gearmotor can be secured into the slot in the damper drive handle. If necessary, turn the shaft again by briefly turning on the ignition.
- If you overdid it, turn the shaft to the “cold” position and repeat the operation from the beginning.
General information about the heater damper and gearmotor
Replacing a gearmotor in a VAZ 2110
As you know, a car interior heater is capable of filling the interior not only with warm, but also with cold air. The heater damper regulates the speed at which the desired temperature in the car interior is established.
Note. Before turning on the heater, all doors and windows of the car must be properly closed to create a high degree of internal tightness. Otherwise, the heater will be ineffective during its operation.
List of main functions of the heating damper gearmotor:
Objective reasons that directly indicate the presence of a malfunction of the heating damper and gear motor:
- the heater has stopped filling the car interior with cold or hot air;
- after 15-20 minutes of operation of the heater, no change in temperature is observed;
Replacement of gear motor VAZ 2110
- the rate at which the car interior is filled with appropriate air is too low and the practical effect of the heater’s operation is almost unnoticeable.
Note. The degree of sound insulation of a car interior is an objective indicator of the degree of insulation. Sometimes the problem of inefficient functioning of the heater lies precisely in the low degree of insulation.
Signs of a malfunction of the VAZ 2110 gearmotor
The most obvious sign of a non-working gear motor is a significant decrease in the rate at which the interior warms up. But if there is no ventilation regulation at all, then most likely there are problems with the stove wiring. In addition, the car owner notes the impossibility of changing the temperature of the air supplied through the heating system.
There are several reasons why this device fails:
- There is a violation of the integrity of the electrical circuit, the power unit does not receive voltage from the battery, as a result of which the heater gear motor cannot function normally.
- Malfunction of the autonomous unit controlled by the heater; the gearbox is not able to provide the normal temperature regime of the heater.
Source
Detection and causes of malfunction
The main indicator of gearmotor failure is the inability to regulate the air temperature of the car heater. You can check the performance of the micromotor gearbox by supplying electricity from the battery to its motor in the middle position. In the same way, you can check the functionality of the controller, the failure of which also leads to the impossibility of temperature control.
The following defects may be the cause of gearmotor failure:
- violation of the integrity of the electrical circuit, that is, the supplied voltage does not flow to the engine, the gearmotor cannot function correctly;
- a defect in the autonomous heater control unit, as a result of which the reducer does not supply air at the required temperature.
Heater diagram VAZ 2110