Many VAZ-2114 owners try their best to improve the appearance of their car. Moreover, special attention is paid primarily to the exterior. But in no case should we forget about the interior design. After all, this is where the driver mainly spends his time.
In this material we will talk about how door trim is done on a VAZ-2114 on our own. In reality, this is quite easy to do - you just need to be patient and careful. The procedure here is as follows:
- door disassembly;
- removal of old casing;
- installation of a new one.
In some cases, it is also necessary to remove the trim when repairing the door if:
- it rattles when driving;
- her power windows squeak;
- lock is faulty, etc.
Selecting the material
There is now quite a large selection of materials suitable for the purpose in question. Therefore, choosing the one that suits you best will be quite simple.
Most often used:
Leatherette has a low price, but does not last long. Often cracks.
Genuine leather has gained the reputation of a reliable and durable material. Its only drawback is the high price. It is very convenient to use, and the results are always excellent.
Alcantara has a pleasant appearance and high strength. It is not difficult to care for her. Externally it resembles suede. The color palette allows you to satisfy the most whimsical taste.
Velor, as they say, looks rich on car doors, but wears out very quickly on seats. It needs regular cleaning, as due to its structure, literally everything sticks to it.
Flock looks very similar to velor, but is more practical and easy to clean. He is not afraid of water, he is not afraid of the cold.
Carpet, in fact, is a type of carpet. The difference is that it is softer and more pleasant to the touch. Wear-resistant, ideal stretch. Inexpensive.
How to remove
The disassembly process is the same for all doors, including the driver's door. To replace the casing, you will need to remove interfering structural elements and remove old material. You need to prepare a set of screwdrivers.
Initially, the podium is dismantled. There are three screws underneath, which can be easily removed with a standard Phillips screwdriver. You need to remove it carefully and with feeling. Otherwise, you may break the wires supplying the power windows. After dismantling the podium, you will need to disconnect the terminal from them.
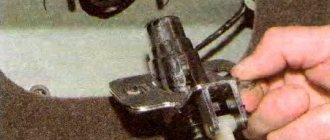
Next, remove the inner handles. The pads must be carefully pryed off with a flat screwdriver or knife. The bolts are hidden behind them. After unscrewing them, the handles themselves are removed.
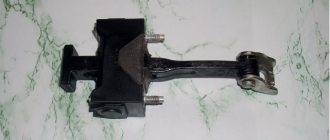
Then it will be necessary to dismantle the lining of the closing mechanism. It is pryed off with a flat screwdriver. Then comes the turn of the stoppers - these are plastic pins located on top. Unscrew with a Phillips screwdriver.
We should not forget about the speakers, usually located in the front doors. They are secured with screws. It is worth noting that if they were not installed at the factory, the latches may be non-standard. Having pulled out the speakers, you need to disconnect the wires leading to them. You shouldn't pull them sharply, as they are quite thin and tear easily.
After this, remove the lever that moves the side mirrors. Then you can remove the decorative moldings as well. Only after this will it be possible to remove the old cladding material. It is held in place by plastic caps. They are attached directly to the metal of the doors. The casing is pryed off with a knife or screwdriver, after which it is detached from the base. There is no need to worry about breaking the caps - they cost mere pennies and are sold everywhere.
There is no point in replacing Euro screws with self-tapping screws in the future if they reliably fix the upholstery. On average, one door takes about half an hour. If you have minimal experience, you will have to spend significantly more.
Stage 2. Covering with Lycra
Now we take our door for covering. We need Lycra to give shape to our skins. To do this, you can use any thin and well-stretchable material; tights from your wife, sister, or mother are suitable (underline as appropriate).
Now we take a construction stapler and punch through all the indentations; you can also use Akfix glue for this.
At the back of the card, along the edges, we turn two blocks to give rigidity to the cards, otherwise they will turn out to be “banana-shaped”.
Be sure to pull the lycra very tightly; after pouring the resin, folds may appear that can be removed with putty, but do we need it?
At this stage, we immediately think about the fastenings for the door opening handles if we remove the factory ones.
Sheathing process
After removing the old material, you can begin to install the new one.
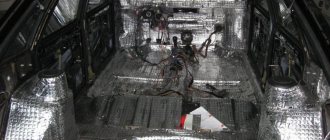
The metal surface must be cleaned of traces of corrosion. Carefully remove any debris that has accumulated inside and repair any damage found. Since the upholstery has been removed, nothing prevents you from carrying out preventive maintenance along the way.
To improve sound insulation, foil foam rubber is installed inside with glue. This, among other things, will ensure better heat retention in winter.
Using a pattern, which is easy to download on the Internet, or, at worst, old sheathing, new elements are cut out from previously selected material. In the latter case, it is important not to forget to leave a few centimeters of margin around the perimeter in order to be able to tuck it inside.
Communities › Car audio › Blog › How I sculpted the trim for the front.
I would like to share with you the work done on manufacturing and covering the skins for a loud front. There is a lot of information here, but it may still be useful to someone.
What we need:
Coverings 2 pieces. Rings 6 pieces (made by myself) Polyester resin 2 kg. Fiberglass Tights (in my case) Putty with fiberglass 500g. Filling putty 500g. Sandpaper with grit from 80 to 140 1 lm. bielastic (i.e. leatherette) Can 88 glue. Construction hair dryer Stationery knife Patience.
Material selection
The first thing you need to start with is the choice of sheathing material. The current range is quite wide, which allows each car owner to choose the ideal option in accordance with their wishes, requirements and financial capabilities.
The most attractive options are:
- Genuine Leather;
- Faux leather;
- Alcantara;
- Velours;
- Flock;
- Carpet.
For more information about the nuances of these materials for creating door trim, see the table.
Material
Peculiarities
This is a strong, reliable and durable material, the only significant drawback of which is its high cost. It's not easy to work with, but the end result is a stunning finish. A true classic that will never go out of style
Noticeably cheaper compared to genuine leather, but the service life is not as long. In just a year, leatherette may become covered with miniature cracks in the form of cobwebs.
Many call this material ideal for the fourteenth model. It has an attractive appearance, similar to suede, but has increased durability and practicality. Easy to care for, easy to install and comes in a wide range of colors. Alcantara has no disadvantages as such
Well suited for door trim, as opposed to seats. The material is pleasant to the touch and beautiful in appearance, but with constant contact, abrasions form. The peculiarity of the structure will require you to frequently clean the fabric, because velor collects a large amount of dust
It feels like velor to the touch, but unlike it, it is much easier to clean, does not get wet and is not afraid of even sudden temperature changes.
Almost carpet, but softer and more pleasant. The material is easy to work with, costs little, does not wear out in a short period of time and stretches well. For the VAZ 2114 this is especially true, since when replacing the trim it is important to carefully repeat all the bends of the doors
The choice depends on your goals for refining the car interior. Thus, flock is suitable for a sporty style, leather is for class, and velor is for sophisticated ideas.
What does sound insulation provide?
Sound insulation allows you to solve the following problems:
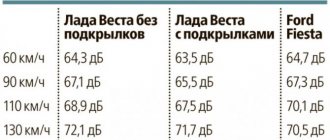
- Significantly reduce the level of extraneous noise that enters the car interior from the street
- Completely eliminate squeaks and knocks produced by dashboard parts (see Soundproofing a car's dashboard is always necessary) and parts of decorative door trim
- Significantly improve the quality of musical sound in the cabin, which is especially noticeable when you have speakers built into the doors
Materials
On the VAZ 2114, door sound insulation is performed using the following materials:
- Vibroplast is a vibration-absorbing material used for soundproofing cars, suitable for use in any area of the car body, be it interior floors, doors or roof, engine compartment partition, body sides, trunk lid or hood
- Vibroplast is a flexible, elastic material made on the basis of a polymer (rubber mastic) self-adhesive composition, using aluminum foil
- The logo and embossing are applied to the top of the foil.
- The material is moisture-resistant, does not decompose over time and under the influence of environmental factors, it resists corrosion and provides good sealing of the coating when applied correctly
- Retains its properties in the temperature range -40 +100 degrees
- Installation can be easily done on complex surfaces with relief; no heating is required during installation if the ambient temperature is above +30
- Be sure to roll from the center of the piece outward to remove any air bubbles and ensure a tight fit and seal.
- Madeline is the material most beloved by most car enthusiasts, which allows you to compensate for friction, thereby eliminating the occurrence of unpleasant squeaks and other sounds, and its price is affordable for everyone
- This material is actually an “anti-creak”, but unlike Bitoplast, it is thinner, which allows it to be used where the gaps are very small, the thickness of madeline is about 1-1.5 millimeters
- The scheme for its installation is very simple - on any of the surfaces that rubs against another, you will need to stick a piece of this material so that this material is located between the surfaces, and they come into contact only through it
- Any creaks and extraneous knocks will immediately disappear; such a moment is indispensable in the soundproofing of any car, since creaks are present to one degree or another everywhere
- Accent - needle-pierced (porous) material based on foamed polyethylene
- It is due to this structure that it perfectly absorbs sounds.
- Widely used for soundproofing machines in any installation areas
- It is considered mandatory to use coatings of a similar group when acoustically tuning cars (doors, roof (see Sound insulation of a car roof is part of a set of actions to reduce noise in the cabin), hood, interior, trunk)
- The surface of the material is oil and petrol resistant, plus it has good durability, heat insulating and sound reflecting properties
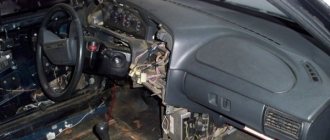
Dismantling
So, to change the door trim, the first step is to remove the door components and get rid of the old trim material. Basically, all you need to get started is a set of screwdrivers and a good mood.
- First remove the podium. To do this, there are three mounting bolts under the podium, which can be unscrewed with a simple Phillips screwdriver.
- Remove the podium carefully, take your time. Otherwise, there is a risk of damaging the wiring from the power windows.
- Disconnect the connector with wires from your power windows.
- Now you need to remove the door handles. Pry off the covers with a flat-head screwdriver. Under them you will find mounting bolts. They are unscrewed with the same screwdriver, after which the handles are easily removed.
- The next step is removing the door opening mechanism trim. To do this, you need to carefully pry off the cladding using a flat-head screwdriver and remove the element.
- There are locking mechanisms on top of the doors. Plastic pins. They have a hole where a Phillips screwdriver fits perfectly. The stoppers are removed by simply unscrewing them with a screwdriver.
- There are probably speakers on the front doors. To remove them, simply unscrew the mounting bolts. If these are not standard speakers, the dismantling procedure may be slightly different.
- Carefully remove the speakers from the casing and disconnect the wiring. Do not pull anything sharply until you are sure that all wiring is disconnected.
- Remove the plastic lever that adjusts the side mirrors and get rid of the decorative moldings.
- Now you can remove the casing itself. It is held in place by plastic pistons, which are inserted directly into the metal part of the doors.
- Using a flat-head screwdriver, pry up the trim, smoothly detaching the material from the surface.
- Don't be afraid to break the caps as they are consumables. New ones will cost a small amount of money.
Communities › Car audio › Blog › Making trim for VAZ 2114
Sound front everyone!
)) The week of making skins has begun at the studio)) In this post I’ll tell you about the loud front on the VAZ 2114, for our friend from the vastness of BPAN.Moscow
First, we go to the auto market, disassembly, to the store... We buy a couple of door cards without a rag, completely cast, they are much more convenient to work with.
Next, everything is as usual)) we take a router and make rings for the speakers, in this version 6*8″, 4*6.5″ and a couple of platforms with three horns.
We put the trim on the door, estimate the location of the rings to choose the optimal lift height, door turns, location relative to the panel, driver convenience and general appearance.
On both maps we place rings and platforms symmetrically. On a flat surface we stretch the lycra (supplex) and give it a shape. The main thing is not to overtighten the material, otherwise the casing will move and in the best case there will be small gaps, or in the worst case everything will be a screw and you will have to start from scratch.
We impregnate the lycra with resin (we use accelerated polyester resin), wait for it to dry and try it on again on the car.
After making sure that everything is normal, we apply a thin layer (or several) of P300 fiberglass (we use half P600). Someone can do without this procedure, but we prefer not to take the chance since the plastic is then cut out from the defensive side and the lack of strength can be very harmful.
After the inner part is removed using a grinder and a jigsaw, we begin to lay P600 fiberglass around the entire perimeter. We make about two or three layers, each layer is well impregnated with polyester with the addition of moderate to more hardener (the ratio comes with practice), Fill some parts around the perimeter.
The next thing is to apply putty on the outside, a rough layer of Glas to form the basic shape and Soft for final leveling (manufactured by Car Sistem or Body... whatever you like).
The skins are sanded and ready, you can take them for re-upholstery...
Not this time)) today we will paint!
We cover the skins with anti-gravel to give structure
Paint the base with white mother-of-pearl
We cover it with a layer of xerallic, which shimmers very beautifully at different angles of light and simply burns in bright light
We fix everything with several layers of varnish
The casings are ready, the next step is to assemble the box for the subwoofers and install them in the car.
Source