Print this article Font size 16
It cannot be said that the build quality of AvtoVAZ cars is at an extremely sad and low level. But these cars cannot be called exemplary either. One way or another, if you properly care for your car, monitor it, and carry out periodic preventive maintenance, expensive repairs will be reduced to a minimum.
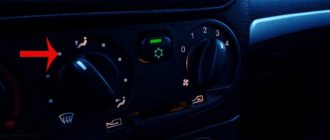
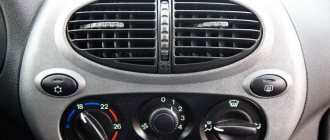
A car is a means of transportation that has a certain level of comfort. The stove is partially responsible for the comfort of the driver and his passengers in the VAZ 2110 . Various problems occur in its design, and the heater damper on the VAZ 2110 is no exception. The role of this unit is to maintain the temperature specified by the user.
Replacing the heater damper gearmotor
If the stove on your car suddenly stops blowing warm air, then one of the reasons for this may be the failure of the gear motor, which is installed on all VAZ 2110, 2111 and 2112 models. That is, when you switch the temperature knob, the motor stops moving the damper, which is what happens. leads to a similar result.
It is noteworthy that the option to change the direction of the heater dampers is used in all cars of the “tenth” family. “Chetyrki” and other “Samara” cars cannot boast of such an innovation. However, you have to pay for all the options, so the instructions for repairing and replacing the heater damper gearmotor will be useful to many.
The stove on the Priora does not work - possible causes and their elimination
January 16, 2017
The Lada Priora car enjoys the well-deserved love and respect of our compatriots. Good value for money, availability of spare parts and excellent maintainability make it the leader of the domestic automotive market. However, being the result of a Russian design, this car also has some disadvantages.
As you know, “Priora” is a deep restyling of the previous model – the 2110th. Therefore, most components and assemblies moved from the “ten”, including the design of the heating and ventilation systems for the interior. Most of the main parts of this system are “decimals”.
Therefore, such unification is very helpful during repairs. Unfortunately, this feature backfires when malfunctions occur. There are quite frequent cases when the stove on a Priora does not work. The situations are different. In one case there may be problems with the fan, in another - with the dampers, etc.
Replacing the damper motor
If you decide to replace the gearmotor yourself, you should keep in mind that to do this you will need to perform the following steps:
To complete this work you will need:
- head 10 with ratchet;
- Phillips screwdriver of regular length;
- short Phillips screwdriver;
- magnetic handle.
Note that when carrying out work to remove the motor, you can also clean the cavity of the stove motor. Extraneous dirt, leaves and branches interfere with the normal flow of air into the cabin.
Video on replacing a VAZ 2110-2112
First, I advise you to watch the detailed video report that I prepared specifically for this material. Everything was shown clearly using the example of a dozen produced in 2002. Accordingly, an old-style gearmotor was installed there.
If you have any questions about the video review, you can leave comments.
Photo report of the work completed
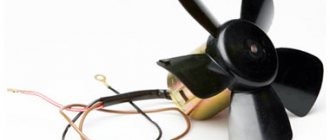
Now information for those who are used to looking at everything in pictures. This is what our heater damper control motor looks like:
- After access to the gear motor of the VAZ 2110 stove is gained, it is necessary to disconnect the two plugs with the power wires. This is clearly shown in the photo below.
If there is damage to the wiring, replace it or strengthen it with electrical tape.
- After this, you need to unscrew the three screws securing the heater damper motor, which are shown in the picture with arrows.
- Unscrew everything using a short screwdriver.
- We take out the gear motor outwards, pulling it carefully to the side.
Installation proceeds in reverse order. As for the cost of this part, for the old-style VAZ 2110 the heater damper gearmotor can be purchased at a price of 1,500 rubles, but the new model is much cheaper - about 800 rubles. You can also install a used version, but this choice should only be made if the store does not have a new part.
Replacing the heater damper gearmotor
If the stove on your car suddenly stops blowing warm air, then one of the reasons for this may be the failure of the gear motor, which is installed on all VAZ 2110, 2111 and 2112 models. That is, when you switch the temperature knob, the motor stops moving the damper, which is what happens. leads to a similar result.
It is noteworthy that the option to change the direction of the heater dampers is used in all cars of the “tenth” family. “Chetyrki” and other “Samara” cars cannot boast of such an innovation. However, you have to pay for all the options, so the instructions for repairing and replacing the heater damper gearmotor will be useful to many.
Replacing the damper motor
If you decide to replace the gearmotor yourself, you should keep in mind that to do this you will need to perform the following steps:
To complete this work you will need:
- head 10 with ratchet;
- Phillips screwdriver of regular length;
- short Phillips screwdriver;
- magnetic handle.
Note that when carrying out work to remove the motor, you can also clean the cavity of the stove motor. Extraneous dirt, leaves and branches interfere with the normal flow of air into the cabin.
Video on replacing a VAZ 2110-2112
First, I advise you to watch the detailed video report that I prepared specifically for this material. Everything was shown clearly using the example of a dozen produced in 2002. Accordingly, an old-style gearmotor was installed there.
If you have any questions about the video review, you can leave comments.
Photo report of the work completed
Now information for those who are used to looking at everything in pictures. This is what our heater damper control motor looks like:
- After access to the gear motor of the VAZ 2110 stove is gained, it is necessary to disconnect the two plugs with the power wires. This is clearly shown in the photo below.
If there is damage to the wiring, replace it or strengthen it with electrical tape.
- After this, you need to unscrew the three screws securing the heater damper motor, which are shown in the picture with arrows.
- Unscrew everything using a short screwdriver.
- We take out the gear motor outwards, pulling it carefully to the side.
Installation proceeds in reverse order. As for the cost of this part, for the old-style VAZ 2110 the heater damper gearmotor can be purchased at a price of 1,500 rubles, but the new model is much cheaper - about 800 rubles. You can also install a used version, but this choice should only be made if the store does not have a new part.
How to change the gear motor of a VAZ-2112 stove with your own hands
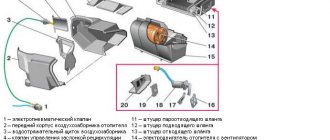
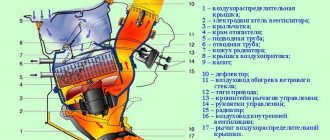
The main malfunction that completely paralyzes the operation of the heater in VAZ-2112 cars is the failure of the heater gear motor. The purpose of this element in the system is to control the heater damper, that is, the gearmotor (MR) is responsible for opening and closing it. The movement of the damper can be monitored using appropriate signals from the control module of the machine's stove. It is worth noting that in the VAZ-2112 the temperature in the cabin can be maintained automatically, that is, the air is either heated or cooled if necessary.
If the heater gearmotor fails, before purchasing and replacing it, you need to pay attention to one important point: there are two types of gearmotors (old model and new), which are fundamentally different in their design. In view of this, it is very important to know what type of element is installed on the car, so as not to waste your time and not make unnecessary purchases.
The stove does not work on the Lada Priora (reasons and repairs)
With the onset of cold weather, the first malfunctions of the Lada Priora heater begin to appear. Situations may be different; in one case there may be problems with the fan, in another with the dampers, etc. Today we will tell you how to properly repair a stove on a Priora with your own hands.
Engine cooling system problems?
As practice shows, most problems with the Priora stove occur due to the ESD (engine cooling system).
In this case, the procedure is as follows:
1.
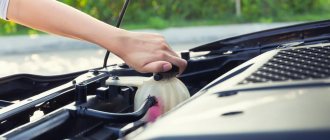
We check the coolant level in the expansion tank so that it is between o and “MAX”. If coolant has to be added all the time, then the cooling system is leaking somewhere. You should carefully inspect all pipes for leaks, and also tighten the clamps. By the way, in order for warm air to enter the cabin faster, many car enthusiasts in winter specially add coolant only to the “MIN” mark. After all, the less liquid there is in the system, the faster it will heat up.
Reasons why a gearmotor fails
If this element malfunctions, it is completely impossible to control the car's heater. You can check its functionality after setting the heater regulator to the middle position and applying voltage from the vehicle battery to the terminals of the gearbox electric motor. In good condition it should work. If the opposite is observed, it means that the gearmotor controller, which is responsible for regulating the temperature inside the cabin, has failed. Its serviceability is checked by analogy with a gearbox.
MR often breaks down for the following reasons:
- A defective place has arisen in the electrical network of the car, due to which the electric motor of the gearmotor of the VAZ-2112 stove no longer receives voltage, and it cannot function as before.
- The autonomous heater control unit received any damage during operation, as a result of which the MR can no longer correctly regulate the air supply in accordance with the temperature set by the driver.
- The gear motor shaft position sensor has failed.
Dismantling
The stove is being disassembled
To replace the device, you will have to perform a series of sequential steps. The work is not particularly simple, but doing it yourself is more than possible:
- Drain all coolant from the heating system;
- Disconnect the battery. To do this, simply remove the negative terminal;
- Remove the trim, windshield trim and sound insulation;
- Remove the fan from the stove;
- Disconnect the vacuum pipe clamps from the heater housing;
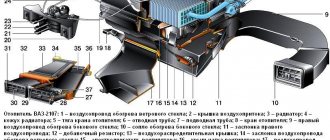
- Remove the front heater air intake housing. There's definitely no need to rush here. To facilitate dismantling, we recommend removing the dashboard. Inside the cabin, the fasteners that hold the heater are unscrewed, and then raised;
- Remove the spring clips, mounting nuts, and front housing;
- Disconnect all hoses from the radiator;
- Disconnect the rear casing from the heater;
- Remove the radiator from the stove.
After these manipulations, you can finally replace the damper.
Sequence of actions when installing the VAZ-2112 heater micromotor gearbox
Replacing a faulty element is within the capabilities of every car owner. The sequence of all stages of work is quite simple; the necessary tools for this are included in the standard set of the machine’s first aid kit, so there is absolutely no need to contact a service workshop. So let's get started:
- dismantle the frill;
- to get to the micromotor gearbox, you need to remove the pedal block and the vacuum brake booster;
- remove the faulty micromotor gearbox and its plastic block;
- a serviceable element is installed in the damper sector socket.
That's all. As you can see, there is nothing complicated in replacing a micromotor gearbox, but still, careful execution of all stages of the work will not be superfluous. Things are more complicated with the installation and adjustment of the micromotor gearbox damper. You can’t manage this alone; you’ll need the help of a friend. The sequence of actions is as follows:
- It is necessary to apply voltage to the electric motor of the new micro-gearbox, that is, connect a contact pair.
- Provide a supply of cold air. To do this, the heater damper must be turned from right to left.
- After turning on the ignition, the heater control unit sensor should be turned so that it is opposite the blue mark of the regulator.
- You can do it differently: set the heater damper to the final position by turning it clockwise, and rotate the micromotor gearbox so that the sensor is opposite the red mark.
- Since the micromotor gearbox is constantly turning, it is more advisable to lubricate the square. This will help to install the element correctly and prevent accidental damage.
- It is necessary to install the electric motor so that the mounting holes completely coincide.
- At this stage, you will need the help of a friend, who will need to carefully push the electric motor inside while turning the temperature regulator.
- The installation of a micromotor gearbox is considered correct only if the squares match. In this case, warm air enters the car interior, the heating of which is regulated by the driver.
- If the square of the element does not completely fit into the square of the damper, there is no need to worry. It is quite normal when only a third of the gearmotor fits. This will not affect the operation of the heater in any way.
- All that remains is to fix the housing using self-tapping screws and rotate the micromotor gear shaft several times from the red mark to the blue one, and vice versa. This is necessary in order to fix the operating range of the installed element. There should be no complaints about the operation of the device in the future.
If all steps are completed correctly, when rotating the micromotor reducer regulator, the heater dampers will not occupy the required position. Their adjustment takes place automatically when the device is turned on to position “A”. The error of this adjustment is approximately 2 degrees.
Drive problem
When changing the damper, do not forget to check the functionality of the actuator.
Drive unit
If the micromotor gearbox does not work, it will have to be repaired or simply replaced with a new one.
- Having removed the trim and trim from the windshield, directly behind the vacuum booster of your “ten” you will find a micromotor gearbox. Disconnect two connectors from the amplifier - the micromotor and the micromotor-reducer. Now unscrew the screws and
- remove the micromotor gearbox. You have to remove the motor from it.
- Connect it to the automatic control system to check its functionality.
If the device does not work, you can try to repair it. For this:
- Bend the pressed side slightly and remove the lid;
- Check the condition of the commutator, brushes and bearings;
- Replace the specified components or correct them;
- If the gear teeth are worn out on the gearbox, it will have to be replaced;
- Be sure to lubricate the bearings. Ideally, a silicone-based lubricant should be used;
- If the above measures do not help, simply install a new unit.
Replacing the heater gear motor
To perform this procedure, you will need wrenches and a shaped screwdriver. Installing a new part is not very difficult, so a novice car enthusiast can easily handle it in a personal garage.
- remove the windshield wipers, unscrew the locknut and release the frill;
- Now we have free access to self-tapping screws;
- At this stage, you need to remove the rubber seal from the electric motor compartment. To do this, you need to unscrew the nuts on both sides of the frill;
- the damper pipeline must be disconnected so that it does not interfere;
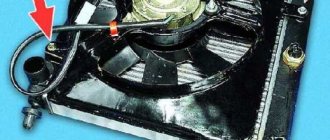
- Unscrew the screws holding the gearbox thermal radiators;
- near the vacuum brake booster in the left niche of the gearbox compartment there is a motor that must be removed by unscrewing the screw securing it from below;
- The damper is assembled in the reverse order immediately after installing the heater gearmotor.
Testing the functionality of the installed element is carried out by measuring the resistance on contacts X1.1 and X1.4 with the controller turned off and the left regulator set to the blue mark position. If there is no resistance or remains constant during the test, this indicates a faulty shaft position sensor. Unfortunately, it is not sold separately, so you will have to change the gear motor.
Source