Of course, AvtoVAZ products cannot be called the highest quality. But still, with proper care and sufficient skill, you can make the car quite comfortable, convenient, and enjoyable.
Let's talk about warmth and comfort, in particular, about how to repair the heater damper on a VAZ 2110 so that it provides exactly the temperature in the cabin that you set.
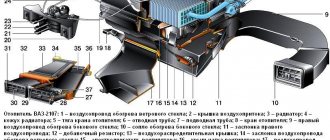
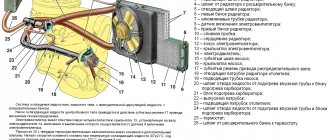
Heater diagram VAZ 2110
Design and operation of the VAZ 2110 heating system
The system includes the following components:
- Heater VAZ 2110, whose task is to heat the air. The main element of the heater is the radiator, through which coolant circulates.
- A fan that directs heated air into the cabin. It is attached to the casing using elastic pads that dampen vibration.
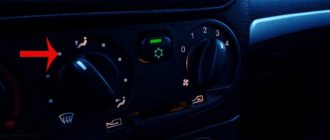
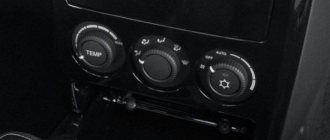
- Heater control system, including a fan button, handles and dampers for the heating mode control system.
The heating system works like this:
Through the grilles on the hood, air enters the air supply box located in the engine compartment near the windshield.
In the event of rain or downpour, the water is separated from the air and flows into the holes in the box. This allows you to use the stove in any weather, but until the radiator heats up, the air entering the cabin during rain will be damp.
The air flow is directed to the VAZ 2110 heater and heats up as it passes through the radiator. Heating is regulated using a tap, which regulates the amount of coolant passing through. The crane is controlled by a flexible rod attached to the control lever.
While driving, the air flow enters the engine compartment and the air independently enters the heater. When stopping or at low speed, an electric fan is used, controlled by a switch that has three positions: “off”, “full speed” and “low speed”. Reduced speed is achieved by turning on the electric motor through a resistor, which reduces the voltage on the motor winding.
After the radiator, the air enters the air ducts and exits through deflectors, which allow you to change the direction of flow. Warm air can be directed onto the windshield and side windows, under the feet of the driver and front passenger.
Control elements of the air flow from the VAZ 2110 stove:
- Fan air distribution cover that regulates air flow.
- Levers and handles that change the position of the air supply covers and dampers that regulate airflow.
Before repairing the VAZ 2110 stove, it is necessary to understand the causes of the malfunction.
Disassembly
Naturally, replacing a VAZ 21210 damper that works poorly or does not want to change its position at all begins with a rather troublesome analysis. Here are its stages:
- Draining coolant from the heater system;
- Disconnecting the battery. It is enough to disconnect the “minus”;
- Removing the trim, windshield trim, sound insulation upholstery;
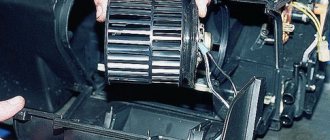
- Removing the stove fan;
- Disconnecting the vacuum hose clamp from the heater body;
- Removing the front heater air intake housing. The work is meticulous and not fast. To make disassembly easier, removing the instrument panel can help. From inside, unscrew the screws that secure the heater, then it can be lifted;
- Removing spring brackets, mounting screws and removing the front housing;
- Removing all hoses from the radiator;
- Disconnecting the rear heater casing;
- You need to remove the radiator from the stove;
- It is now possible to replace the damper.
Features of the design of the VAZ - 2110 stove damper
Note that VAZ-2110 of different years of manufacture uses heaters that differ in design:
1. Old-style stove damper
Old heaters use two central dampers, one of which blocks the flow of air into the cabin from the outside, and the second one redirects the air flow to the heater radiator or bypasses it. They are interconnected by drives and opened by a micromotor gearbox.
2. New sample
In the new type of stove there is only one central damper and it is connected by a drive to the gear motor directly, and not through a lever.
3. Under the “Euro” panel
Structurally, such a stove does not differ from the new type of heater, but in it the damper for distributing the air flow into zones is controlled by another micromotor gearbox.
It is easy to visually distinguish the stoves by the location of the heater fan. In the old-style interior heater, the fan is located horizontally, while in the new model, it is positioned vertically. Their gearmotors are also different.
Damper functions
The stove damper determines the direction of air flow. It either goes to the radiator or goes around it. Thanks to the damper, the interior warms up much faster, and the entire system functions more efficiently. Accordingly, if the damper is broken, then the air flow either does not pass through the heated radiator at all, or passes in an insufficient volume. Problems with the damper can be identified by a number of signs:
- The temperature regulator “freezes” in some positions.
- The regulator by which the temperature is set rotates with difficulty.
- The air flow blows in one direction, despite the fact that the driver tries to adjust the position of the damper.
So, if the stove blows cold air and one of the indicated reasons is observed, then the problem is in the damper. It needs to be repaired or adjusted.
Causes of poor foot airflow
Heater malfunction
Air through the cabin filter is taken from the street by the rotating blades of the electric heater motor. Through a damper system, air is distributed through air ducts and supplied into the cabin through deflectors and non-adjustable grilles.
Air, like any gaseous medium, tends to follow the path of least resistance. Therefore, it is logical that the air flows first come out of the central and side deflectors. The feet of the driver and passengers are blown last. Structurally, the air ducts to the central deflector and the upper side airflow points have a larger cross-section, and it is much easier for air to pass through them.
Initially, you need to make sure that nothing interferes with the intake of air from the atmosphere. After all, if the air is supplied in insufficient volume, then it will not be enough to supply all airflow points with the intensity that was calculated at the design stage of the car.
Check the condition of the cabin filter. To do this, remove the wipers and frill. The cabin filter is located on the right side of the vehicle under the windshield. It is covered with a plastic casing, which is secured with four self-tapping screws. Unscrew the screws and remove the cabin filter. We start the engine, warm it up to operating temperature and check the operation of the stove. If the situation has improved, change the cabin filter and close the issue.
The second common cause is a clogged heater core. In this case, the heating of the interior will be weak, because warm air does not come out of all the deflectors well, and not just into the legs. But the fact is that when driving for a long time, your feet begin to freeze first, so it seems that the problem is in this part of the airflow.
Video: Why the stove does not blow at the feet of VAZ 2111,2110
This malfunction is easily diagnosed. We find two pipes for supplying antifreeze to the heater radiator (rubber hoses on the left side in the direction of travel of the car). With the engine warm, carefully touch the two pipes one at a time with the heater running at full power. The difference in temperature between the pipes should be minimal. If one pipe is hot and the second is cold or barely warm, we wash or replace the heater radiator.
Checking the operation of the dampers
There are nine exit points for air flows from the heater on the VAZ-2110:
- central deflector;
- two side deflectors and two windshield air vents;
- heated feet of the driver and front passenger;
- two outputs for heating the feet of rear passengers.
In an ideally operating system, the pressure generated by the heater motor is sufficient to create an effective flow to warm the feet. However, over time, gaps form in the joints of the air ducts, and the dampers of the VAZ-2110 heater begin to fit loosely to the body. This leads to atomization of the air flow. As a result, a minimum amount of air reaches the distant exit points.
First, dismantle the panel with the central deflector. It is held in place by four plastic clips. To remove it, simply pry it off one of the sides with a suitable object, such as a flat-head screwdriver. Be careful: the clips are fragile.
Evaluate the damper's performance
In older cars with a manual damper drive, pay attention to the play in the linkage of the rods. A broken rod system will not allow the damper to fit tightly to the body in the extreme position, which will cause air to leak from the cold circuit
The problem is corrected by adjusting the damper. In a mechanical drive, it is possible to shorten the rod due to a movable lock on a gear rod or a threaded tip. During the adjustment process, check that the position of the switch on the panel corresponds to the actual position of the damper.
Another reason why the VAZ-2110 stove does not blow into your feet is a malfunction in the operation of the automatic heater control system (AHC) unit or the gear motor of the VAZ-2110 stove. In this case, there is usually insufficiently warm or even cold air from the stove operating in maximum heating mode. This is due to the incorrect position of the damper in which the gearmotor sets it.
Evaluate the operation of the gear motor of the VAZ-2110 stove. To do this, visually check how it closes the damper when switching modes. The easiest way to do this is to remove the panel with the central deflector. Move the temperature knob to the extreme position (for example, set the minimum temperature), then sharply switch to the opposite mode. The damper should completely block the channel visible from the driver's position. If this does not happen, the problem lies in the gear motor or the automatic control system unit. Check the serviceability of the gearmotor and unit.
How malfunctions manifest themselves
The automatic temperature maintenance system used on the VAZ-2110 is more convenient in terms of control, since the automatic control system does everything independently, but is less reliable than a mechanical cable drive. Moreover, problems are caused by the electronic and electrical components of the stove - the controller, temperature sensor and micromotor gearbox, the central damper, which regulates the air supply to the cabin from the outside.
This is interesting: Spare parts for foreign cars
Problems with the operation of the VAZ-2110 heater related to the damper:
- lack of temperature control (only hot or cold air comes from the stove) regardless of the position of the handle on the controller;
- insufficient air heating (even when setting the handle to the maximum temperature);
- squeaks, knocks and extraneous noises after setting the temperature.
The cause of such problems is the central damper of the VAZ-2110 stove, which is adjusted by the controller through a gearbox. The design of the stove includes another damper - air distribution into zones. It is controlled using a handle mounted on the central air supply deflector into the cabin, so malfunctions with this part are rare.
Causes of malfunctions
Depending on the design of the stove, the damper may cause a disruption in the efficient operation of the heater for the following reasons:
- deformation;
- wear of seals;
- deterioration or damage to control levers and rods;
- skew.
Deformation is a problem with old-style heaters. The first dampers of the VAZ-2110 stove were equipped with plastic elements that bent under the influence of temperature. Because of this, even when completely closed, cold air from outside leaks in and mixes with the heated air, and the efficiency of the stove decreases. Subsequently, the designers replaced the plastic flaps with aluminum ones and the problem with deformation disappeared.
To ensure tightness, the dampers have seals that reduce air leakage. Initially, foam rubber seals were used, which quickly wore out and became damaged. Later, foam rubber was replaced with rubber, but this only extended the service life of the seal; over time, the rubber ages, cracks and collapses.
On old-style stoves, rods and levers may break. On new heaters, there is another problem - wear on the edges of the square end of the gearbox, with which it is inserted into the groove made in the damper axis. As a result, the limit switch bypasses the groove, and the heater damper jams, although the gearmotor operates. The misalignment occurs due to the displacement of the damper axis in the mounting holes of the housing. Because of this, the damper warps and jams when opening.
Principles of interior ventilation
Before you understand the causes of the malfunction, you should know the principle of the device and the rules by which ventilation is carried out. So:
- Air is supplied to the passenger compartment through the holes in the trim on the windshield: when the car is moving voluntarily, or forcibly with the help of a heater fan.
- Air escapes through the gaps between the inner door panels and between the upholstery, then through the holes located at the ends of the doors. The thermal insulation of the interior is improved by valves built into the openings, which allow air to pass out and prevent it from entering the inside of the car.
- The main part of the air is directed to the windshield; flows are directed to the central part and side windows through deflectors blocked by flaps.
- Air is supplied to the driver’s feet and the passenger sitting next to him through two pairs of deflectors: one pair is located near the floor, the other at knee level.
- Through a lining located on the floor tunnel and two air ducts built under the front seats, air is supplied to the feet of passengers in the rear.
- To prevent the entry of outside air, especially if the road section is polluted, smoky or very dusty, there is an air recirculation system. When the recirculation button is recessed on the instrument panel, the electro-pneumatic valve opens. In this case, under the influence of the vacuum that occurs in the intake pipe, the access of outside air is blocked by the recirculation system flap into the vehicle interior.
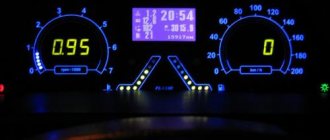
- The air temperature is regulated by the controller handle from 16°C to 30°C.
- Information about the temperature is read from its sensor by a unit with a microfan located on the ceiling. The unit turns on the micromotor when a temperature difference occurs, which controls the heater dampers. When the damper reaches the desired position, a signal is sent from the sensor to the control unit, which turns off the micromotor.
Diagnosis of the problem
If the reason why the VAZ-2110 stove does not work is the damper, it is not difficult to identify it. To do this, disassemble the central deflector, turn on the ignition and rotate the temperature setting knob to its extreme positions. In a working stove, the central damper will not knock and will completely open and close the air supply channel.
If the heater damper does not move or stops in a position that does not completely block the air passage, it may be stuck. You can verify this by pushing the valve with your hand or a long rod. If after this the damper returns to its normal position, then this is the reason why it is jammed. Through the mounting hole of the deflector, you can assess the condition of the damper and its seals. If the damper is deformed, its bend is clearly visible.
Repair of the VAZ-2110 heater damper
Repair of the damper is carried out only in a situation where it is skewed or jammed in a certain position. It is very difficult to call this a repair; it is most often a forced measure to extend its operation for a short period of time. If there are problems with the valve or its drive, then soon you will still have to disassemble the stove and replace the failed parts.
The repair consists of installing the valve in its standard seat. To do this, you do not need to completely disassemble the heater. With the ignition on, it is enough to try using manual adjustment to try to seat the valve in its seat. You can also remove the deflector and try to activate the damper by hand. If it starts to move, then you have a temporary fix. However, as previously stated, this is a conditional fix for the problem. If a part jams, it will soon have to be replaced, since the stove will not function correctly.
Location of the heater damper of the VAZ-2110 car
If, after restoring the performance of the damper with the ignition on, it is only possible to manually control the damper, then the source of the breakdown is the micro-gearbox.
This is interesting: The VAZ 2106 engine is troubled - we are studying the problem: can it be fixed with our own hands?
Functionality check
If you do not want to spend a lot of money on repairing and replacing the device, you need to first check whether such manipulations are required. To do this, you can try to return the displaced damper to its rightful place.
Traction
- Turn on the ignition;
- Switch the regulator to different positions;
- Manually move the flap;
- This way it can be returned to its original position.
Of course, you first have to dismantle the deflector to gain access to the damper. If this method works, the damper will be able to work again as before, which means it will respond to the regulator.
But this cannot be considered a full-fledged measure for restoring the functionality of the damper, since if the socket is already loosened, the unit will no longer be able to work normally. At first, you will apply the half-measures described above over and over again, but over time you will still have to replace the heater damper on the VAZ 2110.
Pay attention to the conditions under which the damper can be operated. If this happens only manually with the ignition on and the regulator turned to the extreme position, then the cause of the breakdown lies in the micromotor gearbox. Other suspects are the microfan with temperature sensor and the control unit.
If any of these components stops working normally or is completely out of order, then the heater damper will not work on the VAZ 2110. Only its replacement is required. Ignoring the problem will result in even greater repair costs in the future.
Replacing the VAZ-2110 heater damper
Replacing the heater damper is not particularly difficult, however, it requires extreme care from the performer. In order to get to the valve, it is necessary to completely dismantle the stove. The main part of the work on removing the stove will be carried out in the engine compartment of the vehicle. Before directly disassembling the stove, it is important to initially disconnect the battery and drain the coolant from the heating system. After this, the windshield, soundproofing material, and heater fan are dismantled and adjusted. Next you need to disconnect the vacuum hose clamp.
The next step is to remove the front part of the heater housing. The work is quite complex, so to simplify the removal of the heater body, you can additionally dismantle the instrument panel and unscrew the fasteners from the inside of the cabin that hold the heater in place. After this, you can lift the heater from the engine compartment and remove the brackets and screws securing the front part of the heater. Only after completing this amount of work can the front part of the stove be dismantled without difficulty.
Next you need to disconnect all the hoses and pipes that go to the radiator. After this, the rear heater casing and radiator are dismantled. Only after these manipulations have been performed will access to the damper be opened. At this point, the preparatory stage of work can be considered complete. After this, you need to proceed directly to replacing the VAZ-2110 heater damper with a new part.
Repair and replacement of the damper of a VAZ-2110 car
Dismantling a damaged part and installing a new one is not particularly difficult. The only question that may arise during dismantling is how to remove the heater damper rod of the VAZ-2110. Although it is plastic, it fits extremely tightly on the shaft. To dismantle it you will need two screwdrivers. Use a thin screwdriver to lift the fastening lever, and use a second screwdriver to loosen the plastic protrusions of the rod. After disconnecting the rod, the upper valve will go down on its own, since nothing else will hold it.
When installing a new part, you need to pay attention to the fork located on the valve axis. It is important to secure it in such a way that it engages with the lever. When installed correctly, the heater valve should be in a raised position. In another situation, it will be impossible to adjust and replacing the part will not give the desired results.
When installing a new part, some drivers simultaneously modify the heater damper rods. The design of the rods has some disadvantages. When switching the damper control lever, you can see that in any position of the lever, the air flow towards the driver’s feet is blocked by either the first or second damper. To improve the distribution of air flow, it will be necessary to shorten the adjustable draft by three divisions. For this purpose, it is necessary to cut off the retractable rod end. Such a simple modification will help the damper to move to the required position, which will have a positive effect on air distribution. The flow of warm air will flow evenly to the driver’s feet, the side windows of the car and from the central deflector.
After this, all the removed parts are installed in the reverse order, and coolant is added. Care must be taken when connecting pipes and hoses. Only sealed connections will guarantee high-quality functioning of the heating system. After this, you can check the operation of the dampers and the entire heating system.
Removing the heater damper 2110
In order to replace the damper, you will have to perform a number of rather complex steps. Of course, this is difficult, but if you try, the quality of work will not differ from service.
Dismantling process
- Before dismantling, it is necessary to empty the heating system of coolant;
- Disconnect the terminals from the battery;
- Unfasten the panel trim itself. Sound insulation must also be removed;
- You need to remove the fan of the stove itself;
- Remove the pipe clamps from the heater body of the heater;
- After this, it is imperative to remove the air intake housing. At this stage you need to concentrate as much as possible. Any mistake can be fatal and cause significant damage to your personal car. To make removal easier, the entire dashboard can be removed. All fasteners must be completely unscrewed. This is necessary in order to remove the heating element from the car.
- After dismantling the air intake housing, you need to begin dismantling the spring brackets, front housing and fastening nuts;
- All hoses from the radiator must be removed. Otherwise, they will interfere when replacing the damper;
- It is necessary to disconnect the rear casing from the heating part;
- You need to remove the radiator part from the stove itself.
This is interesting: Replacing the cabin filter in a Chevrolet Aveo: where it is, step-by-step instructions
Installation of a new damper and reassembly of the stove
When replacing the valve, you need to be very careful. You need to make sure that the fork should fit into the lever. After this, the damper should be raised. If the assembled damper is not in the raised position, it means something was done incorrectly. If the fork does not engage with the lever, it will simply be impossible to control the stove normally.
After replacing the damper, you need to begin the process of assembling the stove. To do this, you need to follow exactly the same points as during the disassembly process, simply placing them in the reverse order. After assembling the stove, you need to check the functionality of the damper by filling in the coolant. You need to inspect everything, checking for leaks and whether all hoses are tightly connected.
Now you can turn on the stove. If the heater works normally and responds to the settings, everything was done correctly.
Dismantling
Disassembled stove
To replace the device, you will have to perform a series of sequential actions. The work is not particularly simple, but doing it yourself is more than possible:
- Drain all coolant from the heating system;
- Disconnect the battery. To do this, simply remove the negative terminal;
- Remove the trim, windshield trim and sound insulation;
- Remove the fan from the stove;
- Disconnect the vacuum pipe clamps from the heater housing;
- Remove the front heater air intake housing. There's definitely no need to rush here. To facilitate dismantling, we recommend removing the dashboard. Inside the cabin, the fasteners that hold the heater are unscrewed, and then raised;
- Remove the spring clips, mounting nuts, and front housing;
- Disconnect all hoses from the radiator;
- Disconnect the rear casing from the heater;
- Remove the radiator from the stove.
Damper adjustment
Adjusting the Nissan Qashqai heater flaps is also a fairly simple procedure and can be done on your own:
- The bolt securing the rod to the drive is slightly loosened.
- The damper lever is installed in a position where it is completely open.
Damper position at maximum set temperature
Damper position at minimum set temperature
- The rod is pulled out of the casing, the mounting bolt is tightened.
- The damper drive handle is pulled out to the maximum, which can be determined by the fact that the damper itself has completely closed.
- If the damper does not close, the rod shell bolt is unscrewed.
- When moving the shell you need to look at the damper. If it is closed, the mounting bolt can be fully tightened. This completes the adjustment.
We are engaged in the drive
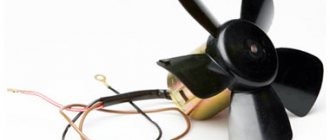
Simultaneously with replacing the damper, we check its drive, and if the MMR does not work, it is necessary to either replace the motor or repair it. After removing the trim and lining of the windshield behind the vacuum amplifier of the VAZ 2110, we find the MMR, disconnect two connectors - the MMR and the micromotor.
MMR new sample MMR old sample
Next, unscrew the screws and take out the MMR, from which we remove the motor. Its operation is checked by connecting to the automatic control system.
If you find that it is not working, you can replace it, but repair is also possible. The stages are:
- Partially bending the pressed side, remove the lid;
- Check the condition of the bearings, brushes and commutator;
- Replace or fix them. If the gear teeth of the gearbox are worn out, it needs replacement;
- Bearings require silicone grease.
If after repair the operation of the motor is restored, you can assemble the MMR and install it in place. In the VAZ 2110 this is done like this:
- The MMR lever pin must be inserted into the slot of the lever, which is located on the heater damper drive;
- If the indicated lever is turned incorrectly, you need to apply 12 V voltage with two wires to the contacts of the motor connector (yellow wires fit here), and the lever will move to the desired position;
- After installing the MMR, check how it works, at the same time, how the heater damper drive moves and the heater control lever works to set the temperature in the VAZ 2110 cabin.
Assembly
When installing a new damper, be sure to make sure that the fork located on its axis is clearly engaged with the lever. If the flap is in the raised position, you did everything right. Otherwise, it will be impossible to control the device, so you can forget about restoring the functionality of the stove.
Damper location
After this, reverse the assembly procedure according to the dismantling steps. Refill the system with coolant and check that the new damper is in place. It is important to ensure that there are no leaks and that the hose connections are not tight.
Turn on the stove and check how the heater behaves. If everything is normal, you have carried out competent and successful work, for which we congratulate you.
Let's sum it up
Malfunction of the VAZ-2110 heater damper is a common malfunction, especially in vehicles with old-style heaters. Breakage in most cases is due to the quality of plastic dampers, which are very often subject to deformation. It is possible to repair and replace the VAZ-2110 stove valve yourself without the help of professionals. Before starting work, you need to understand that in order to carry out high-quality repairs and restore the previous functionality of the heating system, the stove will have to be completely dismantled.
Despite the complexity of the work ahead, the result will please the driver and passengers with warmth and comfort in the vehicle interior. A high-quality repair of the heater damper and its drive guarantees stable operation of the vehicle’s heating system at any time of the year.
Assembly of the unit
Interchangeability of gearmotors
When work on restoring the functionality of the MMR is completed, install it in place. For this:
- Insert the pin of the micromotor-reducer lever into the slot of the lever. It is located on the damper drive;
- If the lever is not turned properly, apply 12V voltage to the motor connector pins using two wires. We are talking about yellow wires here. This way you can return the lever to the correct position;
- Having installed the micromotor-reducer, check it for operability, plus watch how the damper drive of your heater moves, whether the heater control lever “plows” properly to regulate the temperature.
We will repair or replace the damper and heater drive, you will be able to return the heater to its previous functionality and independently determine what temperature regime will be set inside the cabin of your VAZ 2110.
Source