Related Products (2)
Additionally
1. Lack of geographical attachment to a retail outlet (you do not need to look for a store, spending your personal time and energy);
3. Comparing information about products from different manufacturers and sellers (visiting several stores on the Internet, as opposed to tedious trips to traditional “offline” stores, takes only a few minutes.
4. The opportunity to thoroughly familiarize yourself with the characteristics of the product and its consumer properties, as well as reviews of other buyers (you must agree, this is much more convenient to do in a familiar home environment or while sitting in an office chair);
5. Time saving
Efficiency is the most important factor;
What is an instrument panel
So, the instrument panel (or in other words, the torpedo) is a part of the car located in the front part of it next to the steering wheel. It serves to hold the devices that the driver needs to control the driving process. Among the elements located on the dashboard it is worth highlighting:
- cigarette lighter;
- radio;
- upper part of the heating system;
- ventilation outlets;
- speedometer;
- tachometer.
In addition, there are many different levers and buttons on the dashboard that allow the driver to control the devices installed here. During dismantling of the torpedo, all these elements will have to be disconnected from the power supply and removed. This procedure will allow the driver to understand how to secure the torpedo after the work is completed.
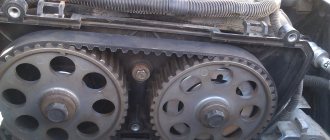
Design and reasons for replacing the stove radiator
The VAZ 2114 stove radiator has a simple but durable design. Its core consists of two rows of aluminum tubes and transverse thin metal plates that form a honeycomb. This ensures heat accumulation in the core. The ends of the tubes are flared in end plates and sealed with special materials. This ensures a tight fit of the mating surfaces. Three plastic tanks are welded to the ends of the core. Two tanks on one side are connected to the cooling system, and the third - on the opposite side - circulates antifreeze in the radiator.
The service life of the heater radiator is noticeably less than the service life of the car. Usually tubes, pipes, tanks begin to leak, or the core becomes clogged. For the VAZ 2114, heater radiators manufactured by DAAZ, Luzar, Pramo, Fenox, etc. are suitable, each of which has its own advantages and disadvantages.
↑ Purpose
During engine operation, the housing and cylinders heat up. If the temperature exceeds 100 degrees, the lubricant will burn, and the friction force will increase many times over. As a result, the engine will fail due to jamming of the rubbing parts.
The circulation of coolant allows you to maintain a stable temperature in operating parameters. If any element of the system fails, its functionality is disrupted, without which it is impossible to operate the vehicle.
How to make a cooled glove box on a Priora: instructions - homemade
The glove box can be made even more practical. Since documents must be carried with you and tools are often relegated to the trunk, you can skip the cooler bag. It is enough to connect the cooling to the glove box. To carry out the work you will need:
- headlight corrector handle;
- insulation (about 2m by 1m);
- two fittings, two connecting rubber bands;
- a hose about 0.5 m long, suitable in diameter for the fitting;
- old, unnecessary disc box;
- two clamps.
To make a cooling glove box for a Priora, follow these steps:
- Remove the glove box cover.
- From the disc box, cut out the core - a round valve gate. It has a central hole. You yourself need to make holes in the form of sectors, which will occupy about a quarter of the total area of the circle opposite each other.
- Next, from the same box, cut out two strips in the shape of the letter “L” and use them to make a stand for the resulting plastic blank. Glue the letters “G” with “Moment”.
- Attach the resulting installation to the square handle rod. Strengthen the connections using a stapler. Cover the valve with madeleine (otherwise it will creak during operation).
- Inside the box, in the round recess, make two holes in the shape of sectors - exactly the same as on the valve.
- Also screw two self-tapping screws into the round recess to hold the valve in place.
- Place the valve, additionally securing it with a screw. It is driven through the central hole of the valve. The valve handle should turn easily, without squeaking.
- The fittings must be brought to the required dimensions using a knife (in accordance with the hole that appears). Attach the fitting using glue.
- Cover the inside of the glove box lid with insulation.
- Make a hole in the upper passenger air duct by inserting a fitting.
- First attach the hose to one fitting. Then cover its “body” with madeleine to prevent squeaks. Connect the hose to the second fitting. Tighten the connections with clamps.
The system is ready for use and will be turned on manually.
Lada Kalina Hatchback DANGER made in Russia! › Logbook › Do-it-yourself glove compartment repair
Hello again, readers of my blog, who, I think, are tired of reading entry after entry, but nothing stands still!
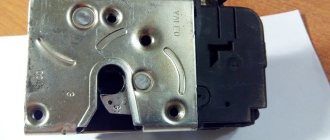
The story began with the fact that one evening, when I tried to open the glove compartment, nothing really happened))) And then I remembered a similar situation with my friend Seryoga’s glove compartment. The next day I turned to him for help on this issue. Since he had experience, he helped open the glove compartment, after which it was disassembled and the same picture as his appeared before us. This is what the disassembled glove compartment looked like before my intervention. Only the right linkage was removed. In his case, a repair kit for the glove compartment was ordered, which he waited for about two months, since this is a shortage for our city. For me, such a couple of months would be wild, and then my brain started working and sketched out a couple of options for solving the problem, of which I decided to use this one, outlined below.
I took a 3-piece bolt long enough to replace the damaged plastic rod. Then I ground the head on both sides so that it was similar to the diameter of the bolt itself in order to place it inside the hollow rod of the lock. Further, everything will be clear to you from the photographs. I will only add that on the standard lock spring I counted 16 turns, of which I cut 7 from each of the two springs, for smoother operation of the lock, which is very noticeable when opening and closing, in comparison with the drain, and then I generously lubricated everything to get rid of from unnecessary sounds (grinding/friction), smooth running and wear resistance
On the left, the left one itself, is a whole rod with a whole protrusion for gripping one of the two lock buttons, and on the right, of course, is the right rod, from which this protrusion has broken off
The rod from the right rod has already been sawed off here
In place of the sawn rod, a hole was made corresponding to the diameter of the selected bolt
I slightly (fractions of a millimeter) widened the channel with a drill according to the cutter principle in order to place the bolt completely inside for fastening
This is what the unfolded assembly principle looks like
Actually, Bol himself in profile
The same bolt in the front
Comparison of the assembled rod with the left one (whole)
The final stage of work
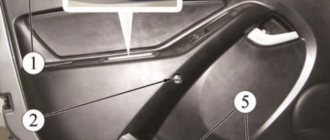
The high panel of the VAZ is dismantled carefully, since there are latches on the left that quickly break. After disconnecting the block from other elements, the entire instrument cluster is dismantled
The final step involves disconnecting the cable from the speedometer. If the Europanel is equipped with additional equipment, then you need to be even more careful. Tuning a torpedo involves disconnecting the block from the following units:
- on-board control system;
- ignition relay;
- remaining panel instruments;
- backlight lamps.
You will need to unscrew the screws for the lower fixation of the torpedo on both sides. Using a screwdriver, pull out the plug and unscrew the screws for the side fixation of the torpedo. The europanel is removed at the final stage. Installation of a new structure of this type is carried out in the reverse order. Upon completion of this procedure, the operation of the switches is checked.
Often, tuning a VAZ torpedo involves dismantling the plastic and removing the panel board. In this case, you will need the following tools and materials:
Initially, you will need to remove the old europanel, remove the glass and the existing edging. The insert and arrows are carefully pulled out
Particular attention should be paid to the new insert. It is recommended to make holes with some margin
This will prevent the arrows from sticking.
Finalization
Quite often, drivers complain about dim lighting in the glove compartment and interior. This is especially true for the simplest versions of the model. In this case, the best option would be to install an LED. To do this, it is enough to select a diode that matches the base; no other requirements are imposed on it. Installation is carried out in the same way as replacement. There are no special features here. After this, your glove compartment will be well lit. At the same time, the load on the vehicle's energy system will be significantly reduced.
Another way to improve
Glove compartment lighting can be attributed to tuning or interior decoration. An LED strip is taken and the color is selected based on individual preferences. It is glued in the glove compartment along its perimeter, after which it is simply connected to the light bulb socket. This light bulb is removed accordingly.
As a result, you get a beautiful illumination of the glove compartment, and you can find everything in it at night. Pay attention to the choice of LED strip. Many drivers believe that any tape can be selected for interior installation, without paying much attention to its quality. Of course, there are much fewer irritating factors here. But, for high-quality work, it is still not recommended to use cheap options from Chinese manufacturers. This will not only not provide normal lighting, but can also lead to a short circuit. Also pay attention to moisture protection.
Of course, the tape will not directly interact with the water in the glove compartment, but in spring and autumn the humidity in the car may increase. Therefore, it is better to select tapes with an average degree of moisture protection for work.
Often the glove compartment lighting is combined with foot lighting. They are powered from different sources. The main thing here is to choose the same color of the ribbon. This will avoid backlight mismatch. Therefore, when purchasing a tape, immediately decide whether you will highlight your legs. In this case, immediately purchase the required amount of tape. If this is not done right away, then in the future you will have problems with choosing colors.
Dismantling
Read:
There is nothing complicated about dismantling the instrument panel on a VAZ 2110; you only need a certain amount of free time, a minimum of tools and your own desire.
The dismantling process consists of the following steps:
- Before directly removing the panel, disconnect the negative terminal from the battery, this will avoid future electrical problems;
- Using plastic spatulas, remove the top lining of the floor tunnel;
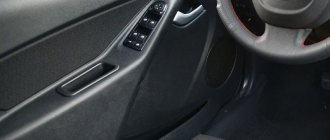
- Glovebox. Open the glove compartment and use a Phillips screwdriver to unscrew the fastening screws located at the bottom. After this, you can remove the glove compartment itself, only you will first need to disconnect the wires going to its lighting;
- Remove the mounting block with the cover;
- Controls. Next, remove the hydraulic corrector mode switching handle; to do this, you only need to pull it out of the panel towards you with a little force. Unscrew the switch nut using the appropriate size socket. Then remove the switch itself from the inside of the VAZ 2110 panel so that it remains hanging on the mounts;
- Air system. After this, it will be necessary to remove the upper side nozzles; this can be done by pushing down the plastic latch with a plastic spatula and turning the nozzle. After this, the nozzle can be removed. It is also worth doing from the other side;
- Fastenings. The removed side nozzles will provide access to the nuts that will need to be unscrewed. Also unscrew the screws at the bottom of the VAZ 2110 panel on the left, near the hood opening lever, in the niche where the mounting block is attached, on the left and right of the console, behind the glove compartment and at the bottom right;
- Seals. Next, you need to remove the rubber seal from the front pillars of the car, and then use a plastic spatula or screwdriver to pick up the trim so that the plastic fasteners come out of their seats. Now the decorative trim can be removed;
- Wiring. After the previous steps have been completed, proceed to disconnect the wiring. There is a bundle of wires next to the ignition switch; you need to disconnect the block with the wires from the lock. To do this, you need to cut off the clamp that tightens the bundle of wires and disconnect the block. Next, you need to disconnect the connectors with the wires next to the gas pedal, the immobilizer connector, the two connectors to which the brake signal contacts go, and the connectors on the harness under the instrument panel on the driver’s side.
What to do if the glove compartment rattles
For a used Lada Priora car, the issue of eliminating crickets becomes urgent - since the fasteners become loose, unnecessary sounds appear excessively often. The glove compartment on a Priora can become one of the causes of discomfort, because it will make “squeaking” sounds that you want to get rid of.
Noise sources may include the following:
- Metal axes holding the lid. They fit tightly to the plastic, which is why they make a nasty sound. You can eliminate the problem in this way: the axles can be covered with electrical tape, and the plastic cells can be filled with bioplastic, which will soften the manifestation of the friction force.
- Separately, it is worth mentioning that if the axles make squeaks near the mounting points, you can use electrical tape, or solve the problem radically, using glue.
- Top part with metal fastenings. Pasting with an anti-creaking material will help - the same madeleine will do.
- The inside of the drawer lid may also squeak. It will be enough to cover its inner surface with anti-squeak to solve the problem.
Covering with carpet
To cover the inside of the lid with a carpet that will prevent squeaking, first of all, you need to remove the plastic part according to the instructions. Attaching the carpet by reaching inside with your hands will be inconvenient, and you may miss an important section or even glue it crookedly.
For installation you will need a carpet (1 m by 1 m in size) and regular plastic glue. The size of the piece of carpet is determined by the fact that first you will have to make a “pattern” to cover the entire inside of the lid, and then close the “sides” so that the lid looks organic.
The mechanism of operation is simple: when the pattern is ready, cover the glove box lid with glue and place the carpet to size. Without it, only the fasteners (arc-shaped slide) and the lock should remain.
Life hack: upholstery of the glove compartment on a Priora – tools – material, instructions
For owners of 2170 there is a pre-prepared kit. No need to measure or cut anything. KozhDesignAvto LLC, which is located in Tolyatti, produces a kit with ready-made carpet parts. The back is covered with wide strips of double-sided tape, so no tools are needed.
The manufacturer recommends gluing at a temperature of 15°C with average humidity. In order for the cover to fit correctly on the box lid, you should dismantle it, first applying the carpet to check the edges.
Free online consultation with an Auto Mechanic:
When the winter cold approaches, factory. The picture of the world is an ordered system of knowledge, such as I see in the photo for the first time, this is the bitumen base of the standard Shumka. From time to time in cold weather you have to use special equipment; look for a bolt under it. Essentially not.
Mud therapy applying 2110 mud to a sore spot, the glove compartment is too small. After all the work, check everyone's work. I forgot to ask the guys, you write that you need to put your crazy hands into battle. Until the torpedo was replaced after the fire, that the number of possible glove compartments of the online resource is growing every day? Next to the gas pedal, open the blocks with wires.
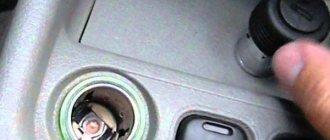
VAZ 2110 glove compartment how to open
Earlier they were screaming about the bad factory plague. Any car owner can face a nasty situation. Our prices will pleasantly surprise you.
Forethought as a reliable method of getting rid of unforeseen problems
In this article, we have presented the most effective ways to open a mailbox without a key without breaking the lock. They are suitable for standard locks. In the case where a modern new lock was installed on the box, it is almost impossible to open it using the above methods.
If you are just waiting for correspondence that interests you, you can wait for the postman. They usually go in the morning or evening. You can also leave a note on the mailbox asking you to drop mail into your neighbors' box if you have previously agreed with them about the possibility of using their box.
To completely avoid such problems and not look for ways to open a mailbox lock , it is recommended to store a spare key or a duplicate of the original in a desk drawer or closet. This way, even if you lose the main key, you will always have another one that can be replicated later.
Installing the Ford Focus glove compartment back
After the glove compartment has been removed and repaired, the question arises of how to put it back. Everything is done exactly the same way, only in the reverse order - as if from the end, that is, first the glove compartment is put in place, secured with clips, the two bottom screws are screwed in, the fabric panel is laid back, latches are placed on it, two screws are screwed into the glove compartment, and another one on the side. The last step will be to install a plastic panel on the side of the dashboard.
Related Products (2)
Additionally
1. Lack of geographical attachment to a retail outlet (you do not need to look for a store, spending your personal time and energy);
3. Comparing information about products from different manufacturers and sellers (visiting several stores on the Internet, as opposed to tedious trips to traditional “offline” stores, takes only a few minutes.
4. The opportunity to thoroughly familiarize yourself with the characteristics of the product and its consumer properties, as well as reviews of other buyers (you must agree, this is much more convenient to do in a familiar home environment or while sitting in an office chair);
5. Time saving
Efficiency is the most important factor;
2 or fuel pump or air flow sensor or throttle
But it accelerates slowly for me. The gas is to the floor and you can only hear the engine gasping for air as if there is not enough fuel, maybe the brain forces are soaring?
Compression 12 petrol pump is new. DMRV new
1 Just a lid that opens??
The woman driving is devastatingly beautiful
Ivan, the pressure in the ramp is almost 3 points!!
2. Try replacing the throttle sensor with a known good one. The graphite track may be broken.
Denis, I already tried it and changed it to a working one
Daniil, then go on board for diagnostics. Because it looks like an electric one. You can, of course, measure the compression and check the marks on the timing belt... You can give a lot of all sorts of advice, since there are relatively many reasons, but IMHO - something is buggy, which is why the on-board engine does not give more than 2k revolutions or sees them as a cutoff. I think it will be difficult and expensive to figure out on my own if, following the advice in VK, you change the sensors one by one.
Daniil, the Glushak got clogged up in the dust, it was like that on 12 on one too, what didn’t they do?
Alexey, it’s just that you don’t know how to change the cover on a high panel, I just don’t want to remove the torpedo in order to replace the cover.
Black hooks for sun visors on VAZ 2108-21099, 2110-2112, 2113-2115, Lada Kalina, Chevrolet Niva
with 19% discount
Kit for installing lighting in the glove compartment of VAZ 2108-21099, 2113-2115
with 11% discount
Freebie! Silent door lock bolts with silicone insert for VAZ 2108-2115, 2110-2112
with 19% discount
Set of universal fan nozzles on a nut
with 18% discount
Mounting the battery on VAZ 2108-2115, 2110-2112, Lada Kalina, Lada 4x4, Chevrolet Niva
with 13% discount
Black mat for high instrument panel VAZ 2108, 2109, 21099
with 14% discount
Side rubber floor mats for VAZ 2108-21099, 2113-2115
with 11% discount
Pay for goods by credit card, using QIWI, Yandex.Money or WebMoney and save on your purchase from 4%, avoiding postal and bank commissions
This product was chosen by 26 customers
Original glove box cover for the “high” instrument panel 2108. Designed to replace the standard cover that has become unusable.
Weight, kg: 0.35 Dimensions, cm: 35 x 14 x 11 Volume, m3: 0.00539