High-voltage ignition wires of the VAZ 2114 are part of the ignition system, through which an electrical impulse is transmitted from the module to the spark plugs. When the current hits the spark plugs, the fuel mixture ignites in the combustion cylinders, which gives rise to a new stroke of the engine.
The design of the GDP, unlike conventional wires, is quite complex. In addition to the conductive core (which is made of copper) and protective insulation, they have metal tips and plastic protective caps.
Metal tips act as contacts; they fit into the sockets on the spark plugs and the ignition module. The durability of the GDP directly depends on how well the tips are made. When purchasing, be sure to check the strength of their attachment to the wire.
High-voltage ignition wires VAZ 2114 - device
It is important to know: The efficiency of ignition of the mixture directly depends on the quality of the high-voltage wires, which means stable engine operation in different modes.
The classic model of the ignition system for all cars around the world provides for a set of five high-voltage carriers. The central cable supplies high voltage from the ignition coil to the distribution device - distributor. Next, four cables supply voltage to the spark plugs.
Modern cars use an electronic ignition system. The circuit does not change, but additional cables may be added if the flammable liquid is ignited by two spark plugs in each combustion chamber.
The armored wire consists of:
- conductive copper, graphite or non-conductive twisted conductors;
- ferroplast shell - insulator;
- metal wire screen;
- sealing hard shell;
- tips on both sides.
I installed explosive wires with zero resistance, how did the operation of the motor change?
Many people remember from Soviet cars that their high-voltage wires had a good copper core. However, they were replaced by fashionable wires with a graphite core and silicone insulation in several layers. Many people praised these wires - they don’t tan, they don’t penetrate the insulation, the radio works without interference, and so on.
But, as they say, “the new is the well-forgotten old.” The network began to actively promote the idea of installing high-voltage wires with zero resistance.
People began to write that there was less resistance, a better spark, the car was speeding, it didn’t even smell the fuel, it just looked at it, the engine rustled, the 10-ruble coin stood on its edge and didn’t fall.
Before describing the emotions of the replacement, I suggest a little physics. In order for a spark to appear on the spark plug, it is necessary to break the distance between the electrodes. Accordingly, it is necessary to store as much energy in the ignition coil as is necessary for breakdown and to maintain the spark burning.
The resistance of the gap between the electrodes is about 60,000 kOhm, the resistance of a normal explosive wire should be about 5 kOhm, the ignition module also has an internal resistance of about 6 kOhm (on the injector) and a resistor in the distributor (resistance about 6 kOhm), if we are talking about a carburetor, also an additional resistor may be in the spark plug - this is about 5 kOhm more. Against the background of 60,000 kOhm, an additional 5-10 kOhm will not play a big role in the operation of a working ignition system. What is more important in this matter is the state of the gap at the spark plugs; it should not be too large or too small.
Moreover, I found a long time ago a study of spark plugs with and without resistors, where the manufacturer experimentally proved that fuel consumption with such spark plugs is even less, but when operating at a voltage of less than 9 volts (let’s say the generator stopped working), these spark plugs began to work a little worse.
Personally, I noticed absolutely no difference, provided that the spark plugs were A17 DVRM (with an additional resistor). The car was absolutely in good working order - a good battery, a new starter, spark plugs were changed every 20 thousand.
There was no difference when starting in winter, in the heat, in snow, in rain, and there was also no difference in fuel consumption or engine power. At first it seemed that the engine was running smoother, but this was more of a placebo effect and nothing more.
I think it’s pointless to believe in some kind of miracle, but there is an advantage.
The main advantage of such wires is their reliability and durability compared to purchased options, where the resistance variation from new can often exceed the permissible values. But a new kit lasts for two years at best (why would a manufacturer sell eternal explosive wires in a situation where there are fewer and fewer cars with a common ignition unit), while for a foreign car the kit can cost far less than 800 rubles.
Signs of faulty armored wires of the VAZ 2114
The main signs of a malfunction of the VAZ 2114 armored wires are:
- Difficulty starting the engine;
- Unstable operation of the engine in idle mode;
- Increased hydrocarbon content in emissions;
- Radio interference, which can lead to malfunction of the multimedia system, electronic control unit and other devices
Therefore, in order to avoid lowering your ranking in search engines, a link to the source is required.
As a rule, when there is severe wear on the wire insulation, many microcracks appear, due to which current leakage occurs. As a result, the wire is not able to transmit to the spark plug a current that is sufficient in magnitude for its normal operation. This significantly increases the spark generation time and interferes with the correct operation of the engine cylinders.
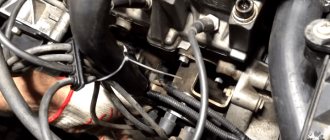
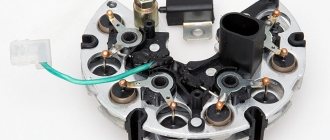
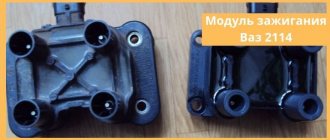
Location of the ignition module of the old VAZ 2114
Quite often there are cases when wires are damaged as a result of contact with any engine elements. Situations of loss of cap tightness are also possible, and as a result - oxidation of contacts and current leakage. Regular cleaning of contacts is a mandatory procedure, especially when operating a vehicle in difficult climatic conditions.
What else can I recommend?
In addition to the listed components, there are also such as Bautler, xopc.
Products from Bautler, which have proven themselves to be highly reliable and efficient among consumers
Bautler uses rubber for the insulating layer, which causes a slight thickening of the product, but allows the ignition parts to work in more difficult conditions.
We also can’t help but say something about xopc’s products. It has been present in the automotive market since 1995. Experts note that today xopc is one of the largest manufacturers of silicone cables in the Russian Federation. To manufacture its products, xopc uses imported raw materials. The production process is carefully controlled at all stages of production.
I would also like to say a few words about armored wires for car ignition systems. The first samples of such parts began to be used on vehicles intended for the Armed Forces. They were subjected to additional shielding with metal braiding to protect radio-electronic devices from interference. Currently, such armored wires can only be found on older cars. The achievements of the developers make it possible to produce armored wires without visible metal shielding.
In conclusion, I would like to recommend that car enthusiasts, if they need to replace armored wires or high-voltage wires, first of all follow the vehicle’s operating instructions. You can choose an elephant or another brand, but this should not be to the detriment of the power unit.
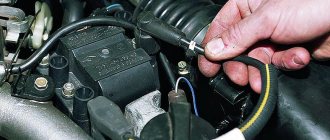
Checking high-voltage ignition wires with a multimeter on a VAZ 2114 - step-by-step instructions
Checking high-voltage ignition wires begins with a simple diagnosis, because all of the above symptoms of problems may indicate a breakdown of other parts of the engine system or something else. For a simple check it is better to wait until dark. Then you need to expose a small section of the wire on one side and the other and close one end to the body of the car or battery, and the second is needed for maneuver: we move it along the wiring joints, plugs, and so on. When there is a hole there will be a spark immediately. The result is obvious - replacement is required. But this method is primary; it concerns direct current leakage, which is not always the reason for the non-operating state of high-voltage devices. In the case of voltage, such a number will not work.
Checking the resistance of armored wires of a VAZ 2114 with a multimeter
To measure it, you need to know what resistance the high-voltage wires should have. After all, each wire from a specific manufacturer has its own resistance, technical characteristics and dimensions:
1) Tesla - 6 kOhm, it is often counterfeited, then you can squeeze out as much as 8 kOhm
2) Elephant - from 4 to 7 kOhm
3) ProSport tends to zero
4) Kargen - 0.9 kOhm
For measuring work, you need a simple multimeter, which we switch to ohmmeter mode. We measure one wire at a time, removing one by one from the cylinders from left to right and from the coil itself.
To check the high-voltage ignition wires on a VAZ 2114, you must do the following:
- Make sure the car is turned off
- Remove the end of the wire from the fastener on the cylinder
- Remove the opposite end from the ignition coil mounting
- You need to connect both ends to the multimeter
- Reading the readings
- Write them down so you don't forget
- We do this three more times with the remaining wires.
Checking the resistance of armored wires of a VAZ 2114 with a multimeter
Expert advice: Normal resistance is numbers in the range from 3.4 to 9.8 kOhm. Of course, all this depends on the manufacturer; this parameter is printed on the rubber skin of the wire. If you have a difference with the permissible value, which varies from 2 to 4 kOhm, this is normal. But no more! If more, then the wires are not suitable for driving, they need to be changed.
Functionality check
To accurately determine whether it is time to change the high-voltage wires of the VAZ, you need to check their performance with a multimeter.
This operation will take you no more than 15 minutes:
- Turn off the ignition;
- We remove the wires: disconnect the first end from the ignition module, the second from the cylinder;
- We switch the tester to ohmmeter mode and connect the multimeter probes to the wire contacts.
If the high-voltage wires on the VAZ 2114 are in normal technical condition, the multimeter will show a resistance within the value indicated on the wire insulation; if the readings are different, the armored wires on the VAZ 2114 need to be replaced. The process must be repeated on each wire in turn.
If the test shows disappointing results, there is a possibility that the problem of increased resistance lies in oxidized contacts. In this case, you can try to revive the VVP by wiping the contacts with VD-40 or carburetor cleaning fluid.
Also, the cause of problems with ignition can be a breakdown of the GDP. You can determine it visually in the dark - take a flashlight and open the hood of the fourteenth, find and inspect the armored wires, if you notice a slight spark on the insulation - the air intakes are broken and need to be replaced.
To avoid mixing up the wires, it is best to change them one at a time.
It is best to replace high-voltage wires as a set at once.
Disconnect one end of the wire from the spark plug.- Disconnect the second end of the wire from the ignition coil.
- Using a multimeter we measure the resistance of the wires.
- If the wire is in good condition, then the resistance on it will be in the range of 3.5-10 kOhm.
- We connect new wires to the spark plugs and coil. On the wire is the number of the cylinder to which it needs to be connected.
Features of choosing VVPZ for VAZ 2114
When choosing a GDP for a VAZ, it is necessary to take into account two key factors - their resistance and breakdown voltage. The lower the resistance, the better the electrical impulse will be transmitted, and the magnitude of the maximum breakdown voltage determines how resistant the high-voltage wires on the VAZ 2114 will be to breakdowns.
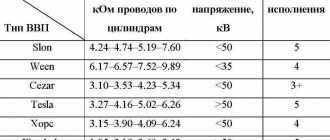
The resistance value of products from different manufacturers differs from each other. As an example, we give you the resistance of the most popular types of GDP:
| Manufacturer | Resistance on cylinder No. 1 (kOhm) | Resistance on cylinder No. 2 | Resistance on cylinder No. 3 | Resistance on cylinder No. 4 | Breakdown voltage (kV) |
| Tesla | 3.27 | 4.16 | 5.02 | 6.26 | 50 |
| Cezar | 3.1 | 3.53 | 4.23 | 5.34 | 50 |
| Finwhale | 1.95 | 2.18 | 2.6 | 3.42 | 50 |
| Ween | 6.17 | 6.57 | 7.52 | 9.89 | 35 |
| Slon | 4.24 | 4.74 | 5.19 | 7.6 | 50 |
Expert opinion: The products of the Czech company Tesla receive the largest number of positive reviews from the owners of the fourteenth. Their wires have optimal resistance and high breakdown voltage, and at the same time they are truly made to last - they do not tan or crack.
The cost of the Tesla GDP set is about 500 rubles, Cezar – 450 rubles, Ween – 270 rubles, Finwhale – 600 rubles, Slon – 500 rubles.
GENERAL INFORMATION AND FEATURES OF GDP DESIGN
Unlike the rest of the car's wiring, high-voltage ignition wires have a rather complex design. They consist of plastic caps, metal contacts, an insulating layer and a copper conductor.
GDP insulation can be either single-layer or multi-layer, depending on the quality and cost of the wire. As a rule, all products from leading manufacturers have multi-layer insulation. The protective layer of GDP performs two main functions:
- Acts as a barrier that prevents current leakage;
- Performs the function of protecting the conductor from mechanical damage and aggressive environmental influences: fumes, fuels and lubricants, moisture, low and high temperatures.
The conductive core of the GDP is made of copper, since this material has minimal resistance and durability (about 8 years of operation). The conductive element of the GDP, according to GOST 14867-79, must meet the following requirements:
- Limit permissible voltage – 22 kV;
- Minimum breakdown voltage – 40 kV;
- Maximum electrical capacity – 100 pF/m;
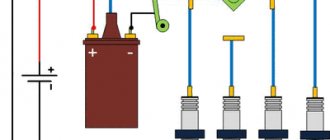
At both ends of the wire there are metal tips that act as contacts, through which the VVP are connected to the coil and spark plugs.
Various types of explosive wire lugs
When purchasing, it is worth checking the high-voltage wires for the quality of the connection between the contacts and the core; it is necessary that they are firmly attached to the core and tightly connected to the spark plugs, since the lack of normal contact is one of the most common problems with VVP.
Plastic caps perform a protective function. They prevent moisture and dust from entering the contacts, and protect them from changes in ambient temperature.
Replacement and connection of high-voltage ignition wires of a VAZ 2114
Important to know: Incorrect installation and location of high-voltage wires can lead to sparks jumping from wire to wire or to ground, which, in turn, can lead to misfires and a decrease in the crankshaft speed when the car is moving at high speed.
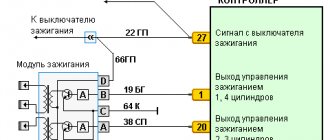
The order of connecting high-voltage wires must be strictly sequential, since each cylinder of the engine corresponds to a specific socket on the ignition module. Considering that there is a numbering of the sockets on the ignition module body, the risk of confusing anything is minimal.
Connecting armored wires to the ignition module of a VAZ 2114
The procedure for connecting high-voltage wires of the VAZ 2114 injection type depends on the year of manufacture of your car. Fourteen cars before 2004 had 4-pin ignition modules installed, and cars after 2004 had 3-pin coils.
Installing an electronic BSZ instead of a contact one
Today it is very rare to find a “seven” with contact ignition. With the arrival on sale of switches, distributors and coils for electronic spark generation systems, owners of classics began to massively re-equip their cars.
What is included in the BSZ kit
The process of converting a contact system into an electronic one is quite simple, and also inexpensive. The cost of an electronic ignition kit for a VAZ 2107 is about 2,500 rubles. It includes:
- transistor switch type 3620.3734 with connector;
- coil 27.3705;
- contactless distributor type 38.3706;
- connecting wires.
In addition, you will need spark plugs (preferably new ones) with a gap of 0.7–0.8 mm and a set of high voltage wires. Coil type B-117A (used in a contactless system) is not suitable for electronic ignition. Its characteristics do not correspond to those of other equipment in the circuit.
Video: review of BSZ elements for “classics”
Required Tools
To complete the work you will need:
- 8, 10 and 13 mm wrenches;
- screwdriver with a Phillips blade;
- drill;
- spark plug key;
- 36 mm wrench or with a ratchet mechanism for turning the crankshaft;
- self-tapping screws;
- pliers.
- Disconnect the terminals from the battery. We remove the battery and put it aside.
- Remove the high voltage caps from the distributor cap and from the spark plugs.
- Using a special wrench, unscrew all the spark plugs. We screw new ones in their place.
- Using a drill, drill holes on the left mudguard or on the engine shield to mount the switch.
- We attach the switch to the car body using self-tapping screws.
- Remove the distributor cap.
- We rotate the crankshaft, placing a wrench on the nut securing its pulley, until the distributor runner is aimed at the spark plug of the first cylinder, and the mark on the pulley points to the middle ebb on the timing cover.
- Using a 13 mm wrench, loosen the distributor mounting nut.
- Remove the vacuum hose from the distributor and disconnect all wires.
- We remove the old distributor from its seat.
- Remove the cover from the new distributor.
- Trying it on in place of the old one, we rotate the slider by hand until it is directed towards the first cylinder.
- We install a new distributor, tighten the nut, but do not tighten it completely.
- We connect the wire connectors and the vacuum regulator hose to the new distributor.
- We dismantle the old ignition coil by unscrewing the nuts securing it with a 13 mm wrench. We disconnect all wires from it.
- We install the new coil in place.
- We connect the connector with the wiring harness to the switch.
- We clean the ends of the wires. We install the chain:
- We securely attach the black wire from the switch to ground using a self-tapping screw or screw;
- connect the red wire to terminal “K” on the coil. We also attach the brown wire from the tachometer here;
- connect the blue wire from the switch and the blue wire with a black stripe to the “+B” terminal on the coil.
- We install the distributor cover and secure it. We connect new high-voltage wires to the cover and spark plugs.
- Let's try to start the engine. If it works, then everything was done correctly. Otherwise, we check the ignition circuit and the reliability of the connection of its elements.
Service life of high-voltage ignition wires on VAZ family cars
According to the recommendations of Auto VAZ, replacement of high-voltage wires of the VAZ 2114 should be done every 30 thousand kilometers. In practice, motorists rarely comply with these replacement deadlines, since if the wires do not have any mechanical damage, they can travel about 100-150 thousand km.
Numbering of connection of armored wires to the ignition module of VAZ 2114
When the service life is exceeded, the internal resistance of the GDP increases, which negatively affects the transmission of the electrical impulse. This leads to problems with ignition and acceleration dynamics, since when the supply of current to the spark plugs is delayed, the normal engine operating cycle is disrupted.
When do you need to replace high voltage wires?
Most cars do not indicate routine replacement of explosive wires. But there are several main signs that indicate that there are problems in the operation of the ignition system and the wires are to blame:
- The car started to have difficulty starting, this happens especially often in rain, fog or simply damp weather.
- When the engine reaches medium or high speeds, it begins to work intermittently.
- If the center wire is damaged, the engine simply stalls.
- The engine power is significantly reduced, it becomes dull, and accelerates poorly.
- Gasoline consumption increases, sometimes by 30-50%.
- After starting the engine, the Check Engine light remains on.
All of these signs indicate that high voltage wires may have broken through and should be replaced. This happens because the insulation dries out over time and becomes outdated, cracking due to high humidity and temperature changes. In this case, it is better to check the explosive wires with a multimeter to assess their resistance.
Another reason for the problem is oxidation of contacts. This occurs at the junction of the spark plugs and the high voltage unit. If it is not possible to check the high-voltage wires with a tester, you can attach the tip at a short distance from the metal parts of the engine and turn on the ignition. The quality of the spark can be used to assess the condition of the wire. An important parameter is the resistance of armored wires, which can only be assessed using special equipment.
Seal
Types of damage and causes of their occurrence
One of the most common flaws occurs when a conductor is broken, i.e., it has ruptured. It is usually located where the metal tips of the explosives contact the coil, or at the junction with the spark plugs. As a result, an unnecessary spark is formed in the problem area - an electrical discharge that creates a parasitic electromagnetic pulse and reduces the voltage. It is he who is responsible for malfunctions in the car’s electronics: sensors and ECUs. The main causes of wire damage:
- careless handling of explosives in severe frost (cables become rigid and can easily break);
- too frequent removal and installation of high-voltage wires, especially if they are of low quality.
Another common malfunction is a break (complete or partial) in the electrical circuit. As a result, insufficient voltage is supplied to the electrode, or there is no voltage at all. This can be determined by the carbon deposits of the candle, which will be black and wet. Other causes and malfunctions:
- Electricity leakage is usually associated with a dirty ignition coil, distributor cap (module), as well as broken caps, which in this case lose their dielectric properties.
- The lack of sufficient voltage may be due to thermal damage to the spark plug caps located closer than the other ignition elements to the hot engine. However, this reason for the malfunction of explosives is usually caused by their low quality.
- Deterioration of electrical contact can occur due to constant vibration of the engine, as a result of which the connecting points become loose.
- A long service life affects the condition of the insulating layer, which gradually cracks due to high temperature, oil vapors, gasoline, antifreeze and ceases to fulfill its main function - to prevent current leakage. The insulation can also be damaged due to exceeding the maximum permissible voltage level produced by the ignition coil (if its primary winding is broken). When the cracks reach the conductive core, a breakdown to ground occurs, as a result of which the high-voltage pulse does not reach the spark plug.
Error codes
When diagnosing a car at a service station or if you have the appropriate equipment, you can determine some malfunctions of the ignition module.
There are several codes that will be very useful for you:
- If the coil of cylinders 1 and 4 breaks, the device will display error P0351;
- If there is a break on cylinders 2 and 3, the error code will be P0352;
- Code P3000-3004 indicates multiple misfires.
It would be a good idea to fully check the ignition module. The simplest diagnostics involves measuring the resistance between wiring of cylinders 1 and 4 and cylinders 2 and 3 with a multimeter. First switch the device to ohmmeter mode. If the indicator was 5.5 units. then everything is fine with your module.
Although there are three more ways to check:
- Check the wiring harness. Disconnect it and check with a voltmeter. The probe is directed to contact A, and the second to engine ground. Start the engine and check the indicators. A good indicator is about 12V. If there is no voltage, the coil may be faulty.
- Examine the condition of the high-voltage wires with an ohmmeter. If the high-voltage circuits are installed incorrectly, the module will simply burn out.
- Pull the block with the wires a little and tap on it. Contacts should not be lost in this case. If the opposite happens, this indicates bad contacts that can completely break off at the most inopportune moment in the very near future.