Payment for goods and downloading of the book in electronic form (PDF format) is made on the website.
To do this, you need to find the book you are interested in and click on the “Buy” button. The price of the book is indicated on the button.
For convenience, the price on the website for residents of Russia, Belarus and Kazakhstan is presented in rubles.
For residents of Ukraine in hryvnias, and for all other countries - dollars.
After clicking on the “BUY” button, a payment window will open where you can select a payment system with which you can pay for the selected book using any bank card (Visa, MasterCard, MIR, etc.)
When you click on the “Pay by bank card” button, the Portmone payment system will open, which is the easiest way to make a payment.
In addition, the website offers four payment systems for payment:
- Yandex (payment from any bank cards, Yandex Money account, QIWI Wallet, terminals, etc.);
- Portmone (payment from any bank cards, Portmone account);
- PayPal (payment from any bank cards, PayPal account);
- WebMoney (payment from any bank cards, payment from WebMoney wallets).
Payment via Yandex Cashier
After selecting payment via Yandex, the Yandex Cashier payment system will launch, where you need to select a convenient payment method (bank card, QIWI, Yandex Money account, etc.)
After specifying payment details and confirming payment, payment for the goods will occur.
If you have a bank card in a currency other than the ruble, then the money will be debited from the card at the rate of the Central Bank of Russia at the time of the purchase.
This payment method is optimal for residents of Russia, Kazakhstan and Belarus.
Official website of the Yandex Kassa payment system https://kassa.yandex.ru
Diagram VAZ 2112 injector 16 valves for Euro-2
1 — spark plugs; 2 — injectors; 3 — ignition module; 4 - ECU VAZ 2112; 5; main relay; 6 - fuse connected to the main relay; 7 — electric fan relay; 8 - fuse connected to the electric fan of the cooling structure; 9 — electric fuel pump relay; 10 - fuses, connected to the electric fuel pump relay; 11 — mass flow and air temperature sensor; 12 — TPS; 13 — DTOZH; 14 — electromagnetic throttle for purge of the adsorber; 15 — lambda probe; 16 - DD; 17 — DPKV; 18 — empty speed regulator; 19 — VAZ 2112 immobilizer computer; 20 — immobilizer status indicator; 21 — phase sensor; 22 — car speed meter; 23 — gasoline pump module with fuel level meter; 24 — oil pressure control sensor; 25 - coolant heat indicator meter; A - terminal connected to the ABS cabin group harness; B - diagnostic connector; B - terminal block connected to the air conditioner wiring harness; G - to the plus terminal of the battery; D - to the terminal block of the side door wiring harness; E - terminal block connected to the instrument panel wiring harness; G1, G2 - ground points; I - the order of conditional numbering of the terminals in the wiring block of the immobilizer computer; II - the order of conditional numbering of terminals in the diagnostic connector.
Scheme VAZ 2112 injector 16 valves for Euro-2 with controller M7.9.7
Payment via Portmone
After selecting payment through Portmone, the payment system will launch, where you need to select the payment method: bank card or Portmone account.
The price in the Portmone payment system is converted into dollars at the exchange rate of the Central Bank of the country where you are located.
If you have a bank card in a currency other than the dollar, then the money will be debited from the card at the rate of the Central Bank of your country at the time of the purchase.
After specifying payment details and confirming payment, payment for the goods will occur.
Official website of the Portmone payment system https://www.portmone.com
Diagram VAZ 2112 injector 16 valves for Euro-3
| 1 — spark plugs; 2 — injectors; 3 — ignition module; 4 — VAZ 2112 computer; 5 — main switch; 6 - fuse connected to the main relay; 7 — relay of the electric fan of the cooling system; 8 - fuse connected to the electric fan of the cooling structure; 9 — electric gasoline pump relay; 10 - fuse connected to the relay with an electric gasoline pump; 11 — air mass flow and heat meter; 12 — rough road meter; 13 — TPS; 14 — DTOZH; 15 — idle control; 16 — control lambda probe; 17 - diagnostic lambda probe; 18 — electromagnetic throttle for purge of the adsorber; 19 — DD VAZ 2112; 20 — DPKV; 21 — immobilizer computer; 22 — immobilizer status indicator; 23 - DPRV; 24 — car speed meter; 25 — electric gasoline pump module with gasoline level meters; 26 — oil pressure warning light sensor; 27 — antifreeze heat indicator meter; A - terminal block connected to the ABS cabin group; B — diagnostic block; B - connector connected to the air conditioner wiring harness; G- to the “+” terminal of the electricity storage device; D — to the side door wiring harness connector; E - connector attached to the instrument panel wiring harness; G1, G2 - minus points; I - method of numbering contacts in the ECU wire connector by the immobilizer; II - method of conditional numbering of contacts in the diagnostic connector |
Diagram VAZ 2112 injector 16 valves for Euro-3 with controller M7.9.7
Payment via PayPal
After selecting payment via PayPal, the PayPal payment system will launch, where you need to select the payment method: bank card or PayPal account.
If you already have a PayPal account, then you need to log into it and make a payment.
If you do not have a PayPal account and you want to pay using a bank card via PayPal, you need to click on the “Create an Account” button - shown with an arrow in the picture.
PayPal will then prompt you to select your country and provide your credit card information.
After specifying the information required to make the payment, you must click on the “Pay Now” button.
Official website of the PayPal payment system https://www.paypal.com
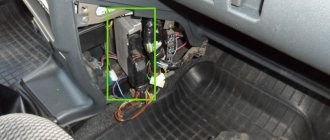
Central locking diagram
The image shows 4 actuators. Also, control unit 3 has a special designation. It is noted that actuator 7 is located in the door on the driver’s side.
This scheme may also seem elementary to the master, but there is a significant fact that is not always taken into account by the creators of the notation. The white cord in the image marks the process of opening the lock, the brown one, in turn, closes the system.
Payment via WebMoney
After selecting payment via WebMoney, the payment system will launch, where you need to select the payment method: bank card or WebMoney wallet.
If you already have a WebMoney wallet, then you need to log into it and make a payment.
If you do not have a WebMoney wallet and you want to pay in another way, you need to select any of the methods that WebMoney offers and make the payment
After specifying payment details and confirming payment, payment for the goods will occur.
Official website of the WebMoney payment system https://www.webmoney.ru/
Downloading a book
After successfully completing the payment (by any method) and returning to the KrutilVertel store from the payment system website, you will be taken to the successful payment page:
On this page you need to indicate your e-mail, where access to download the book will be sent.
If you are already registered on our website, then simply follow the link to your personal account.
The book you purchased will be in your personal account, from where you can always download it.
Please note that after making the payment, you need to return back from the payment system website to the KrutilVertel website.
If for some reason you did not return back to the site and closed the payment system tab with a message about the successful completion of the payment, please let us know - we will send you a letter indicating access to download the book.
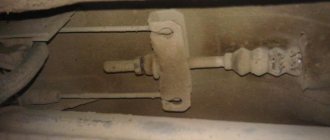
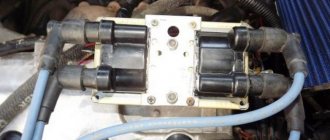
How to check the ignition coil of a VAZ
If the ignition coil is faulty, the engine will not start. A characteristic sign of a faulty coil is its increased temperature when the ignition is turned off. This is easy to determine by touch.
Signs of a faulty ignition module may include the following:
- hesitant engine starting or failure to start;
- failures during sudden changes in speed;
- high fuel consumption;
- two cylinders do not work, the engine is feverish;
- lack of dynamics;
- a sharp drop in power;
- drop in power and thrust after warming up.
These symptoms may not only be caused by the ignition module. To determine the malfunction, it is enough to spend a few minutes diagnosing spark plugs, high-voltage wires and caps. This will eliminate the remaining elements of the ignition system and make sure that it is the ignition module that is faulty.
Checking the ignition coil is performed in one of 2 ways. The simplest one is to remove the central wire from the breaker-distributor, bring it to the motor housing and turn it with the starter, and a running spark should appear. After this, we check the energy supply to a separate spark plug, for which we unscrew the working spark plug, bring its contact to ground and attempt to start the engine. In this case, the spark should come from the wire to ground. If it is absent, the reason will be a malfunction of a system element such as the ignition coil.
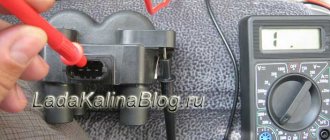
To check the module in the second way, we only need a multimeter, then follow the step-by-step instructions:
- We check the power supply and the presence of pulses supplied from the ECU. We check the power between the central terminal (15) of the wire block connected to the module and the engine ground. When the ignition is on, the voltage should not be less than 12 V. Otherwise, either the battery is dead or the ECU does not work.
- We check the pulses from the ECU on the wiring block. We install one tester probe on connector 15, the second on the far right, then on the far left. The assistant cranks the engine with the starter, and at this time we record short-term voltage surges with a tester. If there are no impulses from the ECU, it is he who is to blame.
- We check the resistance on the secondary windings of the coils. We put the tester in resistance measurement mode and measure it at the high-voltage terminals of the module cover. Between pins 1 and 4 and pins 2-3, the resistance should be 5.4 kOhm. Otherwise, the module must be replaced.
- We check the resistance of the primary windings between contacts 15 and the rightmost, then the leftmost terminals. Nominal - 0.5 Ohm. Deviation is not allowed.
- Check the module for a short circuit. In ohmmeter mode, install one multimeter probe on the central terminal, the second on the metal body. There shouldn't be any resistance. If the device detects at least some resistance (other than unity or infinity), the module must be replaced.
Problems when paying with bank cards
Sometimes difficulties may arise when paying with Visa/MasterCard bank cards. The most common of them:
- There is a restriction on the card for paying for online purchases
- A plastic card is not intended for making payments online.
- The plastic card is not activated for making payments online.
- There are not enough funds on the plastic card.
In order to solve these problems, you need to call or write to the technical support of the bank where you are served. Bank specialists will help you resolve them and make payments.
That's basically it. The entire process of paying for a book in PDF format on car repair on our website takes 1-2 minutes.
If you still have any questions, you can ask them using the feedback form, or write us an email at [email protected]
Video on repairing KZ VAZ
There were no prerequisites for replacement. The original coil worked fine, well, almost normal. I didn’t like that the car was adjusting under constant load. Therefore, I decided to conduct an experiment on replacing the coil with something larger and more interesting. I looked at Oleg reekardo’s blog about replacing the coil and decided to go the same route, but make it a little more complicated. Without thoroughly reading the entry (and it says to buy a coil, not an ignition module from a VAZ), I went and first bought an ignition module and a connector for it. The same module was in my Niva.
I started connecting it, but it didn’t work—the car wouldn’t start. I built a mini test bench (4 spark plugs, wires and battery). The stand showed that the module was working. (And it was written to take a coil, not a module) I went and replaced the module with a coil (I also got the difference in price in my pocket 
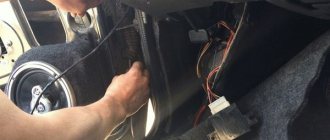
Then it's easier. I found the necessary connection points and checked the operation. Then I soldered the wires to the original wiring. The original connector was wrapped with electrical tape. I mounted the module diagonally on the standard plate, just removed the wire fastening to the knock sensor and screwed the bolt into the vacant hole.