How to remove the starter on a VAZ 2108, 2109, 21099?
Let's remove the starter from a VAZ 2108, 2109, 21099 car with a carburetor engine.
When carrying out the work, we will take into account some of its features, knowing which we can carry out such removal quickly and efficiently.
Required Tools
— Socket wrench “13” (or a head of the same size with a knob)
Preparatory work
— Place the car on a level surface and secure it
— Disconnect the negative terminal from the battery
How to remove the starter on a VAZ 2108, 2109, 21099?
— Disconnect the electrical wires from the starter
On VAZ 2108, 2109, 21099 cars, two wires are connected to the starter. One thick one is the power one, fastened with a nut and washer on the contact bolt of the traction (pull-in) relay, the other thin one is attached with a chip to the winding terminal of the same relay. Therefore, we pull the chip off the terminal and disconnect the thin wire. Using a “13” wrench, unscrew the nut securing the end of the thick wire to the relay contact bolt and remove the nut, the washer underneath it and the wire end from it. We take the disconnected wires to the side.
— Unscrew the starter mounting nuts
There are three of them in total. One on top, one on the side, one on the bottom. On VAZ 2108, 2109, 21099 with a carburetor engine, access to the top and side nuts from the engine compartment is more or less normal. They can be unscrewed using a short 13mm wrench or a ratchet head.
The bottom nut is more difficult. You will have to unscrew it by touch, which is not always possible. If this does not work, you will have to use a combined approach to removing the starter (see below - Notes and additions).
— Remove the starter
We slide it back along the studs and pull it into the space next to the battery.
The starter has all been removed. Installation is carried out in reverse order.
Notes and additions
The instructions given above describe the method for removing the starter from the top (through the engine compartment). If for some reason it is not possible to use it (for example, the lower mounting nut of the starter cannot be unscrewed), then a combined approach can be used.
It is more labor-intensive, but greatly facilitates removal since it provides full access to the lower fastening nut. To implement such a combined approach, you will have to install the car on a pit or lift, remove the engine protection and its mudguards. Then from below, with ease. Unscrew the lower starter mounting nut. The remaining two nuts are easier to unscrew from the engine compartment.
Many car owners secure the starter with only two nuts (top and side). This makes it easier to dismantle it if something happens. But with such fastening there is a risk of destruction of the mounting holes in the starter housing. Due to the fact that in this case the load on them during its operation increases.
Source
General tips for connecting high-voltage wires.
Checking high-voltage wires. To check the wires, you will need a multimeter tester. Check the resistance of the wires - it should be no more than 20 KOhms (in practice, the longest wire of cylinder 1 has a resistance of up to 10 KOhms). If the wire resistance is more than 20 Kom, it must be replaced. Carefully inspect the wires for chafing on parts of the motor or other wires. In case of significant abrasion, replace the wire. In case of minor abrasion, it is possible to lay the wire so that it does not rub and fix it in this position.
Laying wires. Do not try to connect the wires in a bundle. Disassemble the wiring harnesses, release the wires from the plastic holders. Connect the high-voltage leads to the corresponding cylinder spark plugs. Lay the wires so that they do not rub against each other, engine parts, or hoses. Avoid sharp bends and tension on the wires. After connecting all the wires, secure them into the bundle with special comb holders included in the delivery kit.
The procedure for connecting I/O wires to a VAZ carburetor (2108, 2109, 21099)
The central wire from the distributor cover always goes to the ignition coil (bobbin).
The outlet of the distributor cover, which faces towards the front of the car, is connected to the first cylinder.
The outlet of the distributor cap, looking down, is connected to the third cylinder.
The outlet of the distributor cap, looking rearward, is connected to the fourth cylinder.
The outlet of the distributor cap, looking up, is connected to the second cylinder.
The procedure for connecting high-voltage wires to a VAZ Classic, Niva with a carburetor and distributor.
Central wire from the ignition coil (bobbin)
1 cylinder - above the vacuum corrector. Next, clockwise, the order is 1-3-4-2.
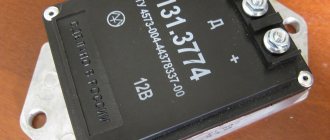
Injection VAZ produced before 2004 with an old-style ignition module (4-pin low-voltage connector)
Actually, on the module body it is already indicated which cylinder the pins correspond to - but we duplicated them in red in case the module gets completely dirty, and you might not be able to see it in the photo.
Injection VAZ produced after 2004 with a new ignition coil (3-pin low-voltage connector)
As with the old-style ignition modules, the new coils are also marked with pins corresponding to the cylinders. But the connection order is different from the order on the old-style ignition module. Be careful!!!
A common problem with starting and stable operation of a car engine occurs due to improper gap between the spark plug electrodes. This problem is aggravated by the fact that today many manufacturers of such components claim that there is no need to adjust the VAZ 2109 spark plug gap (and indeed the gap in any spark plugs). As facts and numerous examples show, this is a categorically false statement. In modern conditions, any car owner needs to know how to check the serviceability of spark plugs and adjust the gap with their own hands.
Instructions for replacing the starter
The starter on a VAZ 2109-2108 car can last for quite a long time even without basic repairs, and there are many cases when it has been maintained for more than 200,000 km without a single problem. Of course, now there are not many high-quality spare parts and one has to dream of such a resource. If this is your first time replacing the starter on your own, the instructions below will help you do it as quickly and conveniently as possible. If it doesn’t work out either on your own or jointly, then there is always the option of changing the car. If you are interested in urgent car purchase , then there will be those who really need your car. Well, for now, in order.
So, first of all, it’s worth talking about the necessary tools to perform this repair:
- 13 open-end or socket wrench
- Head for 13
- Ratchet handle
After this, take a 13mm wrench and unscrew the nut securing the terminal from the contact terminal on the starter solenoid relay, as is clearly demonstrated in the photo below:
And after that we take the wire to the side:
You also need to pull off another positive wire - which is thinner and red:
Now all that remains is to unscrew three or two starter mounting nuts. Two are at the top on either side, as seen in the photo below:
And the third one is at the bottom and it’s most convenient to get to it from underneath (with the engine protection removed):
Next, you can carefully remove the starter from the studs without sudden movements and move it to the side:
And finally remove it from the car, since nothing else holds it:
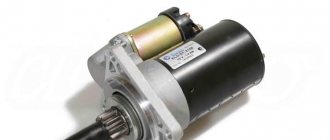
If replacement is necessary, we buy a new starter at a price of 2000 to 3500 rubles. They differ primarily in their design: the more expensive geared one, as a rule, is superior in all respects to conventional devices, but you will have to pay almost twice as much for it! We carry out the installation in reverse order.
Source
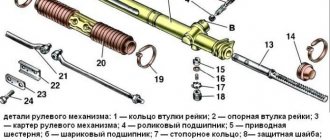
What exactly is making noise and why?
Let's try to understand this issue. The main causes of noise coming from the gearbox are:
- improper operation of the gearbox, in particular the use of counterfeit transmission fluid purchased on the black market and operation of a vehicle with a non-working clutch;
- poor quality of gearbox components;
- maximum service life of manual transmission;
- unskilled technical work on diagnostics and repair of gearboxes.
In addition, the main malfunctions that can result in noise in the gearbox are:
- sudden difficulty switching on speed: in order to engage one or another gear, the driver will sometimes need to move the gearbox lever several times to the neutral position with the clutch depressed;
- The box automatically switches off the car’s gear while driving;
- Transmission fluid may leak from the gearbox.
It should also be noted that the VAZ 2109 gearbox can make noise in various conditions: at neutral speed, while shifting gears, or simply while driving at a certain speed. And each of these noises can indicate a different malfunction of the box.
In addition, during diagnostics, one must not forget that only one external sign may indicate several malfunctions in the gearbox. Therefore, it is virtually impossible to visually (i.e., by the type of hum) calculate which component of the box has failed. The damage can only be determined by removing and disassembling the box.
It is also necessary to add that repairing a transmission and eliminating defects requires a lot of knowledge, so it is better not to do this at home. The gearbox is an important unit in the structure of any vehicle, so it is better to entrust its repair and diagnostics to a qualified specialist.
Often the hum of the unit manifests itself:
- when you press the clutch;
- when turning on the third and fourth speeds;
- at neutral speed;
- when driving a car at high speeds.
Most domestic VAZ 2109 car owners face such problems. But if when you press the clutch, extraneous sounds disappear, then this may indicate several breakdowns. In particular, the fifth speed or reverse gear may fail. In addition, the input shaft bearing or release bearing may be faulty.
As practice shows, in the case of bearings the problem is not critical. If noise appeared in your car and then disappeared after several hundred or thousand kilometers, then most likely the remaining bearings were simply ground up by the unit system.
If your VAZ 2109 starts making noise, this does not mean that the bearings or reverse gear have failed. These problems are the most common, but only high-quality diagnostics can specifically determine what has gone wrong.
Replacing the starter on VAZ 2108, VAZ 2109, VAZ 21099
Welcome! The starter - it is only needed to start the car, then when the engine is running it is already turned off (its bendix with the gear goes back and thereby disengages from the flywheel), now we will explain everything to you, if you don’t understand, you already know that is a flywheel? This is a part that is installed at the end of the crankshaft (it is fixed directly at the tip), the flywheel spins along its axis if you start the car’s engine (the crankshaft also spins with it, and thanks to it, the flywheel spins if the crankshaft stands still, then you can’t move the flywheel in any way), and the starter is inserted with its front part (Mask) inside this very flywheel and when you start to start the engine of the car, the bendix with the gear engages in the flywheel standing still (There the starter gear comes into contact with the teeth flywheel), after entering the starter, current flows and the starter gear begins to rotate (gear rotation speed is 250 crankshaft revolutions per minute, respectively 4 revolutions per second), thereby (the starter gear engages with the flywheel) and the flywheel also begins to rotate, Well, together with the flywheel, the crankshaft rotates thanks to which the car’s engine starts, and when you remove your hand from the ignition key, it is pulled back with the help of a spring and thereby the bendix at the starter also returns to its place (the gear disengages with the flywheel), and this is how the car starts.
How to replace the starter on a VAZ 2108-VAZ 21099?
Removal: 1) At the beginning of the operation, you will have to remove the negative terminal from the car battery and this must be done in order to cut off the power supply to the starter. If you do not know how to remove the terminal correctly, then in this case, read the article : “Replacing the battery in a car”, you will need to familiarize yourself with the first point in this article.
2) Now everything is simple, think from which part of the car it will be easiest for you to remove the starter itself from the car (Top or bottom), we will give you advice, in principle, if you have a carburetor engine and there is no inspection hole nearby, then you can remove it from above, as for injectors, there you can also do it from above, but in addition you will have to remove the air filter housing (it can be difficult to put it back in place, for detailed instructions on how to remove this housing, refer to the article on our website entitled: “Replacing the air filter housing on a VAZ”) , but with regards to the lower part of the car, if you decide from below, then firstly it will be much more convenient for you to remove it and, most importantly, unscrew the lower bolt without any problems (from above, by the way, you most likely won’t even unscrew the lower bolt without a special tool, so you’d rather In total, you will need to 100% crawl under the car), but you will also have to remove several parts from below, namely, if you have a crankcase protection, then remove it immediately (All cars were not equipped with protection from the factory, so you may have it either way or not to be, but a mudguard protecting the engine from pollution has always been installed, you will need to remove it from the car; read “in this article” for how to remove it).
Typical faults
It is better to start diagnosing the starter even before you remove it.
After dismantling, some signs of failure, by which the source of the problems can be determined, can no longer be determined.
Signs of a faulty element include:
- An unusual noise occurs when the engine starts;
- Complete absence or slow rotation of the starter;
- Rotation occurs, but there is no gear engagement with the Bendix ring;
- The unit rotates with the bendix, but then the clutch breaks;
- Turning the key in the ignition, there is silence.
Checking the dismantled unit
Before blaming the starter for everything, take the time to look under the hood and check the condition of the terminal contacts and connectors. Also pay attention to whether everything is ok with the battery. Only after this can you start working on the starter.
VAZ 2109 starter: how to repair it yourself
Today we will try to look at the VAZ 2109 starter from all sides, but we will pay special attention to repair and maintenance. It is quite possible that the battery in the car is fully charged, the contacts are perfect, without oxidation or damage, and clicking sounds are heard when you turn the key. And the rotor turns with difficulty, as if something is stopping it. If such symptoms appear, then you can judge that the starter is faulty. It needs to be disassembled and overhauled.
How to remove the VAZ 2109 starter
It should immediately be mentioned that the original VAZ 2109 starter can be easily repaired; there are special kits for it. But there are non-original mechanisms that cannot be restored - if the brushes are worn out, it will be easier to install a new starter than to repair it. The fact is that brushes can only be soldered or welded. And soldering, for example, worsens the reliability of the entire device. As for the original ones, installed at the factory, their price is higher, but the number of repairs can be unlimited.
To remove the VAZ 2109 starter, you will need to perform a few simple manipulations:
- Open the hood and disconnect the negative terminal from the battery.
- If the engine has a carburetor and not an injector, then you are somewhat lucky; you have good access to the starter. If there is an injector, you will need to remove the air filter housing.
- Now, using a key set to “13”, unscrew the nut from the solenoid relay and move both wires to the side.
- Using the same wrench, unscrew the three starter mounting nuts.
Please note that all procedures can be carried out from below the car, but you will have to completely dismantle the protection (if there is one, of course). You need to pull the entire unit through the top or bottom, depending on the chosen strategy.
Diagnostics
To carry out diagnostics, arm yourself with a conventional tester with voltmeter mode.
- Connect the battery terminals to the poles of your measuring device. You will need an assistant to drive.
- After connecting the terminals to the voltmeter, look at the readings of the device. If the battery is working properly, the data will be 11-13 V.
- Turn the ignition key and at this moment measure the voltage. If the losses are only 1-2 Volts, then the starter works normally and does not show resistance.
- If the voltmeter parameters decrease by 2 times or more, the reason is in the starter. Or rather its bushings or brushes.
- Remove the starter and check the relay. Connect the battery terminals to its terminals on the body and transfer it to 12 V. If the overrunning clutch moves in the front cover, then the relay works perfectly. If not, replace it.
Well, the check showed that the starter needs to be repaired. Therefore, the first thing we do is dismantle it.
- Secure the car stationary by turning on the handbrake and placing stoppers under the wheels.
- Move the negative terminal from the battery to the side. This will deprive your car of power.
- Disconnect the wire connector from the starter solenoid relay terminal.
- Unscrew the fastening nut from the relay contact bolt and remove the wire.
- If there is a crankcase guard, remove it. Here all the bolts are simply unscrewed.
- The 2 starter fixing nuts are unscrewed from the bottom of the engine compartment. But the third one is more conveniently removed from inside the engine compartment.
- Having removed the fasteners and disconnected the wiring, you can safely remove your starter from the clutch housing.
Before starting work, be sure to clean the device from accumulated dirt so that it does not get inside the structure and reduce all repair efforts to nothing.
Next, you have to check the condition one by one and take appropriate measures to eliminate problems with the following components of the starter:
Now let's talk about everything one by one.
First, assess the current condition of the brushes. In most cases, they are the source of problems with the starter.
- Remove the pair of screws that hold the protective cover in place. The cover is now easy to remove.
- Use a screwdriver to remove the retaining ring from the shaft, and don’t forget about the adjusting washers.
- Unscrew 2 more tie rod nuts. Remove the manifold side cover.
- Use a screwdriver to press out the springs and remove the brushes from the holder.
- Measure the brushes with a caliper or ruler. If the height is less than 12 millimeters, the brushes must be replaced.
- It is also better to replace elements if there are chips, cracks and other defects on the surface.
Brushes
If all is well with the brushes, the next suspect is the anchor.
- Remove the housing with the starter.
- At the anchor, look at the condition of the commutator, check whether the winding is intact.
- If there is carbon deposits on the collector or signs of breakdown, clean these areas with fine sandpaper.
- Check the armature and stator windings using a multimeter in ohmmeter mode.
Overrunning clutch
Parallel checking of the overrunning clutch with the armature will allow you to replace the latter at the same time.
To gain access to the clutch you will have to remove the armature from the front cover. At the same time, change it if necessary.
- Remove the retaining ring located near the overrunning clutch.
- Remove the restrictor ring.
- Remove the plastic lever stop, which will allow you to reach the anchor.
- Remove the intermediate support from the shaft.
- Check the condition of the gear teeth. If there are defects, the unit is replaced with a new one.
Bendix or overrunning clutch
Traction relay
Replacing the traction relay is necessary if, when voltage is applied to its terminals, the overrunning clutch does not extend. Sometimes the VAZ 2109 is equipped with collapsible relays. But it’s still better not to repair it, but to replace it with a new relay.
- To remove the relay, unscrew the two screws located on the front;
- Lift the relay, disconnect the armature from the lever;
- Remove the relay from the housing, grabbing the spring and armature. All elements are changed if necessary.
Excessive wear on the bushings often impairs the performance of the starter. This is due to the material from which they are made - brass, bronze or copper. Contact with stronger metal causes wear.
Bushings
- In the case of the VAZ 2109 starter, we have one bushing located in the rear cover, as well as a second one, which you will find in the clutch housing.
- The presence of defects can be determined visually. If the elements have chips, cracks, burrs, or other defects, this indicates wear.
- Try moving the starter shaft transversely. If there is noticeable play, the starter bushings are worn out and need to be replaced.
- When planning to replace the rear bushing, it is recommended to simultaneously change the cover itself.
- The front bushing is removed from the crankcase using a tap of the required size. Tighten the tap like a thread, and resting it against the bottom of the hole, the sleeve will gradually begin to move out of its place.
- Before installing a new bushing, treat the inner surface of the seat with engine oil.
When putting the starter back together after repair, the most significant advice is to clean the surfaces from contamination. This will significantly extend the service life of the repaired unit and avoid breakdowns in the near future.
Be prepared for the fact that attempts to repair the starter will not give the expected effect. In this case, it is better to replace it completely or contact a trusted car service.
Carrying out major repairs
The most vulnerable component in the entire device is the graphite brushes. The fact is that during operation of the mechanism they rub against the lamellas and heat up due to the current flowing through them. But there are many more nuances that should be taken into account during repairs. Here is a list of works:
- Replacing brushes is mandatory when carrying out repairs.
- Cleaning the lamellas on the rotor is mandatory. If they are destroyed, you will have to install a new rotor.
- Replacing the bronze bushing on the rear cover of the starter.
- Replacing the bendix is not necessary, but it is advisable to do so.
- Installing a new bushing in the internal combustion engine block (second rotor support point).