The dashboard of a modern passenger car is an independent part of the car’s interior. Moreover, one of the most important components, which must meet two requirements and solve two important problems. Provide the highest functionality and create a feeling of aesthetic satisfaction, combined with an awareness of the comfort provided by a particular panel, through conveniently located storage drawers, cup holders, instruments and control buttons, as well as pleasant, non-straining lighting.
Dashboard VAZ 2114
Dashboard VAZ 2114
Cars of the Samara 2 family are equipped with a modern VAZ 2114 instrument panel, which is also called the “European panel”. The designers worked on it so that it allows for good forward visibility, a pleasant appearance, combines information content and ergonomics, and at the same time helps the driver cope with ordinary everyday needs. And they mostly succeeded. A block of instruments and sensors installed in front of the driver’s eyes, behind the steering wheel, provides him with the maximum possible amount of information:
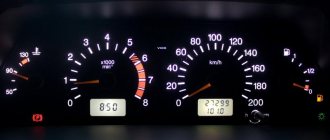
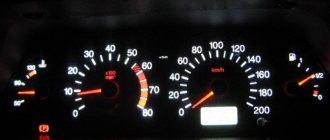
- In the central part there are two dial instruments, on the left there is an engine speed indicator, by which the driver determines what load the power plant is working with at a particular moment and, if necessary, corrects this process by switching speeds; in the window under the arrow there is a digital clock. On the right is a speedometer or an indicator of the current speed of the car, in the window under the arrow there are digital readings of the kilometers traveled for the entire period of operation of the car and for the last trip;
- In the upper part, between the dial instruments, there is a turn signal indicator lamp with green arrows pointing left and right;
- In the lower central part there is a red “stop signal” triangle, and below it CHECK ENGINE is a red signal for engine emergency conditions according to information from the electronic on-board unit;
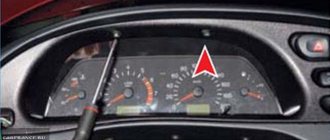
- In the left middle part of the instrument block there is a dial gauge for the engine temperature, or as it is called in the literature, a coolant temperature sensor, above it there is an icon that lights up when the engine overheats. Below it are icons for the throttle, oil pressure, handbrake and battery;
- In the right middle part there is a dial indicator for the presence of fuel in the fuel tank, above it is an icon for a fully filled tank, below it is an icon for the minimum amount of fuel in the tank, as well as icons for low beam, low brake fluid level and high beam.
Ergonomics is ensured by the convenient arrangement of instruments and information icons for visual perception of information, as well as keys, buttons and levers for manipulating them. A standard on-board computer is installed in the central part of the panel, usually a Gamma, Multitronics, Prestige or State computer. The location for its installation was chosen very well and with its help the driver receives expanded information about the state of the operating engine systems and vehicle components.
This information is reflected not only on the BC display, but is also transmitted through other control or information lamps and signs located on the instrument cluster and in other places on the dashboard. In addition, the on-board computer display displays other information, for example about the timing of the next inspection or maintenance.
The glove box, which can be closed, is conveniently located and has a backlight and a fairly large niche underneath it. The central beard also has a niche for storing something and an ashtray. The air duct outlets are quite well made, allowing for efficient glass blowing and preventing fogging.
During the operation of a car, problems constantly arise with malfunctions or failures in various systems. In order to get to some of them, it is necessary to remove the VAZ 2114 panel. Even to remove the instrument panel, you need to figure out how to remove the dashboard on the VAZ 2114 (instrument panel).
Dismantling
There may be several circumstances for dismantling the low panel of the VAZ 2109:
- Body repair;
- Repair of panel components;
- Car soundproofing;
- The desire to replace an old torpedo with a new one, etc.
We offer you a step-by-step control that will allow you to remove a small type of panel installed on a VAZ 2109 without outside help.
Dismantling process
- Remove the stove control knobs. A total of three difficulties.
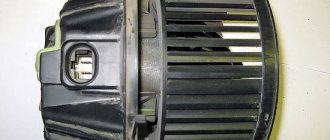
- Remove the heater fan switch knob. To do this, you need to pull it towards you.
- Unscrew the 2 fasteners of the dashboard trims from each side of the console. The cover must be pulled towards you.
- Disconnect the wiring block from the rear fog light switch.
- Disconnect a couple of power connectors and one power wire from the heated rear window switch.
- Disconnect the wiring block from the hazard warning light switch.
- Remove the wiring harness from the exterior light switch.
- Disconnect the power supply for the cigarette lighter illumination.
- Disconnect the cigarette lighter wiring harness and remove the panel trim.
- Remove the 4 heater control panel fasteners.
- Unscrew the 2 fasteners of the device shield visor.
- Remove the visor itself of the device composition.
- The spring clamps need to be compressed.
- Remove the instrument cluster
. - Unscrew the speedometer mounting nut, and then disconnect the speedometer cable.
- Disconnect the block with wires (it is white) from the instrument panel.
- Remove the hose from the econometer fitting, and then remove the cotter pin.
- Disconnect the cable from the speedometer that resets the odometer for the day.
- You now need to disconnect the red block from the instrument cluster
- Remove the instrument panel light switch handle and the headlight hydraulic adjustment handle. They need to be pulled towards you.
- Unscrew the mounting nut of the instrument backlight switch.
- Unscrew the fastening nut of the headlight hydraulic corrector socket.
- Remove the steering wheel and its paddle shifters.
- Insert the key into the ignition and turn it to position 1. This will disable the anti-theft device. Only after this can you turn off the power supply to the ignition switch.
- Unscrew the 2 mounting bolts and 2 nuts of the steering column tube.
- Remove this pipe, taking the ignition switch along with it.
- Pull the choke handle towards you (we are talking about carburetor suction). There should be a craving. After this, the handle is removed from the rod.
- Unscrew the 2 choke guide rod fasteners holding it to the instrument panel.
- Remove the mounting screw on the left side of the dashboard.
- Unscrew the fasteners for the lower panel fixation on the left.
- Similarly, remove the fasteners from the side and bottom on the right side of the dashboard.
- Unscrew the panel fastening screw, which is located inside the glove compartment.
- There remains one fastener on both sides of the panel, which must be unscrewed in order to eventually remove the tidy.
Torpedo device
What is a torpedo? In short, this is the dashboard. The word “torpedo” came to us from the West and has now become firmly established in the everyday life of domestic car enthusiasts.
Dashboard of a VAZ 2115 car
The instrument panels on the VAZ 2113, 2114 and 2115 are almost the same. These are complex collapsible structures made of metal with plastic inserts. In addition, in the panels of this line of VAZ models, engineers actively used polymer film, which covered most of the controls.
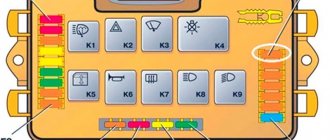
Diagram of the main elements of the VAZ 2115 dashboard
Step 1: Using a vibration isolator
Glue the Vibroplast M1 vibration isolator onto the flat areas of the plastic - this will make the elements heavier and significantly reduce the vibration of the panel. But you shouldn’t make it too heavy either - it’s enough to cover 50-60% of the entire flat area. Otherwise, the unibody design will add a significant amount of weight, but the mountings will remain the same, and are designed to be lighter from the factory.
The vibration isolator must be applied not only to the dashboard elements, but also to the heater body, air ducts, etc. In a word, to cover everything that could be a source of unpleasant noise. After such treatment, if the noise remains, it will be much quieter and become “deaf.”
How to remove the instrument panel from a VAZ 2115
Since the instrument panels on the thirteenth, fourteenth and fifteenth models are the same, the procedure for dismantling the dashboard will be considered using the example of the VAZ 2115. But before you begin, you should stock up on everything you need.
Tools and materials
- flat blade screwdriver;
- Phillips screwdriver;
- pliers;
- set of open-end wrenches.
Sequence of operations when removing the dashboard from a VAZ 2115
- Using a Phillips screwdriver, remove the screws that hold the left side of the console.
The left side of the VAZ 2115 console is removed with a Phillips screwdriver
The right side of the VAZ 2115 console is attached to 5 screws
The VAZ 2115 heater handles are removed manually
Just pull the handle of the VAZ 2115 fan towards you
Self-tapping screws from the VAZ 2115 panel brackets are unscrewed with a Phillips screwdriver
Self-tapping screws from under the instrument window of the VAZ 2115 are removed with a Phillips screwdriver
The self-tapping screw plug on the VAZ 2115 dashboard is pryed off with a flat screwdriver and removed
All instrument wires of the VAZ 2115 are disconnected manually
The nuts on the steering brackets of the VAZ 2115 are unscrewed with an open-end wrench
The nut on the VAZ 2115 panel bracket is unscrewed with an open-end wrench
The last screw holding the VAZ 2115 dashboard is located at the driver's door
Torpedo VAZ 2115 is removed
Video: removing the dashboard from the tag
Is it allowed to install a dashboard on a VAZ 2115 from another car?
In short, no. The dashboard on the VAZ 2115, 2114 and 2113 has a number of design features that are not found on other cars. Its cross members, mounting brackets and console sides are too long. There is nothing like this even on other VAZ models, not to mention foreign cars. But it should be noted that car owners often practice reverse replacement. In particular, a dashboard from a VAZ 2114 can be successfully installed on a VAZ 2109. But in this case, you have to trim the sides of the console and drill new mounting holes on the brackets.
Stage 2: Processing the “wrong side” of the dashboard
At this stage you need to use Bitoplast noise absorber. It is advisable to use a thickness of 10 mm, but 5 mm is also possible. They need to cover 100% of the back of the panel. Bitoplast here acts not only as an absorber of sounds from the motor, but also forms a soft barrier that will prevent the wires behind the panel from “knock” on the plastic. This sound insulator is quite flexible and has excellent stretch, so it is convenient to place it even on bends. Simply trim off any excess that extends beyond the detail area.
Source
Important points regarding replacement
- When removing the right side of the console, be careful. Behind it are wires that can easily get caught on the side and be damaged. So before removing this cover, you should remove the negative terminal from the battery. You should also turn off the car radio by removing its connector from the common wiring harness located behind the upper instrument panel;
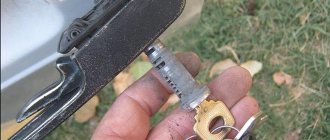
- Removing the plastic handles from the stove levers can cause serious difficulties. The fact is that there are protrusions on the stove levers (top and bottom), and holes on the handles. When you put the handle on, it snaps onto the lever. The only way to remove it is to pry it off with a flat screwdriver as shown in the picture. But when prying up the handle with a screwdriver, you should not bend it too much: the plastic breaks very easily;
The handles on the levers of the VAZ 2115 stove can be removed using a flat screwdriver
So, a novice car enthusiast is quite capable of removing the dashboard from a VAZ 2115 and other cars in this line. All that is required is patience and attentiveness. If, after unscrewing all the fasteners, the dashboard stubbornly refuses to come off, you should inspect everything again: it is quite possible that some tiny screw was missed.
Preliminary panel removal, features
Buy a shaped screwdriver at the store and use it to gradually unscrew the screws that secure the instrument panel. These are directly three elements that secure the left screen of the center console. If you cannot figure out their location, focus on the place where the driver's pedals are located. We also remove the self-tapping screw, which is located under the plug or, if you previously installed the radio, then under it.
Those who have been driving recently need to know that the plug is located next to the button that turns on the heating of the rear window of the VAZ car. After this, you will need to pull out absolutely all the chips from the surface of the instrument panel. It is best if you completely replace them in the future. This will ensure better fastening and will prevent you from getting confused with the parts later.
When working, keep in mind that they are located on the cigarette lighter and the ashtray light. It is imperative to remove the steering column. After dismantling is completed, we also remove the steering wheel. After this, the column will smoothly move down. Next, all the remaining screws are turned out and the unit responsible for controlling the heating of the car is lightly pressed inward.
After removing all the specified elements of the dashboard, you will also need to unscrew the mounting bracket. This is an element that runs from the floor of the car directly to the instrument panel. Please note that the relay holder and fuses for the fuel injection system are also attached to it. Don't forget that you will also need to remove the cross mount.
You need to carefully pry and then remove the knobs responsible for leveling the headlights and regulating the lighting in the instrument panel, pull out the decorative trim and begin dismantling the LED insert. All work on the instrument panel must be carried out with the utmost care so as not to damage serviceable elements.
Subsequently, all the nuts are unscrewed, and the chips located in the immobilizer and glove box are disconnected. Once you have removed all associated elements, handle the old panel carefully and pull it towards you. Only now can you begin installing the new dashboard. There is nothing complicated or time-consuming about this task, but you will still have to spend a certain amount of your time on installation.
Required spare parts
Before you fix your dashboard, you need to decide which bulbs you will use to replace the ones that have failed. You can use the same option that was used by the manufacturer, but experts recommend using more modern models. They are not only functional, but can effectively transform the panel. So, to choose from:
- standard lamps A12-1.2 (article 21061-3709500);
- standard lamps AS12-5-1 (article 2101-3746998);
- LED light bulbs ShoMe SM T5 (article 3035);
- LED light bulbs with high brightness SMD (article 182294);
- Osram halogens (item 2473MFX6, 2721MF, 2886X).
Up to 19 devices will be required, depending on the machine modification and combination.
Tools you will need for your work
To replace light bulbs on the instrument panel of a VAZ 2114 and other models, you will need the following tools:
- flat screwdriver;
- Phillips screwdriver;
- small pliers;
- rags.
Independent work is quite justified, since the price of this service in car services as of December 27, 2022 is on average 700 rubles, while the lamps themselves cost from 20 to 60 rubles. At the same time, the driver will conduct an inspection of the car’s interior, which is always useful. Now you can start repairing, but it’s better to first understand the dashboard diagram.
Order of Operations
- Remove the radio cover using a screwdriver, carefully threading the tool under the socket. First we pull it out from the bottom, then the top part of the lining.
- The electrical wires leading to the cigarette lighter must be disconnected.
- Now we find the screws on the dashboard and unscrew them.
- Remove the handles from the damper sliders and the heater switch by pulling them towards you.
- Now you need to remove the dashboard panel, it is held not only by screws, but also by other fasteners, so first you will have to loosen it a little.
- Now you need to disconnect the wiring from the panel: from the clock, from the alarm, from the headlights and other devices.
- On the back surface we find cartridges. It's easier to unscrew them with small pliers. Release the cartridge by turning it counterclockwise. Half a turn is enough. We do the same with the rest of the cartridges - they are all designed the same.
- We check the lamps with a tester and determine which ones are faulty. Or we change the entire combination, for example, to LEDs. We screw in the light bulbs tightly, remembering that they operate under conditions of vibration and shaking.
- We install all the cartridges in place. We use pliers again. Turn half clockwise until it stops.
- Now we connect the panel to the instrument connectors and check the functionality of all the light bulbs: from the ignition to the hazard warning lights.
- If everything works correctly, we fix the panel and perform the installation in the reverse order, before installing the radio cover.
For the procedure for replacing light bulbs in the dashboard of VAZ 2113, 2114 and 2115, watch this video.
Removing the torpedo step by step
- We find two screws on the central panel on the right and unscrew them. We perform the same action on the other side on the left. After this, carefully remove the shield from both sides.
- Using a flat-head screwdriver, pry off the plug, which is located on the central tunnel. We unscrew the tunnel fastenings located on the sides and behind it. Unscrew the screws holding the central panel.
- This part of the interior can already be removed completely. We see that there is access to the cigarette lighter. We mark the wiring and disconnect it, then remove the cover from the gearbox handle.
- The next step is the air duct. We take the key for 10 and dismantle it. There is access to the central panel, which is held on a mount in the front and rear. Unscrew the screws and remove the panel. After dismantling the central panel, you can move on to the main body of the torpedo.
- The glove compartment was removed in advance, as it interfered with the overall process. All that remains is to disconnect the backlight and unscrew the fastener on which it was held.
- Carefully pry up the air duct with a screwdriver and then remove it. There is still a nut on the dashboard that needs to be unscrewed. Now the panel can be easily removed by lifting it up and slightly pulling it towards you. Now it will easily slide off the stilettos. We take out the plugs, not forgetting to mark them with a marker.
The torpedo has been dismantled and can easily be replaced by installing a new panel from a VAZ-2110 or tuned using a more prestigious panel. Assembly must be done in reverse order.
vote
Article rating