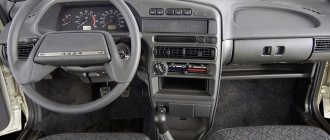
Thanks to the presence of a dashboard (DP), the car owner can know the speed, engine temperature, remaining fuel volume in the tank and much more. The PP, in essence, is the link between the car and its owner. What indicators are located on the instrument panel of the VAZ 2110, how do the devices differ and how to replace the PP? Read about it below.
Description and location of indicators and instruments on the panel
Let's start with a description and designation of the instrument panel icons and symbols in 21102:
- Engine coolant temperature controller; this sensor determines the temperature of the engine as a whole. Thanks to the device, it is possible to promptly detect overheating of the power unit.
- Tachometer. This controller is designed to display crankshaft speed readings.
- The left turn signal indicator always flashes when the turn is turned on.
- Left right turn signal. Icons numbered 3 and 4 blink synchronously when the light alarm is turned on.
- Speedometer. Thanks to the speedometer, the driver can know how fast his car is moving.
- A controller for the volume of remaining fuel in the tank, which helps the driver navigate when to refuel. If there are about 5-7 liters of fuel left in the tank, a yellow indicator in the form of a gas pump will light up next to the sensor. Do not operate a car with a yellow light on regularly, as this can lead to failure of the fuel pump.
- The gas station indicator, which we described above.
- Light symbol for turning on the side lights.
- The brake system performance symbol appears on the instrument panel when the engine is running if there is not enough brake fluid in the expansion tank. The problem may be due to a leak.
- High beam activation icon.
- Clock setting regulator with switch. Can be used to switch between daily and total mileage data.
- At the bottom of the instrument cluster there is a small screen that displays data on the vehicle's kilometers traveled.
- A light bulb that lights up when the light alarm is activated.
- Check Engine symbol. Its appearance indicates that the control unit has detected a problem with the motor. It is advisable to turn off the power unit and identify the breakdown, which is often caused by the inoperability of auxiliary sensors.
- Clock screen. When the regulator is switched, it may display data on the outside air temperature if such a sensor is installed.
- This instrument lamp indicates a detected malfunction in the battery charging system. The cause may be a loose, worn or broken generator set drive belt. It may also indicate a malfunction of the unit itself, damage to the power circuit and other problems in its operation.
- Handbrake activation icon.
- The symbol in the form of an oil can indicates an insufficient level of engine fluid pressure in the internal combustion engine. When it appears, you need to turn off the car engine and find the cause, which is usually an oil leak from the system.
- The air damper icon is placed only on carburetor engines (the author of the video is the In the Garage channel).
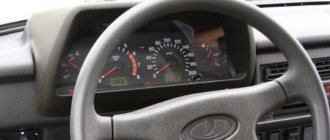
Features of the old and new dashboard
Over the decades of production of the VAZ 2110, the dashboard has undergone certain changes. Therefore, devices can be divided into two groups - devices of the old and new models. It should be noted that these dashboards are not interchangeable, since they have different electrical connection diagrams, as well as designs of the central console in the cars. Moreover, both types of devices are characterized by different shapes, but as for the location of sensors and indicators, in fact it is almost the same.
Over time, devices began to be equipped with backlight brightness controls. In addition, digital odometers (mileage meters) were not used on old-style dashboards; they began to be installed much later. At first, the odometer was mechanical (author - proVAZ-2110 channel).
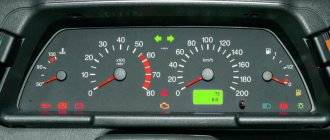
Top part
So let's start from left to right. First, the top part of the control panel:
- Side scale from 50 to 130 and arrow. Shows the temperature of antifreeze (antifreeze) in the engine cooling system;
- Almost round scale (0 – 80) and arrow. Tachometer showing engine speed;
- Two arrows at the top, almost in the middle of the control panel - turn signals (right, left);
- Speedometer. Well, this device, probably everyone knows, shows the speed at which the car is moving;
- A side scale with an arrow and, most often, two images of a filling column (white and red). Instead of a red column there may be a yellow light. This is an indicator of the fuel level in the tank. If the red column (yellow light) lights up, it means that there is very little fuel left in the tank - no more than 7 liters, urgent refueling is required.
Possible malfunctions: signs and causes
What problems can a car owner encounter:
- Some of the light bulbs on the dashboard do not work. If one or more light sources fail, then most likely this is due to burnt-out lamps. The problem is solved by replacing devices.
- The backlight has stopped functioning altogether, while all instruments and indicators light up. Apparently, the reason must be sought in the inoperability of the brightness control itself; it could have broken down. With constant use of this regulator, its connection contact with the on-board network may have come loose, so you need to check the wiring. The reason may also be a blown fuse located in the mounting block.
- The backlight does not turn on, and none of the indicators or sensors work. Perhaps the panel itself was “covered” or the block with the wires connected to the panel was damaged. You need to remove the device and carefully check all circuits.
- The speedometer does not work - the needle does not rise or rises, but very slowly and jerkily. With such a problem, the cause should be sought in the speed sensor, which can be electronic or mechanical. If it is mechanical, then check the condition of the tips that go into the speedometer itself and the gearbox. The end of the cable connected to the speedometer often wears out; you can try to solve the problem by wrapping a piece of food foil around this end. If the sensor is electronic, then you need to check the quality of the contacts.
- Indicators, for example, turn signals or optics, do not turn on. It is necessary to check the functionality of the steering column switches for low and high beam headlights, as well as turns.
- The fuel volume sensor does not function, the needle does not move or has risen all the way and does not fall. In the first case, the reason may lie in the failure of the controller itself, located in the fuel tank. You need to find the sensor and check its functionality. In the second case, the possible cause is a short circuit in the electrical circuit; you will need to test the wiring with a tester.
- The tachometer does not work. Again, the reason must be sought in the crankshaft position sensor - it could have failed, or the contact could have come loose from it. Most often, the reason for the malfunction of the sensors on the device is associated with oxidation of the contacts; they should be checked first.
Fuel level indicator
The device indicating the fuel filling level of the tank operates in combination with a control sensor; it is installed in the fuel tank. If the lamp shows a resistance of 284-334 ohms on the board, then the indicator needle will be located near the beginning of the scale.
If the sensor reports a resistance identical to the level of 102-136 ohms, then the needle will move to the middle of the scale. If the sensor value is 8-26 ohms, the needle will move to the very end of the scale. If the resistance and the needle level on the scale do not match, then repair of the machine is inevitable.
- Author: ratico19
Rate this article:
- 5
- 4
- 3
- 2
- 1
(2 votes, average: 5 out of 5)
Share with your friends!
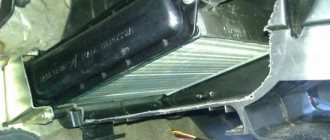
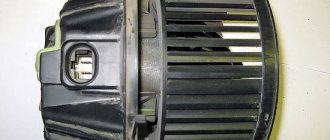
Instructions for replacing the tidy yourself
Instructions for replacing the shield yourself:
- First, you need to turn off the ignition and turn off the power to the Tens electrical network; to do this, open the hood and disconnect the terminal from the battery.
- The switches located on the sides of the tidy are removed.
- Then use a Phillips head screwdriver to unscrew the bolts that secure the device.
- Next, you need to dismantle the mountings of the tidy to the trim. After this, the shield can be easily removed from its seat, and the glass can also be removed.
- The next step is to disconnect all the connectors and connectors connected to the dashboard.
- When the connectors are disconnected, the panel is dismantled. It is repaired or replaced with a new one, the assembly steps are performed in the reverse order (the video was filmed by the channel In the Garage).
Lada 2110 2004, 77 l. With. - breakdown
Cars for sale
Lada 2110, 2002
Lada 2110, 2002
Lada 2110, 2001
Lada 2110, 2002
Comments 24
Did you change the sensor and drain the oil?
I have the same garbage, sometimes it lights up, sometimes it doesn’t, but the oil level is normal
The other day I went for diagnostics, it turned out that the whole thing was in the BSK
this means the problem has resolved itself) you can simply turn off the sensor and, in theory, the on-board indicator won’t show anything, and checking the oil level manually is better than trusting Russian sensors)))))
Well, you're lucky, I tried to disable it myself, to no avail ((
It’s just that when I changed the oil filter, I don’t remember whether the sensor was connected before or not, but the light didn’t light up, then I connected it and the light started to light up
The store says that when this sensor fails, oil starts leaking from it, but mine doesn’t leak and doesn’t respond to shutdown, I’ll try to figure out the BSK-10 soon... I downloaded the instructions here, found out that to reset the data, the BSK needs to be removed the ignition key, turned off the oil level sensor and a miracle happened, no errors were displayed. Previously I tried to turn off the sensor without removing the key, because of this the lamp did not go out)) All that remains is to buy a new sensor, it costs 130 rubles from us and replace it, by the way, the replacement can be done without draining the oil from the engine, this requires a pit and a 10 key
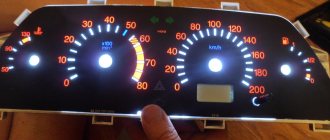
Ideas for tuning and modifying the shield
How can you improve the tidy in the “Ten”:
- By installing a new trim on the console. This type of tuning is the simplest, since you just need to install a trim on top. However, it will not improve the dashboard itself in any way, only its upper part.
- In the VAZ 2110 you can install a dashboard from Priora; in general, the selection of tuned, ready-to-use dashboards is quite large. When installing a device in 2110 from another car, you will have to partially redo some connectors and connect new devices. But in general there is nothing difficult about this.
- Installation of new scales on sensors. Scales can be downloaded from the Internet, found in a store, or developed independently. The alteration procedure in this case will be more complicated - you will have to remove the shield and disconnect the arrows from the instruments, this will take time. After installing the new scales, the arrows must be correctly installed, otherwise the speedometer and other sensors may malfunction.
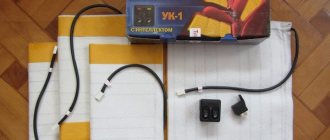
- Installation of LED lighting in the tidy. You can simply replace standard light bulbs with LED ones, or purchase a diode strip and solder it into the shield. But keep in mind that if the light bulb fails, it can be replaced without any problems, which cannot be said about the LED strip. If it burns out, you will have to unsolder the tape and install a new one in its place. Although the service life of the LED strip is quite long.
- If you install diode lamps, then you can additionally paint the numbers on the scales, as well as the arrows of the sensors, with fluorescent paint. The fact is that combining these two types of tuning will allow you to achieve a truly high-quality and beautiful result. Under LED lighting, arrows painted with luminescent paint will glow much brighter.
Photo gallery “Tuned devices of VAZ 2110”
Indication symbols
As you know, all the lights on the control panel come on when the ignition is turned on, and then, when the engine is already running, most of them go out. But when one remains on or blinks, this cannot but be alarming, because not everyone can immediately figure out what malfunctions this indicates, which of the systems needs urgent repairs.
Let's look at the designations of the instrument panel of the VAZ 2110. You should know that regardless of whether the panel is new or old on your car, the designations are almost the same, but the indicators may be located slightly differently.
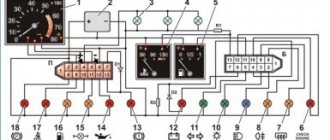
Before deciding to upgrade the instrument panel, it is recommended to understand its pinout. Details:
Instrument panel VAZ 2110
Functional
The pinout of this VAZ model is as follows:
- Electronic speedometer;
- Electronic type tachometer;
- Coolant temperature indicator;
- Fuel level indicator in the tank;
- Indicator lamps in the amount of 12 pieces.
This combination is fixed on a special board, in a separate socket using two screws. The panel is removed after unscrewing them. The accuracy of the board is ensured by the printing method of production and installation of this pinout; foil getinax is used for printing.
Separately illuminated arrows
LED instrument panel VAZ 2110
If you want the arrows to glow a different color, you can do the following:
- Remove the dashboard.
- Take it apart.
- Install separate LEDs under the arrows.
Note: in this case, the arrows will light up in a different color only when ignited.
More about the block
Open doors
This function works thanks to limit switches in the door. When the door is opened, the switch contacts close and the door open lamp lights up. Each limit switch is responsible for the door in which it is installed.
Quite often it happens that due to oxidation of the limit switch contacts, the indication does not operate. This problem is solved by removing the end switch and cleaning its contacts with sandpaper.
Low oil level
A special oil level sensor is installed in the engine crankcase, which informs the driver when the level drops to a minimum value. The sensor is a reed switch with a float; the contacts of the reed switch close when the oil level drops, which leads to the lighting of the corresponding lamp on the display unit.
Low antifreeze level
This indication system is similar to the oil level design. A sensor is installed in the expansion tank, operating on the principle of an oil level sensor. When the coolant level decreases, the contacts on the sensor close and the low antifreeze level indicator lamp lights up.
Low washer fluid level
The principle of operation of this indicator is to measure the windshield washer fluid level. There is a level sensor in the washer reservoir, the same as in the expansion tank. It measures the level and, when the minimum mark is reached, lights the lamp on the display unit.
Front pad wear
This indication informs the driver about the wear of the front pads; this occurs using a sensor that is connected to the pad itself. It is important to note that in order for this indication to work, it is necessary to use special blocks in which this sensor is built-in.
Unfastened seat belt
This function has long been known on cars of foreign origin, but it was used for the first time in AvtoVAZ. The sensor built into the seat belt buckle closes its contacts when the belt clip is inserted into it. If you start driving without a seat belt fastened, the display unit will begin to emit a sound warning of danger.
Burnt out lamp indication
The essence of this function is to inform the driver about one of the burnt-out lamps in the headlights or taillights. This function works by measuring the resistance in the power supply circuit of headlights or flashlights. As soon as the lamp burns out, the power circuit is interrupted, which causes the indicator on the unit to light up.
Forgotten key in the ignition
After stopping the engine and turning off the ignition, if you open the door while the key is inserted into the lock, the display unit will emit a sound signal that will last 10 seconds and will stop if you close the door again or remove the key from the lock.