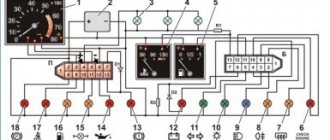
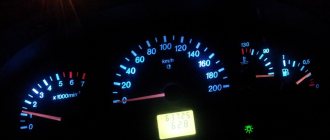
Niva instrument panel: description of indicator lamps
| Number | Description |
| 3/4 | The turn indicators turn on simultaneously when the hazard warning lights are activated. |
| 7 | Insufficient fuel level in the gas tank. |
| 8 | The vehicle's side lighting is on. |
| 9 | Emergency situation in the brake system. |
| 10 | The long-range illumination of the head optics is activated. |
| 12 | Vehicle mileage monitor. |
| 13 | Check engine light. If the indicator lights up, you need to carefully check the power plant. |
| 14 | Hazard warning light. |
| 15 | Clock display. |
| 16 | If the lamp lights up, you need to check the generator and battery charging. |
| 17 | Handbrake activated |
| 18 | The engine oil level has dropped critically. |
| 19 | Most configurations include a backup lamp. |
You should also highlight the colors of the car's indicators. They can be divided into three parts.
- Green/blue – indicators of these colors indicate normal operation of machine components.
- Orange/yellow - tells the driver that a certain unit requires attention or service.
- Red is the most dangerous color. If a lamp of this color lights up on the dashboard, the car must be urgently shown to a mechanic.
Exclamation mark on the Niva panel
Indicates that the fluid level in the brake system has decreased. You will need to open the expansion tank cap and add brake fluid to the required level. It is recommended to check the line for leaks and pad wear.
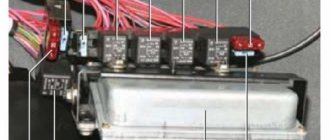
Electrical Harness System
Due to the ignition system, a spark appears in the cylinders corresponding to the current power strokes. In modern engines, wires go to sensors that are responsible for monitoring several indicators:
Motor temperature. Ignition, and so on
The injector also becomes an important part. The ignition system harness is in most cases connected to several other parts:
The ignition system harness is in most cases connected to several other parts:
Next, the wires are sent to the rear harness. Moving on to the engine compartment, the main harness splits into two wires. Of these, the largest is sent to the radiator, connecting with the following components along the way:
- DMRV.
- Crankshaft sensor.
- Resistor.
- Electric fans.
Through the power steering pump, other wires are thrown from the core, going to additional sensors:
- phases;
- idle move;
- throttle valve;
- detonation;
- injectors - a fuse for them is not added to the system.
The second core goes up, after which it is divided into two parts. The wires to the plus and minus go to the right. The battery is also located there. To the left they connect to the adsorber, fuel pressure sensor and oxygen sensor. This is how electrical wiring is arranged in most cases.
A branch from the harness may go to the air conditioning fuse if the car is equipped with such equipment.
If even one part of this system shorts, there is a high probability that the engine simply will not start. The controller stops seeing information regarding temperature, fuel supply to the injectors, and throttle valve position.
Under such circumstances, it is better not to resort to diagnostics, but to replace the entire harness at once. It may take too much time to find one wire, and the result will be questionable. The wiring works better when new.
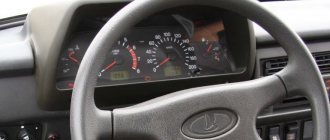
Shield Niva 21213
A transitional link between the classical and modern systems. The dial indicators and indicators are similar to the dashboard of the VAZ 2105, which many car enthusiasts do not like, and they want to change it.
Which panel is suitable for Niva 21213
Users often install panels from a VAZ 2114 or 2110 car. A minimum number of alterations and modifications will be required here. Contact groups and wiring terminals are reinstalled under the required pins. Refinement of plastic and seat will be required.
Installing and connecting music in the cabin
To one degree or another, it is difficult to do without this with any approach to improving the interior (starting from ascetic options and even more so in the case of serious alterations). Car audio and multimedia in Niva are real, although in some cases it is extremely irrelevant, taking into account the peculiarities of off-road operation. Therefore, during internal tuning, in any case, you will have to deal with the installation of music. Moreover, not only the head unit of the system itself, but also all the accompanying car audio components - amplifiers, acoustics, subwoofers and other “bells and whistles”. Usually a simple Niva gets by with a minimum of such equipment, but there are exceptions that amaze with the originality and power of the equipment.
Amateur and professional approach to car audio installation.
Various aspects of this type of modification can be found in the Car Audio section of our article catalog.
Other improvements and changes
- Sliding or lifting sunroof;
- Opening side windows;
- Electric windows;
- Air conditioner;
- Neon lights;
You can read about all these areas in the following materials. .
Interior tuning video
Video selection on internal tuning in NIV showrooms. Work of varying degrees of complexity and material costs (cost of materials, spare parts and additional accessories) - how best to remodel the interior.
Fresh photos with descriptions can be viewed in the corresponding category of the VAZ - photo tuning section, and even more in the Niva thematic category after tuning our photo album. Enjoy watching!
Tuning the interior of a Niva (Lada 4x4)
You can find other useful materials using the links below.
You will find it in the section: Car tuning - online photos of our article catalog.
You might be interested to see:
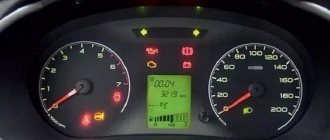
Shield Niva 21214
In the version where the injector is installed, the manufacturer installs a relatively modern device with a small display. The partially digitized version is easier to read and has a new indicator - a seat belt light.
Which panel is suitable for Niva 21214
On this version, users rarely change the device. The native panel is informative and only overexposure may be required here. If the driver decides to make a replacement, he needs to choose from a Lada tenth series car.
Ignition system
The operation of the internal combustion engine installed on the VAZ 2121 car is based on a classic scheme, a video of which is shown in driving courses:
- The generator produces electric current;
- The ignition coil increases its power;
- The ignition distributor supplies electrical impulses to the spark plugs when the piston reaches TDC;
- The spark plugs ignite the air-fuel mixture in the engine cylinders.
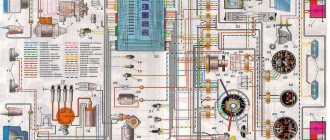
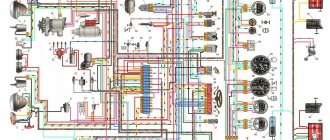
Factory wiring diagram of VAZ 2121: elements of the ignition system
The photo shows the following components:
- From pos. 3 to 12 – ignition coil and its structure;
- From pos. 13 to 20 – spark plug;
- From pos. 21 to 42 – ignition distributor (distributor).
For reference: The distributor slider, which is responsible for closing the contacts with the high-voltage wires going to the spark plugs of each cylinder, is shown separately. In the diagram presented, it is indicated by pos. 41-45.
Engine modernization
The all-wheel drive transmission of the VAZ 2121, in addition to significant advantages, also had domestic disadvantages. In particular:
- Fuel consumption was quite high compared to passenger cars (13.4 liters per 100 km in urban conditions and off-road);
- This was reflected in operating costs - the price of 1 km was much more expensive for the owners. And the power of the existing engine was insufficient for harsh off-road conditions.
For reference: the automaker, by modernizing the existing engine, increased its technical parameters. In particular, the volume increased from 1480 cubic meters. cm up to 1680 cc see Cars with such a power unit received the factory index VAZ 21214.
An increase in engine displacement and the use of a non-contact ignition system led to the need to modernize the electrical circuit in the engine compartment. Replacing the VAZ 2121 wiring solved this problem completely.
Electrical wiring for VAZ 21214 installed on a car with a 1680 cc engine. cm
Ignition system modernization
Since the high-voltage coil is traditionally responsible for the sparking power, the automaker has made changes to its operation. In particular, the wiring on the VAZ 2121 was supplemented with a harness that connected the switch and other components of the ignition system.
Contactless ignition system VAZ 21214
This factory manual contains:
- Ignition switch acting as an electrical circuit switch with pins 30/1 and 15;
- Ignition relay with pins 85,86,30 and 87;
- Switch with 6-pin terminal block;
- Upgraded ignition coil with terminals “B” and “K”;
- Distributor (ignition distributor);
- Candles.
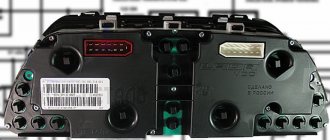
Dashboard
For subsequent modifications of the VAZ 2121, the instrument panel was thoroughly redesigned. In particular, the design and location of the warning lamps have changed, and new scales have appeared on the instrument panel indicators.
Original wiring diagram for VAZ 21214 – instrument panel and warning lamp harness
Conclusions: the owners of the VAZ 2121 car often serviced it themselves. And servicing electrical systems is impossible without original circuit diagrams. This was especially true for modernized versions, where changes were made to the operation scheme of components and assemblies.
The device on the Niva failed - the reason
For most classic versions, problems exist.
- The corresponding fuse has blown. This is usually insert F2.
- There are problems with the wiring. Such problems are not uncommon in classic car models. Here you should check the wires for damage to the insulation, loosening, oxidation of contact groups, breaks.
- Damage to the device. Here you should check the device circuit for breakdowns and burns.
If we are talking about modern modifications with an ECU, it is easier to find the problem using computer diagnostics. The BC standard errors will accurately indicate the location of the fault.
Niva instrument panel does not light up
The backlight of the shield is checked in the same way. If the panel periodically blinks or only some of the indicators go off, check the wiring. This is where the contact groups are usually oxidized. It is also possible that the integrity of the insulation may be compromised and individual light bulbs may burn out. If the backlight goes out completely, check the lighting fuse.
Which torpedo is suitable for the VAZ 2107? When you want comfort
Many owners wonder which torpedo is suitable for the VAZ 2107. This is not an idle question. After all, the driver spends most of the time on the road looking at the dashboard. The “seven” torpedo was developed more than 30 years ago. In this regard, its angular shape hurts the eye. Also, the devices are quite faintly visible. After all, their scales are simply painted on plastic with white and sometimes red paint. This reduces the ability to see instrument readings in the dark. Also, this appearance has no attractiveness. Therefore, many drivers replace dashboards. Panel or torpedo? Which torpedo is suitable for a VAZ 2107? The issue is complex, but completely solvable. Just to begin with, you should determine how radical the alterations will need to be made. Such tuning can be done in two ways:
- Replacing the dashboard;
- Replacement of the entire torpedo.
The first option will allow you to get by with little expense and replace the panel with another one that suits you more. You just have to adjust the socket a little in size. It is somewhat more difficult to install a new panel. At the same time, it must be suitable in size and provide the ability to connect all vehicle systems. The final choice depends on your final goals and capabilities. Dashboard Let's start with the simplest tuning option. A donor will have to be found for a replacement. The simplest option would be to install a panel from a VAZ 2110. There will be a minimum of problems with this work, and the resulting design will look much more advantageous. You will have almost no problems connecting wires. Here they are almost identical. All main devices are also connected in the same way. Tools you will need are a soldering iron and scissors. In order for the devices to work better, you need to install fluid reservoirs from 2110 under the hood. Another equally common option is to install a dashboard from GAZ 3110. It also looks much better. The installation itself is practically no different from similar work with a panel from a VAZ 2110; it can also be adjusted to size using a soldering iron and scissors. But here you will have to tinker with connecting devices. For example, you purchase a tee from a “six”, and use it to connect an econometer and an oil pressure sensor. It is recommended to install a speed measurement sensor used in the tenth family of VAZs. These are the easiest panels to install. But you can use this part from other foreign cars. Just be sure to take into account the compliance of the VAZ 2107 devices with the chosen foreign car. The easiest way is to find a similar set of sensor readings displayed on the panel in foreign-made cars produced in the late 80s and early 90s. Changing the torpedo Some drivers are not satisfied with the appearance of the torpedo on the VAZ 2107. Sometimes this element from the “five” may be installed on the car. In this case, a purely practical inconvenience is added to the unpleasant appearance. You have to close the glove compartment with a universal “lock”, or rather, seal it with tape. Otherwise it will constantly open. Therefore, you can change the torpedo. Of our models, the best fit is a spare part from a VAZ 2115. You just have to use polyurethane foam to seal small non-joints. Of the foreign cars, the best fit here is a torpedo from a BMW E30. She will look much more advantageous. There is another option, to install a torpedo from a Toyota Camry. It is slightly wider than the standard part. Therefore, for a more accurate installation, you will have to trim the torpedo a little from the bottom on the sides. But even in this case, it will interfere with the window regulators. So get ready to install electric lifts right away. This will be the best option. You will also have to struggle with installing the steering wheel cover. The standard cover will not fit into the steering wheel opening on the BMW dashboard. Therefore, craftsmen usually perform adjustments. Some people cut the panel, but it is much easier to cut off the excess from the casing. It is better to use standard mounts from the original torpedo, only they are slightly bent. Often the torpedo can sag downwards, so it is advisable to immediately provide support. Connecting the stove. Many drivers cannot connect the stove. The problem is that the air ducts do not match. Therefore, you will have to make special adapters. To do this, you can use air ducts from the Gazelle. All that remains is to adjust them a little and secure them. It is best to use a cable from the heater from BMW. It is much easier to connect it to the stove than the original Zhiguli one to a new torpedo. By the way, according to
Niva: tidy does not work
There are several ways to solve the problem.
- On the version with a carburetor, check the fuse and the device itself. Turn signals and other vehicle devices can work.
- If the car does not start, the malfunction probably occurred on the injection machine. Here you will need to perform computer diagnostics.
The Niva's tidy was constantly changing and updating. The board, regardless of modification, is informative and easy to perceive.
Specialization : Graduated from the State Automobile University, worked for 20 years at GAZ-56, now I drive a Zhiguli.
Source
How to check the VAZ speed sensor
A failed speedometer sensor in a VAZ car is easily determined - in this case, the speedometer stops working, and it may also show some signs of life, but display incorrect information.
Using a tube, pliers or other available tools, rotate the sensor axis. In this case, you should see the voltmeter readings changing: the higher the speed, the higher the voltage (from 0.5 to 10 V). If this does not happen, the sensor requires replacement.
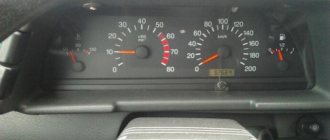
Description of the Lada 4×4 instrument panel (VAZ 2121, 2131)
VAZ 2121 or Lada 4x4 has been produced since 1977. During the entire production period, the body of the SUV changed slightly, and the interior was modified, for example, changes concerned the instrument panel. Let's look at the types of Lada 4×4 dashboards and their descriptions.
The most common instrument combinations (catalog numbers):
- 2121-5325120 - the very first model;
- 21213-3801010 - intermediate model;
- 21150-3801010 - modern model.
Despite the fact that the instrument panels are different, the indicators showing the status of the vehicle systems remain unchanged and are divided by color:
- Green and blue lamps are informational;
- Yellow lamps are informative (Attention!);
- Red lights are emergency lights, movement is prohibited!
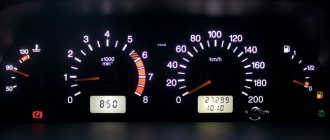
Let's look at the description of the instrument panel using the latest VAZ 21214 model as an example.
- coolant temperature indicator. Red zone - engine overheating. When the arrow reaches it, you must stop the car, turn off the engine and check the serviceability of the cooling system;
- tachometer. Shows crankshaft rotation speed. Do not allow the arrow to go into the red zone;
- left turn indicator. Lights up when the left turn signal is turned on;
- right turn indicator. Lights up when the right turn signal is turned on;
- speedometer. Shows the actual speed of the SUV;
- fuel level in the gas tank. 0 - the tank is empty; 1/2 - half of the fuel tank; 1 — full gas tank;
- Fuel reserve indicator lights up when there is less than 9.5 liters of gasoline left in the fuel tank. Do not let the fuel run out, this may damage the fuel pump;
- indicator for turning on external lighting. Lights up when the exterior lighting is turned on;
- low brake fluid level indicator. Lights up when the brake fluid level in the reservoir is below the minimum allowable level. Driving with this lamp on is prohibited;
- high beam headlight indicator. Lights up when switching the headlights from low to high;
- daily mileage reset button;
- odometer display. The upper numbers are the total mileage of the vehicle, and the lower numbers are the daily mileage;
- hazard warning indicator. Lights up when the emergency lights are turned on;
- engine management system malfunction indicator (CheckEngine). It is necessary to read error codes from the ECU using an on-board computer or diagnostic equipment;
- battery charge indicator. Lights up when electrical equipment starts running on battery power;
- handbrake indicator. Lights up if the handbrake is on;
- emergency oil pressure indicator. Lights up if the oil pressure in the engine lubrication system drops below normal. Operating the engine with the lamp on is prohibited. Check the engine oil level and the serviceability of the filter;
- reserve.
Replacement.
To remove the DS, you need to place the car on a level surface. After this, it is best to disconnect the battery terminals to avoid errors in the BC.
Disconnect the wire terminals; to do this, press the plastic lock on the block. After this, use a wrench to unscrew the sensor from its seat. If you cannot unscrew it immediately, it is not recommended to use excessive force. You need to treat the threaded connection with WD-40, wait a few minutes and continue dismantling.
Installation of a new DS is carried out in the reverse order. When purchasing a new part, you need to pay attention to the external condition: the contacts must be treated with a sufficient amount of varnish, as this protects them from moisture. After completing the work, it is necessary to reset the on-board computer errors in order to remove the CHECK ENGINE error.
Also interesting: Chevrolet Niva idle speed sensor
As for its location, look for the DS in the engine compartment in close proximity to the exhaust manifold. To be honest, the place where it is installed cannot be called ideal. While the car is running, the manifold heats up. The sensor wires rub against it, which over time leads to malfunctions and short circuits.
It doesn’t matter whether you have an injection car or a carburetor with a Europanel - the connection of the speed sensor to the instrument cluster is identical.
Replacing the VAZ speed sensor: step-by-step instructions:
- Drive into the pit - it will be more convenient to work from below - and wait until the engine cools down.
- Turn off the vehicle's power by removing the cable from the negative terminal of the battery. Do not close the hood after this, this will provide you with lighting.
- Locate the speed sensor on the transmission. Clean it and everything near it with a rag to remove any dirt.
- By pressing the spring clip, disconnect the wire block from the sensor.
- Dismantle the sensor itself by unscrewing it counterclockwise - with your fingers or an open-end wrench to “22”.
- Carefully, so as not to break anything, install a new part in place of the removed part. Connect the wire block to it and the procedure for replacing the speed sensor can be considered complete.
How to properly connect a new DS? It is important here that the device rod fits correctly into the fixing sleeve, otherwise rotation will not be transmitted to the sensor. If the sensor fits into the socket the first time, then everything is in its place, and if something prevents it from moving, then the rod did not fit into the bushing.
BKL
In addition to the instrument cluster, important information may also be contained in the LCL. As the year of manufacture changed, on Nivas some of the information went to the warning lamp unit. On modern models, almost all the icons below are located only there.
- 1 — Differential lock indicator
- 2- Immobilizer indicator
- 3 — Lamp for monitoring the power steering condition
- 4 — ABS diagnostic lamp
- 5 - Airbag warning indicator
- 6 - “Insufficient brake fluid level”
- 7 — “Unfastened seat belt”
The warning lamp unit is usually replaced by an on-board computer, and all icons are transferred to the BC.
In addition to the standard dashboard, tuned ones can also be used. But the combination on them will be different.
First presented to the public back in 1977, the VAZ 2121 Niva all-terrain vehicle has by now undergone significant changes. The transformations affected not only the exterior of the car, but also its interior. The Niva 2121 instrument panel was also not spared from restyling, which in its original version had the appearance and characteristics presented below.
Information icons
The machine icon may light up differently; it happens that the “car with a wrench” icon, the “car with a lock” icon, or an exclamation mark are lit. About all these notations in order:
When such an indicator lights up ( a car with a key ), it informs about malfunctions in the engine (often a malfunction of a sensor) or the electronic part of the transmission. To find out the exact cause, you will need to perform diagnostics.
A red car with a lock lights up , which means that there are problems in the operation of the standard anti-theft system, often this icon means that the car does not see the immobilizer key and it will be impossible to start the car, but if this icon blinks when the car is locked, then everything is normal - the car under lock and key.
A yellow vehicle indicator with an exclamation mark notifies the driver of a hybrid vehicle that there is a problem with the electric drive. Resetting the error by disconnecting the battery terminal will not solve the problem - diagnostics are needed.
the open door icon lit when a door or trunk lid is open, but if all the doors are closed and the light on one or four doors continues to shine, then often the problem should be looked for in the door terminals (wire contacts).
The slippery road icon begins to flash when the stability control system detects a section of slippery road and is activated to prevent slipping by reducing engine power and braking the slipping wheel. There is no need to worry in such a situation. But when a key, a triangle, or a crossed out skid icon appears near such an indicator, the stabilization system is faulty.
The wrench icon pops up on the display when it’s time to perform vehicle maintenance. It is an information indicator and is reset after maintenance.