The more modern the car, the more complex its design and the more difficult it is to control the condition of components and systems independently. For foreign-made cars, this issue has been resolved since the 80s by integrating on-board computers and other auxiliary devices into the car control system. Modern cars from Tolyatti are at the level of the 70s of the last century in terms of electronics equipment, and on-board computers can only display the time and temperature in front of the front bumper.
Designations
Despite such electronic asceticism, it is in principle possible to splurge on several dozen light bulbs and scales. Sitting at home, with a book in hand and drinking tea. But when, at a speed of 140, some indicator begins to frantically demand attention, you involuntarily get lost, and control over the car becomes, to put it mildly, not the most ideal.
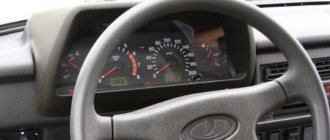
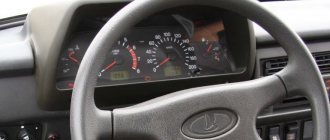
Especially when you change from a penny to the wheel of a 2112, you feel like young Gagarin in an alien spaceship, when every light means something, and what exactly - go and figure it out. For these purposes alone, it was worth studying the new panel one hundred and twelfth in more detail, which we are happy to share.
Description
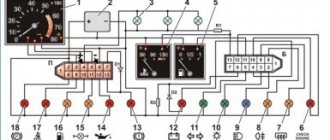
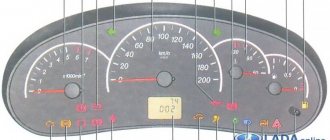
In order not to violate the informational nature of the panel description, and most importantly, so as not to redraw the arrows, we will use the factory layout of warning lamps and indicators on the instrument panel. Here she is.
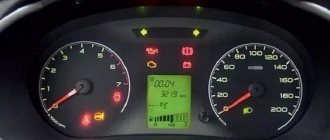
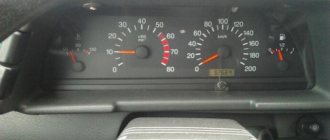
- A pointer indicator that schematically shows the approximate temperature of the coolant in the cooling system. The pointer receives a signal from a sensor that is installed between the cylinder head and the thermostat, so it shows a more objective temperature. The device is divided into divisions with a value of 20 degrees. The sensor is able to recognize temperatures starting from 50 degrees, and unsafe temperature conditions begin in the red zone with a temperature of 105 degrees. The gradation ends at 130 degrees, at which the motor is almost guaranteed to overheat and jam.
- Tachometer. Shows engine revolutions per minute in real time. The tachometer scale has divisions of five units, and digitization is carried out every 10. By adding two zeros we get the real value. The red zone starts at 55 units.
- A llama with an arrow indicating which turn signal is on, in this case, the left one.
- Controlling the activation of the right turn signal.
- An induction speedometer receives data on the speed of the vehicle from a sensor located in the gearbox. The accuracy of the speedometer readings is not very high, and depending on the speed of movement, it may have an error of 5 km/h or more.
- Fuel level indicator. It receives a signal from a sensor located directly in the fuel tank.
- When the fuel level drops to critical, this warning lamp lights up.
- Low beam switch lamp.
- Brake fluid level warning lamp.
- High beam indicator.
- Clock adjustment knob.
- Odometer and daily mileage.
- Alarm.
- Critical engine failure caused by failure of electronic systems.
- Clock and thermometer.
- Low battery charging voltage.
- Handbrake warning indicator.
- Critical oil pressure.
- Fuel mixture enricher indicator.
Europanel
On cars manufactured after 2006, they began to install a new panel, which for some reason was called Euro. Probably similar to European-quality renovations.
Many people install them on old-style 112s, believing that they look better. It has a lot of buttons that support features that older cars don't have, and you often have to install a steering wheel mounted switch assembly to blend in with the new design.
Installing a Europanel on an old-style VAZ 2112
Replacing the entire panel is a rather labor-intensive and time-consuming process, because you will have to repack almost all the wiring. But it's not just the work that makes the replacement process difficult. You will have to purchase some necessary elements for the panel to fit into place. Namely:
- plugs for extra buttons;
- air duct;
- inserts, buttons, pads;
- a new wiring harness corresponding to the wiring diagram;
- shield mounting brackets;
- The door cards will have to be replaced because the old ones do not fit with the new design.
Therefore, before replacing, you should think about the feasibility of the operation. Thus, we have become closely acquainted with the dashboard of the VAZ 2110, and we hope that it will not cause you any trouble on the road. Fewer red lights on your dashboard, and have a good trip!
Instrument panel VAZ-2112
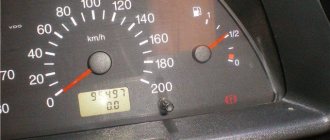
The instrument panel of the VAZ-2112 is quite ascetic by modern standards. In its central part, located in front of the driver, there are two pointer indicators: a tachometer and a speedometer. The first, as you know, shows at what frequency the engine is currently rotating, the second - the speed of the car. Under the tachometer, the designers placed on the panel a dial with an electronic clock and a thermometer that shows the outside temperature if there is a corresponding sensor. Below the speedometer is an electronic odometer showing total and daily mileage.
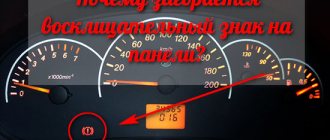
To the right of the odometer is the electronic clock adjustment lever. On panels with a narrow display installed, this knob can be used to switch the odometer readings to total or daily mileage. Between the tachometer and the speedometer at the top there are indicators for left and right turns, respectively, and at the bottom there are two indicators: “hazard lights” and a critical engine malfunction, which appeared due to a malfunction in the electronic systems. When this indicator comes on, it is best to turn off the engine, since there may be several reasons why it came on. Sometimes this indicator signals the presence of errors in the operation of the on-board computer, which are eliminated at the service using special software.
The VAZ-2112 panel is also equipped with a dial gauge for coolant temperature. A sensor connected to the device detects temperatures starting from 50 degrees Celsius. On the VAZ-2112, the red zone starts at 105 degrees. At 130 degrees, the motor will jam from overheating, so further indication here is simply meaningless. Under the coolant temperature sensor on the VAZ-2112 panel there are 4 indicators:
- fuel mixture enricher (for engines with a carburetor);
- oil pressure – the oil level has dropped to a critically low level. It is best to turn off the engine, identify and, if possible, eliminate the problem, continuing to drive only after adding oil;
- parking brake;
- battery charge - the indicator signals the presence of a malfunction in the system, for example, an open circuit, a broken generator belt, and other such problems.
Replacing the wiring harness in the rear of the car
The vehicle manual warns that harsh climatic operating conditions have a negative impact on the vehicle's electrical components. And electrical connectors and wires are among the first to suffer.
Girls in revealing clothes are a favorite “bait” among scammers
And since the price of parts is low, the car owner can replace:
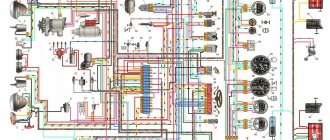
Wiring diagram for VAZ 2112 - harness and connectors for the rear of the car
Advice: for this you need a VAZ 2112 wiring diagram with decoding in order to clearly understand which electrical circuit is responsible for what and controls what.
Rear Harness Terminal Blocks
Let's take a closer look at the above diagram:
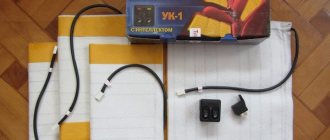
Wiring an additional wiring harness for VAZ 2112
Individual parts of the wiring can also be replaced with your own hands. Specifically, an additional wiring harness in the trunk of the car (pictured below).
It connects to the mains:
VAZ 2112 wiring diagram: lighting and electrical equipment of the trunk
The VAZ 2112 electrical wiring of this wiring harness has the following designations:
Ignition and engine control circuit
Here are the control diagrams for the following internal combustion engines:
- 21120 – January 5.1 or BOSCH M1.5.4N, Euro-2;
21120 (Euro-2) - 21124 – BOSCH M7.9.7, Euro-2;
21124 (Euro-2) - 21124 – BOSCH M7.9.7, Euro-3.
21124 (Euro-3)
| Motor | 21120 (Euro-2) | 21124 (Euro-2) | 21124 (Euro-3) |
| Injectors | 1 | 2 | 2 |
| Ignition coil | – | 1 | 1 |
| Candles | 2 | – | – |
| Ignition module | 3 | – | – |
| Diagnostic connector | 4 | B | B |
| ECU | 5 | 3 | 3 |
| Tidy taps | 6 | E | E |
| Ignition relay (6) | 7 | 4 | 4 |
| Ignition fuse (1) | 8 | 5 | 5 |
| Fan relay (4) | 9 | 6 | 6 |
| Fan fuse (2) | 10 | 7 | 7 |
| Fuel pump relay (5) | 11 | 8 | 8 |
| Fuel pump fuse (3) | 12 | 9 | 9 |
| Mass air flow sensor | 13 | 10 | 10 |
| Rough road sensor | – | – | 11 |
| TPDZ | 14 | 11 | 12 |
| DTOZH | 15 | 12 | 13 |
| RXX | 16 | 17 | 14 |
| Lambda probe main | 17 | 14 | 15 |
| Additional lambda probe | – | – | 16 |
| Knock sensor | 18 | 15 | 18 |
| DPKV | 19 | 16 | 19 |
| Canister purge valve | 20 | 13 | 17 |
| APS block | 21 | 18 | 20 |
| APS indicator | 22 | 19 | 21 |
| Speed sensor | 23 | 21 | 23 |
| Fuel pump + level sensor | 24 | 22 | 24 |
| Oil pressure sensor | 25 | 23 | 25 |
| Antifreeze thermometer sensor | 26 | 24 | 26 |
| Oil level sensor | 27 | – | – |
| Phase sensor | 28 | 20 | 22 |
| ABS connector | A | A | A |
| Air conditioner connector | B | IN | IN |
| Fan connector | C | – | – |
| Illumination of the ignition switch (to the blue-white wire) | D+E | – | – |
| Bends to the door harness | – | D | D |
| + battery | F | G | G |
| Weight | G1+G2 | G1+G2 | G1+G2 |
The elements installed in the additional mounting block are indicated in brackets.
Mounting block on the right side under the dashboard
Pinout of the dashboard of VAZ2113, 2114, 2115
There are 26 contacts on the VAZ-2114 instrument panel, each of which is responsible for the operation of the indicators of this panel. If a plus is supplied to the panel, then each contact displays information about the state in which the car is currently located.
White block (X1)
Red block (X2)
- Housing (weight) - black
- To ambient temperature sensor - cyan-magenta
- Tachometer (low voltage input from ECU) - brown/purple
- Fuse F16 (to terminal 15 of the ignition switch) - orange
- Tachometer (high voltage input from coil) - yellow
- Housing (weight) - black
- To fuse F3 of the mounting block (+battery) - white-purple
- Instrument lighting control - white
- Coolant temperature sensor. - green-white
- Turn signal RIGHT - blue
- To fuse F10 of the mounting block - brown
- Turn signal LEFT - blue-black
- Brake fluid level - pink-blue
- Check Engine Light to ECU Controller - White-Purple
- To the trip computer - brown
- To the ECU controller - pink and black
- Speed sensor - gray and yellow
- To the fuel gauge sensor - orange
- To the fuel gauge sensor - pink
- To the parking brake switch - brown-blue
- Fuse F14 of the mounting block - green-black
- Alternator terminal "D" through fuse panel - brown and white
- Hazard switch
- Oil pressure sensor - blue
- To terminal “50” of the ignition switch - purple
In addition, special indicators and signal sensors are installed on the instrument panel, and the panel itself is controlled by a special electronic unit. Having disassembled the instrument panel, you can see that there are two pads inside it: red and white. And all inputs, outputs and fuses are connected to the plug. If the sensors fail, they will need to be replaced. It is also better to replace damaged or oxidized wires. Indicator lights, like any other, sometimes burn out. Undoubtedly, they need to be replaced with whole ones. Along with them, the lamp sensor often burns out.
VAZ 2114 instrument panel connection diagram
- rear window heating switch;
- rear fog lamp switch;
- switch for headlights and direction indicators;
- mounting block;
- wiper switch;
- fog light switch;
- on-board control system display unit;
- instrument panel harness block to additional harness;
- instrument cluster;
- instrument panel harness connector to the on-board computer harness;
- instrument panel harness connector to the ignition system harness;
- instrument panel harness connector to the side door harness;
- fuse 16 A;
- fuse 16 A;
- ignition switch;
- lighting switch;
- heater electric motor;
- additional resistance of the heater electric motor;
- ignition switch unloading relay;
- rear fog light relay;
- starter relay;
- socket for connecting a portable lamp;
- cigarette lighter;
- instrument panel harness connector to the glove compartment lamp wiring harness;
- illuminator;
- illuminator;
- illuminator;
- heater switch;
- instrument lighting regulator with rheostat;
- brake light switch;
- horn switch;
- hazard switch;
- heater control lamp;
- fuse 16 A;
- seat heating relay;
Useful: Pinout, connection diagram and checking the VAZ ignition coil
Another variant of the connector pinout diagram
- checking the brake fluid level indicator. If you apply +, the brake light will light up. You can connect it to the red wire of the ignition switch, then, just like on 2110/2114, the lamp will be checked when the starter is turned on.
- Hazard warning lamp will light up when + is applied.
- high beam lamp, connect to the green-black wire.
- fuel level indicator, connect to the pink-red wire.
- to the speed sensor.
- speed signal output to the on-board computer. If there is one, then take the speed signal from this contact.
- Brake fluid level indicator, connect to the pink-blue wire near the lamp above the cigarette lighter. In the VAZ-2107, the lamp works the other way around: the sensor connects the lamp to ground and it lights up. You will have to either leave the lamp where it is, or in the new device, solder the lamp to + and swap the diodes (in this case, to check the lamp, pin 1 must be connected to ground, for example, to the parking brake lamp), or remove the black wire from the sensor on the tank, and connect instead the orange one from the EPHH unit, or the blue one from the ignition coil, while the diode in the wiring (between the beard and the glove compartment) must be disconnected; if this is not done, there will be a short circuit.
- left turn lamp, connect to the blue-black wire of the steering column switch block.
- Right turn lamp, connect to the blue wire of the steering column switch pad.
- instrument lighting, connect to the white wire.
- ground, connect to the black wire.
- power supply of devices, connect to the orange wire.
- if the device is simple (without microcircuits, etc.), then connect it to the blue-red wire (fuel reserve lamp), if there is a display under the tachometer, then connect it to the temperature sensor (take from a VAZ-2114, one contact to the device, the other to ground, place it either in the passenger compartment or in the engine compartment, but far from the engine and so that the wind does not blow).
- ground, connect to the white-black wire.
- low-voltage tachometer input (from the ECM), connect to the brown-blue wire.
- high-voltage tachometer input (from the coil), connect to the brown-blue wire.
- If there is a display under the speedometer, then connect it to the red and white wire at the brake light switch.
- coolant temperature gauge, connect to the green-white wire.
- outdoor lighting lamp, connect to the yellow wire.
- carburetor choke cover lamp, connect to the gray-orange wire.
- go to the ECM lamp. If the machine is injection, then connect one of the contacts to the orange wire, and the other to the remaining one.
- go to the ECM lamp. If the machine is injection, then connect one of the contacts to the orange wire, and the other to the remaining one.
- power supply of devices, connect to the orange-blue wire.
- handbrake lamp, connect to the brown wire.
- battery charge lamp, connect to the brown-white wire.
- low oil pressure lamp, connect to the gray-blue wire.
The most common breakdown
Before digging into the inside of the car, check how securely the ground wire leading to the front panel is secured. A restless passenger in front often simply pulls him out of his place with his feet. To prevent the situation from repeating itself, after fastening it is worth insulating the wire from reach.
Its signs are very characteristic:
- All indicators do not work: speedometer, tachometer, odometer, fuel level recorder, coolant temperature sensor;
- The rest of the equipment - optics, radio, even the panel backlight - turn on normally and do not act up;
- The ignition works properly, the car does not refuse to start;
- Fuse F3 is almost 100% blown. It is located in the mounting block and will have to be changed. But first you need to find out why it was covered, otherwise the new one installed will suffer the same fate. In most cases, a short circuit is to blame for burnout. On well-used VAZ-2114, the fuse often blows after each wash. Instead of carrying a spare one, you need to figure out where moisture is getting into it.
If the fuse is intact, this is not a reason to immediately leave it alone. It would be a good idea to remove it and check the contacts: if the fuse is live, but the terminals are oxidized, the circuit will be interrupted, and the device will stop showing any signs of life.
The next weak link: It is the ignition relay. It is located to the left of the steering column, fixed on a pin, so to speak, upside down. You need to remove it and try to make direct contact with the wires. If there are obvious signs of revival on the instrument panel, it immediately becomes clear that the time has come to change the relay.
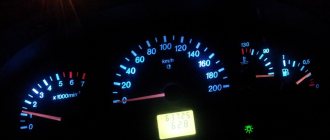
Indicator lamps located on the additional panel of the VAZ-2112
An additional panel is installed in the VAZ-2112 dashboard, on which the designers also placed several indicators. In particular, in the middle there is a silhouette of a car with its doors open. If one of the doors is illuminated, it means that it is not closed tightly enough.
On the left side of the vehicle indicator (one above the other) there are three indicators:
- low engine oil warning (optional);
- warning about low fluid level in the windshield washer reservoir;
- additional warning about high coolant temperature.
To the right of the car silhouette, again one above the other, there are three more indicators:
- indicator of malfunction of brake lights or side lights;
- warning of high brake pad wear;
- seat belt warning.
Installation of fog lights
Car owners can independently equip their car with fog lights. To make installation easier, you can watch videos from forums where craftsmen share their experience of such work.
Wiring VAZ 2112 for fog lights (Luxury package)
Conclusions: in fact, replacing old wiring in the rear of a car is much easier than in the engine compartment or inside the cabin. And the diagrams proposed in the article will help you figure it out faster and avoid mistakes.
Source
Installation and repair instructions
View after dismantling the panel
Replacing the panel, especially if you are installing it on an old VAZ 2112, is a certain difficulty. Older machines do not have some of the functions for which the panel has buttons. The wiring may need to be worked on.
Tools and materials
Standard tools will be required.
But a certain amount of additional materials is needed:
- you will need plugs for extra buttons that are not needed on an old car;
- air duct;
- various inserts, buttons (5 pieces) and pads;
- a new wiring harness suitable for the wiring diagram;
- brackets for mounting the instrument panel;
Algorithm of actions
Shield fully installed
First you need to remove the old panel. This is done in the same way as on other models of VAZ cars.
When installing, you need to replace the ignition switch with a decimal or Kalinovsky one, depending on how many terminals there are on the block to the lock. You can leave the old one and rearrange the wires, but the new one will work and look better.
The instrument panel wiring needs to be replaced. Also, connect the dimensions with additional two wires in Ш4/13 and Ш3/13 on the mounting block. This applies to older units with 11 relay spaces.
Depending on whether it is an injector or a carburetor, the connection has its own nuances. If you bought a solid factory panel, then instructions should be included with it. Briefly, it can be noted that the injector is not equipped with a speed sensor, please take this into account when installing.
The car's electrical circuit can be of great help. If it is not there, you can find it on the Internet. There are some differences between the VAZ 21124, 2111 and other car variants, so find yours.
If the instrument panel does not work after turning it on, check that the wiring is connected correctly - this is usually the error.
To change the torpedo trim, it is not necessary to remove it completely!
Why doesn't the instrument panel work on the 16 valve VAZ-2112?
So let's get started, let's look at the panel overlays, which are divided into:
Euro-1, another name is “Caprice” and has an index of 21104. The features of this lining are that it does not have a passenger shelf.
Euro-3, a cover without a shelf, but under the instrument panel of Kalina, Priora, and has a climate control module with 3 knobs and an emergency stop button.
There are also exclusive panel overlays that make the interior of the VAZ 2110 similar to the Nissan Primera, where the instrument panel is in the center.
In addition to these Euro-overlays, there are overlays that are installed on top of them. For example, the overlay of the Chestnut panel.
It is not difficult to install the Kashtan overlay on the dashboard, so we will not dwell on this, but changing the old panel overlay to the Euro one is already more difficult.
The euro overlay for the panel consists of:
- On the masonry itself
- Inserts for buttons (small insert 2110L-2120031, large 2110L-2120032)
- Air ducts (2114-81080623)
- Device panel trim (2110L-5325124)
- Double button for turning on the headlights and low beam
- Key for turning on the rear fog lights (with fixation)
- Rear window heating switch (latching)
- Key pads - 2 pcs.
- Plugs instead of keys - 6 pcs.
- Wiring harness for connecting the dual side position switch and low beam headlights
- Block
- Device panel fastenings
- It may be necessary to purchase separately different keys for the VAZ-2114 and pads for them.
The cover gives the impression of a high quality product. It is softer than the old pad and, as the developers say, is more injury-proof. They also promise improved air flow to the side windows.
Now we are moving towards installation, and here we can distinguish 2 methods, each of which has its own advantages and disadvantages:
Removing the car dashboard
- Using a Phillips screwdriver, remove the three screws that secure the center console;
- remove the cover, the protrusion located at the bottom, remove the protrusion from the bracket;
- Using a nozzle, unscrew the five screws located in the console on the right and remove the screen;
- Disconnect the terminal with the (-) sign from the battery. If there is a radio receiver, you need to remove it, remove the plug from the shield;
- Disconnect the wires coming from the cigarette lighter, remove the cartridge;
- Using a narrow screwdriver, remove the handle from the levers;
- pull the handle towards the heating and fan switch;
- unscrew the two screws above the panel and the two located under it using a screwdriver;
- unscrew the screw located behind the panel;
- Also unscrew the two self-tapping screws securing the cover;
- disconnect the harness and wire connectors. To avoid confusion when installing the panels, you should mark the order in which they are connected;
- unscrew the fastening bolts;
- unscrew the two self-tapping screws, those that secure the bottom bracket using an 8 key;
- unscrew the self-tapping screw securing the light guide and remove it;
- Also unscrew the screws securing the heating unit;
- remove lamp sockets;
- after removing the external parts, remove the decorative insert;
- unscrew all nuts with a 21 key;
- hydrocorrector, remove its lamp;
- Unscrew the screws that are attached to the cross member on the left.
- Finally, the panel itself is removed. The panel is assembled accordingly in the reverse order.
In general, the repair work is quite doable even with your own hands, but before starting dismantling work, you need at least a pinout mapped on paper, otherwise it will be difficult: you will need to “trace” every wire and every connection that is on the “path” from devices to the power button.
What types of overlays are there?
If you just need a Euro pad, then there are two options:
Euro-1 rubber, another name for which is Caprice. It has the same instrument cluster as the VAZ 2110, the only thing is that there is no shelf on the passenger side;
Panel trim VAZ 2110 Euro-1
Euro-2 is practically no different except for the presence of the mentioned shelf.
Panel trim VAZ 2110 Euro-2
There is also a Euro-3 overlay on sale. But it is for later and more advanced VAZ cars - Priora, Kalina. The fact is that this version provides more devices, for example, there is a unit for climate control, which is not observed in the top ten. Although, in principle, if desired, installing this option is also possible.
Panel trim VAZ 2110 Euro-3
Any Euro pad mentioned above is a quality product, unless, of course, it is a cheap fake. It is softer and even, according to manufacturers, less traumatic, like the old one. In addition, after its installation, the supply of warm air to the side windows should improve.
Components
When purchasing, you will receive what is included in the kit, namely:
- Europlate;
- Inserts for switches (buttons) of devices;
- Trim on the instrument panel;
- Since your instrument combination may differ from those whose installation is structurally provided, there should also be six plugs; they can be inserted instead of buttons;
- The buttons themselves and two pads for them: • Double – for low beam and dimensions; • To turn on the fog lights; • Heated rear window.
- Air ducts;
- Block and wiring harness designed to connect a double button for side lights and low beam;
- Brackets securing the instrument panel.
In addition, if you are not entirely satisfied with this combination, and you need more buttons for other devices, then they, as well as the pads for them, can be purchased separately.