In every car, the heater, that is, the stove, plays an important role. It's hard to imagine how to drive during sub-zero temperatures without having it in the car. In this article we will look at the heating system on a Niva-Chevrolet car. We will also learn about ways to replace both the stove itself and its radiator separately, without resorting to the help of service stations and auto repairmen.
The stove on the Niva is of a liquid type and is connected to the cooling system. In the instrument panel there is a casing made of plastic, which is where the heater radiator is located. In a Chevrolet Niva car, the stove does not have a tap and is controlled only by dampers.
Stove components
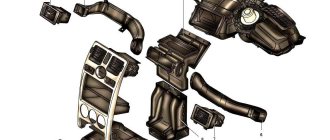
First of all, let's figure out what the stove itself consists of. "Niva-Chevrolet" has the following layout:
- ventilation duct;
- air duct heating the windshield;
- intermediate body;
- air intake filter;
- fan;
- interior heating duct;
- foot heating duct;
- heater radiator.
For flawless operation of the stove, it is necessary to strictly follow the operating rules and promptly carry out preventive cleaning of the entire system. If a breakdown occurs, there is a need to fix it. Next, we will look at ways to disassemble and replace the stove and radiator on a Niva car.
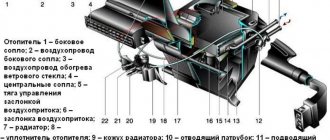
Heater diagram
First of all, we want to inform you that the Niva already has a liquid-type heater installed, which allows you not only to supply warm air into the car’s interior, but also to cool the running engine, preventing it from overheating. It's no secret that overheating the engine entails extremely undesirable consequences. The engine may jam, and restoring its performance will be possible, but difficult, and you will have to incur significant financial expenses.
Design Features
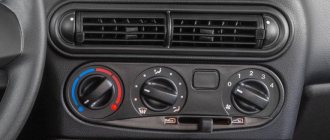
The main design feature of the stove installed on the Chevy Niva is the absence of a tap. In this case, the supply and regulation of the flow of warm air is carried out thanks to the presence of dampers.
And also in the new Niva, heating and cooling are carried out by the same device. The vehicle was equipped by the manufacturer with a sufficient number of nozzles, thanks to which air flows can be targeted specifically at the side windows and doors, at the windshield, etc. In addition, the stove is equipped with a special switch for the high-speed mode of supplying warm air. There are a total of four heater operating speeds; the vehicle driver, at his own discretion, chooses the mode that is acceptable to him.
In order to expand the functionality of the heating and ventilation system, the manufacturer equipped the car with additional regulators, by controlling which it is possible to regulate not only the temperature of the supplied air, but also distribute its flow, as well as ensure the supply of outside air. Of course, everyone can easily understand that outside air will easily flow into the Niva’s interior with the side windows open. However, this is not the only way. Outside air also enters the vehicle through air intakes that are part of the heating and cooling system. It is important to note that the air passing through the air intakes then passes through the heater, and after that it enters the cabin either cold or already heated. Another advantage of passing outside air through the air intakes is its purification from dust, soot, and pollen. This becomes possible because the stove contains filters.
The intensity and direction of the air flow directed into the car interior is also regulated by dampers. They can not only be adjusted in a certain direction, but also completely closed, making it impossible for air flow to flow through. All these actions are carried out using a switch located in the second position. Below the switches there is a lever that can be moved to the left and right. This lever activates the air recirculation function. In this case, the access of outside air to the cabin is completely stopped. Recirculation is used more often in winter, when it is important to warm up the car interior in a minimum period of time. Some drivers actively use the recirculation start function also in cases where they have to stand idle in traffic jams or move in a tunnel. In these cases, the concentration of harmful substances in the air increases due to the simultaneous presence of a large number of vehicles.
However, it is also undesirable to use this mode often, since this results in an increase in the level of humidity inside the cabin. Of course, high humidity causes the windows to fog up, limiting the driver’s visibility.
If you suddenly notice that your windows have started to fog up, you can direct a stream of cold air onto them by using the air flow distribution control and the outside air supply control. If you have to operate a car in winter, you know that in severe frosts the windows freeze excessively and ice appears on them. It is possible to eliminate such ice by using the first switch, selecting the maximum indicator, indicated in red. You can also turn on the fan in the mode of supplying warm air directed directly at the frosty glass.
Dismantling
Now it’s time to talk about how to remove the stove on a Niva. It is dismantled due to a breakdown or when it interferes with the repair of other equipment. To remove the stove, prepare a set of tools.
Before the heater is removed from the car, the Niva-Chevrolet is initially de-energized. In other words, you need to disconnect and remove the battery. Then remove the instrument panel. On the stove control panel there are handles that are responsible for heating and air circulation. Let's take them off.
After carrying out the above work, remove the decorative control panel of the stove. Using a Phillips screwdriver, unscrew the screw securing the bracket. Next, remove the light bulbs that serve to illuminate the levers. Unscrew the screw securing the bracket and disconnect the damper drive rods. Next, unhook all the wires and remove the remaining rods. The next step is to remove the fan and heater switch after unscrewing the element that secures it to the instrument panel.
At this stage, the removal of the stove is completed. After the necessary maintenance, we reassemble in the reverse order.
The main reasons when the stove does not blow warm air into your feet
The heater radiator is leaking
Before gutting the air ducts and air dampers, you need to make sure that the antifreeze warms up to its operating temperature.
And this may depend on a lot of factors - the quality of the pump , the tightness of the system and the heater radiator , including the correct operation of the thermostat, and the quality of the coolant. If the temperature with a fully warmed-up engine is within 80-90 degrees, we look for the reasons for the lack of air in the legs in the design of the heater.
Turn on maximum heat.
A feature of the stove on a Chevrolet Niva is the absence of a heater radiator tap, that is, antifreeze circulates in a full circle in winter and summer and passes through the heater radiator. Taking this fact into account, the factory somewhat complicated the design of the air ducts and air dampers - there are two of them in the Chevrolet Niva.
Upper deflector flap.
One works for frontal airflow, the second is responsible for supplying air to the feet of the front and rear passengers and the driver. It is with this damper that problems arise that we will try to solve.
Correctly turn on the foot airflow
It turns out that even after several years of owning a Niva Chevrolet, not everyone knows how to properly turn on the warm air to blow their feet. By using fan speed controls and damper position controls, and using sound logic, we can end up with a situation where the entire flow of hot air is directed onto the windshield and into the face of the driver and front passenger. Of course, the car is warm, even hot, but your feet are cold.
Practice has shown that Shniva has a special algorithm for supplying hot air to the legs . On most instances this is done like this:
- We warm up the engine until the flow of warm air is clearly felt by the hand.
- The fan speed switch is set to the fourth position, 4th speed.
- Turn the airflow direction knob to exactly 12 o'clock.
- Immediately return it to the 10-11 o'clock position.
Correct position of the stove blower control.
- The air damper will make a characteristic click and the air flow will flow to your feet. Now you can set the blowing intensity at your discretion.
- If this method did not work the first time, the second or third time it works in 90% of cases.
Having remembered this sequence, you will have to turn on the airflow several times, after which the damper will rub in and find the desired position itself in accordance with the pictogram on the adjustment handle.
It's all about the inaccuracy of assembling the heater assembly - backlashes and gaps interfere with air distribution and setting the damper in the desired position from the first turn on.
How to replace the heater on a Niva-Chevrolet car
If you frequently travel through the forest or simply off-road, your car may upset you with the smell of antifreeze or foggy windows. In this case, you need to either repair or replace the stove. If your heater cannot be repaired or restored, it means it needs to be replaced.
Replacing the stove on a Niva is quite easy. First of all, remove the heater as described above. We are installing a new stove. The whole process happens in reverse order. Before the decisive step of removing and replacing the heater, you should pay attention to the heater radiator. It may well be that this is the reason for the non-working state. In a Chevrolet Niva car, the stove can be installed and removed without any problems, the main thing is to follow the procedure.
Solutions to the problem
However, realizing that poor bottom heating is a technical mistake of car developers, drivers still do not want to put up with such a problem and strive to modernize something on their own, eliminating the discomfort that has arisen. In principle, such owners do the right thing. You cannot give in to problems; it is important to look for ways to solve them. If it is difficult to find the right course of action on your own, then by visiting specialized forums, it becomes much easier to come to the right decision with the collective wisdom.
Technical problems
Initially, we suggest that you figure out why such a problem arises on Niva. In this vehicle, the heating and ventilation systems are interconnected. Air penetrating from outside enters the radiator, then it can be heated, and after that the warm flows will be redirected into the car interior. At the same time, the developers provided the vehicle with three main ways for warm air to enter the cabin. It all depends on what position the driver sets the switch:
- When the lever is moved all the way to the right, air will penetrate through the upper deflectors.
- If you move the lever in the opposite (left) direction all the way, air will flow between the side and top deflectors.
- If the lever is installed centrally, the air should be directed directly to the legs, but, unfortunately, in practice this cannot be achieved.
It should be noted that by choosing the first option for installing the lever, the driver will be able to provide a good flow of warm air onto the windshield, helping to quickly remove ice if it occurs. Experienced drivers do not recommend choosing the second option for installing the lever, since in this case the warm air flows will be mainly directed under the dashboard, leaving only “crumbs” to heat the interior.
Solutions
Now that the reasons for poor heating, especially in the lower part of the car’s interior, have become clear, it doesn’t hurt to delve into the recommendations we have proposed, which will guide you towards actions that can completely eliminate the problem.
So, most of all the problem lies in the incorrect operation of the dampers, which do not rotate enough in the right direction, and sometimes close completely. An old bank card will help you solve a technical problem. No, you will not pay off, spend your financial savings. Please note that we suggested that you use the old, no longer needed card. We'll just really need to cut some things out of plastic.
Now remove the decorative panel of the heater, then remove the damper control. While holding this regulator in your hands, remove its lower part. We recommend that you do not make hasty movements, since all parts of this regulator are made of not very durable plastic. It is not difficult to break such fragile plastic structures. Unfortunately, this will complicate your work later, since you will have to use a soldering iron to restore the integrity of the structure.
We recommend: A proven method for repairing an engine without disassembly
Now set the upper flap to the upper position. To forcefully “tightly” secure this position of the dampers, prepare a suitable-sized bracket (you can even cut it yourself), and then secure it with self-tapping screws. Be sure to make sure that the bracket you install creates a real obstacle to choosing a different direction for the lower flap. From the prepared plastic card, cut out a new path for the air flow, singe the edges of the cut out part and introduce them into the structure you have modernized. Of course, after performing these not very complicated steps, you need to return the device to its place, doing all the same steps in the opposite direction.
Unfortunately, while anticipating the joy of high productivity of your own work, you suddenly discover that the air is directed exactly where you wanted it, but at the same time you notice that the strength of the air flow has become less. For this reason, the problem of poor foot heating has not been completely solved. However, we propose to continue some technical changes. Take an old plastic canister, cut out the neck, install it to the deflector, and secure it securely with self-tapping screws. This very simple technical trick will ensure increased flow.
Additional reasons
There are also additional reasons why heating the Niva’s interior becomes impossible. This can happen when a fuse blows due to a short circuit in the vehicle's electrical circuit. Of course, you will have to identify the blown fuse and replace it. In the same way, a resistor can fail; you will also need to remove it and install a new one in return.
If the heater is working, but you are not very happy with the heating power, we recommend checking the coolant level. Oddly enough, a small amount of antifreeze or antifreeze prevents the vehicle from heating well. Sometimes, by pouring in coolant, without following the recommendations, and performing all these actions hastily, the driver himself “airs” the system, which is why the heating power also drops. In this case, it will be necessary to bleed the system to eliminate any air pockets that have arisen in the system.
The following can also negatively affect interior heating:
- excessive contamination of the fan;
- failure of the stove motor;
- thermostat malfunction;
- destruction of bearings.
So, if you are attentive to your vehicle, immediately delve into the essence of the problems, eliminate them in a timely manner, following the algorithm we propose, your Niva will last a long time and will delight you with excellent work.
If this happens regularly, then it makes sense to check the wiring. The problem may also be in the fan itself. To test, turn on the ignition and check the voltage at the engine terminals.
If it is missing, you will have to replace the motor.
Naturally, each specific car has its own gaps in the heating system, so there cannot be a single treatment recipe. However, with little effort, without removing the front panel and the entire heater, you can modify the guides for the dampers so that the main flow of warm air is supplied to the feet.
To do this, you need to remove the casing from the console on the driver's side and, if desired, the steering column casing. In front of us, on the stove side, is a die that is responsible for the direction of movement of both dampers, and therefore the direction of air supply.
All that remains is to unscrew the die with the slots, change the shape in the uppermost slot from curved to straight, maintaining the starting and ending points. Having changed the geometry of the movement of the upper damper, it remains to firmly fix the lower one, which is responsible for blowing the legs. It is enough to fix the lever of the lower damper with a self-tapping screw in the position of blowing the legs.
Now there will be constantly warm air in the legs, and its quantity and proportions between the windshield and the legs are smoothly selected by a conventional air direction regulator.
Types of radiators
Radiators are made from two types of materials: copper and aluminum. Each has its own pros and cons. An aluminum radiator heats up quickly, is inexpensive and has good rigidity with low weight. However, such a device cannot be repaired, since it is very problematic to solder it. Aluminum also does not retain heat well, so it cools quickly.
Copper radiators are more expensive, but have their own positive characteristics:
- Unlike aluminum ones, they last longer because copper does not corrode.
- They maintain the set temperature for a long time, despite the fact that they heat up slowly. In the Niva SUV, the stove requires heating more space than in conventional sedans. This is why you should choose a high-quality radiator.
The downside of a copper radiator is one thing: acquiring parts of acceptable quality is not very easy. A copper device is more expensive than an aluminum one. Its price is in the range of 2000–2500 rubles.
Problems of choosing a new radiator
For the Chevrolet Niva car, you can find aluminum and copper radiators on the market, differing both in performance characteristics and in price.
Aluminum radiators
The main advantages of aluminum radiators:
- low price (from 700 rub.);
- short heating time;
- light weight.
The disadvantages of such radiators include:
- low heat saving rates (heats up quickly and cools down quickly);
- low maintainability (impossible to solder holes and holes);
- the presence of steel inserts that are subject to corrosion and significantly reduce the service life of the radiator.
In Russia, aluminum radiators are produced by LUZAR and.
LUZAR radiators are low cost
Copper radiators
Copper radiators have a number of advantages, the main of which are:
- high heat saving rates;
- longer service life than aluminum radiators;
- possibility of repairing holes and holes using soldering.
Disadvantages of copper radiators:
- high cost (from 1700 rubles);
- slow heating;
- heavy weight making installation difficult.
DAAZ copper radiators retain heat well
Copper radiators produced by DAAZ and SHAAZ are in greatest demand among car owners.
Thus, replacing the heater radiator of a Niva Chevrolet car is quite simple. You will need a new radiator, a standard set of plumbing tools and no more than two hours of free time.
Replacement
Replacing a radiator heater is quite simple, but can take a long time. The main thing is to prepare all the tools and use high quality spare parts before starting work.
The replacement will take place in stages:
- We shut off the entire heating system. If it is leaking, the antifreeze must be drained.
- It is better to cover the interior of the car with a cloth, since some of the antifreeze will get inside in any case.
- We remove the console and disassemble the glove compartment. It is advisable to unscrew the gearbox lever.
- Unscrew the radiator bracket.
- Remove or loosen the panel screws.
- Remove the casing with the fan.
- We remove the radiator, before doing this we drain the antifreeze.
To install a new radiator, perform the steps in reverse order. During work, pay attention to the condition of the device itself and the pipes. Do not install a radiator or pipes that have cracks or cuts. It is better to spend money once on a new one than to constantly repair the old one.
After installation, be sure to make sure that there is no air lock in the system, otherwise you will have to go through everything again. New radiator installed. If treated with care, it can be used for several years.
SUBZH! I finally found ALMOST where the antifreeze goes.
What goes away is BAD. And the fact that there is a stain under the bumper is GOOD. Almost in the center a little closer to the left headlight
But the pipe is leaking or the radiator is not clear yet
My account
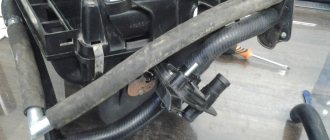
After removing the glove compartment, access to the heater valve opens. A rod is attached to the crane lever using a clamping bracket. Use an open-end wrench size 7 to loosen the nut located on the bracket.
The traction cable is removed from the crane lever. Using an open-end wrench, the fastening of the rod is loosened. Using a 10mm socket, unscrew the two bolts securing the faucet to the wall of the engine compartment. The mounting bolts of the heating tap are unscrewed with a 10 mm socket wrench. The heater tap is removed from its niche and replaced with a new one.
The heating tap is removed from its seat. The tap is assembled and installed in the reverse order. Initially, you should disconnect the hose from the pipe. This action is quite difficult, since the hose sits tightly on the pipe. If you move incorrectly, your hand may slip and you may be injured.
For this reason, we recommend that you wear gloves to avoid such unfortunate consequences. Now, using a screwdriver, unscrew the screws that secure the seal, pressing it against the partition.
To dismantle the stove faucet, it is necessary to drain the antifreeze. Open the faucet as far as possible. We substitute the hose and insert one end into the basin. To drain the antifreeze, you need to unscrew the plug on the cylinder block. Lightly hold the hose with your hand and gradually open the cap located on the expansion tank.
We do this work carefully, as the stream of antifreeze will gradually increase
In order to remove the stove valve, it is necessary to completely drain the antifreeze. Loosen the clamp on the carburetor heating pipe and remove this part from the fitting. After all the coolant has flowed out, screw the plug into the block and tighten it well. Antifreeze leakage from the stove In used cars, coolant often begins to leak from the stove. The reason for this is usually wear and tear on the pipes or a malfunction of the heater tap.
Since antifreeze circulates under pressure, all connections must be tight. However, during prolonged use, hoses and gaskets lose their elasticity and burst. After inspecting the heating system and identifying the leak, the worn part is replaced with a new one. When making repairs, you should not use clamps made in China due to their poor quality.
Due to loss of elasticity, the stove pipes crack over time and leak antifreeze. The coolant can also leak from the heater radiator itself. In this case, it will have to be replaced with a new one.
Replacing a Chevrolet Niva Chevrolet heater core
https://youtube.com/watch?v=PgDz4rJ2GJ0
The stove does not heat well. To diagnose the malfunction, turn on the ignition, start the stove and try to change the intensity of the air supply. If at the first three speeds the air is not supplied or is supplied cold, the cause of this is a faulty resistor that needs to be replaced.
The reason for the inability to switch speeds is the failure of the resistor. If the resistor is OK, the diagnosis continues. If it is low, add antifreeze to normal and check it after a few days.
If the level has noticeably decreased, you should pay attention to the hoses and pipes, wear of which is usually the cause of coolant leakage. One of the reasons for poor heating of the interior by the heater may be a low level of coolant in the system. If the control unit malfunctions, it will have to be removed
Faucet replacement process
Repairing the unit at home is only possible if you have the appropriate tools - it’s easier to contact a car service center.
Another reason for the stove stopping may be a dust-clogged cabin filter.
In this case, the load on the electric motor increases, which, in turn, leads to failure of the heater fuse. In this case, it should be washed. This is true when purchasing and operating used cars. However, it can sometimes fail. Replacing the heater cable Sometimes it is not possible to change the position of the heater damper.
The reason for this is a broken cable. To replace it, you will need a standard set of tools and a headlamp. Replacing the cable is carried out as follows. The driver's seat moves back. The handles are removed from the damper control panel and the screws are unscrewed.
The panel is dismantled on the left side at the location of the driver's feet. To access the cable, you will need to remove the heater control mechanism. The latches securing the cables are removed. The recirculation damper mechanism is dismantled and the cable is removed.
Each end must be twisted into a ring and securely fixed. Using a cable, the position of the air supply flap is changed. Assembly is carried out in the reverse order.
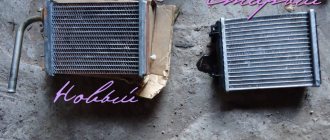
The main signs that a Niva Chevrolet heater radiator needs to be replaced
If you drive a Chevrolet Niva for a long time and do not do or check anything in it, then an unpleasant situation can happen when the car becomes cold in winter because the heater will not work properly. To prevent this from happening suddenly, you need to take into account the following signs associated with the cabin radiator (also called a heat exchanger):
- if antifreeze appears under the driver's mat, this is a serious sign;
- the smell of antifreeze appeared in the cabin;
- a greasy coating began to appear on the glass;
- the air heats up slightly during the cold season;
- Antifreeze in the cooling system must be constantly topped up.
If there are no antifreeze leaks at the joints, it means that all of them need to replace the heater radiator. And then, you can see this just by looking at the radiator; if it is covered in drips, then it is clear that it must either be repaired or replaced. Then you need to choose a new stove radiator; they are usually made from aluminum or copper; both are good, depending on which one you already like.
What is a stove tap, its functional features and location
The stove tap is a metal part that resembles a regular water tap. Antifreeze (coolant or coolant) constantly flows through it.
In the Chevrolet Niva, the coolant can flow through 2 cooling circles: winter and summer. The heating tap gives the driver the opportunity to switch to one of them. For example, with the onset of summer, when the tap is fully open, it is almost unbearable to be inside the car due to the heat, so it is closed for this period of time, and with the onset of cold weather, the tap is opened again. Due to active use, the part eventually becomes unusable and leaks coolant.
It is very easy to determine whether a part is faulty - lift the cover in the Chevrolet Niva interior. If there are obvious signs of leakage, the unit must be replaced.
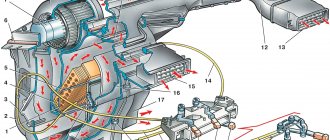
In the diagram you can see where the heater tap is located and the circulation of antifreeze in two circles
It is best to replace the metal faucet of the stove with a ceramic one, which will increase its service life several times.
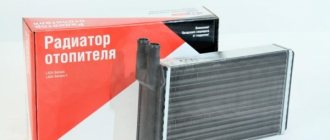
Replacing the Chevrolet Niva heater radiator: preparation
To replace you will need the following tools:
- 14" head with long knob;
- 10" head with long knob;
- head on "8";
- open-end wrenches;
- flathead and Phillips screwdrivers, available in a set;
- pliers that are needed to clamp and grip parts of various shapes.
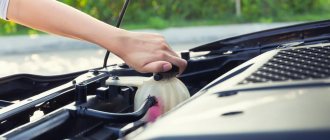
Next, be sure to drain the antifreeze from the cooling system. When replacing the heater radiator on a Shnivy, the coolant is usually drained in the following ways:
- open the hood lid, open the cap on the expansion tank, on the front part of the cylinder block, drain the liquid through the drain hole;
- There is another way - you also need to open the cap of the expansion tank, remove the clamp on the throttle body hose, pull out this hose, and instead put another hose through which the liquid will immediately flow into the bucket.
How does the element change?
When replacing the heater on all VAZ cars, questions often arise - how to get to the heater and how to remove the radiator in the easiest way. In this regard, the Chevy Niva is considered an exception; getting to the stove here is relatively easy. No special tools are required for this; all you need is a set of screwdrivers and the following tools:
- pliers;
- a tube-shaped spanner (size 6-8 mm) for unscrewing and tightening clamps;
- 13 mm wrench for unscrewing the cooling system plug;
- a basin and a piece of hose 1 m long for draining the coolant;
- sealed plastic bag, maybe an old one.
You should also prepare a supply of antifreeze for refilling in an amount of 2-3 liters. An inspection ditch is not needed for work; a flat, open area will suffice. The process begins with partial emptying of the Chevy Niva cooling system. Antifreeze is drained only from the cylinder block; there is no need to touch the cooling radiator.
To empty the basin, you need to place it under the cylinder block on the left side (in the direction of travel) and pass the hose into it. Using a 13mm wrench, loosen the bolt - the plug on the block - and then unscrew it by hand, holding the hose at the ready. When the plug comes out of the hole, you need to quickly insert the hose and hold it until the antifreeze flows out. This way you will avoid loss of coolant and will not leak the engine compartment. As it leaks out, it is necessary to unscrew the cap of the expansion tank. After this, you can move into the car interior.
Replacing the heater radiator begins with disassembly, performed in the following order:
- For convenience, it is recommended to unscrew the front seat at 4 points and pull it out along with the runners.
- Remove the glove box (glove compartment). First, unscrew the plastic trim on the right side, then open the glove compartment and unscrew the screws located in front, on the left and in the back of the box. When removing, you need to disconnect the glove compartment light wires and secure them up so that they do not interfere.
- We unscrew the screws on the side plastic panel of the center console and remove it.
- Considering that a certain amount of coolant remains in the radiator, we slip a bag under the pipes and loosen the clamps. We remove the pipes one by one, trying to let the liquid drain into the bag.
- We unscrew the 2 screws that press the radiator from the side through the plastic cover. Carefully remove the part from the opening so as not to spill antifreeze.
After removing the element, it is worth examining the condition of the rubber pipes supplying coolant to it. If they become sour or cracked, they need to be replaced, otherwise you will have to undergo lengthy disassembly again later. To disconnect the pipes from the engine, you need to remove the plastic casing from the motor and unscrew 2 clamps, then pull the hoses out. That's all, we install the new unit, assemble it and fill it with antifreeze.
Car enthusiasts practice a simpler method, but it involves cutting out the plastic elements of the front panel. Here each motorist decides for himself which method to choose.
Instructions on how to change the heat exchanger of a Chevrolet Niva without air conditioning
The manufacturer advises replacing the heat exchanger after the dashboard has been completely disassembled. But you can do without these complex steps; to replace the Chevrolet Niva heater radiator, you just need to do the following:
- remove the glove box, unscrew all screws using a Phillips screwdriver;
- remove the lower air duct, which is secured with one screw, this air duct is directed towards the feet of the right passenger;
- on the lower pipe, you need to loosen the clamp, take a container to drain the liquid remaining in the radiator;
- Unscrew the clamp on the upper pipe and tighten it too;
- Unscrew the screws that hold the radiator, and then pull the radiator towards you so that it rests against the upper air duct;
- unscrew the nut 8, it holds the relay cover, remove this cover;
- Next, you need to use pliers to bite off the corner of the plastic radiator housing and pull the radiator out, pulling it towards you.
Disassembly - cleaning the fan
As I already wrote above, in each car the removal of this device is done differently, but the essence always remains the same, we either have the fan completely removed or there is direct access to it so that the elements can be lubricated.
I WOULD LIKE TO CAUTION - before you remove the electric motor, disconnect the terminals from the car battery to avoid unnecessary unnecessary short circuits.
The fan is almost always designed the same way - it is an electric motor and at the top there is a cylindrical comb (blades) that pumps air. Here's a small example.
The whistle comes from the engine itself; it has one or two bearings that hold the rotation shaft. If the bearings fail or become clogged with (annual) dirt, strange sounds occur - whistling, crackling, buzzing, etc. There are two possible scenarios:
- Just cleaning . Diagnostics is simple, try turning the removed motor - if it turns difficult, sometimes even with familiar sounds, then vacuum the engine, lubricate the bearings and other rotating elements (can be done with any silicone grease, sometimes you can use WD-40), clean all the dirt from the shaft.
Usually this is enough in 70% of cases, the electric motor starts working quietly, easily, without unnecessary sounds. Enough for a very long time of silent operation.
- Repair and replacement of shaft bearings . Diagnostics - the shaft does not rotate at all. Here the matter is more complicated, you will need to disassemble the engine itself - “look inside it.” Due to prolonged incorrect operation, bearings can jam, they simply break, the balls “wedge” in them. Many people can now say - why bother, you just need to buy a new engine! Perhaps this is a fairer remark, but the cost of the heater fan (and as a rule it comes assembled) is not very small. For example, for an ordinary foreign car of class “C” it will vary from approximately 5,000 to 10,000 rubles, which is a lot! And if you have a car of a higher class, then prices rise geometrically. So replacing bearings is very justified; they cost pennies.
SO : We unscrew the blades, they are either plastic or metal (often aluminum). There will be a nut in the middle that needs to be twisted, if you managed to unscrew it but the blades cannot be removed, put them, BUT NOT THE WHOLE engine, in hot water, not boiling water but not lukewarm (60 - 65 degrees), they can be additionally secured with boiling water glue it will soften a little, the plastic will expand and you will slowly remove the blades.
Next, we disassemble the electric motor itself, usually these are two or three bolts (nuts) that can be easily unscrewed. You need to "halve" the motor with care so as not to lose all the small parts. After removing the cover you will have a picture something like this.
Next, we remove the bearings, I repeat once again - often there are two of them, and then we change them. One aspect, as a rule, is that you will not be able to find exactly the same ones as those installed in yours. However, having removed the parameters of the shaft, or taking the old option, we go to a special store, of which we have a lot in the city, and buy a suitable option.
We just select the size, take a regular ball bearing, or even our domestic one - they will last longer. We put them on the shaft, assemble the motor and rejoice.
In 90% of cases, if you did everything correctly, there will be no noise, whistling, or crackling. Even if your engine was jammed, after replacement, performance will most likely be restored. This is exactly what we did with a friend in his Skoda Fabia, a new stove cost about 5,000 rubles, the price of our repair was the purchase of two bearings + a can of silicone grease, about 400 - 500 rubles. Now for the second year it has been working great, no whistling, no crunching - silence! As a friend said, it works even quieter than the new one, but it seems to me that “every sandpiper praises its own swamp”!
I think there is no need to explain further that the assembled motor is installed in its original place and used! Now we are watching a useful video on the topic.
I’ll end here, I think this article was useful to you.
Similar news
- Do-it-yourself muffler repair. With and without welding, plus detailed vi...
- Different compression in the cylinders. Why and what to do? Let's figure it out...
- Lost my cap | Don't overpay
Add a comment Cancel reply
Installing a new heat exchanger
- take a new radiator and glue a layer of foam rubber around the perimeter, you can take any glue like Moment, let it dry;
- Now you need to do everything in the reverse order, installing a new radiator, but you will also have to remove the corner of the plastic case on the new radiator.
Put the pipes in place, tighten the clamps, tighten the drain bolt on the cylinder block. When everything is assembled, you need to add the required amount of coolant into the tank. And with this, the procedure for replacing the Chevrolet Niva radiator is completed, after a couple of days you can check the coolant level, it should be normal.
And then a more detailed video on how to replace the radiator of a Chevrolet Niva stove:
Repair of heating system components
Despite the rather complex design of the heating system of the Chevrolet Niva, most of the problems can be solved independently. With proper diagnosis, this will not be difficult.
Replacing damper control cables
The damper control cables fail quite often. Usually the cable braid is damaged, which leads to the need to replace the entire part. You can purchase suitable cables at almost any auto parts store.
When choosing a new heater cable, you should pay attention to its length
To replace the cables, you only need flat-blade and Phillips-blade screwdrivers. The replacement process is carried out as follows:
- Remove the side panel of the lower part of the center console. It is located under the steering wheel to the right of the pedal assembly and is secured with self-tapping screws.
- In the resulting niche you will find two cables. Unscrew all accessible screws securing them.
In the niche under the console there are lower fastenings for the damper cables. - Remove the heater control unit switch handles. Then, unscrew the four screws and remove the block itself.
- Disconnect the remaining cable fasteners.
- Install new cables. Connect them to the control unit and dampers.
When replacing control cables, it is important to set the damper to the position corresponding to the mode set by the switch.
Replacing interior heater pipes
To replace the heater hoses you will need the following tools:
- Phillips screwdriver with long blade;
- a long flat screwdriver or pry bar with a flattened end;
- ratchet with extension and set of hex sockets.
Before dismantling, it is necessary to drain the coolant by unscrewing the drain cap at the bottom of the radiator of the cooling system. To do this, you will need a container with a volume of at least 10 liters, since the Chevrolet Niva cooling system in normal mode contains about 9 liters of antifreeze.
Be sure to reinstall the rubber drain spacer after draining the coolant.
After draining the coolant, you can begin replacing the pipes in the following order:
- Open the hood and loosen the clamps of the heater pipes located in the area of the engine compartment partition. The pipes in the engine compartment are connected to the cooling system hoses using clamps
- Using a flathead screwdriver or pry bar, remove the hoses from the cooling system circuit.
- Remove the lower part of the front panel opposite the passenger seat. This will give you access to the connection between the hoses and the radiator.
The heater hoses are pulled through a connector in the partition of the engine compartment - Loosen the fastening clamps and disconnect the internal pipes.
- Remove the hoses and replace them with new ones.
Stove pipes are usually sold without clamps - Connect new hoses to the cooling system on the engine compartment side and to the heater radiator in the passenger compartment.
- Fill with coolant through the expansion tank.
- Turn on the ignition and heater. Check connections for leaks.
Replacing the electric motor of the stove
The Chevrolet Niva heater motor can be removed without completely disassembling the front panel. It is enough to remove the lower panel trim in the glove compartment area using a Phillips and flathead screwdriver. The first is needed to unscrew the fastening screws, and the second is needed to pry and remove the assembly itself.
To avoid a short circuit, be sure to disconnect the terminals from the battery.
The electric motor of the interior heater is removed as follows:
- Disconnect the terminals from the battery.
- Remove the glove compartment and the lower trim of the front panel in the front passenger footwell area.
To remove the lower left part of the front panel, you need to remove the glove compartment. - Remove the passenger footwell air duct secured with screws and plastic clips.
- Disconnect the motor power cables so that they are accessible.
- Unscrew the three screws securing the electric motor to the impeller.
The electric motor is attached to the impeller with three screws - Use a flat-head screwdriver to separate the motor from the impeller and remove it.
You can disconnect the motor from the impeller using a flat-head screwdriver.
Replacing the stove control unit
Replacing the stove control unit requires special care and precision, as plastic parts are easily damaged.
The external stove control unit includes three rotary controllers and one slider
Dismantling is carried out in the following order:
- To avoid short circuits and electric shock, disconnect the terminals from the battery.
- Very carefully pull towards you and remove each of the stove mode switch knobs.
- Remove the air recirculation control lever by carefully prying it off with a flat-head screwdriver.
- Using the same screwdriver, remove the decorative panel of the controller.
Under the decorative panel of the stove control unit there are backlight bulbs - After unscrewing the two mounting screws, remove the control unit.
The heater control unit should be removed very carefully so as not to damage the cables and wiring. - Disconnect all wires from the controller. If you have an air conditioner, also disconnect the vacuum switch hoses.
- Install and connect the new control unit in reverse order.
Replacing the stove radiator
The heater radiator on the Chevrolet Niva is located inside the central unit of the interior heating system. To dismantle it, you must remove the entire front panel and the frame on which it is installed.
To replace the radiator you need to disassemble almost the entire front part of the cabin
After disassembling the front panel and removing its frame, access to the heater unit, inside of which the radiator is located, will be provided. Before dismantling it, it is necessary to drain the coolant and then disconnect the pipes. After this, removing the heater radiator will be quite simple. Installation of the new radiator and previously removed components is carried out in the reverse order. Before assembling the front panel, add antifreeze. This will allow you to check the quality of the hose connection.
Video: replacing the Chevrolet Niva heater radiator
Replacing the stove tap
The Chevrolet Niva heater valve is different from most domestic cars. Its design is a damper controlled by a cable.
By unscrewing the side panel of the center console, you will have access to the heater valve and its drive cable
You can reach the cable through the driver's footwell. The tap pipes themselves are mounted in the partition of the engine compartment.
The heater valve pipes are installed on the partition between the engine compartment and the passenger compartment.
To dismantle the screen of the stove tap pipes, it is necessary to disconnect the hoses from the inside and outside, after draining the coolant. After this, the two fastening screws are unscrewed and the screen is removed.
Replacing the entire heater unit
The central block of the heater includes dampers and their drive cables, a heater radiator and internal pipes. If several components malfunction at once, it is advisable to replace the entire unit. This will require removing the front panel, center console and the brackets that hold them in place. The step-by-step process is as follows:
- Disconnect the car from power by removing the terminals from the battery.
- Drain the antifreeze.
- Remove the heater control unit by disconnecting all wires and cables from it. If there is a radio, remove that too.
- Remove the glove compartment.
- Disconnect the transmission tunnel lining. You don’t have to remove it completely, but only lift it by unscrewing two screws on the driver’s and passenger’s sides.
- Remove the steering wheel, steering column trim and unscrew the screws securing the front panel. When removing the dashboard, mark all the wires to make it easier to reattach them in their places in the future.
Without removing the entire front panel, when dismantling the heater unit, some elements of the air conditioner and the stove itself can be damaged. - Remove the front panel frame attached to the body with screws.
The heater housing cannot be removed without dismantling the front panel frame - Behind the frame you will find the heater unit casing, connected to the intermediate housing of the heater or to the evaporator section on a car with air conditioning. Unscrew the casing.
- Remove the heater unit.
Installation of a new unit is carried out in reverse order.