VAZ 2113, 2114, 2115 cars considered
Attention! The location of fuses and relays in the blocks may differ depending on the year of manufacture and vehicle equipment. You can see earlier modifications of fuse blocks on this page.
Fuses for the VAZ 2114 injector and VAZ 2115 injector are also described on this page.
Where are the fuses and relays located?
The main part of the fuses and relays is located in the mounting block of the engine compartment.
To get to the block you need to press two latches and remove the cover
Using pliers installed in the block, remove the fuses
On the inside of the cover there is a diagram of the location of fuses and relays.
Click on the image to enlarge.
Fuse mounting block 2114-3722010-60
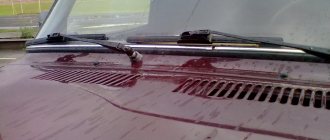
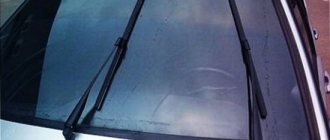
VAZ windshield wiper does not work: causes of malfunction
The operating mechanism of windshield wipers is designed for a long service life and, as a rule, malfunctions and breakdowns occur due to improper operation. Most often, the failure of their wipers happens in winter, when the windshield wiper blades freeze to the windshield, and the driver, without noticing this, turns on the electric motor. In this case, both the electrical and mechanical parts of the windshield wiper may fail. In this article we will analyze the nuances when troubleshooting and repairing windshield wipers on VAZ cars.
Quick diagnosis by weight
The ground outlet is located on the lower bolt of the windshield wiper drive, in the sump. If you suspect that the problem is a bad ground, turn the windshield wipers on maximum and note the speed of their movement. Then turn on the stove. The heater and wipers are connected to the same ground output, so if this is the problem, the speed of movement of the wipers after turning on the heater will decrease significantly.
To fix the problem, find the ground outlet, clean the contacts, solder the terminals if necessary, coat the connection with protective grease, and tighten the fastening nut well.
How the windshield wiper works
On VAZ 2108, 2109, 2113, 2114 (hatchback body) cars a windshield wiper and rear window washer are installed. On VAZ 2199, 2115 (sedan) models there is no rear window wiper.
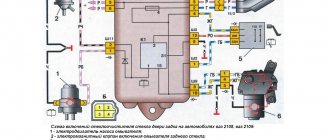
Electrical diagram of the rear wiper:
Windshield wipers have several operating modes: intermittent (work with a pause), low (first) speed, high (second) speed, one-time triple cleaning of the glass, operating mode with a windshield washer. The rear wiper operates only in one position and in conjunction with the rear window washer.
Typical windshield wiper malfunctions and methods for eliminating them:
Windshield wiper malfunctions include:
1) Complete inoperability of the system (not a single mode works, the electric motor cannot be heard):
- check the presence of voltage of 12 volts at terminal 6, in the windshield wiper connector, ground 4, and also check all supply circuits (fuses 4 and 5, switch, mounting block, ignition switch, etc.);
- check the operation of the mode switch (presence of 12 V control voltage at terminals 1 and 2 of the windshield wiper connector when switching modes);
- check the functionality of the electric motor itself (dismantling and disassembly is required);
2) Intermittent mode does not work (all others work);
- the main reason is a non-working “short circuit” relay, in the diagram, and a mode switch (the easiest way to check is by substitution, for a known good one)
3) The windshield wiper blades do not stop in the down position, but stop anywhere (the blades can extend beyond the windshield):
- the limit switch in the electric motor is broken (or burnt out) (it is not possible to replace it, only the entire motor, but you can try to fix and repair the switch);
- incorrect adjustment of the position of the wipers (align the wipers in place);
- the drive shaft of the brush mechanism began to be dismantled (disassembly and replacement of failed parts);
4) The noise of the electric motor is heard, but the brushes do not move (the brushes may twitch in one place):
- the drive shaft of the windshield wiper mechanism has been damaged (“licked off” the splines) (replace or fix the splined part of the electric motor);
- the nut securing the mechanism rod to the electric motor shaft has become loose (tighten the nut);
5) The wipers do not operate after turning on the windshield washer:
- Most likely, the steering column mode switch has failed (replace with a known good one);
- there may be a malfunction in the operation and serviceability of the mounting block (measure the voltage at terminals 9 and 18);
6) Poor quality of glass cleaning.
- The windshield wiper blades have lost their elasticity (replace the blades with new ones);
- contact with oily materials on the glass (oil from the exhaust pipe of a car in front, waxing at a car wash, contamination after polishing, etc.)
Troubleshooting and repair of the rear windshield wiper follows similar principles (the diagram is attached below), with the exception of the absence of operating modes in the rear windshield wiper, and accordingly the absence of some parts (relay, limit switch in the electric motor, and so on).
Electrical part of the windshield wiper:
What is the advantage of a relay with an adjustable pause
As a rule, all modern cars have at least 2 operating modes for windshield wipers: intermittent (that is, with a pause between sweeps of the blades) and constant. Have you ever encountered a situation where, during light drizzling rain, when the windshield wipers operate in the “pause” mode, this pause is too short and the wipers “scrape” on the windshield that has not yet gotten wet? I think most drivers have found themselves in similar situations. If your car does not have the ability to adjust the pause in the operation of the brushes, there are only two ways to solve the above problem. The first is to turn the wipers on and off as needed, but this distracts the driver from driving and creates additional risks for safe driving, especially if the trip is long. The second way is to leave everything as is, that is, to accept the movement of the brushes on dry glass, but this, firstly, leads to increased wear of the wiper cleaning tape, and secondly, it can irritate the driver.
A windshield wiper relay with an adjustable pause allows, by maintaining the required pause between sweeps of the wipers, to easily and most effectively solve the above problem, making travel in light rain conditions more comfortable.
There are two types of such relays:
- with several preset intervals between strokes (for example: 1, 2,4,8, 10 seconds, the driver can only choose the interval most suitable for current conditions;
- with the ability to set any required interval, i.e. Based on current conditions, the driver can set almost any interval using a certain algorithm.
Windshield wiper motor - when repairs are required
Welcome, friends, to the DIY car repair website. Windshield wipers are an indispensable attribute of any car.
Whatever the car is - cheap or expensive, domestic or foreign, passenger or truck, it must have wipers.
The main thing is that they are in good working order and ready to work. In this case, the main element that is responsible for the motor function is the windshield wiper motor.
Operating principle, design and characteristics of fuses
A protective device of this type consists of a housing, which is usually made of high-strength ceramics or special glass, and a fusible insert made of a conductive metal or alloy.
The body performs several functions:
- a fuse-link is built into it in a special way so that when the rated current of the insert is exceeded, it melts or breaks;
- the working thread is inserted into the chamber to extinguish the electric arc that occurs when the circuit breaks; this chamber is equipped in the housing;
- on the body, in those places and in the form as provided for by the fuse design, there are working contacts through which it must be connected to the general network.
Information about the characteristics of this protective device is printed on the housing. This is the rated current of the fuse link and the rated current of the fuse body at which it breaks.
According to their performance characteristics, these protective elements are divided into:
- fast-acting;
- low voltage;
- designed for medium voltage;
- manufactured for high voltages.
In automotive networks, the first two types are used.
The defining point showing the purpose of a particular protective device with a fuse link is its current characteristics. It is she who speaks about the range in which this element is ready to work.
- To protect electric motors, fuses are installed whose inserts can withstand the rated current and its excess for a sufficiently long time necessary to start the main mechanism and reach its operating range. As a rule, such chargers (protective devices) are marked - g - as devices ready for protection from both overload and short circuit.
- There are protective devices that operate effectively during short circuits and protect all equipment from very high voltage currents. Such chargers are marked - a - for protection only against short circuits.
Fuses for cars have several versions:
- low-current inserts, in networks up to 20 A, made of glass with a thin wire insert, there are ceramic cases, the ends are made of metal;
- fork inserts, most commonly used in vehicles, come in miniature and regular types.
According to GOST, a painting system for fusible chargers has been adopted depending on the rated current of the insert. 2 A - gray, 4 A - pink, 5 A - orange-yellow, 7.5 A - brown, 10 A - red, 15 A - blue, 20 A - yellow, 25 A - white, 30 A - green.
How does a windshield wiper motor work?
Most cars have two blades that provide more effective cleaning of the windshield. A single wiper is usually mounted on the rear window.
The device operates in two or three modes, which allow the brushes to provide intermittent, slow or fast cleaning.
The overall design includes a wiper motor (a small motor with a gearbox), a brush return mechanism, a lever system and the cleaning rubber bands themselves. In parallel with the cleaner, you can use the windshield washer, which supplies water in the form of a directed jet.
One of the most unreliable elements of the system, which often fails, is the motor. If it breaks down, motorists do not know what to do and what the reasons may be.
Common problems with front wipers
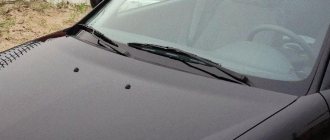
An all too common cause of windshield wiper malfunction is inappropriate handling of them. Their design in the VAZ-2114 is reliable and durable enough to break down quickly, but every Lada owner will someday encounter the fact that the windshield wiper system stops listening.
What are the common problems with wipers:
- they work slowly or inconsistently;
- work constantly and continuously;
- intermittent mode does not function;
- wipers move only in one direction;
- the brushes are motionless during operation of the gear motor;
- The wiper switch does not work;
- turning on the washer stops the wipers;
- the cleansing mode turns on spontaneously;
- no modes work, the gear motor is inaudible;
- Windshield wipers leave behind streaks and dirt.
Motor malfunctions and solutions
Let's look at what to do if the windshield wiper motor does not work, and what can cause such problems. There are several options:
1. The electric motor does not work, the bimetallic fuse is inactive, and the fusible insert responsible for powering the wipers is intact. In this case, you need to check the serviceability of the wiring, the quality of connections of all contacts, determine any existing damage and eliminate them.
If everything is fine with the wiring, then you should check the wiper switch. If it acts up, just replace it. The engine itself may not work - this often happens when brushes stick or contact connections burn.
In this case, you need to repair the windshield wiper motor - inspect it, replace faulty elements, and clean dirty components. It is important to check the integrity of the wiring that connects the electric motor and the block.
Replacing damaged parts
New windshield wiper trapezoid
If the brush springs are damaged or lose elasticity, they will need to be replaced. It is recommended to check how they move in the appropriate holder. If they jam, then worn or existing chips are replaced. In this case, the leads of the new parts are soldered to the corresponding holder.
The collector is cleaned with sandpaper (if there are scratches or other defects on it). If this unit is burnt or worn out, then the gearbox and armature are replaced. Replacement of the gearbox gear is carried out with a similar condition of the teeth. Bent rods are straightened or replaced with new ones. Damaged splines or roller threads require replacement of the rod assembly. All cracked, torn and weak rubber cushions are replaced with new parts.
The procedure for replacing windshield wipers on a “nine” begins with dismantling the main windshield mechanism.
To do this, use a set of screwdrivers and wrenches. Initially, the negative wire of the battery terminal is disconnected. The windshield wiper arms rotate vertically. The nuts are unscrewed and these elements are removed from the rollers.
The next step is to unscrew and remove the levers. If they cannot be removed with light force, then you need to slightly unscrew the nut securing the lever. Using pliers, the last element is moved from the slots. The lever and protective caps on each side can then be removed. The same should be done with the nuts that belong to the upper bracket mount.
Next, the hood of the car is opened and the connector is disconnected from the block. The heating fan is moved to the right (relative to the compartment located in front of the windshield), and the cover is removed from the corresponding unit. After disconnecting the connector, the relays are removed from it. The next step involves removing the lower mounting bolt. Then the holder is pulled out and the wiper rollers are removed from the holes in the body.
How to replace a windshield wiper motor?
The biggest problem is the failure of the mechanism that drives the wipers on the windshield. In such a situation, it is necessary to dismantle the engine, repair it, and in some cases, replace it. Let's look at how to remove the windshield wiper motor (using the VAZ-2109 as an example).
The replacement algorithm is as follows:
- Rotate the brush arms until they are in a vertical position. Now unscrew their mounting nuts.
- It is better to disconnect the negative from the power source so as not to accidentally short-circuit anything.
- Remove the wiper arms from the mechanism rollers.
- Remove one of the caps from each side.
- Unscrew one bracket fastening nut (also on each side).
- Remove the rubber washers.
- Lift the hood and disconnect the connector with wires from the block powering the device.
- Remove the cover from the fuse and relay box. If necessary, remove all relays (they will interfere).
- Unscrew the bolt that secures the windshield wiper bracket.
- Press the plastic wire clamp and remove it from the hole.
- Remove the holder mounted on the wires so that it does not get lost.
- Remove the windshield wiper shafts through the holes mentioned above.
- Pull out the windshield wiper.
Then there are two options - repair or replacement of the windshield wiper motor. Monitor the condition of the wiper motor and inspect the entire system from time to time.
Otherwise, the brushes may fail at the most unpredictable moment. Have a good trip and of course no breakdowns.
After washing the engine, the wipers work
- Registration
- Entrance
- To the beginning of the forum
- Forum Rules
- Old design
- FAQ
- Search
- Users
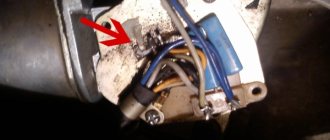
Tell me who knows. The wipers work on their own, what is the reason? VAZ2114.
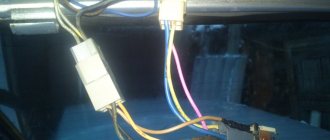
Look at the relay and board in the mounting block. I had the same crap on my new one. An autopsy showed that the connectors on the relay and in the CV were well oxidized, although the car was only a few months old
Look at the relay and board in the mounting block. I had the same crap on my new one. An autopsy showed that the connectors on the relay and in the CV were well oxidized, although the car was only a few months old
I just changed it... a day after washing the engine..
At work, I washed everything under the hood with a Karcher and beat off a heap of dirt above and they started working on their own. On the way home, I removed all the relays and left them to bask in the sun for a day. The mounting block was a glitch (or maybe a feature?) gone.
and now everything is green
I didn’t look closely, it seems the same (I recently tried to turn off the signal) everything works
why should it turn green?
I washed the engine in the evening, the wipers started working, left it to dry, the same thing in the morning. I removed the CY, took it apart, everything was oxidized there. I didn’t clean or repair it, I installed a new one
Source
Modern wipers on the VAZ 2114
To clean the windshield of a VAZ 2114 from dirt and water flows during rain, a special device is provided, so-called wipers on the VAZ 2114. VAZ wiper blades consist of a lever that turns in a certain direction and a rubber gasket that cleans the glass. The wiper gear motor causes the blades to move back and forth.
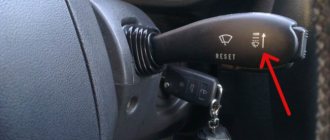
As a result, the windshield or rear window is cleaned. The windshield wiper speed control is located inside the car. It is almost always located under the steering wheel. The size of the brushes can be very different. Windshield wipers on almost all cars operate in several modes. On the windshield, the wiper functions in four ways:
- intermittent, when there is a pause;
- first speed;
- second speed;
- work together with the washer.
The rear window wiper has two modes:
Electrical diagram of VAZ 2115 - 20 cars (left half):
1 – headlights; 2 – fog lights; 3 – air temperature sensor; 4 – electric motor of the engine cooling system fan; 5 – blocks connected to the wiring harness of the ignition system; 6 – engine compartment lamp switch; 7 – block for connection to a single-wire type audio signal; 8 – sound signal; 9 – washer fluid level sensor; 10 – front brake pad wear sensors; 11 – oil level sensor; 12 – generator; 13 – engine compartment lamp; 14 – coolant temperature indicator sensor; 15 – starter; 16 – battery; 17 – relay for turning on fog lights; 18 – coolant level sensor; 19 – brake fluid level sensor; 20 – reverse light switch; 21 – windshield wiper gearmotor; 22 – oil pressure warning lamp sensor; 23 – block for connecting to the rear window washer electric motor; 24 – windshield washer electric motor; 25 – instrument cluster; 26 – mounting block. Conventional numbering of plugs in blocks: A - block headlights; B — electric fuel pump block; C — blocks of the mounting block, ignition switch, windshield wiper gearmotor; D — interior lamp
Source
Functionality and quality of modern wipers
It must be said that the quality of wipers and their size have a huge impact on the safety of the vehicle. Therefore, choosing the right windshield wiper remains a very important task. The reliability and quality of wipers are determined by the fact that they:
- do not make creaking sounds;
- have a long service life;
- Cleans glass very well.
In the absence of any of the qualities described above, the comfort of being in the car is lost, and there is a danger of getting into a traffic accident due to reduced visibility, especially in the rain. The size of the installed wipers plays an important role. If it is slightly larger than required, then the force pressing the blade against the glass, especially when these are frameless wipers, is noticeably reduced. As a result, the glass is poorly cleaned.
In addition, a large brush size will affect the cleaning plane. The edge of the brush may touch the sealing rubber of the windshield, and then it does not touch the working surface. On Kalina's car, the large brush begins to touch the edge of the driver's door. When the brush size is much smaller than required, the cleaning area decreases. The windshield does not clean completely.
At the same time, small wipers leave a dirty island on the glass. What should be the size of brushes on a VAZ 2114? This car model is equipped with two wipers that clean the windshield. They have the same symmetrical size, equal to 51 cm. However, it is possible to install brushes whose size will be slightly changed.
Purpose of fuses
What fuses are on the VAZ 2114? The electrical circuit of this car is designed in such a way that in front of all the main electrical units there are chargers located in the fuse box.
VAZ 2114 fuse diagram
The connection diagram of these protective devices is shown in the figure.
- F1 - rated insert current 10 A - protects the fog lamps located at the rear.
- F2 - with a current of 10 A - these are left and right turn lights, an emergency warning light, a relay-breaker for turn lights and emergency lights.
- F3 - with a current of 7.5 A - protection of light bulbs in the cabin and trunk, trip computer circuits, ignition and brake lights, "Check engine" warning light.
- F4 - with a current of 20 A - protects switches located in the heating circuit of the trunk door glass and heating elements of this glass, “carrying” contacts.
- F5 - with a current of 20 A - protects the horn circuit and its switch, as well as the electric motor of the cooling system fan.
- F6 - with a current of 30 A - this is a circuit of electric windows and their switches with contacts.
- F7 - with a current of 30 A - a protective device for three electrical units - a heater, a windshield washer and a headlight cleaner. In addition, there is also a cigarette lighter, glove compartment lighting and winding for the heating switch for the trunk door glass.
- F8 - with a current of 7.5 A - is protection for the right fog light bulb located in front.
- F9 - with a current of 7.5 A - this is protection for the left fog light bulb located in front.
- F10 - with a current of 7.5 A - protects the indicator lights on the left side, the license plate number, the engine compartment light, the dashboard lights and switches with heating levers, as well as the indicator lights for the size.
- F11 - with a current of 7.5 A - protects the right-side headlight bulbs.
- F12 - with a current of 7.5 A - a protective device for the right low beam headlight bulb.
- F13 - with a current of 7.5 A - a protective device for the left low beam headlight bulb.
- F14 - with a current of 7.5 A - protects the left high beam headlight and the blue high beam warning light.
- F15 - with a current of 7.5 A - protects the right high beam headlight.
- F16 - with a current of 15 A - protects the light bulbs and the turn switch and hazard warning lights, the white reverse light, the power supply of the instrument cluster, the trip computer, the generator winding (at startup), the lights indicating low oil pressure, brake fluid and parking brake, battery discharge.
Replacing a VAZ windshield wiper motor
Sometimes the gear motor fails. The brushes are constantly working, the shutdown relay does not work. When the motor control is turned on, the wipers do not function. In some cases they do not turn off. To eliminate such breakdowns, the motor must be replaced.
The windshield wiper gear motor is a very ordinary three-speed electric motor. Similar to standard geared motors, it has a bimetallic fuse located directly on the housing or hidden inside. Replacing the motor is quite simple. It is necessary to unscrew the four mounting bolts. However, the following difficulties may arise:
- poor engine location;
- the need to mark the location of the crank.
The crank refers to a curved rod that connects the motor and the trapezoid arms. If the crank is installed incorrectly, the teeth of the new motor can be broken. The replacement technology is as follows.
- The fuse box is turned off.
- A mark is made on the location of the crank.
- The crank mount is released.
- The trapezoid mounting bolts are unscrewed.
- The gear motor is removed.
Sometimes the motor is difficult to reach due to its location. For convenience, you need to move the fuse box, having first unscrewed the fastening bolts.
Reasons for wiper failure
There may be several reasons why the windshield wipers of the VAZ 2114 do not work.
The most common of them are:
- Fuse failure.
- Malfunctions in the operation of the electric motor.
- Breakage of the drive trapezoid or its individual rods.
- Broken steering column switch.
The first problem can be solved most simply - you just need to check and, if necessary, replace fuses F16 and F7 (they are located in the common fuse block).
The second reason is the failure of the electric motor (geared motor) driving the device. Such a malfunction is extremely rare, since the electric motor breaks down infrequently, being one of the most reliable elements in the design of wipers.
You can check whether the motor is working properly by disconnecting the rods from it and connecting it directly to the power source. If the rotor does not spin, the gear motor is faulty and should be replaced.
This must be done in the following order:
- disconnect the electric motor from the fuse box;
- put a mark on the rod (crank) in order to fix its position;
- remove the fasteners securing the rod;
- remove the bolts securing the trapezoid;
- remove the gear motor.
Installing a new motor is done in exactly the same order, but in reverse order.
Another common reason why the wipers on the VAZ 2114 stop working is the breakage of the trapezoid. You can determine it visually, and, in case of breakdown, replace the entire unit.
Sometimes it happens that one VAZ 2114 wiper does not work (or works incorrectly), while the other functions properly. The reason for this may be souring of the bushings at the joints of the trapezoid rods. Fixing such a malfunction is simple - just lubricate all the hinges of the moving mechanism. If the reason that only one wiper is working is because its rod or lever is broken, then, again, the entire trapezoid should be replaced with a new one.
If all of the above reasons for the malfunction of the wipers are not confirmed, then you should check the steering column switch with a tester and, if it breaks, replace it with a new one.
Frameless wipers: features
This design does not have its own skeleton. Basically, frameless wipers are a kind of tape that has a steel plate inside. Their appearance harmonizes perfectly with any car, which cannot be said about the skeletons of frame wipers.
These models do not belong to the economy segment. For different brands of cars, such wipers are selected individually. The curvature of the windshield of any car is formed according to aerodynamic parameters. Therefore, the curvature of the wiper must also be appropriate.
This is why low-cost windshield wipers do not press well and the glass does not clean. It is impossible to fix such brushes. You just need to install new, better ones. Premium brushes will work perfectly, regardless of the car model. However, they cost more than 1000 rubles.
A positive quality of frameless models is the ease of cleaning the windshield wiper from ice in winter. You just need to bend them a few times for the ice to instantly fall off. These wipers have excellent aerodynamics. At high vehicle speeds, their downforce increases.
How to properly remove wipers
If you install wipers yourself, before starting work you need to protect the windshield from possible damage. To do this, cover it with foam rubber or a thick towel and begin removing the wipers:
- Raise the metal lever from the windshield and fix it perpendicular to the profile. It must take a stable position so that the spring does not return the wiper to its original position.
- Remove the old windshield wiper blade. To do this, press on the plastic clip, hook or latch that secures the brush, this will open the joint, which will release the worn part.
Some brands of cars are equipped with wipers that have flag indicators installed in the housing. As soon as the set of rubber bands wears out and becomes unusable, the flags change position and the rubber itself will fall away from the wipers.
It’s easy to install a new wiper in place of the old one, the main thing is that the brush must go through all the attachment points, just like the previous one. The short and long cleaners are placed in the appropriate places.
Replacing the frame cleaner:
A characteristic click will indicate correct installation.
The second brush and rear wiper are also replaced.
On older car models, there are T-shaped mounts; they are removed using a flat-head screwdriver; some mounts are secured with screws.
Replacing the frameless glass cleaner:
The process of replacing rubber bands on a frameless cleaner is very simple; to do this, remove the side plastic plugs and take out the rubber band, which is held by two metal plates. The main thing is not to break the metal base.
This is what the rubber bands of a frameless cleaner look like:
Replacing rubber bands on hybrid wipers:
The hybrid model has a protective cover that prevents water and debris from entering the structure.
- Use pliers to remove the steel components.
- Take out the old rubber band.
- Thread a new rubber band through each fastener until it stops; they should fit into the second groove in the rubber.
- Push the steel guides into the first groove of the rubber band; the slots of the steel part should remain on the stop side.
- Check the tightness of the elastic band.
Step-by-step instructions for replacing windshield wipers can be seen in the video.
Windshield wiper trapezoids
The main reason you need to replace your windshield wiper arm is when your windshield wipers are running slowly. The trapezoid is also replaced in case of serious mechanical damage. To replace it, you must adhere to a certain technological sequence.
- Under the hood, the wires connected to the fuse block are disconnected.
- The protective casing covering the heater fan is removed.
- The stove filter is removed.
- The heater motor is disconnected. You just need to move it to the side, there is no need to remove it.
- The decorative trim is removed from the wipers.
- Under the protective rubber cover there is a nut that secures the windshield wiper. The cover lifts slightly and it unscrews. The janitor is removed.
- The wiper shaft is freed from rings and gaskets.
- The second windshield wiper is removed in the same way.
- Under the hood, the bolts securing the trapezoid to the body are removed.
It will not be possible to immediately pull out the released trapezoid. The fuse box will interfere, as well as the heater motor. To remove the trapezoid, you can use two exits.
- Remove the fuse box by unscrewing the nuts securing it, and remove the heater motor.
- Disconnect the gear motor from the trapezoid. Remove the gear motor one by one, and then the trapezoid.
When disconnecting the gear motor from the trapezoid, it is necessary to remember and mark the location of the crank. A marker will be useful for this purpose. Only after this can you unscrew the mounting bolts and disconnect the motor from the trapezoid.
Repair
To troubleshoot problems with the wipers on your VAZ 2109, it is not at all necessary to contact a service station. The work can be done with your own hands, saving a decent amount of money.
Repair consists of performing several operations:
- Disassembling the unit;
- Troubleshooting;
- Eliminating the causes of purifier failures;
- Reassembly.
Dismantling
The first step is to learn how to remove windshield wipers. This will give you access to the device and all its components.
It is enough to follow the specified sequence of actions and first familiarize yourself with the wiper diagram in order to do everything correctly.
Scheme
- First, disconnect the negative terminal of the battery to de-energize the car.
- Remove the brush arms by moving them to a vertical position and unscrewing the fastening nuts. Unscrew the nuts carefully so as not to push the lever out. Otherwise, under the action of the spring, it will fly into the glass and break it.
- By unscrewing the fasteners, the levers can be removed. It is not always possible to do this manually, so arm yourself with pliers. Be careful not to damage the threaded area. To avoid this, screw the nut back onto the splines, but not completely.
- Remove the protective caps made of plastic from the slots on each side.
- Unscrew the upper mounting nuts with the bracket and remove them. Under them there are rubber washers, which are also dismantled.
- Lift the hood and disconnect the wiring harness that powers the wiper motor.
- Unscrew the heater fan mounting screws and move it slightly to the side. This way, when dismantling the purifier, it will not interfere with you.
- Remove the cover from the relay and fuse box. You need to remove not only the wiper relay, but also everything else. Otherwise, they will interfere with your further processes.
- Unscrew the lower fastening nut of the mechanism, remove the plastic holder of the wiring harness from the electric motor from the hole in the car body. Now you can remove the holder so that it does not get lost during the repair.
- All that remains is to push the mechanism roller inside, then lift the electric motor and the windshield wiper mechanism slightly up and to the side. This way you can easily remove the node.
Possible washer malfunctions
In order for the wipers to work properly, a constant supply of water is necessary. To automate this process, a washer was made. There may be the following reasons for its failure.
- The steering column switch has failed. To check this, you need to close the two contacts located under the steering wheel. Front contact 53ah-w, rear contact 53ah-wh. After this, measure the resistance. In case of low resistance or breakdown, the switch must be replaced with a new one.
- The washer pump does not supply water. It needs to be changed.
- The wire connecting the switch to the pump has broken.
- The injectors are clogged with dirt. They can be cleaned with a sharp needle.
- Relay K3 does not work.
- The hose broke.
As you can see, even simple parts have enough problems and breakdowns. However, following the operating rules will help avoid repairs and increase their service life.
Connection diagram for mounting block 2114 – 2115
(the outer number in the designation of the wire tip is the number of the block, and the inner number is the conventional number of the plug): K1 – relay for turning on the headlight cleaners; K2 – relay-interrupter for direction indicators and hazard warning lights; K3 – windshield wiper relay; K4 – lamp health monitoring relay; K5 – power window relay; K6 – relay for turning on sound signals; K7 – relay for turning on the heated rear window; K8 – headlight high beam relay; K9 – relay for low beam headlights; F1-F20 – fuses