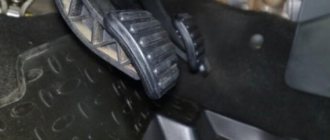
When releasing the clutch, a sound (zilch) was heard. Somewhere in the middle of the pedal stroke. The clutch itself did not engage evenly. If you press the clutch and hold it, you feel the pedal “loose” - the brake fluid flows. After this, you cannot immediately open the clutch with the pedal - only by pressing the clutch twice or three times (the fluid must be transferred back into the working cylinder.
A clear suspicion of a damaged rubber gasket. Position 10.
We change. Along with the tank. We remove the old liquid from the tank with a syringe.
Disconnect the tank. And unscrews the two cylinder mounting nuts.
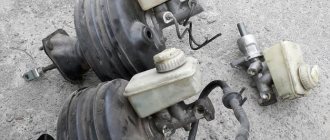
Here's an old cylinder:
Immediately attach the hose from the barrel to the new cylinder using a spring clamp.
For a “hermetic” connection (so that dirt doesn’t get in) we use sealant.
And screw everything into place.
All that remains is to bleed the brake fluid. Again by gravity, as when measuring the RCS.
2101-1602610 Clutch master cylinder - 600 rubles 2123-1602692-10 Clutch hydraulic drive tube - 160 rubles (remained in stock)
I disassembled the old clutch master cylinder and made sure that the rubber was damaged:
Clutch reservoir assembly with hose - 300 rubles Brake fluid - 200 rubles
spring clamp - Spring clamp 12.5×8.4 M8 nut with collar - 2 pcs M8 spring washer - 2 pcs
By the way, a 100 ml syringe and a tube with a clamp will make the work easier.
The presence of a clutch in cars is not accidental, and its absence makes it impossible to travel in a vehicle. For most novice drivers, the clutch is the leftmost pedal in the car. But few people know its design, and therefore in this article we will pay attention to one of the main elements of the clutch - the working cylinder on a Chevrolet Niva. What is this product, why is it needed, where is it installed and how is it repaired and replacement parts carried out? You can learn about everything from this material.
Product added to bookmarks!
- Description
- Reviews
APPLICABILITY: VAZ 2101, 2102, 2103, 2104, 2105, 2106, 2107, VAZ 2121, 21213, 21214, 2131 (Niva).
The largest manufacturer of automotive security systems in the world!
The company's work is divided into 2 areas: Continental Temic - electronic components and Continental Teves - one of the world-famous manufacturers of electronic and hydraulic brake systems, chassis control systems, electronic air suspension systems, sensors.
Continental Teves works closely with Continental Temic as part of the joint operation of Continental Automotive Systems (CAS), which allows them to jointly create unique solutions.
ATE Products:
— Brake discs — Sports brake discs (Power Disc) — Motorsports brake pads (Power Pad) — Brake pad kits — Repair kits — Brake master and slave cylinders — Clutch master and slave cylinders — Brake calipers — Handbrake and clutch cables — Brake hoses
ATE supplies its products to all major car manufacturers, including VAG (VW, AUDI, SKODA), FORD, GM, BMW, TOYOTA, etc.
replacing the Niva clutch slave cylinder
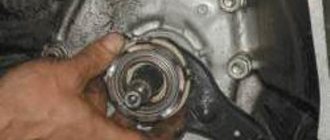
The clutch master and slave cylinders can also cause big problems. I had a leaky clutch giving the effect of the clutch sticking. Sometimes it was impossible to turn off the transmission, sometimes to turn it on. We remove the front cardan, we have already removed it. The flange of the front gearbox is visible, i.e. if the cardan was in place, it would be impossible to unscrew the rcs. Bolts 13, two pieces. It is advisable to photograph the mount itself as it stood. And then (six hours later) I twist it in my hands and can’t remember how it stood.
The cylinder is covered in snot, it’s obvious that it’s dead. Code for purchasing a new one 2101-1602515
That's it, the cylinder is removed, the new one is installed in the reverse order. But first I also changed the main one, it goes higher up the hose.
Pull the clutch cable
On Niva I try to buy everything from the factory, from Lada-Image in blue and white boxes. New slave and master cylinders.
Replacing the clutch yourself
After determining the cause of the clutch malfunction, it must be eliminated. The necessary tools are prepared in advance. To replace the clutch, socket and open-end wrenches in a set and screwdrivers are used. The clutch disc is aligned using a mandrel.
Replacement work is carried out according to the instructions:
- To conveniently carry out repair work, it is recommended to place the crossover on an inspection hole.
- To get to the devices itself, it is recommended to remove the gearbox.
- Marks are made on the flywheel and casing to help determine their location. This procedure is only necessary when using an old pressure plate after repair work.
- The spare parts have mounting bolts that can be unscrewed with a 8mm wrench. They are used to secure the clutch disc to the flywheel. To unscrew the bolts, it is recommended to first fix the flywheel.
- The driven and pressure disks are dismantled.
- The driven disk is inspected. If there are cracks, chips, or signs of wear, the disc is replaced. If the distance from the surface of the lining to the rivets is more than 0.2 millimeters, then it is recommended to discard the part and install a new one.
- The damper springs are checked for secure fastening. If they are damaged or weakened, the disk is replaced.
- The pressure spring is inspected, the petals of which are located at the same level. If this is not the case and there are signs of wear, then the part is replaced.
- If all clutch parts are in normal condition, the old driven and release plates are installed. Otherwise, these parts are replaced.
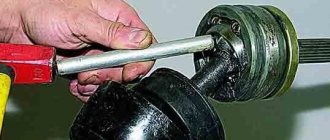
If the clutch elements are damaged, it is recommended to completely replace it. If the car is front-wheel drive, then remove the drive shafts and install plugs in their place. The bolts are unscrewed, the cables and drawstrings are disconnected. Remove the gearbox input shaft from the bearing. In rear-wheel drive vehicles, dismantle the clutch that connects the driveshaft and gearbox.
After unscrewing the basket bolts, it is recommended to remove all clutch parts that are located on the flywheel. When performing the procedure, inspect the device to determine the presence of oil on the surface. If it is greasy, it is recommended to replace the oil seal. If there are scratches and cracks on old disks, change the basket into which a new disk is inserted. After installing the basket on the flywheel, it is recommended to tighten the mounting bolts.
When the gearbox shaft rotates, you need to make sure that it is in the flywheel splines. Installation and dismantling of the gearbox on vehicles with all-wheel drive is carried out using a winch. To install the clutch, it is recommended to perform the same work as for removal, only in reverse order. At the final stage, it is recommended to adjust the clutch. In accordance with the characteristics of the vehicle, a cable or rod of a certain length is used, which ensures adjustment of the free play of the pedal.
Bleeding and adjusting the Chevrolet Niva clutch: step-by-step instructions
At the same time, breakdowns of the first category tend to quickly develop into the second.
Parts of an untimely adjusted clutch wear out quickly and require replacement. An unadjusted clutch drive causes inconvenience when driving a car - difficulties appear when changing gears or jerks when the car starts moving.
When should it be adjusted?
It is necessary to adjust the pedal free play and pump the hydraulic drive in the following cases:
- Pedal travel is too long. In this case, the clutch does not disengage completely (“drives”). This leads to difficult gear shifting and intense wear of the friction lining on the driven disk.
- Small clutch travel. In this case, the disc slips, especially under heavy load on the transmission (driving uphill, in high gear).
- Jerking, knocking or squeaking noises when changing gears or when the car starts moving.
Important: operating a car with an incorrectly adjusted or “aired” clutch drive leads to accelerated wear of gearbox parts. The design of the Chevrolet Niva clutch coincides with a similar unit of the “classic” AvtoVAZ
The only difference is in the other dimensions of the working cylinder and, accordingly, in a larger and easier pedal stroke
The design of the Chevrolet Niva clutch coincides with a similar unit of the “classic” AvtoVAZ. The only difference is in the different dimensions of the working cylinder and, accordingly, in a larger and easier pedal stroke.
How to upgrade?
Before adjusting the mechanism, you need to bleed the hydraulic drive. To do this, you will need brake fluid, a container and a flexible tube whose internal diameter corresponds to the size of the fitting and a 10mm spanner.
The bleeding process is similar to removing air from the brake system. As with the brakes, the work is done with an assistant.
One person must press and release the pedal on command, and the second must open and close the fitting.
How to adjust it yourself?
To adjust the mechanism you will need keys 10, 13 and 17, pliers and a pencil. The operation is performed on a lift or inspection pit. The work order is as follows:
- Using a 10mm wrench, unscrew the locknut of the pedal travel limiter.
- By rotating the nut, set the free play within 0.4-2 mm.
- Tighten the locknut.
Then you need to go down under the car and adjust the free play of the pusher within 4-5 mm (to unscrew the nuts, you need wrenches 13 and 17). The check is performed as follows:
- Using pliers, remove the clutch fork release spring.
- Place a pencil against the boss of the lower mounting of the working cylinder.
- Make two marks: opposite the fork and 5 millimeters to the right.
- Pull the fork all the way back, selecting the free stroke of the pusher.
- The fork should stop exactly opposite the mark on the pencil.
If the gap does not correspond to the nominal one, you need to loosen the lock nut and rotate the nut to achieve the required parameters.
The final check is performed with the engine running. If everything is done correctly, the gears change easily, and the car starts to move if the pedal is released approximately ⅓ - ⅔ of the stroke.
Replacement: step-by-step instructions
For work you will need: pliers, open-end and socket wrenches 13, a rubber bulb and a container for collecting brake fluid.
Before replacing the Chevrolet Niva GCS, you must:
- Using a rubber bulb, remove the brake fluid from the clutch reservoir.
- Use pliers to loosen the clamp.
- Disconnect the hose from the clutch master cylinder fitting.
Then you can start replacing:
- Using an open-end wrench, unscrew the nut of the hydraulic line fitting and remove it, slightly bending the tube.
- Use a socket to unscrew a couple of nuts securing the main center to the body panel.
- Remove the part from the studs.
A new or remanufactured clutch master cylinder is installed in the reverse order of removal.
Important: after replacing the main circulation system, it is necessary to pump the hydraulic line to remove air from it.
How to change the clutch: frequency and replacement order
With careful use and careful driving, you do not have to change the clutch often.
What can become an alarm bell and a signal for diagnosis - this is discussed in our article. Here you will learn how to replace a clutch and will be able to supervise the service center technicians.
When driving with a worn clutch, fuel consumption increases and the power of the internal combustion engine is significantly “lost.”
How long does the clutch last?
It is impossible to name a specific mileage after which it is time to change the clutch. Too many factors influence its service life:
- driving style - a sharp start and frequent slipping, and even more so, participation in races significantly reduces the period of operation;
- quality of the unit - original parts are always more durable than inexpensive analogues;
- foreign liquids or small solid objects can damage even a new unit;
- errors during installation and adjustment inevitably lead to reduced performance.
Wear of linings due to incorrect clutch settings
How do you know when it's time to replace the clutch?
Reasons and consequences that you will avoid if you go to the service station on time:
- Do you hear a loud noise when you depress the clutch pedal? there is a possibility that the release bearing is worn out;
- the smell of burning in the cabin indicates that the clutch discs are slipping relative to each other, so that the friction linings on them burn;
Bleeding the hydraulic clutch of Niva Chevrolet
How to change the radiator of a Chevrolet Niva car yourself: step-by-step instructions with photos and videos
During the process, no grinding noise should be heard in the gearbox. Chevrolet Niva clutch does not bleed When accelerating a car, it should not bleed Chevrolet Niva clutch speed is proportional to the increase in crankshaft rotation speed.
If the engine is running at high speeds, but the car does not accelerate dynamically, it means that the clutch is slipping. It will need to be repaired. How to determine the need to bleed the clutch This can be determined because when you engage any gear, you will hear a grinding noise in the box. This situation may indicate that air has appeared in the system. Bleed the clutch by pressing and holding the pedal. Repeat the procedure until clean fluid comes out of the system.
There should also be no air bubbles in it. Controlling the color of the liquid and air bubbles During the process, you need to check the liquid level in the tank.
If necessary, it is topped up. After pumping, add fluid to the reservoir up to the MAX mark. The clutch fluid leaked periodically. In addition, the presence of air in the system leads to such a breakdown. This problem can be eliminated by pumping.
If the disk is skewed or its surface is warped, then replacement is also necessary. There are other breakdowns that may require replacement of individual parts. Experienced motorists identify them by their characteristic symptoms. So, usually when pressing on a faulty mechanism, a characteristic noise will be heard. If it occurs only when released, this is also a sign of failure. Diagnostics of the Chevrolet Niva clutch You can carry out independent diagnostics of the mechanism of the Chevrolet Niva clutch not being pumped.
To do this, you need to perform several operations: Put the car in neutral gear.
Then start the engine and warm it up to operating temperatures. At the moment when the engine is idling, fully depress the clutch pedal. The Chevrolet Niva starts to work in reverse gear when you shift the gearbox.
How to bleed the clutch on a Chevrolet Niva
The process of pumping the Chevrolet Niva clutch occurs smoothly, easily, and without noise. If various creaks or grinding noises are heard, this indicates that the mechanism is faulty. You can check how the clutch functions while driving.
This requires shifting gears and listening carefully so that there are no noises or any extraneous sounds. A malfunction such as clutch slipping has already been noted. When the car picks up speed, the number of crankshaft revolutions should also increase in proportion to the speed.
The tachometer will help identify the breakdown. If you sharply press the gas while driving a car, and the revolutions begin to rise, the Chevrolet Niva clutch will not bleed, then drop slightly, while the car accelerates, then clutch repair is inevitable. Bleeding the hydraulic drive The list of typical faults indicated incomplete shutdown. It was also noted that the cause of this is air in the hydraulic drive. The problem can be solved by pumping.
It is also necessary if new Niva Chevrolet clutch brake fluid is poured into the drive. In order to perform this operation, you will need a set of motorist tools, several hoses, as well as a container into which the liquid will then be drained.
Additionally, it is necessary to prepare a sufficient quantity of brake agent. The help of a neighbor or friend will not be superfluous.
How to replace the clutch on a Chevrolet Niva yourself
Every motorist who has a manual transmission knows what a clutch is, and sooner or later is faced with the fact that it simply disappears, and when it starts to move, it does not disengage, thereby creating some kind of inconvenience. The only option in such a situation is to contact the nearest car service center, where the clutch on your Chevrolet Niva will be replaced within two to three hours. This option is not cheap, so if your budget does not allow this replacement procedure, you can do it yourself in the wild.
You will learn from this article how replacement, adjustment, and repairs occur, and you will also find out which one is best to install.
What is clutch
Thanks to it, torque is transmitted from the engine to the gearbox itself, making it possible to change gears on the gearbox. If this work is not done properly, it will negatively affect other mechanical components. This drive is hydraulic, there are no gaps in it, and has automated compensation, so there is no wear on the functional linings. This drive is one of the important parts, as it sends a signal to the working elements to the driver himself.
What kind of malfunctions are there?
This is a whole mechanism, and there can be a lot of reasons why it fails. Let's look at the most common ones:
When you press the clutch pedal on a Niva Chevrolet, slipping occurs, that is, the engagement is not complete, this can be caused by:
- If the friction linings are worn out or they are burnt out, this problem can be solved by completely replacing the disc.
- Oil appears on the surface of the driven disk, which indicates that the parts have faulty seals. You can fix the problem by washing the discs, removing the causes of the leak.
It happens that, on the contrary, it does not turn off completely; it starts to behave, this could be for the following reasons:
- Warping or beating occurs on the driven disk; this problem can be solved by repair, unless, of course, it has minor damage. But as a rule, if this malfunction occurs, it can be solved only by completely replacing the disk.
- The rivets on the fixed pads have become loose. The driven disk set will need to be replaced
- The presence of air in the system itself. This can be solved by bleeding the system.
- Warping and distortion of the disk. You can solve it by replacing this part.
A malfunction may occur where some parts need to be replaced. This is determined by the following characteristics:
- Noises are heard when pressing the clutch
- The same noise is heard when the pedal is released
This suggests that it is necessary to remove and disassemble this system, and eliminate the damage that has appeared.
How to make a replacement
When the cause of the breakdown is clear, you need to move on to eliminating it. The replacement process is very long and labor-intensive, so you need to be patient and follow everything strictly according to the instructions, which includes the following steps:
- Installing the car in the pit
- Prepare the necessary tools
- We remove the gearbox, this is necessary to have access to the device
- After the box is removed, you need to mark with marks where the flywheel and housing are located.
- Using an eight-mm wrench, we unscrew several mounting bolts; they secure the clutch disc itself to the flywheel.
- We remove two disks, pressure and driven
- We inspect them and if there are various chips and cracks, then it must be urgently changed.
- Check the condition of the release spring
- After inspection and elimination of all faults, installation occurs in the reverse order in which removal was carried out.
At this point, all stages of replacing the clutch on a Niva Chevrolet car are completed. During the replacement process, it is very important to look at the condition of the release bearing, and if it is in a worn state, it is better to replace it with a new one, since in a couple of months if you do not replace it, you will have to disassemble the device again. Now you have an idea of how to remove and replace the disk yourself, and you can carry out the entire procedure yourself at any time, without contacting a specialist.
Parts and consumables:
Knock sensor for a Chevrolet Niva car
Do not lose the plate that is under the cylinder, it presses the cylinder to the bracket and is located between the bracket and the gearbox housing, the convex part outward
After you have collected everything that spilled onto you, you can safely unscrew the cylinder itself from the hose, carefully there is a copper washer there, I don’t remember the size, but it’s better to replace it
Hurray, a stream of brake fluid started flowing at me, let it flow out, it’s not scary, but it’s realistic to get into trouble trying to fit a new cylinder. And so, nothing drips on me, I can collect it.
Screwing on a new cylinder is not difficult; the difficulty arises when installing the rod. The thing is, my car doesn’t have a stabilizer for religious reasons, which means I have nothing to rest the mounting on to pull the fork back.
Fortunately, there was a bolt of the front lower silent blocks lying nearby, so I fixed it. At this stage, the removal is complete; next, you need to replace the removed element with a new one and install everything in the reverse order of removal.
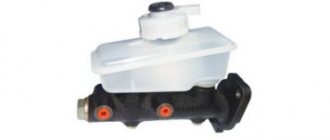
Clutch cylinder working VAZ 2123 AvtoVAZ 2123-1602510
https://youtube.com/watch?v=KjB52LyTThc
After installation, you will need to bleed the system to remove air from the system. A new working cylinder for a Chevrolet Niva will cost rubles, so don’t be upset if the product is no longer repairable. The product is replaced in rare cases, so if a malfunction is detected in the working cylinder, it can be repaired.
For the repair procedure you will need: After the cylinder has been removed from the car, you need to proceed with the following steps: The removed cylinder is clamped in a vice and disassembled.
The rubber boot is removed along with the pusher.
By removing the retaining ring, the piston is removed. The spring with the sealing gasket is removed from the piston.
The gasket must be replaced with a new one. Next, cleaning work is carried out on the cylinder and fitting in order to clean the channels for removing air.
If the spring looks deformed, then it should be replaced. It is imperative to replace the boot and seal ring. Before assembling the product, all existing parts must be washed with brake fluid only.
The assembly of the cylinders is carried out in the reverse order of removal, and upon completion of the work you should make sure that there are no third-party objects that may not have been installed. After installation, you should remove air from the system, and then check the performance of the Chevrolet Niva clutch. Worth knowing... The question is often asked:
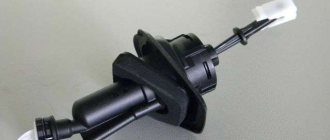
Chevrolet Niva clutch release master cylinder
/ Chevrolet/ chevrolet-niva/ Vehicle options/ Clutch release master cylinder
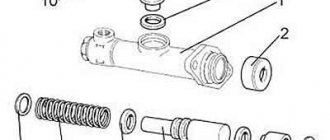
| Rice. 11.1. Master cylinder parts: 1 – hydraulic reservoir; 2 – tank clamp; 3 – plug; 4 – body; 5 – protective cover; 6 – piston pusher; 7 – retaining ring; 8 – support sleeve; 9 – piston; 10 – piston cuff; 11 – clamp; 12 – spring; 13 – valve cage; 14 – valve spring; 15 – valve |
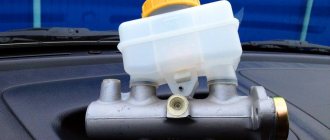
The main difference between the master cylinder described in this section and the version discussed in section. 5 “Transmission”, in which the reservoir is installed directly on the cylinder. The reservoir of another version of the master cylinder is installed separately and connected to the cylinder with a flexible hose. In addition, many of the incoming parts are different ( ).
Removing and installing the clutch master cylinder
The master cylinder is removed from the vehicle for replacement or repair. However, if the contractor does not have the skills to perform disassembly and assembly work, we recommend replacing the faulty cylinder assembly.
| USEFUL ADVICE When removing the clutch master cylinder, the hydraulic fluid does not need to be drained from the hydraulic drive. A small amount of air remaining at the top of the actuator line will be removed when it is bled. |
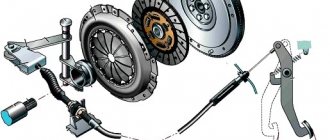
| Rice. 5.2. Clutch release drive: 1 – tube; 2 – main cylinder; 3 – master cylinder fastening nut; 4 – pedal bracket; 5 – clutch release clutch; 6 – ball joint; 7 – clutch release fork; 8 – clutch release fork cover; 9 – bracket fastening bolt; 10 – bracket; 11 – working cylinder; 12 – valve for removing air; 13 – clutch pedal axis; 14 – clutch pedal; 15 – locking bracket; 16 – master cylinder pusher; 17 – bushing; 18 – locking bracket; 19 – bushing |
| 1. Disconnect tube 1 from the master cylinder (see ). Take measures to prevent fluid from leaking out of the master cylinder hole (for example, plug the hole with a piece of rags or a suitable rubber or plastic plug). |
| 2. Disconnect the pusher 16 from the pedal pin by removing the locking bracket 15 from the pin. |
| 3. Unscrew two nuts 3 and remove the master cylinder from the pedal bracket studs. |
| 4. Remove the plug (see ) of tank 1 and pour the liquid into a container. |
| 5. Install the master cylinder in the reverse order of removal. |
| 6. Remove air from the hydraulic drive (see section 5 “Transmission” , “Bleeding the clutch hydraulic drive”). |
| HELPFUL ADVICE To reduce the need to bleed the hydraulic drive to a minimum, after attaching the connecting tube to the cylinder, do not fully tighten the connecting nut. Pour liquid into the tank and finally tighten the tube nut only after liquid begins to flow out from under it without air bubbles. Often, with this method, pumping the hydraulic drive is not required. |
Dismantling and assembling the master cylinder
| 1. Loosen the clamp 2 (see ) and remove the tank 1 from the main cylinder body 4. |
| 2. Remove the protective cover 5 together with the pusher 6. |
| 3. Using special pliers or round nose pliers with long jaws, remove retaining ring 7. |
| 4. Remove support sleeve 8, piston 9, piston collar 10, retainer 11, spring 12, valve cage 13, valve spring 14 and valve 15 from the cylinder body. |
| 5. Wash the parts with fresh brake fluid. |
| NOTE The use of gasoline, kerosene, diesel fuel or mineral oils is unacceptable, as these substances cause swelling of rubber parts. |
| 6. Check the technical condition of the cylinder parts. The cylinder bore and the outer surface of the pistons must be free of damage and corrosion. If any small scuffs or pitting corrosion are found, remove them with a fine-grained sanding block. Replace the piston return spring if it is cracked. We recommend replacing the O-rings regardless of their condition. Check the protective cap; if it is damaged, replace it with a new one. |
| 7. Assemble the master cylinder in the reverse order of disassembly. |
| NOTE Before assembly, lubricate all parts with fresh brake fluid and the spherical surface of the piston in contact with the pusher with grease. |
5.1.11 Disassembly, inspection, repair and assembly of the main and working cylinder
Details Category: 5.1 Clutch Updated 08/14/2014 16:02
Master cylinder
Unscrew the plug, remove the protective rubber cap 2 (Fig. 5.1.11-1) and the retaining ring 3. This will allow you to remove the piston 4, the sealing ring 5, the floating piston 6 with the sealing ring 7 and the piston return spring 8 from the cylinder body 1.
Rice. 5.1.11-1. Parts of the master cylinder: 1 – cylinder; 2 – protective cap; 3 – retaining ring; 4 – pusher piston; 5 – sealing ring; 6 – piston of the main cylinder; 7 – sealing ring; 8 – return spring; 9 – sealing gasket; 10 – fitting; 11 – lock washer; 12 – gasket.
The cylinder mirror and the outer surface of the piston must not be damaged or scratched. Check the condition of the piston spring and replace it if it has lost its elasticity.
Replace the piston cup and all sealing elements. Check the protective boot at the rear end of the cylinder and if the boot is damaged, replace it with a new one. Before assembly, carefully clean and rinse the parts with brake fluid. Do not allow the parts to come into contact with mineral oil, gasoline, kerosene or diesel fuel, as these substances will cause rubber seals to swell.
After checking all the parts, reassemble the main cylinder in the reverse order of disassembly, in this case: – apply a thin layer of DT-1 lubricant on the piston surfaces in contact with the cylinder, support sleeve and pusher; – Lubricate all other parts of the cylinder with brake fluid.
Working cylinder
Remove the protective rubber cover 6 (Fig. 5.1.11-2) together with the pusher 5, then remove the retaining ring 7. This will allow you to remove the piston 8, piston collar 9, spring cup 10 and spring 11.
Rice. 5.1.11-2. Parts of the clutch release cylinder (working cylinder): 1 – housing; 2 – transport plug; 3 – fitting; 4 – fitting cap; 5 – clutch release fork pusher; 6 – protective cover; 7 – retaining ring; 8 – piston; 9 – piston cuff; 10 – spring cup; 11 – spring.
After disassembly, carefully wash and inspect all parts as specified for the master cylinder. Installation of a deformed pusher is not allowed.
After checking, proceed with assembly (the reverse order of disassembly), in this case: – apply a thin layer of DT-1 lubricant on the piston surfaces in contact with the cylinder and the pusher; – Lubricate all other parts of the cylinder with brake fluid.
Applicability
Your data is protected by SSL protocol
OEM and Analogs
Original Manufacturer Numbers (OEM)
And more than 10 payment methods, including cashless payments, electronic money, terminals and communication shops. It is also possible to pay for the goods upon receipt.
Free delivery of wholesale and retail orders to 110 cities in Russia. As well as delivery throughout Russia and the CIS by transport companies, mail and other delivery services.
Online store of auto parts Wholesale, retail, delivery
© 2003–2018 PANTUS LLC All rights reserved
Source
VAZ 21213 | Clutch replacement
12.15. Clutch replacement
| GENERAL INFORMATION |
| Disassembled clutch: 1 – pressure plate2 – clutch housing3 – diaphragm spring4 – driven disc |
Remove the gearbox (see subsection 12.2.).
Note 1
When removing the clutch housing mounting bolts, block the flywheel using a screwdriver. Install a bolt to stop the screwdriver.
Note 2
You can remove the clutch without a mandrel, but you must hold the driven disk - it may fall out of the clutch housing. The mandrel can be made to fit the input shaft, or you can use an old input shaft instead.
| Flywheel friction working surface. |
| EXECUTION ORDER | ||
| 1. Insert the mandrel into the pressure plate hole and remove the six bolts securing the clutch housing to the flywheel (see notes 1 and 2). | 2. Carefully remove the clutch cover from the driven disc. | 3. Inspect the driven disk. There should be no cracks on the driven disk parts. Check the wear of the friction linings. Replace the friction linings or the driven disk in the following cases: a) the rivet heads are recessed to a distance of less than 0.2 mm; b) the surface of the friction linings is oily; c) rivet joints are loose. |
| 4. Check the reliability of the damper springs in the driven disk hub sockets. If the springs are broken, the disc must be replaced. If warping of the disk is detected during a visual inspection, check its runout. If the runout value exceeds 0.5 mm, replace the disc. | 5. Inspect the working friction surfaces of the flywheel and pressure plate: they should not have deep marks, scuffs, nicks, obvious signs of wear and overheating. It is unacceptable to loosen the rivet connections of the pressure plate parts. If defects are found on the flywheel or pressure plate, we recommend replacing them. | 6. Carefully inspect and evaluate the condition of the support rings and the pressure plate diaphragm spring. The support rings must not have cracks or signs of wear. Cracks on the diaphragm spring are unacceptable. The contact points between the spring petals and the clutch release bearing must be in the same plane and have no obvious signs of wear. |
| 7. Install the driven disk into the pressure plate housing so that the less protruding part of the hub is directed towards the flywheel. | 8. Insert the centering mandrel into the splines of the driven disk from the diaphragm spring side. | 9. Install the clutch on the flywheel and tighten the six bolts securing the clutch to the flywheel evenly diagonally to a torque of 19-31 Nm (1.9-3.1 kgfm). After this, remove the centering mandrel. |
5.1.11 Disassembly, inspection, repair and assembly of the main and working cylinder
Details Category: 5.1 Clutch Updated 08/14/2014 16:02
Master cylinder
Unscrew the plug, remove the protective rubber cap 2 (Fig. 5.1.11-1) and the retaining ring 3. This will allow you to remove the piston 4, the sealing ring 5, the floating piston 6 with the sealing ring 7 and the piston return spring 8 from the cylinder body 1.
Rice. 5.1.11-1. Parts of the master cylinder: 1 – cylinder; 2 – protective cap; 3 – retaining ring; 4 – pusher piston; 5 – sealing ring; 6 – piston of the main cylinder; 7 – sealing ring; 8 – return spring; 9 – sealing gasket; 10 – fitting; 11 – lock washer; 12 – gasket.
The cylinder mirror and the outer surface of the piston must not be damaged or scratched. Check the condition of the piston spring and replace it if it has lost its elasticity.
Downloading a book
After successfully completing the payment (by any method) and returning to the KrutilVertel store from the payment system website, you will be taken to the successful payment page:
The book you purchased will be in your personal account, from where you can always download it.
Please note that after making the payment, you need to return back from the payment system website to the KrutilVertel website. If for some reason you did not return back to the site and closed the payment system tab with a message about the successful completion of the payment, please let us know - we will send you a letter indicating access to download the book
If for some reason you did not return back to the site and closed the payment system tab with a message about the successful completion of the payment, please let us know - we will send you a letter indicating access to download the book.
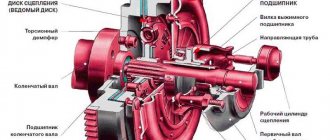
How does the device function?
To understand the issue of assignment in more detail, let’s consider how work
product process. So, when you press the main control lever (i.e. the clutch pedal), the pusher moves, which acts on the piston and it moves forward. When the piston moves under the influence of mechanical force, the pressure in the housing begins to increase. This is a process that occurs in the clutch master cylinder. After increasing the pressure, the liquid begins to be squeezed out through the discharge channel and enters the working cylinder. The article discusses in detail the process of removing and replacing the hydraulic clutch slave cylinder on the Niva 2121 and 2131. It has a piston with a fork, which, under the influence of pressure, presses the release bearing, thereby separating the engine and gearbox. At this moment, the corresponding gear is engaged, and then the driver releases the clutch pedal. After releasing the pedal, a return to its original position is observed: the engine engages with the transmission, which is due to the action of the pushing spring in the cylinder.
Principle of operation
The node works as follows:
- When you press the pedal, the force is transmitted through the hydraulic clutch to the pressure fork. It puts pressure on the release bearing, displacing it towards the engine.
- The latter compresses the petals of the springs mounted on the clutch basket.
- The driving and driven disks begin to rotate independently of each other, breaking the connection between the engine and the gearbox.
- When the pedal is released, the clutch parts return to their original position under spring pressure.
- The discs connect and again transmit torque from the engine to the transmission input shaft.
Friction linings, release bearings and other clutch parts gradually wear out. In this case, you have to change individual parts or the entire assembly.
When does it make sense to repair and when to replace?
If the release bearing, as well as the main and working cylinders are faulty, the system is repaired. If noise occurs, the release bearing must be replaced. This part and the release fork are disengaged. The fork is moved to the side and the bearing is removed. Before installing a new bearing, it is recommended to clean the installation site. Before installation, the bearing and seat are lubricated with a special compound called Litol-24. Assembly is carried out in reverse order. Changing the bearing will ensure good clutch travel.
The purpose of the master cylinder is to transmit impulses from the pedal to the working parts of the clutch. If it does not turn on and off completely or fluid leaks out, then the cylinder must be repaired or replaced. Before repair, the part is removed and inspected. In the absence of major signs of wear and mechanical damage, the part is repaired. To do this, you need to flush the part with brake fluid. When cylinder components wear out, they are replaced with new parts.
The functionality of the clutch drive is ensured by the slave cylinder. To connect the master and working cylinders, a steel tube is used, on the lower edge of which a rubber hose is placed. Liquid periodically leaks through the rubber connection. After removing and repairing the part, bleeding is carried out. The clutch also needs to be adjusted.
To bleed the drive, put a hose on the working cylinder. One of the ends is placed on the valve of the part, and the second is lowered into the liquid. Depress and hold the clutch pedal. The procedure is carried out more than five times. After this, the valve is opened to release the air. The actuator adjustment will be successful if there is fluid leakage without air after opening the valve.
If the fork breaks, you do not need to remove the gearbox to replace it. Replacement is done using pliers, a carrier or flashlight, a hammer, a sharpener and a screwdriver. Pliers are used to remove the return spring.
The bolts on the clutch slave cylinder are unscrewed and the rod is uncoiled, which needs to be pulled out of the fork. After removing the protective glass, the plug is removed. Using a sharpener, the new fork is refined. The ends are chamfered and the rivets are ground down to a height of 0.5 millimeters. The release bearing is rotated in the hatch. In this case, make sure that the edges of the coupling are in a horizontal position.
The tips of the spring are directed towards the hole and the fork is inserted
She is carefully driven into the hatch using a hammer. It is recommended to check whether the spare part is adjacent to the ball joint
The antennae of the support are directed so that they cover the support. All other manipulations are performed in reverse order.
Causes and symptoms of GCS malfunctions
Problems with the clutch master cylinder manifest themselves in the form of fluid leaking from the expansion tank. This can be determined by the drop in the level in the expansion tank. Sometimes brake fluid leaks are visible on the cylinder itself. But it can leak into the cabin under the rug.
If the clutch pedal is faulty, it is possible that the clutch pedal may be pressed tightly or fail, or become stuck in the lower position.
Problems with the cylinder have several causes:
- Worn piston seals.
- Damage or rust on the inner cylinder wall.
- Breakage or sagging of the return spring.
If the main circulation system malfunctions, it must be replaced or repaired by installing new rubber seals from the repair kit.