Signs of wear on joints
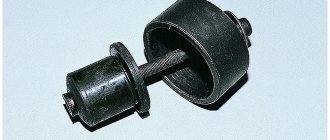
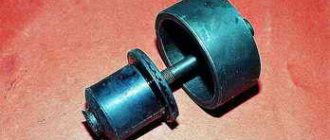
The silent block of the rear beam is a rubber-metal hinge. The part serves as an elastic insert between the car components. It consists of two bushings, between which there is a seal made of rubber or other elastic material. Recently, polyurethane has become widespread. A gasket made of elastic material allows you to dampen vibrations between components and not transfer vibrations to the car body.
The silent block of the rear beam is used not only for connecting suspension units to each other. The element is also attached to the anti-roll bar, at the mounting points of the gearbox and engine of the car. But the suspension has the most severe operating conditions due to dust, dirt, moisture and active movement of parts, so replacement is done regularly.
Rubber bushings are not items that will last forever. Usually they last for 100 thousand kilometers, but due to harsh operating conditions, the replacement period may come earlier. After half this period, it is necessary to check the suspension. This is the only way to understand the degree of wear of the unit and determine whether it needs to be replaced.
Visual inspection procedure:
- drive the car into a pit or lift it with a jack;
- clean the suspension mounting points from dirt;
- carry out an inspection.
The rubber insert must not have cracks or tears. Signs of this kind indicate that it is time to replace the silent blocks of the rear beam. A worn part will subsequently affect handling, and this, in turn, will affect the safety of the car owner and others.
Sometimes the part wears out earlier, especially when driving off-road. The degree of wear can be assessed by the behavior of the car.
Signs of wear on silent blocks:
- when driving in a straight line or when braking, the car pulls to the side;
- increased wear of rubber on the sides;
- increased vibration when driving;
- creaking or knocking in the suspension area;
- the suspension began to work harder.
The presence of one or more signs means that it is time to service the suspension. Delay can be costly. Untimely replacement will lead to loss of control in a critical situation, as well as accelerated tire wear. The hinge seats will also be damaged and then the lever will have to be replaced - this will increase the cost of repairs.
Metal parts of the part break extremely rarely. The rubber gasket usually wears out.
Reasons for premature replacement:
- Long-term use, which leads to drying out of the rubber seal and loss of properties.
- Interaction with chemicals. Oil and gasoline destroy rubber.
- Incorrect installation.
Premature wear indicates that the cause needs to be found and eliminated. Otherwise, the replacement procedure will soon have to be repeated. Oil leaks will be clearly visible, and installation should be carried out strictly according to the instructions and connections should be checked.
In a car, the wheels are attached to the power part of the body using levers. In order for the suspension to smoothly handle all road irregularities, the following conditions must be created:
- The wheel, under the influence of a spring, must move up and down on the lever, so it is screwed to a steel axle rigidly fixed to the spar.
- To absorb small potholes in the road surface at the junction of the chassis and the body, an elastic gasket is needed. Otherwise, the driver and passengers will begin to feel vibration transmitted from the wheels.
Accordingly, silent blocks are needed for a movable and at the same time springy connection between the body part and the entire suspension of the car. They are the same gasket that softens small impacts and allows the lever to work out large irregularities.
On each side, the suspension rests on body elements at 2 or 3 points. In the first case, it is mounted on a lever and a strut, in the second - on two levers and a shock absorber. As many attachment points as there are, so many pairs of silent blocks are used as softening pads.
The second name for a rubber-metal part is a dry hinge. It characterizes the ability of silent blocks to work without lubrication - only due to the elasticity of the insert between two steel bushings. At the same time, the turning radius of the lever is limited by the ability of the rubber or polymer to twist. But for the working stroke of a car suspension, this radius is quite enough.
Now about the specific points where dry hinges are located:
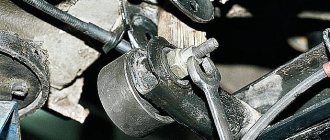
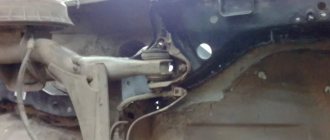
- The main place mentioned above is the attachment of the upper and lower arms. The strength element of the body - the spar (standing under the wheel arch) has a protrusion with a hole into which the axle is inserted in the form of a long bolt. Rubber-metal hinges, pressed into the eyelets of the lever, are placed at the edges of the axle and secured with nuts.
- The small silent block is located at the lower point of attachment of the strut to the steering knuckle.
- On shock absorbers, the hinges are placed on both eyes - top and bottom.
- Parts are also used at the support points of torque rods and anti-roll bars.
DETAILS: Replacing brake fluid and bleeding the ABS modulator Lexus RX300
The rear suspension of modern cars most often has a multi-link or torsion bar design. In both cases, levers mounted on silent blocks are involved. So hinges are used not only in the front suspension. Even on cars with a continuous rear axle beam, rubber-metal products are used to install rear linkages and shock absorbers.
The silent block is considered a fairly reliable part of the car's chassis. Lever joints last from 50 to 150 thousand km, depending on driving conditions and the condition of roads in a particular area. On jet rods, these parts serve no less, but on shock absorbers, struts and anti-roll bar they last up to 50 thousand km.
Silent blocks have one unpleasant feature - it is quite difficult for an ignorant motorist to diagnose their malfunction as a result of wear. You should have an inspection ditch, a tool, and most importantly, practical skills at your disposal. To detect play on a lever or strut, you need to know exactly how to hang the wheel and where in the car to place the pry bar in order to swing this or that suspension element.
There are a number of signs that indirectly indicate worn dry joints:
- a dull, quiet knock when driving over small potholes;
- dull knocks coming from one side when making a sharp turn indicate problems with the stabilizer joints;
- the car deviates from a straight line on a flat area, lateral wear is visible on the tires;
- deep cracks in the rubber filler or misalignment of the lever, detected during a visual inspection from the pit.
The listed symptoms cannot directly indicate the non-working condition of the silent blocks, unless the rubber began to fall out in pieces and the wheels were noticeably warped. Ball joints and tie rod pins can produce dull knocks, while products with cracks in the rubber may turn out to be quite serviceable.
Rear beam replacement procedure
- While the car is on the ground, you need to loosen the nuts on the wheels, after which you can raise the car.
- Remove the shock absorbers on both sides of the rear suspension.
- Disconnect the parking brake cables and remove the cable jackets from the bracket located on the body.
- Bend the brackets securing the cable to the body, then pull both cables out of the brackets. This is done to provide convenient access to the beam mounting bolt.
- From the bracket, which is located on the rear axle beam, you need to disconnect the earring through which the elastic lever of the pressure regulator drive passes, which is connected to the lever bracket.
- Disconnect the brake hoses from the tubes on both sides of the beam. To prevent brake fluid leakage, you must immediately close the holes with something.
- On each side, unscrew one nut from the bolts securing the beams to the brackets.
- Knock out the bolts (they can “sit” quite tightly, so you can hit them quite hard). After this, the beam can be removed, for which it can simply be rolled out on wheels.
PURPOSE AND DESIGN FEATURES OF THE BUSHING BLOCK
There are one more element in the design - silent blocks. These small-sized parts with a simple design play a fairly important role. Their task is to dampen vibrations and prevent their transmission between the components of the suspension. They are connecting elements of the structure; connections of a number of parts are made only through silent blocks. That is, these parts are directly involved in the main task of the suspension.
Silent block refers to rubber products used in the construction of a car. At the same time, it is a consumable material, which, as a result of wear and tear, is simply replaced, since it cannot be repaired.
The design of this part is very simple and includes only two main components:
- metal clips;
- and a rubber spacer between them.
Thanks to the use of rubber, it is possible to dampen vibrations and vibrations received from one component of the suspension, and not transfer them to another.
Outwardly, it looks like a massive bushing that fits into a special seat in the suspension element, but in essence it is just an elastic hinge that connects the parts into one unit. Thanks to the hole in the inner frame, the element in which it is installed to another component of the suspension or body is fastened.
There are also silent blocks, in which only the internal clip is used in the design, and the role of the external one is played by the seat itself in the suspension element.
Right choice
The choice is made after diagnosing the malfunction or during a planned replacement. It is necessary to understand what role the part plays in the suspension. Its task is to dampen vibrations that inevitably arise due to unevenness on the road.
Vibrations during movement are transmitted to the suspension springs, where they are partially damped by shock absorbers. The vibration then spreads to the frame through the connecting nodes. It is partially damped by silent blocks due to the presence of a soft base between the bushings. Therefore, the quality of the base must be of a high level.
Advantages of polyurethane:
- The service life is increased by 5 times. This allows replacements to be made after long mileage intervals and the suspension to be loaded more aggressively.
- Increased thermal stability. Polyurethane tolerates temperature changes well. The material works just as well in cold weather as at high temperatures.
- Thanks to the dense structure of the material, vehicle handling is improved.
Rubber and polyurethane are equally popular. Drivers themselves choose what to focus on. With rubber spacers you can get increased riding comfort, but improved handling can only be achieved with polyurethane. But in the latter case, comfort decreases, which is especially felt by passengers.
When purchasing a part, it is better to consult a specialist in the store. The fact is that vibration isolators are difficult to distinguish from each other in appearance - they are almost similar. But their outer diameter is sometimes slightly different, which will cause installation difficulties.
DETAILS: Replacing silent blocks on a VAZ 2110 Photo instructions on how to change silent blocks on a VAZ 2110
Tags: rear beam came off, repair of mounting for VAZ 2108, 2109, 21099, 2113, 2114, 2115
Comments 34
It didn't hurt too bad
normal. everyone is alive and well. basin HFCH
The most important thing is that everything is fine)))
electrode MP-3 or some other?
No, esab’s ones are exclusive. MP3s blow God knows where. But these ones are just a fairy tale. The troika cooks almost the entire bodywork in my hands. Occasionally I cook one and a half www.esab.ru/ru/ru/
It's clear. I'll have to promote myself there additionally
our EVERYTHING was pushing!
I don’t know how the chisels work, but on my 12th coupe, no matter how you lift it, the doors close perfectly
into the jack or into the threshold? into the threshold through a meter board? specify...
I always put it in the threshold, I don’t put anything in it. Only a diamond jack with a recess for the threshold
I think that the thresholds have already been changed, and a thick amplifier has been welded in. You shouldn’t exaggerate the capabilities of the Lada
I’m the only owner, only if someone cooked it at night while I was sleeping))) I can, of course, not be lazy and shoot a video tomorrow or the day after tomorrow
come on, jack the end of the door into the threshold, and hang out the whole side.
well, a jack at the end of the door is not a problem, but hanging the side with such a jack simply won’t work
come on, jack the end of the door into the threshold, and hang out the whole side.
counter question, why didn’t they show the whole side on the video?
Then I’ll try to hang the whole side with a normal jack, I’m even curious)))
from 2 approaches to the front jack - the entire side is hung
Well done, I wasn’t afraid, of course I almost got to this point, the new spar was torn, I also opened it from the interior, reinforced it with plates, since one pin attaching the beam to the spar was torn off (thanks to the stampers for their contact welding of these pins), it was drilled right through hole, and pulled off the pin with engravers, and drove for six months with a torn spar =) the beam also danced and the car was constantly chattering, there is also a blog entry if you’re interested
I've already done everything. Just for fun, I'll take a look at it in my spare time.
meh. . . there is hard work. )) And what did you use to weld the damaged areas, I see that it was electric welding? )
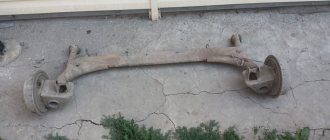
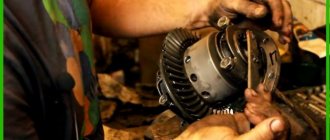
The rear beam of the VAZ 2109 is an unreliable thing, and the owners of this car may have a large number of reasons to remove it. For example, the owner of a vehicle may hear unusual noises: grinding metal, quiet impacts, etc. These “special effects” will be heard in the rear of the VAZ 2109. The sound can be either constant or occur occasionally, for example, when there are bumps on the road.
1 — rubber-metal hinge; 2 — rear suspension arm mounting bracket; 3 — shock absorber casing; 4 — compression stroke buffer; 5 — casing cover; 6 — support washer; 7 — shock absorber cushions; 8 — spacer sleeve; 9 — shock absorber; 10 - insulating gasket; 11 — rear suspension spring; 12 — lever connector; 13 — rear suspension beam arm; 14 — shock absorber mounting bracket; 15 - flange; 16 — lever bushing
Read more: Cadet ru Gorno-Altaisk
It is very difficult for a person who does not have the necessary experience to determine on their own what caused new noises in a car. This is due not only to a lack of practice, but also to the large number of variants of the problem. So, for example, a knocking stabilizer can “move” the silent block to the side, the noise can often be caused by bearings on the axle shafts - in general, there are many options. Therefore, to find out the exact problem, it is recommended to go to a service center and carry out the repair yourself.
How can I check the silent block?
How can you determine whether this part needs to be replaced or not? As a rule, silent blocks can last up to one hundred thousand kilometers. But under road conditions such as ours, it is necessary to carry out an inspection after fifty thousand kilometers.
It is possible to realize whether the suspension silent block has worn out only by your own sensations. If the car’s handling has become worse, or the actions to turn the steering wheel have become “wobbly” with a huge delay, then such criteria are an accurate sign of a worn-out silent block.
However, in order to be sure of this, you should visit a car service center or check the rubber-metal joints yourself. A visual inspection of silent blocks is carried out in the following way: you need to drive into a hole and visually look at a silent block that is clean and free of dirt.
The rubber portion does not need to have cracks or tears. It is best to know how the new part should look before starting to inspect the silent block. An indirect indicator may be to consider a bent camber/toe, if it is established that it was previously correct.
Withdrawal procedure
- Raise and secure the rear of the car.
- Remove the left wheel.
- Disconnect the elastic pressure lever from the earring.
- Remove the left parking brake cable from the 2 brackets on the left rear suspension arm.
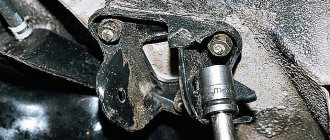
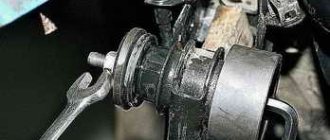
- Using 19mm wrenches, unscrew the nut of the bolt securing the lever to the body bracket.
- We take out the bolt. Pull the lever down so that the brake hose is not stretched. We install the cup of a special puller on the outside, and a special washer on the inside.
- Rotating the nut of the puller bolt, press the silent block into the cup. You need to press the silent block towards the threshold.
Dismantling and installation process
Installation begins after purchasing the parts. You will need a tool - wrenches for removing the beam and suspension arms, a hammer or sledgehammer.
Step by step guide:
- The car is driven into a pit or overpass. You can lift the wheel with a jack, but it is so inconvenient to work with the suspension - you have to work lying down. The jack foot should not be in the same plane as the beam bracket.
- Dismantle the suspension beam. Be sure to remove the handbrake cable when doing this.
- The brackets have special brackets that hold the brake system hoses. The staples are removed.
- The old silent block of the beam is dismantled. Garage conditions require the use of a hammer or sledgehammer. You should work carefully so as not to damage the seat, otherwise there will be problems with installing the new part.
- The seat is cleaned of dirt and graphite lubricant is placed there.
- Install a new part. Replacement of the silent block of the rear beam is done so that there are no gaps or holes. Pressing is done with careful blows of a hammer.
- Reassemble the beam in the reverse order.
The replacement is complete and you can drive the car immediately. During assembly, you should check the installation of each part and only then proceed with assembling the next one. The silent block of the front beam is changed according to the same scheme.
Dismantling the old gum is done with 3 - 4 strong blows with a sledgehammer. You should hit strictly in the center of the part, without deviating to the side from the vertical axis. The edge of the clip is bent using a chisel to facilitate dismantling.
Experienced craftsmen use a piece of tube to press out the silent block of the rear beam. It is important that its diameter is slightly smaller than the same parameter of the seat. The tube is placed against the part and hit with a hammer. In a few blows the part will be removed without unnecessary operations.
Having removed the silent block of the rear beam, check the seat. There should be no chips or cracks on it. If there are any, the part should be replaced. Otherwise, the new silent block will not fit as it should.
Start disassembling the front suspension
All work must be done on an overpass or pit. When replacing the VAZ-2114 suspension, try to use special tools - this will make the work much easier. The sequence is something like this:
- You definitely need to press the handbrake.
- Secure the rear wheels using wheel chocks.
- If decorative caps are installed on the rims, they must be removed.
- If the wheel bearing is being replaced, you will need to unlock and slightly unscrew the nut in advance.
- The wheel bolts also need to be loosened.
- Having lifted my side of the car that is being repaired, it is necessary to completely unscrew the wheel mounting bolts and completely remove it.
You will need to remove the braces from the stabilizer link. After this, using a puller, the ball joint is disconnected from the steering knuckle. It is screwed from below with two bolts; they must be removed using a “17” key. Without this, it will not be possible to dismantle the VAZ-2114 suspension arm.
Reasons for failure and what breaks in the silent block
It is quite difficult to imagine the metal parts of the silent block breaking. If they say that the silent block has broken, it means that the rubber component of the part has started to tear or has already broken. There are three reasons why silent blocks fail:
- Long service life, as a result of which the rubber dried out, lost elasticity and began to crack and tear
- Chemical attack on the rubber part. For example, too much oil got on the silent block, which corroded it.
- Incorrect installation. Tightening the silent block bolts should only be done when the car is on its wheels, and not suspended. But, alas, many car repair shops do not follow this rule; as a result, the wheel tightened under the canopy is at the extreme point, and when it stands on the wheels, the silent block is strongly twisted and the rubber will tear over time, without even a third of its life. Another subtle point is the installation of a silent block with partitions. Such silent blocks can be installed in a strictly defined position, and if it is installed incorrectly, the silent block will fail very quickly.
DIY puller
Dismantling and pressing in a new part are difficult stages of work, especially the last one. Therefore, the installation of silent blocks of the rear beam should be performed using a special device - a puller. You can make it yourself or ask a friend. With it you do not need to hit the parts with a hammer, so damage cannot be caused.
DETAILS: Electric headlight corrector: installation || Electric headlight corrector on a VAZ How to remake and install electric headlight corrector on a Classic VAZ 2104 0507
Device options:
- Small vices. They are put on the suspension part, and a tube is placed under one of the sides. It is important to install the second part so that it presses on the body of the part. But a piece of wood is installed between the vise lip and the part.
- Homemade device from scrap materials. This option involves turning and welding. Make a clamp from metal plates or improvised means. A hole is drilled in the base, where a nut is usually welded. A bolt is installed here, which serves as a press.
- Purchase of factory tools.
The option with a vice is the simplest and most reliable. A factory product costs money. If they are not there, but you have the skills and parts, then you can make the tool yourself. It is important that it can withstand high loads.
Description of the spare part
The rear beam on the VAZ 2114 is a steel element of the torsion bar suspension that provides connection between the rear part of the car body and the wheels. Gives the car lateral stability. Has a U-shaped section. It has high bending rigidity and low torsional rigidity. The design of the rear beam is simple.
The part consists of two longitudinal-type arms connected by welding. At the stern there are special holders with holes used for mounting shock absorber elements. There are also flanges with holes for fastening the axle of the rear pair of wheels. A malfunction of the rear beam is manifested by the knocking of wheels and abrasions on the body from tires.
How to replace silent block
As a rule, the silent block is first screwed to one part or pressed into it, which mates with its outer shell, after which the part is put in place and screwed with a bolt threaded through the internal bushing of the silent block.
Knowing how the silent block is installed, it is not difficult to guess that it is removed either by knocking it out or unscrewing it. When knocking out or pressing out, it is very important not to damage the mating plane of the silent block and the suspension element, since the silent block may then not fit tightly or not be pressed in.
When installing, pay attention to how the silent block should be positioned, since not all silent blocks can be placed arbitrarily. If the silent block has a design with partitions, it must have a strict operating position. If you ignore the strict installation position, the load on the partitions will be too great and the silent block will fail.
Tightening of the suspension with connections through the silent block is carried out exclusively in the “vehicle with its wheels on the ground” position, since the suspension must take the working position before tightening. If you ignore this rule, the silent block will twist and its service life will be significantly reduced.
What can result from untimely replacement of silent blocks?
What can happen if the silent blocks are not replaced in time? Most likely, more than one driver asked this question. If this part is very seriously worn out, then this can lead to the car pulling away at speed, or in other words, at speed the car will be thrown from side to side.
Another significant sign of wear on rubber-metal joints is considered to be uneven wear on the tires of the car. There is no need to start replacing silent blocks, as there may not be very good consequences. For example: the landing zones for attaching the hinges may be destroyed, which will result in a complete replacement of the front suspension arm assembly.
Tools for work
Replacement parts are highlighted in red: hinge, bolt, nut and spring washer.
In order for the replacement of the rear beam silent blocks to be successful, you will need the following tools:
It is best to apply the penetrating agent to rusty nuts the night before.
Source
POLYURETHANE OR RUBBER BUSHING BLOCKS, WHICH IS BETTER?
If the car has rubber bushings and silent blocks in the suspension, which can be replaced with polyurethane parts, then you will only improve the characteristics of the suspension and its operation. Polyurethane silent blocks will last at least 5 times longer than rubber parts.
Polyurethane silent blocks improve the car's behavior on the road, reducing unwanted deformations in the suspension and eliminating the “squeezing” effect typical of rubber parts. This means that the suspension always operates in the mode intended by the designers.
If you want to improve handling, polyurethane silent blocks are what you need. If you calmly move from one point to another, then choose ordinary silent blocks.
WHERE ARE THE BUSHING BLOCKS LOCATED?
FRONT ARM BUSHING BLOCKS
In the front suspension, silent blocks are used in the levers; through them, a movable and elastic connection of the levers with the wheel hub and with the car body is carried out. Silent blocks are often used at the junction of the anti-roll bar with the lever, if this is structurally provided for. It can also be used at the bottom of the shock absorber strut, where it is attached to the hub.
In the rear suspension, silent blocks can be installed on levers (longitudinal and transverse), at the point where the torsion beam is attached to the car body, and in shock absorbers.
In general, the number and location of installation of these rubber elements depends on the design of the car's chassis. For example, consider the location of silent blocks on a VAZ-2110 car. And let's start with the front suspension where these joints are used:
- in the transverse arms (at the place of their attachment to the body);
- at the ends of the anti-roll bar (its attachment to the wishbone);
- in the shock absorber struts at the bottom (the place where they are attached to the wishbone);
- in the extension of the transverse lever (at both ends - at the point of its connection with the lever and with the cross member);
In total, there are 5 silent blocks installed in the front suspension on one side only, and the same number in the other part of the suspension.
Rear suspension device for VAZ 2114, VAZ 2115, VAZ 2113
rear suspension, design and maintenance
Rear suspension parts: 1 – rubber-metal hinge; 2 – suspension arm mounting bracket; 3 – shock absorber casing; 4 – compression stroke buffer; 5 – casing cover; 6 – support washer; 7 – shock absorber cushion; 8 – spacer sleeve; 9 – shock absorber; 10 – insulating gasket; 11 – rear suspension spring; 12 – lever connector; 13 – lever of the rear suspension beam; 14 – shock absorber mounting bracket; 15 – flange; 16 – lever bushing
The rear suspension beam of the Lada Samara 2 consists of two trailing arms 13 and a connector 12, which are welded together through amplifiers.
Suspension of the right rear wheel: 1 – suspension arm; 2 – rubber-metal hinge; 3 – suspension arm mounting bracket; 4 – lever connector; 5 – shock absorber
In the rear part, brackets 14 with eyes are welded to the suspension arms for attaching shock absorbers of VAZ 2113, VAZ 2114, VAZ 2115, as well as flanges 15, to which the rear wheel axles are bolted together with the wheel brake shields. At the front, the suspension arms have welded bushings 16 into which rubber-metal hinges 1 are pressed. Bolts pass through the hinges connecting the suspension arms to stamped-welded brackets 3, which are attached to the body side members with welded bolts.
Rear suspension parts: 1 – rubber-metal hinge; 2 – suspension arm mounting bracket; 3 – shock absorber casing; 4 – compression stroke buffer; 5 – casing cover; 6 – support washer; 7 – shock absorber cushion; 8 – spacer sleeve; 9 – shock absorber; 10 – insulating gasket; 11 – rear suspension spring; 12 – lever connector; 13 – lever of the rear suspension beam; 14 – shock absorber mounting bracket; 15 – flange; 16 – lever bushing