- Hello - Hello - What's the news?
That week I started a post about the Dashboard, or rather about some changes in it. But this entry was ahead of that one, due to circumstances.
I took people to the railway station, but there were no signs. And there is a road - buyraki. The floor of the wheel fits neatly, and in some the floor of the Nine. I put everyone on the train, I turn in backwards, start moving forward, something is wrong, the car doesn’t drive properly, I got out and looked - everything is ok. Turned off the music, drove a meter, there was a knock, a grinding noise, a war
. Has the wheel come loose, is the caliper stuck? I go out, everything is smooth! I went, it’s war again, I see the Central Asians looking strangely at the right rear, I ask, “What’s there?”, “The car is nerfful, the Chief...”
Yes, the right rear beam mount was torn off along with the bracket and that’s it. Wow, I thought. That's normal. Tow truck, service, where is the service? I don’t know anyone + it’s still a day off. I decided to move it to my father’s garage to see what was there. HOW I WENT... these 2.5 km. It was fine on the asphalt, the wheel rested evenly on the fender liner and slid along it. It was sliding because it was raining, which turned out to be just wonderful. But on all other roads, it’s bump on bump and bump on bump! Descents, ascents.
Didn't arrive. 200m. The first time we didn't get there. Moreover, I stood on a flat road, something hit me somewhere, a cannonade of loud sounds, and I was standing in the middle of a country road. It doesn't go forward or backward. There is no access for cars. In 10 minutes, as expected, the AMBULANCE
. It can't leak. Local people begin to gather...
I call my brother, he looks at local tow trucks, and I call. The tow truck driver turns out to be the namesake, tells me where to take it, we take it, leave it on Saturday, and pick it up on Monday morning.
2 lower bolts were torn out of the spar. Why 2 when there are 3 of them? b very well
from this story.
I knew, I wanted to do this somehow (at the same time, stuff it with polyurethane and install beam reinforcements), I saw
that the bracket had already begun to come off.
But just think, instead of 3 nuts they hold 2, right?
At first there were thoughts that the rot was already there, so it fell asleep. But no, after 4 years 2 bolts are just tired and my ears are tired. Together with the bracket, together with the beam. The lounge is fresh, the metal is normal, the white primer under the mastic is visible in the place of the torn out pins.
It's good that this happened on a country road at 3 km/h. On the previous 2 trips I went 180, it was still fun if it happened then.
Cars of the VAZ-2108-09 family are not distinguished by a strong body or durable body iron; the metal rusts especially quickly if it is not treated with anticorrosive. Over time, rust appears on the metal surface, and the rear spar often rots on either side, and cracks appear on it during use. If you drive for a long time with a rotten side member, the rear beam can tear out, which will lead to unpredictable consequences. To avoid a major nuisance or even disaster along the way, it is better to change the spar in advance; this work can be done in a car service center or with your own hands in a garage if you have sufficient experience, the necessary tools and materials.
Tags: rear beam came off, repair of mounting for VAZ 2108, 2109, 21099, 2113, 2114, 2115
Comments 34
It didn't hurt too bad
normal. everyone is alive and well. basin HFCH
The most important thing is that everything is fine)))
electrode MP-3 or some other?
No, esab’s ones are exclusive. MP3s blow God knows where. But these ones are just a fairy tale. The troika cooks almost the entire bodywork in my hands. Occasionally I cook one and a half www.esab.ru/ru/ru/
It's clear. I'll have to promote myself there additionally
our EVERYTHING was pushing!
I don’t know how the chisels work, but on my 12th coupe, no matter how you lift it, the doors close perfectly
into the jack or into the threshold? into the threshold through a meter board? specify...
I always put it in the threshold, I don’t put anything in it. Only a diamond jack with a recess for the threshold
I think that the thresholds have already been changed, and a thick amplifier has been welded in. You shouldn’t exaggerate the capabilities of the Lada
I’m the only owner, only if someone cooked it at night while I was sleeping))) I can, of course, not be lazy and shoot a video tomorrow or the day after tomorrow
come on, jack the end of the door into the threshold, and hang out the whole side.
well, a jack at the end of the door is not a problem, but hanging the side with such a jack simply won’t work
come on, jack the end of the door into the threshold, and hang out the whole side.
counter question, why didn’t they show the whole side on the video?
Then I’ll try to hang the whole side with a normal jack, I’m even curious)))
from 2 approaches to the front jack - the entire side is hung
Well done, I wasn’t afraid, of course I almost got to this point, the new spar was torn, I also opened it from the interior, reinforced it with plates, since one pin attaching the beam to the spar was torn off (thanks to the stampers for their contact welding of these pins), it was drilled right through hole, and pulled off the pin with engravers, and drove for six months with a torn spar =) the beam also danced and the car was constantly chattering, there is also a blog entry if you’re interested
The need to remove the rear beam may arise for many reasons. This has to be done when strange sounds are heard (dull blows, metallic ringing, squealing rubber, etc.) coming from the rear of the car when turning, on bumps and holes, or constantly. Sufficient experience is required to identify the real problem. The problem can be caused by various reasons:
- silent blocks worn out or torn to the side (this creates a feeling when one shock absorber “disappears” when turning - the knock is quite sharp and strong),
- The stabilizer may be knocking,
- There may be play in the axle bearings, as well as a number of other reasons.
It is recommended that diagnostics be carried out by specialists, despite the fact that repairs are planned to be carried out independently.
Recommendations for replacing the rear side members of the VAZ-2108-09
- When replacing a LP, many craftsmen cut off the old body element with a gas cutter, but it is better to drill out the part.
- When installing a new spar, it is very important to find the control points correctly and not to disturb the geometry of the body, otherwise the work will have to be redone and problems will arise.
- It is recommended to grab the spar at three or four points; before thoroughly welding the part, it is recommended to try on the rear beam - the fasteners must match the studs.
- Before installing the body element, the seat must be thoroughly cleaned of rust and well primed; if the metal is rusty, new plates must be welded.
- You cannot weld with a continuous seam, this will weaken the metal of the body.
Read more: What is the Izh 2126 door lock suitable for?
Replacing rear side members is not an easy job, if you are not confident in your abilities, you should not take on it, it is better to use the services of professionals.
During the next pile-up with acceleration in a turn, I heard extraneous sounds coming from the trunk... this tore the beam from the spar...
the third plate is not included in the frame, but it’s clear where to cook it.
We connect it to the pipe in the threshold with a piece of 50 corners
, this is the one that is used as an amplifier
we cut more precisely, we have experience
I sincerely believe that doing this is faster than struggling under the car and welding the ceiling position to the already tired, rotten side members. The RDS was used as usual.
Rear beam replacement procedure
- While the car is on the ground, you need to loosen the nuts on the wheels, after which you can raise the car.
- Remove the shock absorbers on both sides of the rear suspension.
- Disconnect the parking brake cables and remove the cable jackets from the bracket located on the body.
- Bend the brackets securing the cable to the body, then pull both cables out of the brackets. This is done to provide convenient access to the beam mounting bolt.
- From the bracket, which is located on the rear axle beam, you need to disconnect the earring through which the elastic lever of the pressure regulator drive passes, which is connected to the lever bracket.
- Disconnect the brake hoses from the tubes on both sides of the beam. To prevent brake fluid leakage, you must immediately close the holes with something.
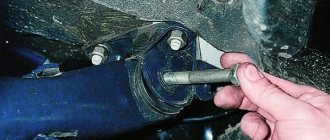
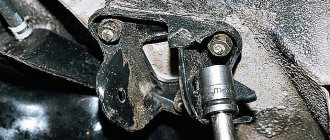
- On each side, unscrew one nut from the bolts securing the beams to the brackets.
- Knock out the bolts (they can “sit” quite tightly, so you can hit them quite hard). After this, the beam can be removed, for which it can simply be rolled out on wheels.
Useful tips
- Before disassembling the beam, you need to loosen the tension of the hub nuts and other connections that are tightened with a large torque.
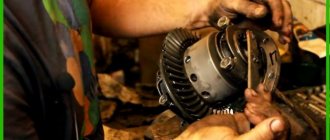
- It is recommended to change rubber-metal hinges in a specialized workshop - this requires special tools, as well as experience in such work.
- The instruction manual states that the beams must be dismantled together with the brackets by unscrewing the three nuts holding them in place. But due to long-term use of the machine, the studs can rust and therefore easily crack. For this reason, it is recommended to remove the beam by disconnecting it from the brackets - it is better to let them remain on the body.
The beam is installed in place in the reverse order; there are no pitfalls here. After the car is already on the ground, you need to tighten all the nuts. It is also necessary to check everything after 80-100 km. After installing the beam in place, the brake system must be bled, the parking brake must be adjusted, and, if necessary, the camber and toe must be adjusted.
Repairing the rear beam of a VAZ 2109
The rear beam of the VAZ 2109 is an unreliable thing, and the owners of this car may have a large number of reasons to remove it. For example, the owner of a vehicle may hear unusual noises: grinding metal, quiet impacts, etc. These “special effects” will be heard in the rear of the VAZ 2109. The sound can be either constant or occur occasionally, for example, when there are bumps on the road.
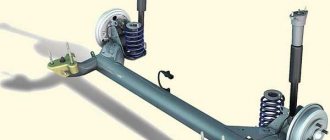
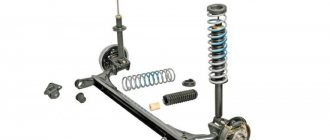
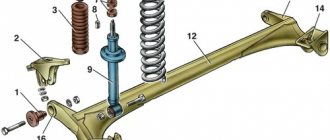
1 — rubber-metal hinge; 2 — rear suspension arm mounting bracket; 3 — shock absorber casing; 4 — compression stroke buffer; 5 — casing cover; 6 — support washer; 7 — shock absorber cushions; 8 — spacer sleeve; 9 — shock absorber; 10 - insulating gasket; 11 — rear suspension spring; 12 — lever connector; 13 — rear suspension beam arm; 14 — shock absorber mounting bracket; 15 - flange; 16 — lever bushing
It is very difficult for a person who does not have the necessary experience to determine on their own what caused new noises in a car. This is due not only to a lack of practice, but also to the large number of variants of the problem. So, for example, a knocking stabilizer can “move” the silent block to the side, the noise can often be caused by bearings on the axle shafts - in general, there are many options. Therefore, to find out the exact problem, it is recommended to go to a service center and carry out the repair yourself.
Features and body structure of the VAZ 2109
| Body type | 5-door hatchback |
| Peculiarity | All-metal, load-bearing, single-volume |
| Length/width/height, mm | 4006/1650/1402 |
| Wheelbase, mm | 2460 |
| Track front/rear, mm | 1400/1370 |
| Ground clearance, mm | 170 |
| Permissible weight, kg | 1340 |
| Curb weight, kg | 915 |
| Body weight (useful weight), kg | 450 |
| Weight of transported cargo with three passengers in the cabin, kg | 50 |
| Weight of transported cargo with one passenger, kg | 275 |
| Maximum speed, km/h | 148 |
| Acceleration time of a car with a driver and one passenger to 100 km/h, s | 16 |
| Front suspension | "MacPherson", independent with shock-absorbing telescopic struts with coil springs, lower wishbones with braces and anti-roll bar |
| Rear suspension | Torsion-lever, with coil springs, double-acting shock absorbers |
Installation and dismantling of beams
The VAZ 2109 beam is very convenient to install and dismantle when using a lift. But if your garage is not equipped with such an addition, then carefully lift the “back” of your swallow with a jack. For greater reliability, place special shoes or at least bricks under the wheels and engage the gear.
Once the vehicle is raised, the wheels can be unscrewed. Then remove the shock absorbers from the rear suspension. The parking brake cables are disconnected and the “shirts” are removed. The brackets securing the cables to the vehicle body are bent, and the cables themselves are removed from the brackets.
When dismantling the brake hoses located on both sides of the beam, be sure to plug the resulting holes with something. Otherwise, brake fluid will leak.
Unscrew the nut on both sides that serves to secure the beam to the brackets. Carefully knock out the bolts. Now you can pull out the beam. Some useful tips:
- Before you begin work on removing the beam, loosen the tension on the nuts on the hub in advance.
- If you need to replace a rubber-metal hinge, it is better to contact a specialist for this. Without a special tool and skills for such work, something good is unlikely to come of it.
- If you look at the documentation of the VAZ2109, which is given by the manufacturer, then you need to remove the rear beam from the car along with the brackets. For this manipulation you need to unscrew the 3 nuts holding the structure. But the operating time of the vehicle makes its own adjustments. After a certain period of time, the studs begin to become corroded, and in some cases they may crack. It is because of this that it is more expedient to dismantle the beam by simply disconnecting it from the bracket and leaving it suspended.
- The rear beam of the VAZ 2109 is fastened in the reverse order of removal.
- After returning the vehicle to a solid surface, all nuts must be tightened. The tightening procedure should be repeated after 80 km.
- After installing the beam, it is important to bleed the brake system, adjust the parking brake, and check the wheel alignment.
As you can see, removing and installing the rear beam of a VAZ 2109 is not at all difficult; all car owners can do this work. The main thing is time and desire.
Replacing rear side members on a Nine in a car service center
Replacing rear LPs is a labor-intensive and quite complex job that requires care, metalworking skills, and the ability to use welding. Not every car owner undertakes to carry out such repairs on their own, so quite often the owners of front-wheel drive VAZs turn to professional technicians. The cost of replacing the rear spar 2108-09-099 can vary significantly, it depends on various factors:
- the location of the auto repair company, usually in the metropolitan region and large cities, repairs are more expensive;
- car service level;
- general technical condition of the car.
If the car body is heavily rusted, not all craftsmen agree to repair such a vehicle. I would also like to note that many auto repair shops fundamentally refuse to hire VAZ-produced cars, preferring to engage in more profitable repairs of foreign cars.
The average cost of replacing one rear spar 2108-09 is from 3,500 to 5,000 rubles; of course, car owners consider such prices to be simply extortionate. The price of body work, including materials, is sometimes a third of the cost of the used car itself, which cannot be considered normal. Private auto repairmen in garages have more affordable prices (from 2000-2500 rubles), but there are pitfalls here:
- a good repairman is not easy to find, and it is difficult to get to him, since due to high demand, repairs are carried out by appointment;
- among private traders working at low prices, there are many outright hacks;
- in garage conditions there is not always everything necessary for high-quality repairs;
- the work is carried out by repairmen with insufficient experience, technology is violated.
When replacing rear LPs, it is important to weld the body part exactly in place; if the spar is shifted to the side, the geometry of the body will be disrupted, the rear beam will “move” to the side, and the car will drive sideways with all the ensuing consequences.
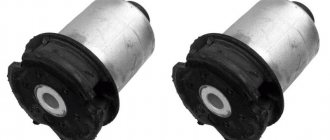
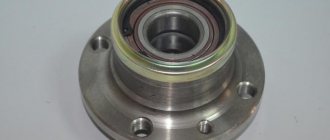
How to change the silent blocks of the rear beam of a VAZ-2109
Problems with rear suspension joints occur in all cars. The VAZ-2109 was no exception. Replacement of the silent blocks of the rear beam of the VAZ-2109 is carried out approximately after a mileage of about 100 thousand km. This figure may differ in one direction or another, because the wear of rubber-metal joints depends on the conditions in which the vehicle is operated. The quality of the parts used in the manufacture and maintenance of the machine is also important. A signal that the wear of parts is critical is knocking and creaking in the area of the rear wheels.
Purchasing a new item
So, you have found out that problems with the chassis are associated with the breakdown of silent blocks. Before starting work, you must purchase a new spare part. First of all, look at the labeling. It is important to buy an option specifically for the VAZ-2109. If you make a mistake, it will be impossible to install the silent block. The spare part must be marked: 2109-2914054. Many auto parts sellers may recommend purchasing a spare part from the “ten”, but to install it you will have to work hard to press the rubber part.
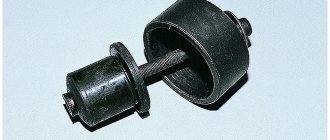
There are two types of silent blocks:
- With rubber bushings. Traditional spare part, provides softness during suspension operation. The main disadvantage is the fragility of such a spare part, especially if you often travel along sections of the road with poor asphalt surface.
- With polyurethane inserts. More rigid, which is its main drawback. Moreover, such a spare part lasts much longer, since it is resistant to temperature changes and deformations.
Beginning of work
If everything is ready for work, you can start replacing.
Important! To avoid injury from the vehicle falling, place the body on reliable metal stands.
The order of work will be as follows:
- Raise the rear of the car with a car jack, place the body on a stand, remove the wheel;
- After this, you should treat all the fastening bolts to be removed with WD 40 liquid, allow some time for the liquid to interact with the metal;
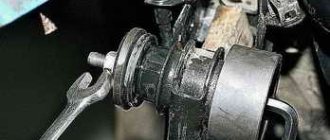
- Next, use 19mm wrenches to unscrew the nut from the bolt connecting the rear beam to the mounting bracket on the body;
- The regulator in the brake system will interfere with the removal of the beam; it should be disconnected;
- Now nothing interferes with the dismantling of the beam. The fastening bolt is removed, the beam is lowered down and a wooden block is installed between it and the body. Its size is selected in such a way that it becomes possible to replace the silent blocks of the VAZ-2109 rear suspension.
After this, they begin the most labor-intensive process, pressing the rubber-metal hinge out of the seat. They do this in different ways. You can try to knock it out with a hammer or remove it using a device. When this does not help remove the hinge, you can try making a hole in the rubber of the part. This will release the tension and allow you to remove it from the socket.
The problem of domestic cars
Car body repair begins with the selection of tools. I’ll say right away that the list will be quite large, because the work is labor-intensive and requires a large number of devices, including electronic and gas models. We will need at least three types of hammers of different sizes, a flap wheel and a sanding wheel (it removes paint and light rust well).
VAZ 2109
A grinder will also come in handy, a 10 cubic meter carbon dioxide cylinder, a welding machine with a maximum current of 150 amperes, several chisels, and a set of metal drills. You can’t do without a jack here either; it’s better to have two of them.
Stock up on cutting wheels of approximately 1-2 millimeters and one cleaning wheel. Any type of jigsaw will do. Brush with rust converter, fiber disc (can be replaced with a simple budget brush). Standard driver's set, 2mm cord and plumb line. It seems that I have listed everything that is needed. It's time to get to work.
What to do next
Before installing a new part, thoroughly clean the seat with a wire brush and rags. The cleaned area is treated with a solution of soapy water to facilitate installation of the new part. It is almost impossible to do this without a special device. If you don't have one, don't worry, you can easily make it yourself. A bolt with a nut or a stud 12 mm thick is suitable for this. You will also need two thick steel washers. Their diameter should be slightly larger than the outer diameter of the part being replaced.
Replacing silent blocks 2109, or rather, installing them is done like this. The bolt and washer are installed in the eye of the beam. On the other side, they also put on a washer and screw on the nut. Now you can tighten the nut with a wrench while simultaneously guiding the hinge. This can be done by tapping the joint with a hammer. If the edge of the hinge rests on the washer, select a spacer between the fixture washer and the beam. You can use a large wrench.
After the rubber-metal hinge is in place, the device is removed and the beam can be put in its place. To do this, lift the car body and pull out the previously installed wooden block. Using a jack, carefully lift the beam and align the hole of the hinge and bracket, while correcting their alignment with a drift or other suitable object. Place the bolt in place, tighten the nut, and put the wheel in place.
The VAZ-2109 silent block is replaced in a similar way on the other side of the car. The final tightening of the nuts is carried out after the wheels have been installed and the car has driven for a short distance. At this point, the replacement of the VAZ-2109 silent blocks can be considered complete. If you still have any questions, watch the video:
Choice
Before you start replacing the silent blocks of the rear beam, you need to decide what exactly you will replace the old, worn bushings with.
We figured out the markings and realized that for the VAZ 2109 you need to take only those that are suitable in size and diameter for the rear beam of the nine.
Today, for the VAZ 2109 they offer two types of silents, differing in the material of manufacture.
Silent block type
Peculiarities
They are not as durable, but provide greater softness when operating the car's suspension.
A more rigid modification, in which the increased rigidity is the main disadvantage. At the same time, these products are more resistant to temperature changes, do not deform so quickly, and remain operational longer.
Size difference
Replacing rear beam silent blocks on a VAZ 2109
Silent blocks produced by AvtoVAZ can safely be called one of the highest quality parts. It is not surprising that other foreign manufacturers also use them for their cars.
Element appearance
The durability of almost any part, including the silent block, directly depends on the driving style of the motorist. The service life of the element is more than 30 thousand kilometers.
Symptoms of a problem
There are several main signs of failure of the rear beam silent blocks, including:
- Unstable behavior of the car on the roads;
- Tires wear unevenly, which is not difficult to notice from the tread pattern;
- When driving on a bad road (that is, 95% of all our roads), unpleasant squeaks and impacts on the car body are observed.
These signs are indirect, since they may be associated with other failures of the vehicle’s chassis. For example, dull knocks are also a sign of a faulty rear pillar. Therefore, in order to make sure that there is a particular problem, you will need to fully diagnose the chassis.
Malfunctions
Often, replacing the rear beam bushings is due to the fact that defects arise in the design of the element. They are like this:
- The elasticity of the rubber element deteriorates;
- The rubber breaks;
- The central bushing is displaced;
- Rotations occur in the seat.
If problems are detected with the silent block of the rear beam, you will need to drive the car into the garage in the near future and replace the damaged components. Unlike foreign cars, changing the silent seal on a VAZ 2109 is quite simple and without outside help. Plus it costs almost pennies.
Before you start replacing the silent blocks of the rear beam, you need to decide what exactly you will replace the old, worn bushings with.
We figured out the markings and realized that for the VAZ 2109 you need to take only those that are suitable in size and diameter for the rear beam of the nine.
Today, for the VAZ 2109 they offer two types of silents, differing in the material of manufacture.
The choice should be made based on the available budget. Rubber elements cost several hundred rubles less. As for manufacturers, we recommend paying attention to the companies SEVI, BelMag, Boge and SS20.
To replace you will need:
- New rear silent blocks;
- A small wooden beam;
- A device for pressing in a silent block (you can do the job without it);
- Open-end wrenches;
- Socket wrenches;
- Spanners;
- Hammer.
When everything is ready, you can start working.
- Place the car on a level surface in the garage above a pit or overpass. Be sure to place wheel chocks and shoes under the wheels. All for your safety.
- It is better to remove the rear wheel to make it easier to work.
- But it is not at all necessary to remove the rear beam. Just complicate your work with unnecessary dismantling processes.
- On the left side of the driver is the pressure regulator rod for the rear brakes. It will disturb you while you work, so we advise you to remove it. This is done by removing the locking bracket of the rod and the handbrake cable. You will remove the latter from the right side from the mount.
- Unscrew the nut from the bolt with a 12mm wrench that holds the rear beam to the bracket. This may cause problems. Place a socket wrench on the driver to increase leverage on the fastener. Remove the bolt, lift the car with a jack and move the beam down. It will come out of the eyelet this way. Do not overdo it to avoid damaging the nearby brake hose. If you press too hard on the pry bar while moving the eye, you risk breaking the hose.
- Take a pre-prepared wooden block and insert it between the body and the beam. This must be done so that the beam is below the eye.
- Using a hammer and a drift (regular metal tubing will do), knock out the old worn bushings. By the way, if you come across such a concept as “fungi”, don’t worry. This is what car enthusiasts often call these bushings because of their external similarity.
- Clean the seat from accumulated dirt and rust. Be sure to lubricate the areas with soapy water. Without it, it will be difficult to press in new silent blocks. Or use a simple dish detergent. Under no circumstances should you lubricate the seats with grease or oil, as these substances will soon begin to corrode the element.
- Now it presses in new elements. Ideally, you should have a special pressing tool. If you don't have one, use a regular hammer.
- Take out a wooden block.
- Armed with a second jack, lift the beam and insert the mounting bolt into place and tighten it with a nut.
- Reinstall the rear wheel and lower the car to the ground.
Only upon completion of all these stages can the bolts of the new silent blocks be tightened until they stop.
Such an operation should not cause any special problems, so it is not at all necessary to go to a service station and spend extra money.
Strengthening and modernization
Strengthening or tuning the body of a VAZ 2109 according to the instructions should be carried out only if the owner is well versed in the design features of the car, has an appropriate understanding of the device, and knows the technical data on weight and other parameters. Otherwise, it is better to entrust the modernization work to professionals at the service station. True, the price of their services in these matters is too high, but you will be satisfied with the result.
So, tuning a VAZ 2109 car is, first of all, upgrading its body. The process always begins with this, and only after that the power unit and other components of the machine are brought to the desired state.
The need for reinforcement at “nine” and the quality of life indicator
It’s interesting that many owners of the “Nine” install modern amplification components more for the sake of beauty. This cannot in any way be a plus for reinforcement, since for the most part such elements can only provide decorative benefits.
On the contrary, if the goal of tuning is primarily to strengthen the body, TK*, spacers, rods and gussets can be selected accordingly. They will significantly strengthen the frame and increase its ability to withstand external influences.
TK* - tubular roll cage
Strengthening, as mentioned at the beginning of the article, is a mandatory procedure. By installing longitudinal and transverse reinforcing elements into the body structure, you can achieve a significant increase in the rigidity of the body frame, and this is already very good. The integrity of the original design obtained at the factory will be maintained and at the same time the corresponding torsional rigidity parameters will increase. At the same time, the weight of the car will practically not increase.
No matter how rigid the body is, it will have weak, vulnerable areas. Even if, under the influence of external forces, these places receive only microscopic damage, over time this will inevitably develop into a big problem.
You can verify the weakness of the “nine” body using a simple example:
- Raise the car on a jack (you can do it on one or both sides at once);
- In 80-90% of cases, car doors jam in the openings, which indicates deformation of the body.
Torsional rigidity or QR is one of the most important indicators of the condition of the body. Hatchbacks are much stronger than sedans in this regard. Thus, the strengthening of the body on the VAZ 21099 (sedan body type) should be carried out much more extensively in order to make it possible to increase the quality of life.
But, again, the VAZ 2109 body has a low quality of life indicator when compared with some foreign-made hatchbacks. This means that the car turns worse, with some delay, as design features interfere.
- During maneuvers and extreme driving, metal in the areas where the levers are attached causes mismatch in the operation of the suspension;
- Due to the periodic twisting that occurs during active driving, the body of the “nine” soon ages or, as engineers say, “gets tired.” This inevitably affects the destruction of welding seams and the appearance of intense corrosion.
Note. As mentioned above, hatchbacks, especially 3-door ones, performed better in terms of quality of life. Worse are sedans, station wagons and minivans.
Modern components for strengthening the body
Thanks to the technological breakthrough of recent years, designers are able to come up with various options for reinforcing elements.
Most often in modern body tuning, a strut is used on the front suspension. They put it on body “glasses”. The effect makes itself felt immediately as soon as the car picks up speed or the driver maneuvers in any other way.
The spacer, like most tuning components, came to the world of tuning from big sport. The body of a sports car was reinforced with such an element without fail, as rigidity increased, which had a positive effect on handling.
If we keep in mind the technical benefits of spacers, then they become an effective method of treating the congenital sluggishness of a VAZ model car. The spacer gives only a positive effect to almost all AvtoVAZ models.
As for the practical effect, it manifests itself to a greater extent with extreme driving methods. During normal, quiet driving, the driver will not feel any interference from the strut in the vehicle's structure.
Here are the advantages a front brace can give to the front-wheel drive VAZ 2109 and VAZ 21099 models:
- Accelerated steering wheel reactions;
- The composure of the body (felt by the driver during a long drive - if there is no spacer, the car becomes “wobbly” after several hundred kilometers);
- The driving characteristics become “sharper”, the play in the steering wheel appears more clearly and the movement is more similar to a sports one (although the steering wheel reacts faster, it does so somehow unpredictably, with accelerated turning);
- Despite the above property, it is much easier to drive a “nine” with an installed strut, since the feeling of tension disappears and the maximum speed at the strut increases.