Choosing racks for Priora: the main differences between modern products
Domestic and foreign manufacturers offer high-quality parts. Standardly installed on the SAAZ oil type product model. Their approximate price is 1800-2000 rubles. They are optimal for driving in urban areas and on minor off-road conditions, and cope well with long journeys along the highway. Travel on uneven surfaces is well tolerated for the first 30-40 thousand km, and then they may require replacement.
The Japanese Kayaba racks have also proven themselves positively. The company has recently appeared on the domestic market, but has pleased customers with both a reasonable price and good quality: the elements cope with both off-road driving and highway racing. They have good stability and are able to absorb strong shocks.
When purchasing products, it is important to study the certificate, since there are also low-quality fakes on the market. A novice motorist who is determining which struts are best for a Priora will definitely like the Japanese elements: they are easy to use and install
Domestic Demfi racks are highly durable and reliable. The service life with careful and careful driving can be more than 70 thousand km. The cost of the products is low and every Priora owner can afford to purchase the parts.
It is important to focus on modern motorists who are accustomed to using personal transport for both work and leisure.
Therefore, when choosing which racks to install on a Priora for long-term use, you should pay attention to Demfi products
You can roughly determine which racks on the Priora are better, and which of them will last longer, based on the degree of rigidity of the products.
For example, SS 20 products differ in the degree of shock and vibration absorption. But the buyer needs to remember that rigid elements, completely eliminating roll in corners, will not provide sufficient comfort when driving on uneven road surfaces. Soft types, while guaranteeing ease of control, will not hold the road so well when passing sharp turns and spiral roads.
When studying suitable racks, you should not be guided by price. Cost will not indicate high or low quality. It is set according to the market segment, company rating, and delivery price. Therefore, custom-made products are usually more expensive than domestic analogues.
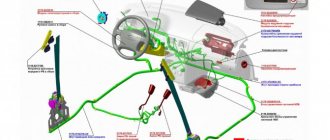
Lada Priora front suspension diagram
1 — steering knuckle; 2 - eccentric bolt; 3 — shock absorber strut; 4 — lever; 5 — stabilizer bar; 6 — mounting bracket for the stabilizer bar cushion; 7 — stabilizer bar strut; 8 — cross member of the front suspension; 9 — ball joint; 10 — stretch 1 — telescopic stand; 2 - spring; 3 — rod nut; 4 — rebound limiter of the upper support; 5 — upper support; 6 — bearing; 7 — upper spring cup; 8 — spring gasket; 9 — compression stroke limiter of the upper support; 10 — compression progress buffer; 11 - protective cover
1 — ball joint; 2 - hub; 3 — hub bearing nut; 4 — protective cap; 5 — hub bearing; 6 — steering knuckle; 7 - nut; 8 — front wheel brake disc; 9 — brake mechanism shield; 10 — eccentric (adjusting) bolt; 11 — rotary lever; 12 — front suspension spring;
13 — shock absorber rod; 14 — upper spring cup; 15 — upper support of the shock absorber strut; 16 — shock absorber rod nut; 17 — bearing of the upper support of the shock absorber strut; 18 — spring gasket; 19 — front suspension compression buffer; 20 — protective casing; 21 — rack body; 22 — bracket for mounting the anti-roll bar cushion;
Description of design
Rear suspension elements: 1 — beam; 2 — anti-roll bar; 3 — silent block; 4 — bracket for attaching the lever to the body; 5 - trailing arm of the beam; 6 — brake drum; 7 — shock absorber; 8 — bracket for attaching the shock absorber to the lever; 9 - spring; 10 — shock absorber cover; 11 — spring gasket; 12 — compression stroke buffer; 13 — rear wheel hub; 14 - rear wheel brake mechanism Rear suspension - semi-independent, with an elastic beam, with helical coil springs and double-acting hydraulic telescopic shock absorbers. The longitudinal arms are welded to the beam through reinforcements. To increase lateral stability and reduce vehicle roll, a stabilizer bar made of 14 mm steel rod runs inside the beam. The ends of the rod are welded to the levers.
Rear suspension: 1 — rear suspension beam; 2 - shock absorber; 3 - spring; 4 — bracket for fastening the beam arm to the body. In the middle part, a rubber cushion is installed on the stabilizer bar. Bushings are welded to the arms in front, into which silent blocks are pressed. At the rear, brackets with eyes for attaching shock absorbers and flanges for attaching the axles (axles) of the rear wheels and brake shields are welded to the suspension arms. The elastic elements of the suspension are coil springs. The lower coil of the spring rests on a cup welded to the shock absorber reservoir, and the upper coil, through a rubber gasket, rests on a support welded from the inside to the wheel arch. Bolt 1 passes through the inner race of the silent block, connecting the lever to the body bracket. The bracket is attached to the welded studs of the body with three nuts. 2In the lower eye of the shock absorber, a rubber-metal hinge (silent block) is pressed into place, through the central bushing of which a bolt passes, securing the shock absorber to the suspension arm bracket. The shock absorber rod is attached to the body through two rubber pads (one at the bottom of the support, the other at the top) and a support washer (under the nut). The chrome-plated surface of the rod is protected from dirt by a rubber corrugated cover, inside of which a compression stroke buffer is installed. A cylindrical collar made on the axle is designed to center it in the hole of the lever flange and center the brake shield on the axle. An unregulated double-row tapered roller bearing is installed in the hub. During operation, the bearing does not require replenishment of lubricant. The outer bearing ring is pressed into the hub and secured with a retaining ring. The fit of the inner rings of the bearing on the journal is transitional (with a slight interference fit or a small gap). The inner rings of the bearing are tightened in the axial direction with a nut, tightened with a large torque and secured by indenting the nut flange into the groove of the journal.
Shock absorber parts and spring: 1 - shock absorber; 2 - spring; 3 — compression stroke buffer; 4 — rod cushions; 5 — spacer sleeve; 6 — support washer; 7 - spring washer; 8 - nut; 9 — cover; 10 - cover cup; 11 — spring gasket
Rear wheel bearing assembly: 1 - axle; 2 - hub; 3 - bearing; 4 - retaining ring; 5 — washer; 6 — bearing nut; 7 — sealing ring of the hub cap; 8 — hub cap The angles of the rear wheels are set structurally by the geometry of the beam and are not subject to adjustment in operation. The angles can only be checked on a special stand and compared with control values (camber angle - 0°30'±30', wheel toe - 0°10'±5'). If the rear wheel alignment angles do not correspond to the control values, it is necessary to check the condition of the rear suspension elements.
Wheel bearings
We continue to study why the rear right wheel knocks when driving. Whether it’s the 9th Lancer or a VAZ, it doesn’t matter – the bearings make the same noise when they wear out. But the sound is very insidious. At first it will be barely noticeable. If it is not detected in time, the broken holder may simply jam the wheel at speed. Also, knocking noise occurs if the bearing is not tightened properly. To diagnose this, just lift the rear wheel on a jack and shake it from side to side.
Note! The bearing should not be over-tightened. You need to leave a small gap in case of thermal expansion. Minor play is allowed. But if the wheel wobbles, this already indicates a problem.
Why is timely replacement of struts on a Priora so important?
Reliable products can ensure good stability of vehicles on the road. It is impossible to determine exactly which racks are best to install on the Priora. When purchasing, you need to focus on the type of product, their hardness and recommendations or reviews of other motorists. But if problems arise with control and driving, replacement of elements is mandatory.
Only new spare parts can guarantee driving safety. Worn struts can lead to roadside accidents and more expensive vehicle repairs.
A sudden breakdown on the highway will require evacuation and cause unnecessary costs. Therefore, Priora drivers must be attentive to restoring the performance and reliability of the vehicle in the event of any malfunction of the racks or auxiliary parts.
Front suspension instructions for installation and repair of Lada Priora
Do-it-yourself modification of VAZ and Lada
Front suspension. Instructions for repairing and replacing suspension parts of the Lada Priora, stages of removing and installing the shock absorber and spring 2171, eliminating knocks and noises in the chassis of the Lada Priora. Repair of the chassis of a VAZ 2170 Priora, instructions for replacing parts in the front and rear suspension of 2172 and 2171 Priora. Examination. The suspension of the VAZ 2170 is independent, telescopic, with hydraulic shock absorber struts, coiled barrel springs, lower wishbones with braces and a stabilizer bar. Malfunctions in the front suspension |
Replacing the telescopic stand
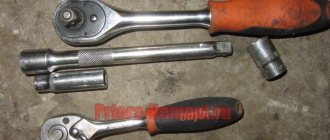
You will need: keys “13”, “17”, “19”. 1. Brake the car with the parking brake and install wheel chocks (“shoes”) under the rear wheels of the VAZ 2172. Raise the front part of the Priora fret with a jack and install it on supports. Remove
Ties for Lada Priora suspension springs, wrench “14”, hex wrench “6”, socket wrench “22”. 1. Remove the telescopic strut from the Priora (see “Removing and installing the telescopic strut”). 2. Clamp the telescopic stand in a vice, squeeze
Spanners, ball joint remover. 1. Lift and place the front part of the VAZ 2170 on supports. Remove the wheel from . Brake the car with the Lada Priora parking brake and install wheel chocks under the rear wheels
Removing and installing the extension
Wrenches “19” (two), “24” (two), spanner “17” (two), wrench for wheel bolts.
- 1. Loosen the front wheel bolts on the corresponding side.
- 2. Lift and place the front part of the VAZ 2170 on supports. Remove the bolts
You should stock up on: keys “13”, “17” (two), a hammer (wooden or polymer). 1. Place the Lada Priora car on an inspection ditch or lift and place the front part on supports. Brake the car with the parking brake of the VAZ 2170
Replacing the hub bearing
The hub is equipped with a double-row ball bearing, which does not require adjustment or lubrication during operation. When pressing out the hub, the bearing is destroyed, so press the hub out of the steering knuckle only for replacement.
- Front suspension
- Rear suspension
Brake disk
Often a knocking sound in the front wheel when braking occurs due to crooked discs. This occurs when overheating occurs. During the braking process, the pads, passing through the place where there is a bend, hit it, which causes a knock.
This problem can be treated, but it is quite difficult to accurately identify deviations from the norm without special equipment. If there are severe defects, of course, everything is visible visually, but then it is better to replace the disk with a new one. You can also grind the surface of the disk on a lathe or using special tools. It is better to replace the pads, otherwise after the disk is restored they will wear out on it again. Sometimes you can guess the curvature of a disc by the condition of the pads. They will wear unevenly.
Replacing the front struts on a Priora car will be carried out in the following order:
Lock the car with the handbrake; Jack up the front end and place supports; Using a wheel wrench, moving clockwise, gradually loosen the wheel bolts, and then pull it towards you; Disconnect the brake hoses from the device; Remove the steering tip with a puller; Apply lubricant to the bottom of the device being removed.
Attention! After this step, it is advisable to wait about 10-15 minutes for the lubricant to work well; Unscrew the bolts (you may have to remove the threads); Remove the bottom part of the device from the mount; Unscrew the nuts securing it to the body, remove the shock absorber; Secure the spring with plastic ties (this makes them easier to store); Place the hexagon at the top of the rod (there is a seat). This will keep it from spinning during the next step; The rod nut must be unscrewed, after which you can completely remove the shock absorber; Take out the compression limiter and then the bump stop; Finally, remove the spring, cup, damper, boot.
Installation is carried out in reverse order. Don't forget to check the front strut support bearing - it will most likely need to be replaced.
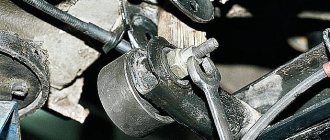
Racks and rack fastenings, supports and other mechanisms - we check
If the rack is knocking, you can determine it more or less simply. At the moment of swinging, you need to attach the hammer handle, for example, to a stand and see if the knock is transmitted to the attached object. It is quite possible that the spring is knocking, which has become deformed and has sagged. It is also possible to get a knock when the rack mounts come loose. There are such problems in these nodes:
- the upper mount of the strut in the form of a support has broken, this can be determined by opening the trunk and placing a finger on the mount, and then rocking the car up and down;
- the lower mount has lost its elasticity, this is also easy to check using the same operation, but only in a hole under the car - put your hand on the mount;
- the strut itself has failed, you can determine this by eliminating all other options and problems with the suspension, then the shock absorber on your car will need to be replaced;
- Next, it’s also worth checking the spring, which can make different sounds, the coils can hit each other, there are a number of other problems that break the spring;
- For a full diagnosis, it is possible to remove the rack and then disassemble the parts with separate diagnostics, but this is carried out at a time when nothing else helps.
It often happens that everything is in order during diagnostics, but while driving the car makes a knocking noise. In this case, you will have to disassemble the rear suspension mechanism. We would like to immediately warn those motorists who want to do this themselves. This is not the best option, since you need to fully understand each rear suspension component in order to then install all the parts in the normal sequence. Otherwise, you cannot avoid problems.
Checking the condition of the chassis and transmission
We check the condition of the chassis and transmission every 15 thousand kilometers. The parts of the chassis (wheels, suspension arms, anti-roll bar, rear suspension beam, shock absorbers and suspension springs) and transmission (front wheel drive shafts) must be free of deformations, cracks and other mechanical damage that affect the shape and strength of the parts. Hanging the front wheels one by one (while the car must be securely fixed on the support stand), we check the condition of the wheel hub bearings.
Use only factory-made support stands. The wheel should rotate evenly by hand, without jamming or knocking.
Holding the wheel in a vertical plane, we alternately sharply pull the upper part of the wheel toward ourselves, and the lower part away from us, and vice versa. We make sure there is no play (knock). If there is a knock on the front wheel, ask an assistant to press the brake pedal. If the knocking noise disappears, then the wheel bearing is faulty, and if the knocking noise remains, then the ball joint is most likely worn out. The hub bearings of the front and rear wheels are not adjustable and must be replaced if there is play. To check the serviceability of the ball joint, insert a mounting blade between the suspension arm and the ball joint housing. Be careful not to damage the ball joint boot.
While pressing the lever with a mounting blade, we monitor the movement of the lever head relative to the ball joint housing. If there is play in the connection, replace the ball joint.
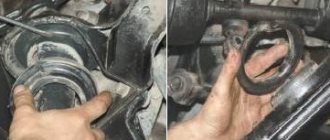
We check the condition of the protective covers of the ball joints. We replace ball joints with torn or cracked covers. To check the silent block of the front suspension arm...
...insert a mounting blade between the body bracket and the lever head... ...and try to move the lever along its axis and along the axis of the bolt. If the lever moves freely, without effort, it means that the silent block of the lever is badly worn or damaged and needs to be replaced. Ruptures, cracking and swelling of the rubber bushing of the silent block are unacceptable. Checking the condition of the silent blocks...
... and the back ends of stretch marks. Tearing, cracking and swelling of rubber silent blocks are unacceptable.
Inspecting the anti-roll bar cushions...
...and rubber bushings for stabilizer struts. If ruptures, cracks or severe deformation are detected on the rubber pads and bushings, they must be replaced. Lifting the rear wheels one by one, we check the condition of the rear wheel hub bearings. The wheel should rotate evenly by hand, without jamming or knocking. To check the condition of the silent block of the rear suspension beam arm...
...we insert the mounting blade between the body bracket and the lever head and try to move the lever in different directions. If the lever moves freely, without effort, it means that the silent block of the lever is badly worn or damaged and needs to be replaced.
We check the condition of the springs, telescopic struts and shock absorbers of the front and rear suspensions. The suspension springs must not be damaged. Tearing, cracking and severe deformation of rubber bushings, cushions and compression buffers of shock absorbers are unacceptable. Liquid leakage from shock absorbers is not allowed. A slight “fogging” of the shock absorber in its upper part, while maintaining the characteristics, is not a malfunction. If the rubber element of the upper support of the front suspension telescopic strut settles or is destroyed, the support must be replaced.
We check the condition of the hinges and the protective cover of the gear shift rod and jet rod. Alternately rotating and turning the front wheels (with the front of the car hanging out)…
...we inspect the protective covers of the outer...
...and internal hinges of the front wheel drives, check the reliability of their fastening with clamps. Covers that are cracked, torn or have lost elasticity must be replaced. We check that there is no oil leakage from the gearbox through the seals of the internal drive joints. If there is a leak, replace the seals.
The VAZ-2110 is considered the predecessor of the Lada Priora; their front suspensions are almost identical, the only differences are in the spring parts and shock-absorbing components. The problems that drivers noted with the VAZ-2110 with front suspension migrated to the Priora - the wheel bearings leave much to be desired, the ball joints wear out quickly and must be regularly replaced.
Messages 4
1 Topic by Sanjk1980 2013-12-16 12:57:03
- Sanjk1980
- New member
- Inactive
- Registration: 2013-09-23
- Messages: 12 Thanks : 2
- Car: VAZ-21103
Topic: Knock in rear suspension
I replaced the rear struts with VAZ 21103. I installed elastomag struts, springs, and SS20 upper rubber bands. I installed everything in the service in April. Since then I have traveled 8000 km. A knocking sound appeared on small bumps in the upper right rear (that's what you hear). I checked everything was tight both at the top and bottom. I tried removing all the junk from the trunk and the knocking still remained. Tell me what else could be the reason for the knocking.
2 Reply from Wolfy36 2013-12-16 16:54:55
- Wolfy36
- New member
- Inactive
- Registration: 2013-12-12
- Messages: 19 Thanks : 5
- Car: VAZ 21120
Re: Knock in rear suspension
The cause of a knock or squeak in the rear suspension may be simple negligence of the craftsmen who installed the protection incorrectly. Very often, an extraneous knock in the rear suspension is nothing more than the knock of a loose muffler. Also check all bushings and fasteners for damage. after 8000 quiet driving it would be a sin to rely on the springs and even more so on the shock absorbers.
Engines and transmissions
In 2001, a new facelift model of the VAZ 2110 was introduced. The car had slightly more rounded edges and a modernized front bumper. Until 2004, the offer included 1.5-liter gasoline engines with a power of 77 or 92 hp. With. Since 2004, larger 1.6-liter 80- and 89-horsepower engines have been installed under the hood. Power was transmitted to the front wheels through a 5-speed manual transmission 2110.
A year after its debut, the sports version 21106 GTI appeared. The transmission here is based on a 2-liter 150-horsepower engine from Opel, which allowed acceleration to just over 200 km/h. Car enthusiasts are also familiar with the Lada 110 Premier, the difference of which was that the body was increased by 19 cm. It can often be found in the form of a taxi. Under the hood is a 1.8-liter gasoline engine producing 98 hp. With. In 2009, production of the Lada 110 was completed, and the Priora became the model's successor. The VAZ 2110 was offered in sedan (2110), station wagon (2111), five-door hatchback (2112) and coupe (21123) body styles.
The main “disease” of all VAZ 2110 engines is the cooling system. Oxides and deposits often collect here and become clogged in the engine casing and radiator. Due to a malfunction of the sensor, the electric fan periodically fails. The tens clutch also usually fails quickly during aggressive driving.
Every owner of a Ten is faced with the need to replace a piston - the one on the Priora is perfect here. It will significantly improve the technical characteristics, but such an exchange is best carried out after 120,000 km.
Salon VAZ-2110
If we compare the VAZ 2110 and Priora, Russian manufacturers have been upgrading the latter’s 1596 cc engine for many years. The four-cylinder sixteen-valve engine produces 72 kW/98 hp. With. at 5600 rpm and a maximum torque of 145 Nm at 4000 rpm, which, according to available data, allows the Priora to reach a top speed of 183 km/h, and provides acceleration to 100 km/h in 11.5 s.
Suspension arms or beam - check fastenings and silent blocks
One of the common causes of knocking in the rear suspension is the beam. If your car has such a suspension design, it is worth determining the exact location of the knock. To do this, you need to put the car in a pit, ask someone to rock the car, and in the pit, grab hold of various places on the beam with your hand. Most often we are talking about the knocking of the silent blocks of the rear beam. The suspension arms may also knock, and here the diagnosis will be somewhat more complicated:
- you need to install the car in the pit, putting it on speed, and not on the handbrake, then climb into the pit, taking with you a pry bar, a large screwdriver, and a set of keys;
- using a mount, check the functionality of the bushings and silent blocks; if they move easily in their seats and noticeably play, they need to be replaced;
- check the integrity of the suspension arms, their bending can lead to knocking and uneven running of the car, and cracks indicate the need for quick replacement;
- the fastenings of the levers can be loose, for this you need to use keys and tighten all visible connections, this will help eliminate this item from the causes;
- When the suspension elements are deformed, the levers themselves can knock on body parts and other elements of the rear suspension space while driving, so you can rock the car and find out.
Let's sum it up
There are many interesting options for car repair. Among them there is also self-diagnosis. This is a great advantage for every owner that you can do your own research on the car, detect problems, and go to the service already prepared for all the nuances. Our modern service stations do not always tell the truth about problems, make incorrect diagnoses and make money out of the blue. This is why there is an outflow of customers to garage foremen. Sometimes the latter offer much better quality of services.
There are indeed many complex elements in the rear suspension, and sometimes it is very difficult to diagnose. But in fact, you just need to gain a little experience in order to more or less understand the details of the chassis. This will help you simply carry out the necessary actions and get a more or less good inspection of the car yourself. If you have a master whom you completely trust, it is better to contact such a specialist. This will help you find the cause much faster and perform high-quality repairs in a matter of hours. How do you prefer to detect the causes of knocking noises in your car's suspension?
Engine and gearbox problems
If we talk about power plants, in general they are quite reliable (at least when compared with the “decimal” ones). The timing system is belt driven. The belt runs for quite a long time - up to 120 thousand kilometers. However, the roller and pump may fail earlier, which leads to a break in the timing drive or overheating of the motor in the first and second cases, respectively.
By the way, the “Prior” engine has different pistons, crankshaft and lightweight connecting rods. The resource of the internal combustion engine is about 300-350 thousand kilometers.
Among the common problems on Priora is difficult starting. The reason for this is a low-quality standard battery. Its service life is no more than one year. The owners strongly recommend replacing it with a better one so as not to experience problems with starting, especially in winter.
Now about the transmission. All power units are paired with a five-speed manual transmission. It has been significantly improved and is now equipped with a cable drive. Shifting gears is clear, without hesitation. The clutch lasts up to 100 thousand, depending on driving style. The box itself has no major flaws. The recommended transmission oil change interval is 60 thousand kilometers.
Brake system - knocking noises may occur here too
The braking system and hubs are also a common source of knocking. A bearing that has worn out and is not doing its job can make a knocking noise. Too much wheel play can cause unpleasant effects when turning when there is lateral load on the wheels. In cold weather, when starting to move, there may also be a knocking effect, which has an unpleasant effect on the ride. But this is due to the thermal clearance of the bearings and does not always indicate a breakdown. So you need to figure it out before you buy parts for repairs.
There can be a variety of knocking noises in the braking system:
- a broken hub hole in the drum causes wheel play, which does not depend on the bearing; in this case, the knock will constantly intensify until the hub assembly is replaced;
- the caliper in the disc braking system can knock on nearby parts, and this is also an important feature of some cars; such knocking must be eliminated in time before serious problems begin;
- the drum has a rather complex mechanism, so one spring that has slipped off can cause unpleasant knocking and other problems, this is also worth remembering when diagnosing;
- the pads may knock if they have fallen out of their seats in the drum; also in this case, grinding and other unpleasant features may appear, and the rear brake does not work well;
- Handbrake cables occupy not the least place in the rating of knocks; they can fall out of their seat, become detached from the holders and experience other problems in operation.
Knocks are not always associated with a breakdown, but the suspension should not be allowed to loosen for too long. Otherwise, after a few hundred kilometers of driving with constant knocking, serious troubles will arise that will have to be eliminated. And in this case, the cost of fixing your car's problems can actually be uncomfortably high. So it’s worth remembering possible troubles and checking for problems with the brake and hub mechanisms. Otherwise, future restoration costs will be severe.
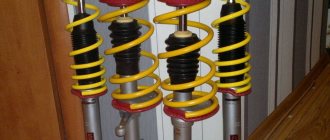
Chassis SS20
These spare parts for domestic and foreign cars are produced under the “System Technologies” brand. These racks have become so popular due to their high quality. For Priora, the manufacturer offers 4 product options that differ in hardness. Which stands are better? They need to be selected according to your driving style. The softest ones are the “Standard” series racks. Rear shock absorbers from the same series are also offered.
A reinforced version is offered to increase the load capacity. Next are the “Comfort” racks. According to reviews from many car owners, this is the best option. They are stiffer than the Standard, but the suspension works equally well on bad and good roads.
The “Highway” kit is suitable for those who like stiff suspension and high speed. With these racks you can drive on bad roads, but it will be uncomfortable. “Sport” is the toughest option from this manufacturer for Priora cars. A front suspension of this type is not very suitable for the city, but for sports competitions it is just right.
How to disassemble the front and rear suspension
The chassis consists of 41 parts, so disassembly takes longer and assembly may require additional adjustments. The process looks like this:
- Using a wheel wrench, loosen the bolts on the wheel one by one and pull the car onto an inspection hole or overpass. Be sure to tighten the handbrake - this will lock the rear ones, now remove the front ones.
- Unscrew the nuts from the hubs, now you can remove the steel ball joint rod from the damper strut.
- Disconnect the stabilizer from the lever. Unfasten the ball joints from the steering knuckle and remove them.
- Disconnect the bracket from the body, and then remove the extension. At the same time, loosen the pad holders.
- Tie the brake caliper, leaving it attached to the hose. Removing it is not so difficult, but installing it is much more difficult, so it is easier to leave it hanging.
- Unscrew the nuts from the damper, remove it, and then the protective fist.
- Using socket wrenches, remove the fastenings of the ball joint and steering knuckle. Be careful not to damage the protective cover of the hinge.
- Analysis of the rear chassis looks like this:
- Place the car on the pit (it is better, of course, to use a lift);
- Open the trunk, under the trim (which covers the wheel arches) loosen the shock absorber bolts.
- Gradually loosen the wheel bolts and remove them.
- Unscrew the brackets securing the handbrake cables, then remove them - otherwise they will get in the way. Unscrew the drum mechanisms, cable ends, flanges.
- Remove the brake pipes. Unscrew the drive lever washer, then remove the drive itself.
- Remove the damper supports.
- remove the stand.
- Unscrew the fasteners of the beam (from below), and smoothly lower it to the ground.
What else could be knocking in the back of the car?
There are the most unusual types of knocking noises that many drivers have been looking for for years and cannot find. If the suspension knocks, the knock sooner or later begins to intensify and localizes itself. That is, you will soon be able to understand where exactly the car is knocking. But if the knocking is monotonous and does not change, there is a real point in carrying out additional checks. These checks consist of discarding the most incredible options for knocking in the rear of the car:
- the wheel has come loose - this is possible after going to a low-quality tire service; if the wheel is not tightened, it can not only knock, but also fly off at speed;
- There are several metal parts lying in the trunk and actively knocking against each other, but it seems to you that we are talking about knocking directly in the chassis or other systems;
- the spare tire is knocking on a specially designated place for it - place rubber bands under it or simply turn it over, this will help eliminate the knocking, if any, in this unit;
- body parts may knock, if the spot welding has failed or any bolts securing body elements have become loose, the knocking may be annoying;
- The muffler often breaks off the rubber bands and begins to drum on the bottom of the car or the gas tank; this can be easily checked by driving the car into a pit and pulling the muffler in different directions.
All these seemingly incredible aspects are checked first at professional service stations. In 20% of situations, diagnostics of the rear chassis will not even be required - the problems will be eliminated in exactly this way. It is enough just to perform a normal search for the cause of the problem and get more information on how to cope with the tasks. However, it is better to find out this from the specialist after discovering problems. We offer a video with detailed diagnostics of the Hyundai Solaris rear suspension:
Problems when paying with bank cards
Sometimes difficulties may arise when paying with Visa/MasterCard bank cards. The most common of them:
- There is a restriction on the card for paying for online purchases
- A plastic card is not intended for making payments online.
- The plastic card is not activated for making payments online.
- There are not enough funds on the plastic card.
In order to solve these problems, you need to call or write to the technical support of the bank where you are served. Bank specialists will help you resolve them and make payments.
That's basically it. The entire process of paying for a book in PDF format on car repair on our website takes 1-2 minutes.
If you still have any questions, you can ask them using the feedback form, or write us an email at
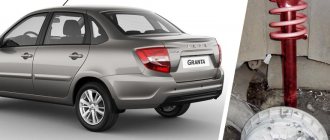
Lada Priora
This car was released relatively recently and has already earned the respect and sympathy of car owners throughout the country.
To get to know Priora better, it’s worth taking a look at its strengths:
Appearance. One of the main strengths that ensured Lada good sales. Judging by the design, we can say that this is a man's car. Features from the Granta are noticeable in the front fenders and hood. Other elements, such as the front bumper, radiator grille and optics, are new.
Thanks to its unique external features, Priora stands out clearly in the city traffic, attracting attention.
Suspension. There are also slight similarities with previous models. This fact gives the buyer absolute confidence in the quality of the suspension, because the products of the VAZ plant have always been distinguished by their indestructibility and ability to overcome even the most difficult obstacles
Based on this, we can say with confidence that Priora will feel great on our roads.
New control panel. The new panel cannot be called domestic in any way. The standard European design is clearly visible here. The panel has become more attractive and has acquired new functions.
"Bogdan"
The coexistence of the previous model and the new one in the same market is a worldwide practice. As soon as the new version finally puts the previous one to shame, production of the old model is stopped or transferred to other countries. So the painfully dear sedans and station wagons of the tenth family, having left the assembly line in Togliatti, appeared in the model range of the Ukrainian corporation Bogdan.
The new VIN code did not scare off fans: in Russia alone in 2010, more than 5 thousand Extogliatti small cars were sold, and in the first half of 2011 - more than 3 thousand. Since we have a dime a dozen sedans in this class, we decided to understand why aliens from the past captivate buyers using the example of the Bogdan-2111 station wagon and its direct relative, the Lada-Priora.
In Russia, the tenth family left the main conveyor in stages. In 2007, the sedan left the scene. The hatchback and station wagon lasted two years longer, then the family finally gave way to the Priora. Although the factory stubbornly insists that this is not a restyling, but a radically redesigned car, the buyer is skeptical about such statements.
Basic faults
A beam can fail for two reasons:
- displacement from place;
- mechanical damage (most often a crack).
When a crack occurs in the lever, the torsional rigidity of the body decreases. This parameter determines the degree of safety, as well as the position of the parts. The fact is that with normal body rigidity, which is laid down during design and obtained after the final stage of car assembly, absolutely all components and assemblies (down to the bolts) are in place, they have a maximum permissible vibration amplitude. For example, the suspension “swallows” potholes - the parts actively move, and people in the cabin may not even notice the rolling.
In addition to the fact that you will most likely have to get used to unpleasant sounds, there will be increased wear and tear on small parts. When a lever cracks, everything that is attached to it begins to move with greater amplitude. The problem is temporarily solved by welding, but this only postpones the solution to the problem for some time. Craftsmen recommend changing the beam.
Caliper piston jamming
During braking, the fluid presses on the piston. However, it gets stuck in the cylinder and remains in this position until an increase in pressure pushes the piston out of it. When this happens, it hits the pads with force and presses them down - this is the reason why you hear a knocking noise from the front when braking.
To correct this situation and get rid of annoying sounds, just remove the caliper and remove the piston. Then its condition is visually checked, and the surface of the cylinder is inspected together with the piston. If traces of corrosion are found during the inspection, the cylinder must be cleaned, and it is recommended to replace the piston.