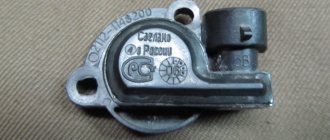
Throttle valve
Removal
1. Turn off the ignition, open the hood and disconnect the wire from the negative terminal of the battery.
2. Loosen the clamp securing the air duct to the air filter housing.
3. Then loosen the clamp securing the air duct to the throttle valve.
4. Loosen the clamp...
... and disconnect the engine crankcase ventilation system hose from the fitting.
5. Disconnect the intake air duct assembly from the air filter housing and from the throttle body and then remove it from the vehicle.
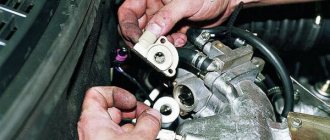
6. Using a 5mm hex wrench, unscrew the four bolts securing the throttle valve.
7. Disconnect the throttle valve from the intake manifold.
8. Remove the wiring harness from the holder on the throttle valve, use a flat screwdriver to pry up the retainer...
... and disconnect the electrical connector from the throttle valve. We finally remove it from the car.
9. Remove and discard the throttle valve gasket.
Cleaning
Caution: Do not remove the two damper mounting screws shown below. If they are then poorly tightened and tightened, the loosened screw can get into the engine cylinder and damage it.
1. Thoroughly clean the body and internal surfaces of the throttle body with a regular carburetor and throttle cleaner using a brush or an old toothbrush, especially in the area where the edges of the closed throttle valve are located.
Note: When cleaning, be careful not to scratch the throttle body.
Caution: Avoid getting cleaner on the throttle position sensor connector and throttle motor cover (i.e., keep the throttle body with the cap and connector facing up when cleaning, as shown in the photo below).
2. Carefully wipe the case and internal surfaces of the case with a rag that does not leave fibers.
3. Let the cleaner evaporate completely and reinstall the clean throttle valve.
Installation
1. Install a new throttle valve gasket on the intake manifold flange.
2. Using a lint-free cloth, carefully wipe the throttle valve mounting location on the intake manifold.
3. Install the throttle valve on the intake manifold and tighten its mounting bolts.
4. Connect the electrical connector of the throttle valve; a characteristic click should be heard. We attach the wiring harness to the holder on the throttle valve.
5. Reinstall the intake air duct assembly and secure it with clamps.
Perhaps this is exactly the case when one should not interfere with a properly working mechanism, because... There were no indications for surgical intervention in the Granta throttle assembly.
The engine is running. Idle speed does not float. The throttle response to the electronic accelerator occurs as normal. Occasionally I noticed, standing at a traffic light, that the tachometer needle was trying to unobtrusively change its position, but the electronics quickly eliminated this incident. In early spring, one could refer to some amount of condensation that sometimes appears in the fuel system. Now, May. Warm. But sometimes the arrow still tries to “twitch”.
The situation is not annoying, but the mileage is under 17,000 km. indicates that behind the throttle it is not at all the same as it was in the first hundreds of kilometers.
I did not contact the “dealer” service station, where Grant was under warranty, to clean the throttle. After we “adjusted” the thermal clearances of the valves during maintenance-1, there was no desire to communicate with such “specialists”.
It’s high time for AVTOVAZ to check its dealers and subdealers for high-quality performance of work when undergoing scheduled maintenance of warranty vehicles. There are enough statistics. And those who are negligent will be punished with a ruble so that the desire to run an official car service will no longer exist once and for all.
If adjusting the “valves,” for me, still requires consolidating the experience gained, then with cleaning the throttle valve, everything is much simpler.
What you needed: *A 5mm hex wrench. *Star key T-20. *Brush flute. *Lubricant. *Thread lock. *New bolts with washers, made of stainless steel. *Phillips and slotted screwdriver. *Cheap degreaser. *Spray for cleaning carburetors and chokes. *Cotton rags. lint-free. *Disposable rag on a roll. *Rechargeable cylinders and a hand pump for them. *Garbage bag.
Using the “Open Diag” program, we take screenshots of the throttle position before starting cleaning.
Communication of the throttle valve with other automotive systems of the VAZ-2110
The throttle valve of a VAZ-2110 car is a component of the engine intake system and is directly connected to a large number of other vehicle systems. These include the following systems:
- directional stability;
- anti-blocking;
- anti-slip;
- anti-slip;
- cruise control.
In addition, there are those systems that are controlled by the electronics of the gearbox. After all, it is this throttle valve that regulates the flow of air into the car system and is responsible for the quality composition of the fuel-air mixture.
Features of the Lada Granta throttle assembly
The throttle valve is turned by an electric motor through a gearbox. Both are built into the throttle body.
When starting and warming up the engine, as well as during idling, the flow of air into the cylinders is regulated by opening the throttle valve.
The throttle position is controlled by two sensors built into the throttle body.
The throttle valve opening angle is set by the electronic control unit (ECU) depending on the estimated amount of air that should enter the engine cylinders. This takes into account the operating mode of the engine (starting, warming up, idling, and so on), the temperature of the ambient air and the engine, and the position of the gas pedal.
Control commands are sent to the throttle assembly to the electric motor. At the same time, the ECU monitors the opening angle of the damper and, if necessary, sends appropriate commands to adjust its position. As a result of the fact that the ECU simultaneously regulates the amount of injected fuel and incoming air, the optimal composition of the combustible mixture is maintained in any engine operating mode.
The electric throttle body is sensitive to deposits that may accumulate on its inner surface. The resulting layer of deposits can interfere with the smooth movement of the throttle valve, jamming it (especially at low opening angles). As a result, the engine will operate unstably and even stall at idle, start poorly, and failures may also appear during transient conditions. To avoid this, as a preventive measure, deposits should be removed with special detergent compounds during regular vehicle maintenance. A large layer of deposits can completely block the movement of the damper. If flushing fails to restore the throttle assembly to operability, it must be replaced.
A malfunction or incorrect operation of the throttle assembly may be caused by a broken contact in its electrical circuit (oxidized terminals in the wiring harness connection block). In this case, it will be possible to restore operation by treating the terminals with a special compound for cleaning and protecting electrical contacts. There are other possible causes of the malfunction:
— no supply voltage is supplied to the throttle assembly;
— signals are not received from both throttle position sensors;
— The computer cannot recognize signals from the throttle position sensors.
In these cases, the engine control system goes into emergency mode. At the same time, the car retains the ability to independently move a short distance at a slow speed, which, in extreme cases, will allow it to be moved to a safe place (pull to the side of the road, leave an intersection, etc.).
The fact that the throttle assembly is operating in emergency mode may be indicated by a burning warning lamp for a malfunction of the engine management system and an increased speed of the crankshaft at idle (about 1500 rpm, despite the fact that the engine is warmed up to operating temperature). it will not respond to pressing the gas pedal.
Each of the throttle position sensors is a potentiometer. During operation, gradual wear of conductive paths and moving contacts occurs. Over time, wear can reach such an extent that the sensor cannot function correctly. The presence of two sensors increases the reliability of the entire unit.
If only one sensor fails, the warning lamp will light up, but the engine management system will switch to backup mode. In this case, the engine will respond adequately to pressing the gas pedal, but with worse performance parameters
The reserve mode allows you to drive your car to the repair site under your own power.
When and how to do it yourself
When to do it
adaptation of the throttle valve zero and adaptation of the misfire diagnostic function:
- After replacing the ECU controller or resetting the controller using a scan tool.
- After replacing the throttle assembly.
Throttle zero adaptation procedure
:
- When the car is stationary, you must turn on the ignition, wait 30 seconds, turn off the ignition, wait until the main relay turns off.
Adaptation will be interrupted
, If:
- the engine turns over;
- the car is moving;
- the accelerator pedal is pressed;
- engine temperature is below 5 °C or above 100 °C;
- Ambient temperature is below 5 °C.
Adaptation procedure
Misfire diagnostic functions:
- warm up the engine to operating temperature (parameter value “Coolant temperature” = 60.90 °C);
- accelerate the car in 2nd gear until higher crankshaft speeds are reached (parameter value “Engine crankshaft speed” = 4000 min-1) and perform engine braking (“Engine crankshaft speed” = 1000 min-1);
- Perform engine braking six times in one trip.
The adaptation procedure is specified in the technological instructions (TI 3100.25100.12056) for Lada Vesta (download) and XRAY (download).
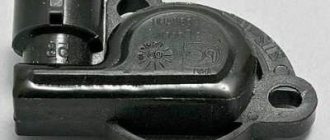
Throttle assembly - removal, inspection, cleaning and installation of Lada Granta
The throttle assembly is non-separable, cannot be repaired and in case of malfunction it is replaced as an assembly. The need to perform work is determined by checking the technical condition of the engine control system.
To flush the throttle assembly, you need a means to clean the engine intake pipe. As a last resort, you can use a carburetor cleaner. If the problem cannot be eliminated using a cleaner, the throttle assembly must be replaced. After removing the throttle assembly, the gasket (O-ring) must be replaced. A product to clean and protect electrical contacts may be required.
To avoid damage to the electric drive, do not attempt to forcefully turn the throttle valve by applying force to it. When installing a new throttle assembly on a vehicle, special diagnostic equipment will be required in order to check the “calibration” of the throttle valve position in its extreme positions.
1. Prepare the car for work and disconnect the wire terminal from the negative terminal of the battery.
8. Using a multimeter in ohmmeter mode, measure the resistance of the throttle position sensors between terminals 1 and 4. A working throttle assembly should have a resistance in the range of 750–1250 Ohms.
When performing the following operation, hold the throttle assembly with the electric drive upward so that the cleaning agent cannot flow down the throttle valve axis towards the gearmotor and get inside the mechanism.
9. Using a cleaning agent, we wash away deposits from the inner walls of the throttle assembly and from the throttle valve.
10. Wipe the throttle assembly with a clean rag and blow it with compressed air from a compressor or foot pump.
11. Install the throttle assembly in the reverse order, replacing the O-ring with a new one.
Increased idle speed, dips and jerks when accelerating the car, loss of power - all this indicates problems with the throttle valve, which needs to be removed and cleaned, or replaced, if cleaning does not give the desired result, the unpleasant phenomena persist.
The procedure for removing the throttle assembly on a LADA Granta car
To remove the damper you need to perform the following operations:
- The wire is disconnected from the negative terminal of the car battery.
- The tightening that secures the ventilation hose going to the engine crankcase is loosened.
- The hose attached to the fitting of the air supply pipe is disconnected.
- The clamp connecting the pipe and the throttle becomes loose.
- The pipe is disconnected.
- The connector connecting the wires to the throttle assembly is disconnected.
- The bolts securing the throttle valve are unscrewed.
- The gasket located on the flange of the intake module is dismantled.
It should be noted that the gasket is disposable; when dismantling it, it is necessary to subsequently install a new element.
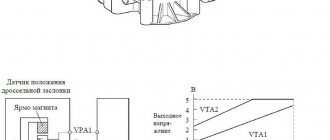
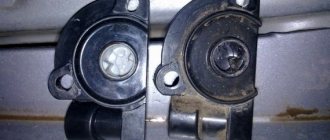
The throttle position sensor is mounted on the side of the throttle assembly and is connected to the throttle shaft
The sensor is a potentiometer, one end of which is supplied with a plus supply voltage (5 V), and the other end is connected to ground.
From the third terminal of the potentiometer (from the slider) the output signal goes to the controller. When the throttle valve is turned (by operating the control pedal), the voltage at the sensor output changes.
When the throttle valve is closed, it is below 0.7 V. When the throttle valve opens, the voltage at the sensor output increases and should be more than 4 V when the throttle valve is fully open.
By monitoring the sensor output voltage, the controller adjusts the fuel supply depending on the throttle valve opening angle (i.e., at the driver’s request).
The throttle position sensor does not require any adjustment, since the controller perceives idle speed (i.e. the throttle valve is completely closed) as the zero mark.
A specific cause of jerking during steady vehicle movement may be damage to the throttle position sensor.
Additional symptoms confirming the malfunction of this sensor are:
– uneven operation of the engine at idle;
– reduction in maximum engine power.
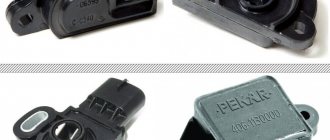
The sensor is not dismountable and therefore cannot be repaired. If a sensor malfunction is detected, it is replaced as an assembly.
What is TPS in a VAZ-2110 car?
The throttle position sensor is abbreviated as TPS among motorists. This part is used in several types of engines:
- Gasoline injection type.
- Single injection type.
- Diesel engines.
TPS is also known as a throttle valve potentiometer. This is due to the fact that the sensor is designed to function as a variable resistor. The sensor itself is installed in the engine compartment - the place of fixation is the throttle pipe. The mechanism of operation of the sensor is as follows: depending on the position and degree of opening of the throttle valve, the resistance also changes. That is, the level of the value of such resistance depends on the pressing of the gas pedal. If the pedal is not pressed, the throttle valve will be closed and the resistance will be minimal. The opposite is true when the damper is open. Accordingly, the voltage across the TPS, which is directly proportional to the resistance, will also change.
The control of such changes is carried out by the electronic control system; it is the one that receives all signals from the TPS and supplies fuel using the fuel system.
So, at the maximum voltage of the signal contact of the throttle position sensor, the fuel system of the VAZ-2110 car will supply the largest portion of fuel.
Thus, the more accurate the TPS indicators, the better the VAZ-2110 electronic system adjusts the engine to the correct operating mode.
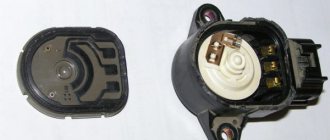
Checking the throttle sensor response
With the ignition off, disconnect the engine management system wiring harness connector from the throttle position sensor.
Terminals “A” and “B” are indicated on the plug retainer, and terminal “C” is marked on the opposite side of the plug body.
To check the power circuit of the sensor itself, we connect the tester to terminals “A” and “B” of the plug. The voltage should be 4.8 - 5.2 volts.
If there is no voltage at these terminals, then you need to check the serviceability of the circuit itself (which means there is a break or short to ground somewhere) between terminal No. 32 of the controller and terminal “A” of the wiring harness block.
Then we check the circuit between terminal No. 17 of the controller and terminal “B” of the block - the sensor is grounded.
If the circuit is OK, but the voltage is not normal, then the controller is faulty.
Sensor check:
To check the sensor, connect the plug to it.
And where the wires come out of the plug, insert two wires or two needles, where the terminals “B” and “C” come out.
We connect the tester and turn on the ignition.
When the throttle valve is closed, the voltage should be 0.35 - 0.7 V
When the throttle is open (gas pedal is pressed), the voltage should be 4.05 - 4.75 V
If the voltage does not correspond to these readings, then the sensor is faulty and must be replaced.
Perhaps this is exactly the case when one should not interfere with a properly working mechanism, because... There were no indications for surgical intervention in the Granta throttle assembly.
The engine is running. Idle speed does not float. The throttle response to the electronic accelerator occurs as normal. Occasionally I noticed, standing at a traffic light, that the tachometer needle was trying to unobtrusively change its position, but the electronics quickly eliminated this incident. In early spring, one could refer to some amount of condensation that sometimes appears in the fuel system. Now, May. Warm. But sometimes the arrow still tries to “twitch”.
The situation is not annoying, but the mileage is under 17,000 km. indicates that behind the throttle it is not at all the same as it was in the first hundreds of kilometers.
I did not contact the “dealer” service station, where Grant was under warranty, to clean the throttle. After we “adjusted” the thermal clearances of the valves during maintenance-1, there was no desire to communicate with such “specialists”.
It’s high time for AVTOVAZ to check its dealers and subdealers for high-quality performance of work when undergoing scheduled maintenance of warranty vehicles. There are enough statistics. And those who are negligent will be punished with a ruble so that the desire to run an official car service will no longer exist once and for all.
If adjusting the “valves,” for me, still requires consolidating the experience gained, then with cleaning the throttle valve, everything is much simpler.
What you needed: *A 5mm hex wrench. *Star key T-20. *Brush flute. *Lubricant. *Thread lock. *New bolts with washers, made of stainless steel. *Phillips and slotted screwdriver. *Cheap degreaser. *Spray for cleaning carburetors and chokes. *Cotton rags. lint-free. *Disposable rag on a roll. *Rechargeable cylinders and a hand pump for them. *Garbage bag.
Using the “Open Diag” program, we take screenshots of the throttle position before starting cleaning.
Before starting work, in the area of the throttle assembly, we clean all accessible surfaces from dirt and sand...
The main reason for the unstable operation of the Lada Granta engine at idle is a malfunction of the regulator, throttle position sensor.
Note to the driver!
The Lada family, starting from the Priora, is equipped with an electronic throttle position control system. Previous models used a mechanical type of drive (cable).
Systematic use of equipment leads to wear and unstable operation. The process of self-prevention and replacement is simple, but requires attentiveness on the part of the master.
Using the example of a Lada Granta car, we will consider a step-by-step algorithm for replacing the idle speed sensor.
Do-it-yourself traffic control repair
The basis for confirming that the throttle position sensor is faulty are: jumps in speed or inability to idle, the engine does not reach maximum power, movement with jerks. Moreover, the problem can occur in a car of any make and model, be it a VAZ.
When faced with the listed reasons, you should not immediately blame the throttle position sensor and blame it on its malfunction. It should definitely be checked, and if it turns out to be in order, then turn your attention to the idle speed sensor, which has the same symptoms of a malfunction. In addition, you will need to measure the compression in each cylinder.
Repair the sensor yourself.
If you want to do the repair of faulty components of the TPS sensor yourself, they will be listed below. Options for solving problems that have arisen will also be described, so you can easily begin repairs yourself, or you can always completely replace the throttle position sensor, if necessary.
Causes of possible malfunctions of the throttle position sensor.
1. Oxidation on contacts. Take WD-40 multi-purpose lubricant and apply it to a cotton swab. Clean the wire terminals and all possible contacts.
2. The sensor substrate shows signs of wear. The design of some cars provides for the installation of a sensor with a substrate; a resistive layer is sprayed onto it, which wears off over time. In this regard, the sensor stops increasing the linear voltage at the output, which leads to a problem with the operation of the engine.
3. Failure of the slider. One tip of the slider contact is broken - a fairly common problem. If one of the tips breaks, it causes scuffing, which can cause the remaining tips to fail.
4. Incomplete closing of the throttle valve, minimum one percent opening at idle speed. To fix this problem you will need a round file. When installing the sensor at its landing site, the effect of its cocking is obtained, that is, the spring is required to be compressed so much that it begins to count from zero the percentage of the damper opening. If the countdown starts from one percent, then the cocking is not enough, so you need to bore the ears to fit the sensor using a file, thus adjusting the cocking.
Such a sensor is considered a kind of potentiometer. It is responsible for determining the throttle angle and is an important part of the car. The operation of the engine depends on the accuracy of its indicators: the data affects the calculation of the fuel supplied to the engine cylinders. In simpler terms, it monitors the position of the damper - whether it is open or closed.
Signs of failure, need to replace IAC, TPS
- Difficulty starting the engine “cold” or “hot”;
- idle speed floats, engine operation is unstable;
- increased fuel consumption;
- the accelerator pedal is uninformative;
- vibration in the car interior, vibration of the steering wheel;
- reduced acceleration dynamics;
- the car stalls when driving downhill;
- when you press the accelerator pedal, periodic dips and speed jumps are noticeable;
- increased consumption at idle.
Signs of sensor malfunction
When the TPS is in good working order, your vehicle operates without uncharacteristic jerking or jerking and quickly responds to pressing the gas pedal. If any of these conditions are not met, then there may be a sensor malfunction. This can be determined by the following signs:
- Starting the engine is difficult both hot and cold;
- Fuel consumption increases significantly;
- When driving, the engine jerks;
- At idle, the speed is often higher than normal;
- The car's acceleration is sluggish;
- Sometimes there are extraneous sounds similar to popping noises in the area of the intake manifold;
- The power unit may stall at idle;
- The Check indicator on the instrument panel blinks or stays on.
Most often, the sensor becomes unusable due to exceeding its service life due to wear-out. The contact group has a coating and, accordingly, it is characterized by wear. Those TPS that operate on a non-contact principle do not have this drawback and, accordingly, last much longer.
In order to finally make sure that it is necessary to replace this part, you need to be able to check the sensor .
Causes of breakdowns of idle speed sensors
The breakdown indicator lights up on the dashboard, the car speed fluctuates, and the air consumption increases.
The second most common reason is systematic jamming of the mechanisms in the ventilation valve. As a result, the tachometer needle shows speeds from 850 to 1250 rpm, and the idle speed is unstable.
Completes the “top three”: a lean mixture entering the cylinders for subsequent ignition.
Sensor
Preparatory stage before installing the idle speed sensor
Necessary tools, materials:
Sequence of actions when independently replacing IAC and TPS sensors
- We place the machine on a level platform and ensure priority safety measures during repairs.
- We open the hood, an air duct with a receiver is laid above the engine. The Lada Granta with 8 and 16 valves has plastic, while in previous Lada models it is aluminum.
- We press out the plastic clamp of the block with wires.
- Disconnect the contacts of the electronic gas pedal.
- Using a Phillips screwdriver, unscrew the two screws securing the IAC to the throttle body.
- We remove the IAC from the cavity of the throttle assembly.
- Next, we proceed to unscrew the TPS, it is installed a few centimeters lower.
- We unscrew the two screws, remove the TPS, and disconnect the block with the wires.
Note to the driver! When removing the valve, be extremely careful not to lose the rubber bushing.
- We carry out troubleshooting of the seat of the IAC and TPS. We clean the rust deposits with a rag and use WD-40 aerosol as needed.
- Screw in each of the sensors one by one and connect the connectors with wires.
- We start the engine and check the idle speed.
Replacement of the idle speed sensor is complete.
Replacing the idle speed sensor
We determine the malfunction ourselves
The regulator is designed to maintain idle speed in a given range and ensure correct and timely warming up of the engine.
Although malfunctions in the functioning of the engine in this mode rarely occur on the Lada Kalina, practice has made it possible to establish a certain set of signs indicating a malfunction of the regulator.
- difficulties starting the unit;
- when the gearbox is in the neutral position, “floating” engine speeds are observed;
- when switching transmission stages on the move, the engine stops without authorization;
- Once the unit begins to warm up at low outside temperatures, the speed is not able to overcome the 1500 per minute mark, which “delays” the time it takes to reach operating temperature.
Observant owners of Lada Kalina testify to a decrease in speed after turning on the air conditioning compressor. This often leads to the engine stopping, and the lubricant pressure symbol in the unit lights up on the instrument panel.
Replacing the sensor is not characterized by any difficulties and allows you to do it as quickly as possible, the main thing is to know where it is.
Equipment diagnostics
- We switch the tester to resistance testing mode (ohmmeter), measure the resistance at the regulator terminals according to the diagram: A - B, C - D. Data in the range from 0.040 to 0.080 Ohm.
- Using a caliper, measure the distance between the end of the needle and the flange; it should not exceed 23 mm.
- We inspect the mounting socket for each of the sensors, clean it with a rag from dirt and dust.
- Before installation, lubricate the O-ring with engine oil.
- We tighten the screws of the regulators with a torque of 3 - 4 Nm.
Getting rid of engine vibration part 2. Throttle revision
1 Cleaning and lubricating the throttle
Recently, the car has become very annoying with the behavior of the throttle. The car reacted nervously and with a slight delay to pedal presses, the idle speed fluctuated greatly, and releasing the gas was like a blow. I went for spring diagnostics for 299 rubles. Everything is fine, no electrical problems. I checked the spark plugs and changed the fuel. There was no effect, I tried to remove and clean the throttle, but knowing AvtoVAZ I decided to look at the condition of the E gas reducer. I bought a throttle cleaner and got to work. When I unscrewed the throttle nuts, the studs came out with them. The studs are held inside the plastic manifold by nuts; they fell out. I had to look for new ones and use thread glue. The damper was crap quite badly, especially around the axis of rotation. I slightly lifted the flap and turned it; it moved with little effort and stuck. A view opened up to the end of the damper; there was a lot of carbon deposits on it, which interfered with the passage of air at idle. Hence the sausages at low speeds. I washed everything, blew it with a cleaner from the heart. The biggest surprise was waiting inside the gearbox. We open it and see a completely dry gearbox. Not a drop of grease on the gears. The idler gear shaft has wear and plastic dust from the gear. And there’s actually an oval hole in the lid! I blew it out and lubricated it, very little lubrication is needed. A little inside the idler gear, a little into the cover and onto the drive gear of the engine. We close everything and put it in place. The result is excellent. Before cleaning and inspection: — Starting the engine was accompanied by vibration and floating speed. — Idle speed fluctuated greatly from 830 to 950 revolutions, sharply and with dips. — Acceleration up to 2500 rpm was sluggish, after 2500 it was like a kick. The car accelerated faster. — The release of gas was accompanied by a strong nod, which created discomfort in the flow. — The overall reaction to the gas pedal was very sluggish. — Squeaking sound when the ignition is turned on. After cleaning and inspection: - Now the engine starts, somehow abruptly, the speed is stable, vibrations are minimal - Idle speed has become more even, floating within 860 - 900 revolutions. — Acceleration is now smooth throughout. There is no such jerk after 2500. — The throttle release is smooth, the needle falls smoothly