Hi all! As I wrote a long time ago, I wanted to improve the power supply to the ignition module. This idea came after I accidentally came across an article by user mcsystem, for which I thank him. An additional fuse box was even installed, but another problem arose. My character does not allow me to get involved in the factory wiring; I like it when everything can be returned to stock without major problems. Therefore, I wanted to find the ignition module connectors and make a removable system. The connector that is inserted into the module was found in the store without any problems, but the mating part is more difficult to find. It was decided to rip the connector out of the dead module. But finding a dead module in my city turned out to be problematic. And paying 2 kilo rubles for a new one is stupid because of the connector. That's why the matter stopped.
But the world is not without good people, and exclusive33rus sent me a dead module, for which I thank him very much! At the factory I took two wires with a cross-section of four squares, and real four squares, and not those funny wires that are sold in the store. Well, at the same time, two tips, with holes for 6 and 8 mm, since I still didn’t know which one I would put.
I tore the connector out of the module, measured the required length of wires and began soldering. And here’s a surprise - the metal that connects everything in the module is not soldered with anything! The metal is very shiny, like lead, and brittle to bend like aluminum. I was upset, but there was nothing to do, I had to think further. And then the OBD-II diagnostic KKL cord caught my eye, and I saw that the pins were the same! I disassembled it, found unused pins, heated them with a soldering iron and pulled them out. I pulled out solderless pins of unknown metal from the connector and melted the pins from the cord. I soldered it and decided to fill the soldering area with supermoment and soda. It was with great grief that I found superglue at home, but, as they say, it wasn’t diarrhea—it was scrofula, and there was no soda at home. It seems like such a thing that everyone has had for years and practically never used, but I don’t have it. It was late, the shops were already closed, there was no way to buy anything. And then I remember that on the balcony there is soda ash, which I used to make printed circuit boards using the photoresist method. I try it with superglue - everything is great! I fill the connector, and am faced with the second problem - the wire did not fit into the connector, so about five centimeters to the connector I had to slightly reduce the cross-section, from four squares it dropped to about 2.5, but I thoroughly tinned everything, so the losses will be minimal. I put everything in the corrugation and leave the wiring until daylight; it’s not very convenient to install in the dark.
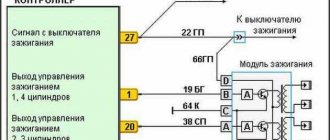
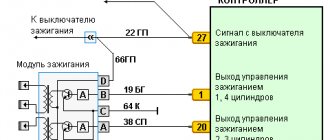
As you can see, there is a relay in the circuit. Those who understand electrics, I think, understood immediately, but for the rest I’ll explain what I can do. So, there are four wires going to the module, two signal wires, through which the ECU gives the command to give a spark to the cylinders (1-4 and 2-3, respectively), and two 12 volt power supply. So the signal signals go directly from connector to connector, but the module’s power now goes to the relay, through which +12 volts goes directly from the battery with a thick wire.
Pinout and diagram of the VAZ ignition coil
Pinout of ignition coil modules for various car models of the VAZ family:
Ignition VAZ 2101
1 – generator; 2 – ignition switch; 3 – ignition distributor; 4 – breaker cam; 5 – spark plugs; 6 – ignition coil; 7 – battery.
Ignition VAZ 2106
1 – ignition switch; 2 – fuse and relay block; 3 – EPHH control unit; 4 – generator; 5 – solenoid valve; 6 – microswitch; 7 – spark plugs; 8 – ignition distributor; 9 – ignition coil; 10 – battery.
Ignition VAZ 2108, 2109
Ignition VAZ 2110
Ignition VAZ 2111
Ignition VAZ 2112
Ignition VAZ 2114
Diagram of a non-contact ignition system: 1 – non-contact sensor; 2 – ignition distributor sensor; 3 – spark plugs; 4 – switch; 5 – ignition coil; 6 – mounting block; 7 – ignition relay; 8 – ignition switch.
Cost and article
The table below shows the cost of the VAZ 2110 ignition module depending on the manufacturer and VAZ engine size.
| Engine volume | Number of valves | Manufacturer | vendor code | Price, (rubles) |
| 1,6 | 8 | JSC SOATE | 2111-3705010-03 | 905 |
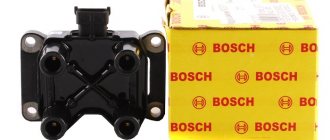
| 1,5 | 8 | BOSCH | F000ZS0211 | 2600 |
| 1,5 | 16 | StarVolt | 2112-3705010 | 1600 |
| 1,5 | 16 | Omega | 2112-3705010 | 1590 |
How to check the ignition coil of a VAZ
If the ignition coil is faulty, the engine will not start. A characteristic sign of a faulty coil is its increased temperature when the ignition is turned off. This is easy to determine by touch.
Signs of a faulty ignition module may include the following:
- hesitant engine starting or failure to start;
- failures during sudden changes in speed;
- high fuel consumption;
- two cylinders do not work, the engine is feverish;
- lack of dynamics;
- a sharp drop in power;
- drop in power and thrust after warming up.
These symptoms may not only be caused by the ignition module. To determine the malfunction, it is enough to spend a few minutes diagnosing spark plugs, high-voltage wires and caps. This will eliminate the remaining elements of the ignition system and make sure that it is the ignition module that is faulty.
Where is the ignition module located?
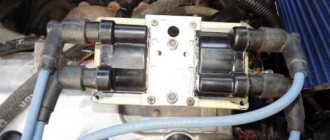
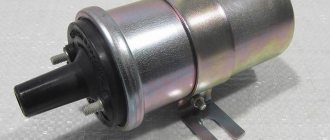
It’s not difficult to find it, well, firstly, to find it you need to at least approximately know its location, and its location is the engine. After you have found out where it is located, open the hood of your car and turn your attention to the spark plugs, wires will come from these spark plugs, so look where these wires lead and after finding it, you will see in front of you a small square-shaped box that called the ignition module, it is also depicted in almost all the photographs posted in this article.
Connecting and replacing VAZ short circuit
The procedure for removing and installing the ignition coil on old VAZ models:
- First, disconnect the central high-voltage wire leading to the distributor (ignition distributor).
- Disconnect all power wires from the coil contacts. Since they are fastened with nuts, you will need an 8 wrench for this.
- If you don’t know which wires to connect to which connector later, it’s better to immediately remember or mark them somehow, so that later during installation you can connect them correctly.
- Unscrew the coil housing. It is attached to a clamp (clamp), which is pressed to the car body with two nuts.
- After the work has been done, you can remove the ignition coil and replace it if necessary.
For new type VAZ cars:
- We remove the “minus terminal” from the battery.
- Remove the top protective cover of the engine. If the engine volume is 1.5 liters, then this part is missing and this step is skipped.
- We remove the high-voltage wires from the coil.
- Now, using a 13mm wrench, unscrew the two fasteners.
- Using a 17mm wrench, loosen one bolt securing the coil.
- We take out the module.
- Use a hexagon to unscrew the coil from the holder.
- Assembly is carried out in reverse order.
Particular attention should be paid to the connection, since high-voltage wires must be located in the strict order provided for by the design. If this is not done, the car will stall or the engine may not start at all.
Replacing the ignition coil on a VAZ is quite simple. Even a novice motorist can do this in his garage, and if everything seems too complicated, contact a car service center. Particular attention should be paid to the choice of product, since this will determine how well the engine and ignition system will work.
Replacement
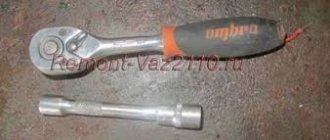
Replacement is quite simple and effortless. To replace, you will need a ratchet with an extension and a 10mm socket.
Replacement process
- We remove the negative mark from the battery, since the work is carried out on the electrical equipment of the car. This will avoid an unintentional short circuit in the vehicle's network.
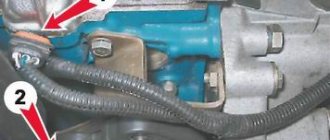
- We remove the high-voltage wires from the MZ and the power connector.
- We unscrew the nuts securing the MZ and dismantle it.
- Installation is carried out in reverse order.
Pay attention to the order in which the wires are connected. Do not confuse them, otherwise the car engine will not start. Cylinder numbering starts from the timing mechanism from left to right. Connect the wires as it is written on the Ministry of Health.
VAZ models 8 and 16 valves
Despite the similarity in engine design, the ignition system of the 1.5-liter injection 16-valve engine differs from the 1.6 16-valve engine. The 1.6 liter engine uses an electronic contactless ignition system with individual coils on each spark plug. Therefore, there was no need for an ignition module. Such a system is more reliable and cheaper to operate, since if one coil fails, there is no need to replace the entire module.
The 16-valve 1.5-liter VAZ 2112 injection engine used the same non-contact ignition system as the 8-valve engine, but a different ignition module was installed. Its catalog number is 2112-3705010. The design of the module remains the same - two ignition coils (for cylinders 1-4 and 2-3) plus switch keys in a single block. The spark is supplied to the cylinders in pairs using the idle spark method. This means that sparking occurs in two cylinders simultaneously - in one on the compression stroke (working spark), in the second on the exhaust stroke (idle spark).
Video on repairing KZ VAZ
Often, when the ignition module breaks down, the car owner immediately runs to the store and buys a new one. But, for the VAZ-2112 there is an alternative method - repair. Of course, without proper knowledge in auto electrics, it will be difficult to understand all the circuits and communications. This article will tell you in the most accessible way how to repair the ignition module with your own hands.
Module design
Before you begin repairing the ignition module, it is worth understanding what it consists of. So, let's look at the design of this element:
- Two ignition coils that generate a high-voltage pulse.
- Dual channel switch.
If there are problems with the operation of the ignition module, there are reasons for this. It is worth warning that in the event of a malfunction, the “Check Engine” warning light will not light up: engine stops, loss of spark, interruptions in the operation of the power unit, etc.
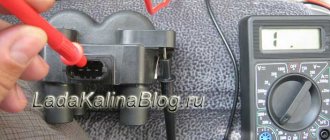
For diagnostics and repairs, basic knowledge is required not only in conventional electrics, but also in the principles of auto electrics. Also, for a successful process you will need skills in working with a digital multimeter.
Repair process
Often, the high-voltage pulse disappears in cylinders 2 and 3 . So, to begin repairing the ignition module, of course, you will need to dismantle it. To do this, disconnect the high-voltage wires and unscrew the assembly itself from the fastenings. When the preparatory operations are completed, you can proceed directly to the repair process:
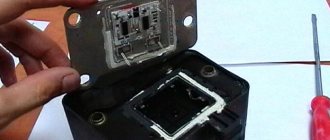
- We tear off the aluminum plate.
Use a screwdriver to open the aluminum plate
Scheme of soldering wires and arrangement of elements on the boards
Diagram of the assembled ignition module
Completely assembled ignition module
Video about repairing the ignition module on a VAZ-2112
The video material will tell you about repairing the ignition module, as well as how to remove it from the car.