So friends. After purchasing and replacing the KZATE 115A generator, one problem appeared that was familiar to many, namely a voltage drop for a couple of seconds when switching to neutral. At first I went and didn’t worry, but then I got pretty tired of it. After reading on the Internet and in particular on our favorite site, I came to the conclusion that it is necessary to change the voltage regulator (brushes), because A Chinese regulator is installed on this generator from the factory. Having gone to the store and saying what I needed, they showed me 2 regulators marked 849.3702 14V 5A and 897.3702 14V 5A, stating that they were the same. I doubted and postponed the purchase.
When I came home, I began to study how they differ, and how I realized that the regulator marked 849 is for a 90 A generator, and the regulator marked 897 is for a 115 A generator. It was the regulator marked 897.3702 that was purchased for 570 rubles. Then I went to an electrician I knew who replaced the regulator for me without removing the generator!
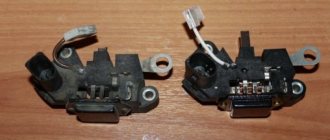
Having removed the old regulator, it was marked TRT5-01. Apparently it really is a Chinese regulator.
After the replacement, the sag when dropping to neutral disappeared, the on-board voltage increased slightly (14.7 - without load, at maximum load it does not drop below 14) and remains stable. I was pleased with this regulator.
Which TRN is suitable for LADA
| Generator, article number | Automobile | TRG, article number |
| 26.3701, 37.3701, 371.3701, 372.3701 | VAZ-2107, -2108, -2109, -2110, OKA | 67.3702-01 |
| 3002.3771, 332.3771, 3202.3771, 3212.3771, 4302.3771, 94.3701, 9402.3701, 9422.3701, 3740.3771-38, 3743.3771-61, 3747.3771- 93, eld-a-21214, LG01214 | VAZ, GAZ | 67.3702-02 |
| 4052.3701, 409.3701, PRAMO “ISKRA” 5102.3771, -10, 5112.3771, -10, 5122.3771, -10, -30, 5142.3771, AAK 5727 | VAZ, GAZ, UAZ with generators PRAMO “ISKRA” 5102.3771, 5122.3771 | 67.3702-04 |
| G222 | VAZ-2104, -2105, -2107 | 67.3702-09 |
| 26.3701, 37.3701, 371.3701, 372.3701 | VAZ-2107, -2108, -2109, -2110, OKA | 67.3702-11 |
| 3002.3771, 332.3771, 3202.3771, 3212.3771, 4302.3771, 94.3701, 9402.3701, 9422.3701, 3740.3771-38, 3743.3771-61, 3747.3771- 93, eld-a-21214, LG01214 | VAZ, GAZ | 67.3702-12 |
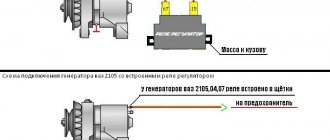
| generators with an additional three diodes, the excitation winding of which is connected to the positive circuit | 673.3702 |
Installation and connection instructions
For Lada cars (except Vesta, XRAY)
, photo author:
2.
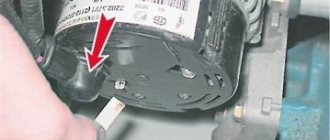
Remove the plastic casing of the generator. To do this, first disconnect the generator excitation wire. Then unscrew the nut from the stud (10mm wrench) and move the power wire to the side. Next, 3 latches on the plastic casing are unfastened.
3.
Remove the standard voltage regulator from the generator. To do this, unscrew two screws ("8" key) and disconnect the wire.
4.
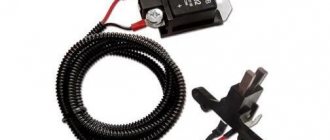
Install a three-level voltage regulator on the generator instead of the standard one.
5.
Output 2 wires for the control module. The module itself should be mounted in conditions of reliable contact with the “ground” and as far as possible from the possibility of moisture ingress. For example, on a hairpin near the right headlight.
For Lada Vesta, XRAY cars (with Valeo TG12C209 generator).
This generator is no different from the previous ones, the only difference is in the voltage regulator. It communicates with the engine ECU via a “lin” interface. The task of this “lin” is to avoid loss of throttle response at power modes. By installing the TRN, we cut off the ability to control the regulator using the ECU!
For this generator there is no ready-made solution in the form of a TRN yet, so the design will have to be modified.
- three-level voltage regulator (article 67.3702-01)
- 2-pin block 904576 NORD YADA
- generator voltage regulator (leave the standard one (if the brushes are live) or ARV1103AD)
- wire for powering the regulator (2 meters)
No recharging of Lada Priora battery (VAZ 2170, 2171, 2172)
Checking electrical equipment
| 1. Check if the alternator drive belt is broken. If a break occurs, replace the belt and adjust its tension (see “Replacing the alternator belt”). |
| 2. If the belt is intact, check and, if necessary, adjust its tension (see “Generator belt tension”). |
| 3. If the belt tension is normal, check to see if fuse F1 in the fuse and relay mounting block has blown. The location of the fuses and their ratings are indicated in this manual (see “Electrical faults”), in the vehicle repair manual, in the electrical diagram, on the housing of the mounting block and on the fuses themselves. If the fuse is blown, replace it, start the engine and check to see if the low battery light goes out. If the light goes out, you can continue driving. |
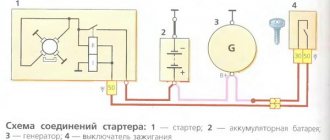
5....to the starter...
| 4. If the battery discharge lamp does not go out, check the wires connected to the positive terminal of the battery... |
| 6. ...and to the generator. Wires may be broken, broken inside the insulation, or have oxidized or unreliable contacts. Correct the problem and start the engine. If charging current appears, you can continue driving. |
| If, after taking the measures, the charging lamp continues to light up while the engine is running, then the possible cause of the malfunction lies in the generator itself. There may be several reasons, and it is better to eliminate them in a car service center or garage, and you just have to hope that the energy reserve in the battery is enough to get to them. |
| Recommendation |
| In order to reduce current consumption when driving a car with a faulty generator, if possible, turn off the radio, unnecessary lights, heater fan, window defroster, etc. |
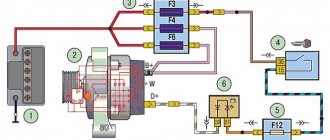
| You will need: flat-blade and Phillips-blade screwdrivers, a 12" wrench (two), a DC voltmeter, a megohmmeter. |
| 1. Remove the rubber boot and connect the “+” wire to the “B+” terminal of the generator, and the “–” wire to the generator housing. |
| 2. Start the engine and turn on the car's headlights. |
| 3. After 15 minutes of engine operation at medium speed, measure the voltage; it should be in the range of 14.4–15.1 V. If undercharging or overcharging is observed (the voltage does not fall within the specified limits), replace the voltage regulator. |
Description Identification numbers Keys Dashboard Instruments Trip computer Heating and ventilation Ventilation control Lock control Control of power windows Using seat belts Airbags Child seat Adjusting seats Adjusting the steering column Using mirrors How to shift gears What to carry Starting the engine Malfunctions when starting the engine Checking the ignition Checking the fuel supply Injection faults Lost idle If the engine runs unevenly Inspect the spark plugs Jerks while driving Does not accelerate Stalls while driving Loss of oil pressure Engine overheats No battery recharging Engine knocks Suspension knocks Gearbox knocks Causes of knocks and noises Steering wheel vibration Brake problems Replacing a wheel
priora-vaz.ru
Checking the work
- Switch position “min” - for operation at high ambient temperatures (above 20ºС), as well as during operation in particularly difficult conditions (traffic in traffic jams, long climbs in the mountains, etc.);
- The middle position of the switch is for operation at ambient temperatures from 0ºС to 20ºС;
- The “max” switch position is for operation at low ambient temperatures (below 0ºC), as well as for recharging a discharged battery.
Average load (PTF, dimensions, music and heater fan at first speed)
:
Maximum load, maximum number of consumers activated
:
Will you be installing a three-level voltage regulator on your car? Take part in the survey and leave your feedback in the comments.
Let us remind you that another reason for low voltage on the on-board network may be a bad ground.
Share on social networks:
Found an error? Select it and press Ctrl+Enter..
Source
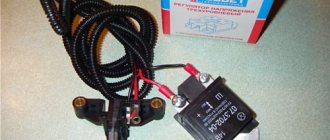
Three-level voltage regulator Priora 115a
what do we have? Send us a link, we will take a look and offer the same, and possibly lower, price.
Designed to replace the standard voltage regulator built into the generator in case of its unsatisfactory operation or failure.
Extends battery life.
Allows you to set the optimal battery charging mode depending on the ambient temperature and operating conditions.
Allows you to recharge the battery when the car is parked for a long time or when it is discharged for other reasons.
Specifications:
Setting voltage, V: Three levels: 13.6 – low, 14.2 – nominal, 14.7 – high
Generator types: 3002.3771, 332.3771, 3202.3771, 3212.3771, 4302.3771, 94.3701, 9402.3701, 9422.3701, 3740.3771-38, 3743.3771-61, 3747. 3771-93, eld-a-21214, LG01214
Attention! Prepayment is required for this product
Hello people! In general, there was a well-known problem with the KZATE 115A generator with a voltage regulator; when the speed was lowered, the voltage dropped to 12 for a couple of seconds. In general, as expected, the Chinese LV replaced it, all the voltage drops disappeared. I also threw in a dubbing of 50 kg (I forgot to say that there was a loss of voltage to the generator, it gave 13.8 at idle, and 13.1 came to the battery, so I decided to throw dubbing at the same time) In general, there are no voltage surges and now the gene outputs 14.5 and under full load 14.1 also comes to the battery. The question is that everything seems to be fine, but sometimes when you turn on the heated rear window and press the power windows up (not every time, but I noticed it twice) the battery light on the panel came on for seconds, maybe it’s that the blades just haven’t gotten used to it yet? (RN comes with a brush assembly if anyone didn’t know) thanks in advance
Standard generator on Priora - article number and price, where it is
The installation location may vary for different car brands and models. You should look for it in the engine compartment, near the rubber cushion on which the engine is mounted. 90A article 3282.3771, is a source of energy in the electronic equipment system of 2170-72 Priora cars.
Generator for Priora produced by BATE price from 4120 rubles
- Weight 5.5 kg
- LxHxW 200x170x200 mm
- Rectified current 90 A
- Power 0.98 kW
- Voltage 14 V 100 A
It has article number 5132.3771 and is a source of energy in the electronic equipment system of 2170-72 Priora cars.
Generator for Lada Priora with air conditioning manufactured by Pramo price from 4200 rub.
- Maximum rectifier current 100 A
- Weight 5.3 kg
- Voltage 14 V
- Power 233 W/kg
- Internal cooling
- Stator diameter 125 mm
- 115 A
It has article number 9402.3701-14 and is a source of energy in the electronic equipment system of 2170-72 Priora cars.
Article number - 2170-3701010-10 has a KZATE generator for the Lada Priora car, its price starts from 5300 rubles, and Bosch - 2170 3701010 13
Device manufactured by LKD - price from 4400 RUR
- Maximum rectifier current 115 A
- Weight 5.2 kg
- Nominal voltage 14 V
- Power 1610 W
- Stator diameter 125 mm
- Length 188 mm
- 115 A
It has article number 9402-14 and is a source of energy in the electronic equipment system of 2170-72 Priora cars.
120 A Has article number 9402-3701-14P, is a source of energy in the electronic equipment system of 2170-72 Priora cars.
- Maximum rectifier current 120 A
- Weight 6 kg
- Nominal voltage 14 V
Manufacturer ATE-1 cost from 4000 rub.
The generator tension roller 2170 serves to tension the belt. One of the important tips for beginners: if you unscrew any bolt when changing a part, lubricate it with graphite grease, this will greatly facilitate repairs in the future.
FakeHeader
Comments 17
I'm interested in the question, I found what I wanted
No. There is no regulator with such a brush assembly! And there is no longer any need for it, the voltage rarely drops below 14V, only when all electrical appliances are at full load!
Yes, he didn’t do anything! But lately there have been no failures in the on-board network!
Yes, at idle I have 14.2 with nogruskoy 13.7 when driving with nogouzko keep 13.8 but when you slow down the speed and rpm it drops sharply and sometimes it drops to 12.3 but 1-2 seconds and everything is restored
There was also voltage, I solved this by soldering a small diode from an old diode bridge, I did it according to this article www.drive2.ru/cars/lada/p…k/zver41k/journal/497417/
Yes, I read this article a long time ago, but I would like to do without soldering - I bought it and installed it. But if I can’t find it, I’ll have to solder.
I didn’t want to solder either, but the store couldn’t say anything definite, so I soldered it so as not to risk burning the gene
I have a staff in the same place)
An option is to simply solder a regulator to this brush assembly
If only someone would give instructions, but I don’t want to experiment with something...
What signs will indicate that the generator brushes are faulty?
The following external signs will help you understand that the generator brushes have become unusable on a Priora with power steering or air conditioning:
- length of the element being inspected;
- if upon inspection it is discovered that the length of the brushes is less than 5 mm, they must be replaced;
- Replacement also be required if the appearance of the brushes indicates uneven wear, that is, one element is heavily worn out, and the second is brand new. Uneven wear of these elements will certainly negatively affect the operation of the generator, so experts recommend replacing them without fail.
The cost of new components for the Priora does not exceed 150 rubles; of course, you can also find cheaper brushes for the generator, but it is unlikely that such elements will serve faithfully for a long period of time, and such savings will lead to a repeated procedure for replacing these components.
How to remove RN
You can remove the old regulator without visiting a service station. To do this, you need to perform the following operations:
- Disconnect the terminals from the battery.
- Using a 10mm wrench, unscrew the nuts from the stud and disconnect the power cable.
- Unfasten the three latches on the plastic casing. After this, access to the regulator opens.
- Next, unscrew the two screws with a size 8 wrench and disconnect another wire.
- After this, you can remove the factory LV and install a 3-level one.
Please note that installation of a new generator occurs in the reverse order. There is only one feature: you need to bring out two wires for the control module. It is very important that the control module is secured very well and that there is no chance of moisture getting in there.
Selection of components
The original generator, installed on a car with a 16-valve engine at the factory, is marked with article number 5102.377. Its cost, as a rule, fluctuates around six to seven thousand.
Carefully check the generator itself and its packaging before purchasing so as not to encounter a counterfeit. It is important that the part is free of unevenness, chips and paint runs, as well as extraneous markings.
To avoid overpayments, you can purchase a similar original spare part. The following devices are suitable for installation on Lada Priora:
- VAZ (power 120/115a);
- KZATE (115a);
- BATE (90a);
- BOSCH (120a).
The price of analogues can be either higher or lower than that of the original. As a rule, it is in the region of 3500-6000 rubles. We choose a generator device with a large power reserve so that it lasts longer.
Keep in mind that installing less powerful generators is unacceptable, especially if you connect several different devices to the vehicle’s on-board network (when connecting a large number of electronics, it is generally recommended to increase the current). Before purchasing, we carefully check for damage to the case and the integrity of the unit.
What was the result?
Of course, it is impossible to say unequivocally that the factory generator is very bad. It fails only in the case of active use, for example, music, headlights and air conditioning. The 3-level pH is suitable for precisely such motorists. After installing this device, you can select 3 modes:
- 13.4 V – like a standard generator;
- 14.3 V – medium mode;
- 14.8 V – suitable for use in the cold season.
It is also worth noting that although the three-level regulator is much better, it is not an ideal replacement for the factory one. The fact is that both the first and second LVs have one significant drawback - they cannot regulate the voltage depending on the ambient temperature.
Do not forget that a new voltage regulator must be looked for solely by the markings of the old one. For example, for marking 4302.3771, TRN with mark 67.3702-02 is suitable.
Source
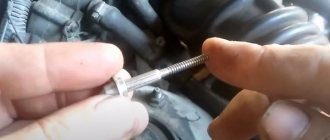
Step-by-step replacement of generator brushes
replace worn brushes without removing the generator from your car. However, according to experts, this process will be much simpler if you remove the generator from its permanent place before replacing it. After the generator is removed, the replacement process is performed in the following order:
- using a screwdriver, remove the cover made of plastic to protect the generator in order to be able to get to the brushes;
- the connecting plug with wires is disconnected from the brushes;
- two fixing fasteners, which are located at the edges of the elements being inspected, are carefully unscrewed;
- using a size 13 wrench, unscrew the fixing bolt in the center of the element;
- after all the fasteners have been unscrewed, the brushes should be removed to inspect their external condition and replace them.