Domestic cars have a serious problem of rapid battery discharge. Unstable battery operation leads to rapid loss of resource, and buying a high-quality battery today is not a cheap pleasure.
The main provocateur for the rapid failure of batteries is the frequent change of operating modes and little depends on the driver of the vehicle. The battery, in turn, requires different voltages to charge.
To solve this problem, a regulator comes to the rescue. The standard device installed by default does not cope well with its responsibilities, because the circuit uses a very simple design that supplies only constant voltage. The disadvantage of such a regulator is that it does not take into account the speed of the vehicle, the amount of energy required and the ambient temperature.
A three-level voltage regulator can optimize all these processes.
Disadvantages of electrical equipment of the VAZ 2110
Where, exactly, do all the complaints about the battery come from? A good well-maintained battery will last five to seven long winters and no questions will arise about it if you charge it correctly, discharge it correctly and at least slightly monitor its condition. In the case when the battery is charged directly on board the car, which most often happens, the charging current strongly depends on the number of consumers on board.
The more of them, the stingier the generator becomes and pays less and less attention to the battery. He also needs to feed the voracious fog lights, a powerful audio system, additional comfort equipment, refrigerators, glass, mirror and seat heaters, and you never know what else the tuners come up with. And the generator is designed taking into account the rated charging current, without taking into account the additional load. As a result, the battery sits on starvation rations, is constantly undercharged, especially in winter, the plates crumble and after two years of grueling work asks to be thrown into a landfill. We blame the battery, of course. Only in vain.
Dismantling
To disassemble, remove and repair or replace the generator, you will need to do the following.
- Drive onto an inspection hole or overpass to have access to the bottom and engine compartment.
- Remove the battery, otherwise it will not allow you to get to the nut that holds the generator you are looking for.
- Next, the same nut and adjustment bar are removed. Here you will need a 17 mm wrench. Use an extension cord. This will make the task easier; you will have to apply less force to unscrew the fastener.
- In the engine compartment, remove the shield that performs dirt protection functions.
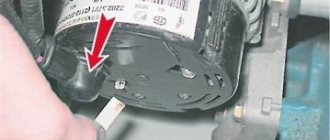
- Now the drive belt is removed and the wires are disconnected.
- Be sure to remove the protective cap and use a 10mm wrench to unscrew the nut that holds the tip and positive cable of your battery.
- There is another nut on the fixing bracket, which will also have to be unscrewed.
- That's it, you can remove the generator. Just remember to pull out the long bolt first.
- When removing, keep an eye on the buffer sleeve. It won't be good if you lose it.
Dismantling works
This completes the procedure for removing the generator. You can proceed with partial repairs or complete replacement of the unit.
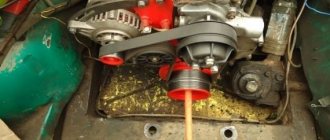
Belt
Often, the solution to a poorly functioning alternator is simply adjusting the belt.
Belt
- For the device to work effectively, it is necessary to ensure normal deflection of the belt;
- The deflection size should be 6-10 millimeters with a force of 98 N or 10 kgf;
- To adjust or replace the belt, you need to move the generator slightly to the side, towards the cylinder block;
- By rotating the adjusting bolt, you can adjust the belt tension.
How to stabilize voltage
We ourselves are to blame, but there are certain complaints about the standard voltage regulator. He, poor thing, cannot take into account the mass of tasks that we pile on his little head in the process of improving the car and adding various devices. A new solution has appeared, especially relevant in VAZ cars of the tenth family and above. Not because these cars are most often stuffed with additional devices, but because the generator and relay regulator are designed close to the rated current consumption.
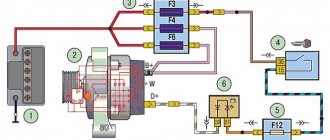
The three-level voltage regulator VAZ 2110 works in close conjunction with the generator. There is no need to remind that the generator produces an electrical direct current of variable value. That is, the higher the engine speed, the greater the output voltage the generator would produce, and this is not useful for all devices. If there were no voltage regulator, it would jump in the on-board network from 10 to 16 volts and higher, and this is unacceptable for most instruments and devices.
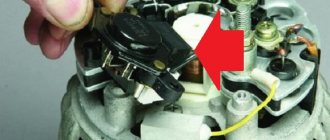
What do you need for installation?
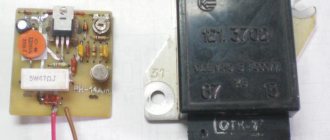
First of all, you should familiarize yourself with the equipment of the device. The standard set of the regulator includes instructions, the device itself and connecting wires with special brush holders that are needed to fix the body.
Before installing the equipment, you should prepare a spanner wrench and a Phillips-type screwdriver in advance. You will also need a knife and a voltage tester. You should use pliers to securely clamp the terminals, but regular pliers will also work.
Application of three-level voltage regulator
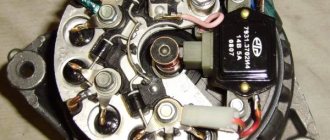
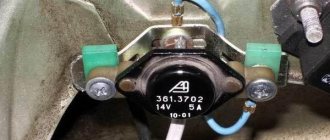
This is why a voltage regulator is installed. We won’t go into details, but the relay is connected to the brush assembly and regulates the output voltage by limiting and stabilizing the generator winding currents. Normal operation of the relay regulator on a VAZ 2110 assumes the presence of 13-14 volts at the output and this is quite enough for the battery to recharge normally in operating mode.
It is enough if you do not add additional electricity consumers. This is a clear mistake by the engineers, although most likely they are using a generator design from half a century ago, when the most powerful consumer on board could only have been a tape recorder with cassettes. It is at this point that three-level voltage regulators should come into the picture and offer their assistance.
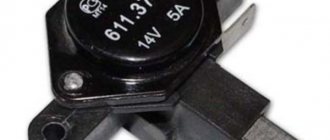
Which TRN is suitable for LADA
| Generator, article number | Automobile | TRG, article number |
| 26.3701, 37.3701, 371.3701, 372.3701 | VAZ-2107, -2108, -2109, -2110, OKA | 67.3702-01 |
| 3002.3771, 332.3771, 3202.3771, 3212.3771, 4302.3771, 94.3701, 9402.3701, 9422.3701, 3740.3771-38, 3743.3771-61, 3747.3771- 93, eld-a-21214, LG01214 | VAZ, GAZ | 67.3702-02 |
| 4052.3701, 409.3701, PRAMO “ISKRA” 5102.3771, -10, 5112.3771, -10, 5122.3771, -10, -30, 5142.3771, AAK 5727 | VAZ, GAZ, UAZ with generators PRAMO “ISKRA” 5102.3771, 5122.3771 | 67.3702-04 |
| G222 | VAZ-2104, -2105, -2107 | 67.3702-09 |
| 26.3701, 37.3701, 371.3701, 372.3701 | VAZ-2107, -2108, -2109, -2110, OKA | 67.3702-11 |
| 3002.3771, 332.3771, 3202.3771, 3212.3771, 4302.3771, 94.3701, 9402.3701, 9422.3701, 3740.3771-38, 3743.3771-61, 3747.3771- 93, eld-a-21214, LG01214 | VAZ, GAZ | 67.3702-12 |
| generators with an additional three diodes, the excitation winding of which is connected to the positive circuit | 673.3702 |
How the device works
Three-level regulators are able to fulfill almost any conditions that are necessary for a battery to charge efficiently, and the overall network voltage does not drop, but only stabilizes. There is nothing complicated in its design, since it is the same regulator, only three pieces, with a special electronic control mechanism that can take into account very important things:
- Battery condition.
- Its charge level.
- Load on the battery.
- Ambient temperature.
- Number of engine revolutions.
Based on this data, the device can independently set the optimal charging voltage for the battery without depriving other consumers, which is very important in winter and in the dark.
Troubleshooting
Lack of charging can be caused by a wide range of reasons, which we will talk about today.
These reasons include:
- Weak contacts;
- Winding breaks;
- Short circuit on the rotor housing;
- Interturn short circuits;
- Mechanical breakdowns;
- Closing the positive clamp on the body;
- Short circuit in the phase winding;
- Short circuit of the stator to the housing.
Let's look at these situations in more detail to determine the true cause of the breakdown specifically in your case.
Operating modes of the VAZ 2110 regulator
Since the device has a three-level circuit, there should be three gradations:
- The minimum voltage that the regulator supports is 13.6 V, this applies to
- difficult operating conditions at high air temperatures;
- normal mode stabilizes the voltage at 14.3 V;
- the maximum is a voltage of at least 14.7 V for operation under load conditions at low air temperatures.
Installing a three-level relay is quick and hassle-free and is no more difficult than replacing the brushes. The instructions that come with the device explain in detail each step, including switching. The price of a three-level regulator for a VAZ 2110 is no more than 350 rubles, depending on the manufacturer.
Thus, after weighing the pros and cons of the device, you can significantly extend the life of the battery and stabilize the operation of electrical equipment in the car for little money. Good luck to everyone and stable voltage in the network!
PRICE CATEGORIES
Three-level voltage regulator for VAZ 2114
To find out the cost of a voltage regulator for VAZ 2114, it is advisable to simply go to the nearest car market and ask, the price range may vary. This factor is influenced by the type of components and the region in which the store is located.
Typically, the price of a two-level standard regulator, which is installed at the factory in the VAZ 2114 and their families, can range from 300 to 1200 rubles, here the reason for the fluctuation depends on the quality and the specific manufacturer; more reliable and high-quality options will always be somewhat more expensive than their low-quality counterparts. As for three-level models, their price starts from 1,500 rubles, but their productivity is much greater. During the purchase, it is advisable to immediately ask the seller to check the functionality so that there are no problems in the future.
FakeHeader
Comments 33
Several years ago I developed a PP circuit with a temperature sensor, the same as a three-level one, only the voltage changes automatically depending on the temperature.
When I created my relay regulator, the goal was to create a reliable relay regulator that would make it easier to start the engine in winter, because... In cold weather, I had to remove the battery and heat and charge it at home, which was not convenient. When I did it, the problem with starting the engine in cold weather disappeared. Moreover, other useful qualities appeared. Like increasing battery life. The engine began to start with batteries that had not started it before (smaller capacity or old, dead ones). more stable voltage.
here's a video of how it works,
anyone interested can order from me.vk.com/id6807678
The bridge's kick came from him(((
Handsome, my friend)) I installed it for myself and also noticed such a hat. Everything flickers, today I’ll redo it +100500 for you :)
The regulator just broke. Thank you I will install it)
By the way, it is more convenient to route the wire through a large hole that looks like a circle with a rectangle. It seems to be under W. We don't have an output for this W. As far as I understand Gennady’s circuit, this is one of the generator windings (phase). This hole is on the right side of the cover (if we assume that B+ and D are on the left) and is located vertically between the holes for B+ and D.
It's clear. Why don’t you take your car for a drive?
Because I don’t like taking pictures and being photographed. I don’t even have a normal camera. You can take it, of course, but you also need to wash yourself, find a place, choose an angle, edit the photo - doing things that I don’t like. Yes, and it’s a waste of time just for this. I’d rather spend time with my daughter, or work on the typewriter, or sit at the computer ;-), or sleep =) And I have to do something along the way. And I don’t like taking photo reports (the reason is above - I don’t like taking photos).
Well done, good choice
I had one of these burnt out in August. By the way, bad man, the light was also blinking. It has been standing since the beginning of 2010. I bought the same one, but for the 10th family. There is a different current collector. But I don’t mind, I have a current collector. I put it there in the same place - on the upper mounting bolt of the right headlight (not the lower one as in the photo). Everything worked as before, although there was no blinking at all
In general, I associated the blinking with the fact that I allowed the use of a PWM (pulse width voltage amplification) circuit in the regulator. I don’t know what the actual scheme is. Why did you suspect?1
Because when using PWM, the DC voltage has a duty cycle. Those
the current flows in rectangular pulses at a frequency specified by the circuit designer (most likely there are certain recommendations for choosing this frequency)2. Now he doesn't blink. So I’m thinking, is PWM used there?
PS, gentlemen WHO INSTALLED, this is a useful device. MONITOR the voltage of the on-board network! This spring I burned Osram Night Breakers with a voltage of at least 16V ((. It’s good at least the battery is still alive. PS, the only more useful thing than this regulator is (in descending order) 1) THORN Adamchuk (thermo-optimized voltage regulator, super sophisticated) 2) voltage regulator from Chevy . He himself normally monitors the correct voltage in the on-board network. Costs a penny compared to TORN, and even cheaper than a three-level
BUT, Attention, it must be installed by an auto electrician if you don’t understand Gennady. And install it so that, if it fails, it will be easy to replace it with the same one or a native one (suddenly on the road, in a “distant village”, there will be no regulator from Chevy)
I’ll add right away that if the brushes are worn out, just change the brushes on the current collector. They are not sold separately. You can buy a cheap regulator with the same brushes, or beg a couple of burnt-out regulators from an auto electrician. Just make sure the brushes are of normal length, i.e. so that at least 2/3 of the new ones stick out. You don’t want to often climb into the genadium and solder brushes
Carrying out diagnostics of RN with your own hands
Now we’ll tell you how to check a three-level voltage regulator with your own hands. The procedure for checking the regulator can be carried out both at a service station and in a garage, but we will consider the second option. Testing a voltage regulator of 40 amps or less should be done using a tester - a voltmeter or a multimeter. It should also be taken into account that fault detection in the operation of the launch vehicle should be carried out exclusively with a fully charged battery.
So, how to check the generator voltage regulator using a tester:
- First of all, you need to open the hood and turn the key in the lock, turning on the ignition.
- Next, the power unit is started. The engine should idle for some time; to obtain more accurate diagnostic data, it is recommended to turn on the optics. The engine speed when running should be around 2.5-3 thousand. For the internal combustion engine to switch to this operating mode, you usually need to wait about 10 minutes.
- Then the tester probes are connected to the battery terminals. When you connect the tester, diagnostic indicators should appear on its display, ideally they should be approximately 14.1-14.3 volts.
If the check shows other values, be they higher or lower, then you need to start repairing the generator unit. But as practice shows, the problem usually lies precisely in the launch vehicle, so most likely it will have to be replaced. Before starting diagnostics, make sure that the belt is properly tensioned. During diagnostics, contacts must not be closed, as this may cause deformation and failure of the rectifier unit.