Removing the front seats of Lada Kalina
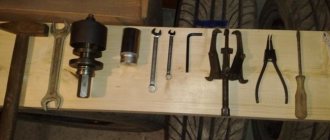
Required tools: “E-10” head (or a regular “8” head), “10” head, “13” head.
- Move the seat back until it stops, and unscrew the 2 screws of the front mounting of the slide using the “E-10” head.
- Move the seat all the way forward and unscrew the 2 rear mounting screws for the seat slide.
- Remove the front seat of Kalina through the front door opening.
Removing the passenger seat is done in the same way.
Alternative seating
As we can see from the above, the answer to the question - how to raise the rear seat of a VAZ 2114 - is quite simple, since it is attached using a minimum number of fixing elements and does not require the use of a large number of tools. But another, no less important issue is the choice of new, alternative seats.
Many motorists, as already mentioned, install on their VAZ 2114 seats from other models and even other brands of cars (for example, seats from Ford). At the same time, when choosing them, you should pay close attention to their dimensions and fastening features (although very often motorists look specifically at the “performance” characteristics - convenience, wear resistance, anatomy, etc.).
The same rule applies to the front seats - the fewer modifications that need to be made during installation, the better. It should also be noted that when replacing the front seats, you should pay attention to the so-called “anatomical” seats (for example, manufactured by UNP).
They allow you to spend long periods of time driving and travel for many hours without feeling any fatigue or discomfort in your back and joints (such seats are especially recommended for frequent and long drives in urban environments).
Removing the rear seats of Kalina
- Lift the rear seat cushion by the strap, unscrew one nut securing each hinge to the floor with a 10mm socket.
- Remove Kalina's sofa cushion.
- Unscrew the 2 nuts securing the backrest brackets to the floor on the left and right sides using a 13mm socket.
- Fold the backrest, unscrew the 2 bolts securing the backrest brackets on the left and right sides.
- Remove the back of the sofa.
Installation of the left side of the backrest and seat cushion of the Kalina is carried out in the reverse order.
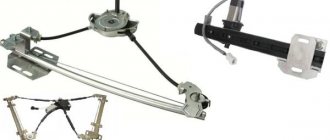
Removing and installing Kalina seat slides
Required tool: 8mm socket.
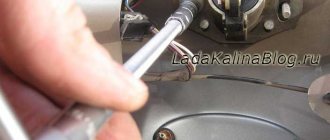
- Move the slide so that the fastening bolts are visible through the technological holes. Unscrew the bolts securing the slide to the seat using a 8mm socket.
- Remove the slide assembly with the moving mechanism lever.
- The slide is attached to the frame with 3 bolts. Remove the end of the travel lever shaft from the inner slide hole. A spring is installed between the lever and the outer slide.
When reassembling the slide, before installing the lever shaft into the hole of the outer slide, first put a spring on the shaft and place the short mustache of 1 spring on the latch. Then, squeezing the long mustache 2 springs (can be tied with wire), insert the shaft into the hole in the slide, so that this mustache goes under the slide.
How to fold out the back seat on a Kalina sedan
Tool:
- Driver for socket attachment
- Knob attachment 10 mm
- Knob attachment 13 mm
Note:
The work is shown on the example of the left side of the seat. The cushion and backrest of the right side of the seat are removed in the same way.
1. Lifting the rear seat cushion by the strap, use a 10 mm socket bit to unscrew one nut securing each hinge to the floor.
2. We remove the pillow.
3. Using a 13 mm socket, unscrew the two nuts securing the backrest brackets to the floor on the left and right sides.
4. Having folded the seat back, use the same tool to unscrew the two bolts securing the backrest brackets on the left and right sides.
5. Remove the seat back.
6. Install the backrest and cushion on the left side of the seat in the reverse order.
The article is missing:
- Photo of the instrument
- High-quality photos of repairs
Lada K alina 2 . BACKSEAT
The rear seat is equipped with head restraints that can be locked in only two positions: fully raised or fully lowered. To raise, pull the headrest up until it locks (you will hear a click).
To lower the head restraint, press the left latch as you did for the front head restraint (see “Adjusting the front seats,” page 27) and lower the head restraint.
All three rear seat head restraints can be removed in the same way as they were for the front seat head restraint (see “Adjusting the position of the front seats,” page 27).
To increase the luggage compartment area, the rear seat can be folded. The backrest and rear seat cushion can be folded completely, 2/3 or 1/3.
Fold the rear seat in the following order.
4. Unfasten the micro-lock of the middle passenger's seat belt strap by inserting the ignition key into the slot shown by the arrow in the photo and, pressing the latch, move the belt to the side.
I don’t know what about the Kalina sedan, but in a station wagon you can make quite a decent platform for transporting cargo. Although the trunk itself is quite large, by folding out the rear seats you can get almost three times more space.
The seats fold out quite simply, but owners who just bought Kalina may not know this. I myself had a similar story with a VAZ 2112; after half a year of operation, I only later found out that the seats can be folded down to create a flat platform, and load fairly large cargo.
The first step is to fold the bottom row; to do this, just pull the laces, which are located right next to the seat belt buckles. And to recline the back, you need to pull the levers at the end on each side, and also pulling them towards you, lower them all the way down. The pictures below show everything clearly, but the levers themselves on the backs are not visible because of the covers, but I think everyone understands where they are.
Disassembling the panel
To dismantle the instrument panel in Kalina, you should arm yourself with a set of high-quality screwdrivers and patience. To work you will need:
- crosshead screwdriver;
- slotted screwdriver;
- 10mm wrench with round head;
- marker or tape to indicate disconnected wires.
Disassembly begins from the sides. How to remove a torpedo? The sequence is:
- The first step is to disconnect the rubber seal that prevents the panel from being removed. Using a flat-head screwdriver, bend it to make room for dismantling.
- Next you need to remove the plastic casing with three clips. It is located on the front pillar of the cover. Again, a flat-head screwdriver will come in handy, which can be used to pry off the socket.
- The next step is to detach the trims in front of the glass. You can unscrew them using a Phillips screwdriver by unscrewing the fasteners on both sides.
- After this you will be able to remove the black trim under the glass. It is secured with iron clips and screws, so there is no need to rush. Slowly pull towards you until it comes loose. It may happen that the clips get stuck under the panel or some of them will be missing altogether.
- We unscrew all the screws that are nearby and remove the covers from the side air ducts.
New Lada: About daytime running lights of Lada cars
After removing all the side and side elements, you can begin to dismantle the central part.
Hatchbacks Lada Kalina, Lada Samara, Lada 112. A look at the back
Hatchbacks Lada Kalina, Lada Samara, Lada 112. A look at the back
LADA > Kalina
LADA KALINA (VAZ-11193)
Five-seater 5-door hatchback. Body options: sedan, a station wagon is also being prepared.
Engine: 8-valve petrol 1.6 l (81 hp) with distributed fuel injection.
Transmission: 5-speed manual. Drive is on the front wheels.
Options: “standard”, a little later - “luxury”.
Expected price: $8620 (250 thousand rubles)
Five-seater, 5-door hatchback, serial production began in 2000. Body options: sedan, station wagon, coupe.
Engine: since October 2004, a 16-valve petrol 1.6 liter (89 hp) with distributed fuel injection has been installed.
Transmission: 5-speed manual. Drive is on the front wheels.
Options: “standard” and “luxury”, additionally power steering and air conditioning.
Price: $8520 (247 thousand rubles)
The five-seater 5-door hatchback has been in serial production since 2003 to replace the VAZ 21093. Body options:
3-door hatchback, sedan.
Engine: 8-valve petrol 1.5 l (77 hp) with distributed fuel injection.
Transmission: 5-speed manual. Drive is on the front wheels.
Options: “standard” and “luxury”.
Price: $7240 (210 thousand rubles)
In 2004, Lada Samara 2 replaced the first generation cars on the assembly line. Prototypes of the 2113 and 2114 hatchbacks received a fifth door that extends to the bumper—this trunk is much more convenient to use. During testing, another advantage emerged - due to the rounding of the “back part” of the rear, the glass remains clean even in slush! Unfortunately, for the sake of economy, the “old” door was used in the series.
The "tenth" family - essentially a further development of "Samara" - is devoid of many of its shortcomings. Undoubtedly, the Lada-112 looks more elegant and modern than the fourteenth and the quality of the bodywork is higher.
If we, without a doubt, classify the “fourteenth” and “twelfth” as hatchbacks, then this “Kalina” is perhaps closer to station wagons. At least her "back" is not a "hatch" at all.
The latest model “Kalina” is already a modern car of European level. At least externally, in terms of the size and uniformity of body gaps, it is almost inferior to most of its foreign classmates. The interior matches the exterior - elegant and ergonomic.
EIGHT AND SIXTEEN
The VAZ 2111 1.5-liter eight-valve injection engine provides the Samara with good dynamics and moderate fuel consumption. Well, they inherited good handling from the first generation.
But it is unlikely that the manufacturer will ever offer power steering, ABS, air conditioning or airbags to the owners of these cars, even as options.
Double-glazed window control unit “Norma” 1118 – 6512010 for VAZ 11183 “Kalina”
©Aktuator On cars of the Kalina family, 2 types of non-interchangeable (by wiring) glass control controller 1118 - 6512010 and 11180 - 3763040 can be installed. 1118 – 6512010 has one 25-pin connection connector, 1118 – 3763040 (1118 – 3763040 – 10) – two connectors.
Remote control system for double-glazed windows “norm” on a VAZ 11183, Kalina. Controls power windows and central door locking. When the connector is removed, the engine does not start; the device performs some of the anti-theft functions.
Connection
| Sign | Malfunction | Possible reasons | Diagnostics | Elimination method |
| 1 beep IC flashes | The key code is not readable |
| № | Wire color | Purpose, addressing |
| 1 | External shock or volume sensor input (Not used)* | |
| 2 | Pink/Black | To the door lock switch in the switch block |
| 3 | Brown/Green | K-Line. To Kl. 71 ECM, Cl. 18 APS‑6 |
| 4 | Brown | Connects to ground when the driver's door is closed |
| 5 | Grey | To rear window heating element |
| 6 | Black | Weight |
| 7 | Pink/White | To the door lock switch in the switch block |
| 8 | Yellow/Blue | In the instrument cluster, to the APS-6 indicator |
| 9 | Black/White | Connects to ground when opening the hood. C VK engine compartment lamp |
| 10 | Two White/Red | Connects to ground when opening the rear doors |
| 11 | Brown/Red | Connects to ground when opening the right front door |
| 12 | Output 12 V power supply for external sensor (Not used)* | |
| 13 | Not used | |
| 14 | Yellow | Pulse + 12 V, closing all doors and trunk |
| 15 | Red/Blue | To class 14 APS‑6 |
| 16 | Blue with Black | To the left direction indicator |
| 17 | Red/Blue | Impulse + 12 V, opening passenger doors |
| 18 | Red/Black | Pulse + 12 V, driver's door opening |
| 19 | Pink/Red | Impulse + 12 V, opening the trunk lock |
| 20 | Yellow/Blue | To terminal “15”, through fuse F 9, in the mounting block |
| 21 | Grey/Black | "-" Horn relay |
| 22 | White/Blue | Connects to ground when the driver's door is opened |
| 23 | Red | To permanent plus through fuse F 5, in the mounting block |
| 24 | Blue | To the right turn signal |
| 25 | White black | Connects to ground when opening the trunk |
Hatchbacks Lada Kalina, Lada Samara, Lada 112. A look at the back
Hatchbacks Lada Kalina, Lada Samara, Lada 112. A look at the back
LADA > Kalina
LADA KALINA (VAZ-11193)
Five-seater 5-door hatchback. Body options: sedan, a station wagon is also being prepared.
Engine: 8-valve petrol 1.6 l (81 hp) with distributed fuel injection.
Transmission: 5-speed manual. Drive is on the front wheels.
Options: “standard”, a little later - “luxury”.
Expected price: $8620 (250 thousand rubles)
Five-seater, 5-door hatchback, serial production began in 2000. Body options: sedan, station wagon, coupe.
Engine: since October 2004, a 16-valve petrol 1.6 liter (89 hp) with distributed fuel injection has been installed.
Transmission: 5-speed manual. Drive is on the front wheels.
Options: “standard” and “luxury”, additionally power steering and air conditioning.
Price: $8520 (247 thousand rubles)
The five-seater 5-door hatchback has been in serial production since 2003 to replace the VAZ 21093. Body options:
3-door hatchback, sedan.
Engine: 8-valve petrol 1.5 l (77 hp) with distributed fuel injection.
Transmission: 5-speed manual. Drive is on the front wheels.
Options: “standard” and “luxury”.
Price: $7240 (210 thousand rubles)
In 2004, Lada Samara 2 replaced the first generation cars on the assembly line. Prototypes of the 2113 and 2114 hatchbacks received a fifth door that extends to the bumper—this trunk is much more convenient to use. During testing, another advantage emerged - due to the rounding of the “back part” of the rear, the glass remains clean even in slush! Unfortunately, for the sake of economy, the “old” door was used in the series.
The "tenth" family - essentially a further development of "Samara" - is devoid of many of its shortcomings. Undoubtedly, the Lada-112 looks more elegant and modern than the fourteenth and the quality of the bodywork is higher.
If we, without a doubt, classify the “fourteenth” and “twelfth” as hatchbacks, then this “Kalina” is perhaps closer to station wagons. At least her "back" is not a "hatch" at all.
The latest model “Kalina” is already a modern car of European level. At least externally, in terms of the size and uniformity of body gaps, it is almost inferior to most of its foreign classmates. The interior matches the exterior - elegant and ergonomic.
EIGHT AND SIXTEEN
The VAZ 2111 1.5-liter eight-valve injection engine provides the Samara with good dynamics and moderate fuel consumption. Well, they inherited good handling from the first generation.
But it is unlikely that the manufacturer will ever offer power steering, ABS, air conditioning or airbags to the owners of these cars, even as options.
The front seats of all three hatchbacks are approximately the same in terms of comfort and living space, except that the interior of the Kalina looks more fresh. However, the latter is a matter of taste
The base engine of the “twelve” is a sixteen-valve engine, the volume of which has increased to 1.6 liters since last year (ZR, 2004, No. 12). The old one and a half liter Lada-112 also provided excellent dynamics, but with the updated one, thanks to better elasticity, it became easier to get underway, and while driving it is possible to change gears less often. Owners will be pleased with low fuel consumption, good smoothness and relatively low noise, but with vibrations, alas, the situation is somewhat worse.
The Viburnum hatchbacks will initially have high-torque eight-valve VAZ 21114 engines with a displacement of 1.6 liters. A little later, a new 1.4-liter engine will appear, not inferior in power, but more economical and “cleaner” (ZR, 2004, No. 9).
Thanks to the high seating position and low window sill line, visibility in the Kalina is clearly better, which is especially valuable when operating in the city. And the compactness of the car will come in very handy here.
Sound insulation of the trunk Kalina 2 (VAZ 2192, 2194)
At the moment, the new Kalina is available in two versions: hatchback and station wagon. These body types are very practical, but they also have a drawback - noise, because the trunk is essentially located in the car's interior. To improve sound insulation, it is proposed to make sound insulation for the trunk of Kalina 2 with your own hands.
Car soundproofing technology is the same for all brands and types of cars, however, specific cases have their own characteristics. In the case of the Lada Kalina 2, the whole process begins with removing the trunk trim and tailgate trim, which does not cause difficulties. Next, the entire surface should be cleaned and degreased with White Spirit.
The first layer of trunk sound insulation is vibration isolation material. It is recommended to start installing sound insulation from the rear arches; it is through them that the main noise from the road is transmitted. To soundproof arches, it is recommended to use material with the highest vibration absorption coefficient, for example, 'Bimast Bomb'. We cut sheets of a suitable size (the larger the pieces, the better), and heat the bitumen side with a hairdryer. We apply the material to the cleaned metal of the body and roll it out with a hard (plastic/iron) roller. Glue the next sheet of vibration isolator overlapping or at the joint
After this, we move on to soundproofing the horizontal surface of the trunk, paying special attention to the part where the muffler resonator passes (for Lada Kalina 2 this is the left side)
The second layer is sound-absorbing material. Most often, due to its availability and low price, SPLEN (a largely thermal insulating material) is used, but we recommend that you use an accent. Both materials have a self-adhesive base, so their installation will require significantly less time. We glue 100% of the surface, joint to joint. The only exceptions are technological openings (openings for interior ventilation).
The trunk lid of Kalina 2 must also be soundproofed. Unlike the trunk, you should use a lighter material for vibration isolation, for example, StP Aero. We glue the material between the stiffeners. We set the accent on top in the same way.
Fighting squeaks and crickets
It is worth paying special attention to the sound insulation of the rear shelf. To prevent it from making squeaks, you should stick an anti-squeak (modelin) on all rubbing surfaces, for example, places where the trunk shelf is attached, the fifth door trim, etc.
The soundproofing of the trunk of the Kalina 2 hatchback is completed, we carry out the assembly in the reverse order. The station wagon trunk is treated in a similar way.
It will take one working day to soundproof the trunk, as well as:
- On the trunk shvi there are 8 sheets of 'Bimast Bomb' (0.53*0.75m) and 2 accent sheets (1.0x0.75m)
- On the trunk lid there are 2 sheets of Vibroplast and 1 sheet of accent.
The effect of sound insulation is significant; firstly, the exhaust pipe becomes less audible. Secondly, it became almost inaudible how the rear suspension worked. And also, if you have tuned the trunk of Kalina and installed a subwoofer there, then soundproofing the trunk is required!
Remember that the best sound insulation is when a set of works has been carried out aimed not only at insulating from external noise (noise from wheels, wind, etc.), but also eliminating creaks and crickets inside the car.
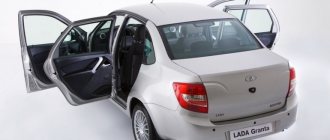
How to remove the seat from the rear sofa on a Lada Granta - photos and videos
Unlike the “Sport” modification, the seats of the Lada Granta Liftback are not equipped with height adjustment. For a driver of average height this is not significant. But for those who are over 180 cm or under 165 cm, this becomes a problem.
Often, owners independently install seats from Opel, Ford, Mercedes-Benz, Audi in order to increase comfort.
Driver and passenger front seat overview. Adjustment mechanism
The ergonomics of the driver's seat are good, the range of settings for the steering column and seat allows a driver with a height of 180 cm to fit comfortably. However, the longer the distance, the faster fatigue sets in; the right leg increasingly becomes numb from the limited position.
For the first time in the Lada Granta Liftback model, the seat is equipped with lateral support. This was previously installed in the second generation Kalina, Kalina Sport. Scheme for manufacturing the structure:
- metal frame;
- foam pillow;
- back.
The frame is a supporting structure. The backrest and cushion are installed on the movable hinges of the frame. In the Liftback model, the backrest is solid, the height is proportional to the height of 170 cm. There are bolsters on the sides that provide a comfortable seat for the driver and passengers.
The seat elements have a spherical structure: springs covered with special foam and polyurethane are placed on a metal base. The top is covered with upholstery fabric.
Improvements at the factory
The manufacturer cannot always make what will actually be effective under different operating conditions. Therefore, car enthusiasts often modify their cars on their own.
Rear shelf
In viburnum, the rear shelf is made of low-quality material, which soon leads to it being skewed. Also, if you install a speaker system in your car, then a standard shelf will not allow you to achieve good sound.
Removing the front seats of Lada Granta
Required tool: 8 key. The front seats of Lada Granta are installed on skids that are attached to the floor.
- Move the seat all the way forward.
- Unscrew the two rear mounting bolts for the guide slides and remove the spring washers.
- We move the seat all the way back, and similarly unscrew the two front bolts with washers.
- If seat heating is installed, then disconnect the block with wires. Raise the seat and disconnect the seat belt sensor wiring harness connectors.
The second front seat is dismantled in a similar way. Installing the seats is done in the reverse order.
What to look for when choosing?
It is no secret that the level of visibility to the rear depends on the efficiency of the brush, which is especially important when maneuvering in cramped conditions and in bad weather. When choosing, you should lean toward high-quality branded products that will not subsequently emit an annoying squeak when rubbing against the glass and do not have to think about how to remove and replace the wiper. You should also inspect the integrity of the working element of the brush, which initially should not have cracks or breaks. An important role is played by the force with which the rear wiper is pressed to the surface of the glass, as well as the material from which the product is made.
Rear seat overview. Adjustment
In the back of the Lada Granta Liftback it’s already cramped for three, but there’s plenty of space for two. The sofa is flat, without ergonomics. For tall passengers, long trips will be painful.
Adjustment of the sofa is not provided, unless you move up and down around the perimeter yourself. Don't forget about the restrictions on the back of the seat back and roof lining.
In order to increase safety and reduce the likelihood of injury to passengers, the rear row of seats is equipped with seat belts.
How to fold out the seats in a Grant Liftback
The rear backrest folds in a 60/40 ratio, which is very convenient and practical when transporting non-standard loads. Press the side clamps of the upper backrest and lower the desired side.
If necessary, the back row folds completely onto the floor, forming a flat platform without steps or bends. Folding the seats is easy: just press the side hinges of the upper backrest. The lower sofa is fixed with metal hinges at the base.
Owner reviews
| № | Positive |
| 1. | Kirill , 33 years old: I am completely satisfied with the original seats on the Granta Liftback, comfortable, ergonomic. Height is 175 cm, I don’t feel any discomfort. |
| 2. | Vitaly , 41 years old: I installed heating on the standard seats, nothing else is needed. It’s very nice that they installed lateral support, it was so lacking in Priora and Vesta. |
| 3. | Mikhail , 30 years old: my positive review of the back sofa. Comfortable, practical, good material, easy to clean. |
| 4. | Gennady , 29 years old: the quality of the seats is average, I’m satisfied, I put on the covers. I'm going to install heating. |
| Negative | |
| 1. | Victor , 24 years old: I don’t like standard seats, I bought a second generation Opel Astra at the market and installed heating. My advice to motorists. |
| 2. | Peter , 36 years old: everything is good in the Grant Liftback, except for the seats, they are not comfortable, too soft, the fabric is the cheapest. Replaced from third generation Ford. |
| 3. | Vitaly , 28 years old: my height is 185 cm, my original seats are not equipped with height adjustment, it’s so lacking. Replaced from Opel Astra. |
Removing the front seat
1. Move the seat back all the way and use a 10mm head to unscrew the two screws for the front fastening of the seat slide.
2.
Having moved the seat all the way forward, use a 10mm head to unscrew the two rear mounting screws for the seat slide.
3.
We take out the front seat through the car door opening.
Removing the front seat slide
We move the seat slide so that the bolts securing the slide to the seat frame are visible through the technological holes in the slide.
1. Using a 8mm socket, unscrew the bolts securing the slide to the seat frame. Each of the slides is attached to the frame with three bolts.
2.
Remove the slide assembly with the longitudinal movement mechanism lever.
3.
We remove the end of the lever shaft of the longitudinal movement mechanism from the hole in the inner slide and from the hole in the outer slide.
A spring is installed between the lever and the outer herrings. Similarly, we remove and disassemble the front passenger seat.
We assemble and install the front seat in the reverse order.
Before installing the lever shaft into the hole of the outer slide, first put a spring on the shaft and place the short mustache of 1 spring on the latch, then, squeezing the long mustache of 2 springs (can be tied with wire), insert the shaft into the hole of the slide so that this mustache goes under the slide .
In what cases is it necessary to remove the casing?
As a rule, it becomes necessary to remove the rear or front trim to gain access to cavities located inside the vehicle, namely to window lifting systems.
Despite this, there are other cases when such a need arises, namely:
- when installing acoustics in the inside of the door;
- when troubleshooting problems with the automatic window lifting buttons;
- when removing double-glazed windows for work on their replacement or tinting;
- when lubricating or repairing mechanisms that raise and lower door windows;
- when replacing door trim, which has lost its presentable appearance over the years of use;
- when performing work on the car body, namely when welding damaged parts, painting or carrying out measures to treat the vehicle against corrosion;
- when carrying out work on installing additional vibration or noise insulation.
Removing the rear seat
The work is shown on the example of the left side of the seat.
The cushion and backrest of the right side of the seat are removed in the same way.
1
. Lifting the rear seat cushion by the strap,
Using a 10mm socket, unscrew one nut securing each hinge to the floor.
2. Remove the pillow
3
. Using a 13mm socket, unscrew the two nuts securing the backrest brackets to the floor on the left and right sides. 4. Having folded the seat back, use the same tool to unscrew the two bolts securing the backrest brackets on the left and right sides.
5. Remove the seat back.
Install the backrest and cushion on the left side of the seat in the reverse order.
All articles on repair and maintenance of Lada Kalina - “Repair Lada Kalina”
Good day to all.
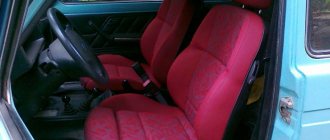
While the car is waiting for a salary to replace the heater core, I decided to wash the seat upholstery (my family). No sooner said than done. I’ll make a reservation right away - I only removed the passenger seat and the back seat without a backrest (I’ll explain why a little later).
And so let's go: for removal we will need a 10 socket, as well as an 8 socket (or an asterisk, I don’t remember which one). I had exactly 8 in stock. The rear sofa has 4 nuts for 10, and the front one has 4 bolts for an asterisk (the head for 8 is ideal).
And so we unscrew the seats and take them home (someone removes the upholstery on the spot, but I think it’s more convenient and easier to bring it home. Moreover, the seats can be easily removed).
Let's move on. Disassembly. For disassembly you will need a Phillips screwdriver (to remove decorative plastic) and a flat screwdriver (to remove the upholstery itself. Some use pliers, but in my opinion a screwdriver is more convenient).
After removing the elastic, you need to either bend or cut the wire holding the upholstery with the foam. The fastening of the upholstery on the back of the front seat is slightly different. On the sides and bottom there is a groove in the groove, when disassembling it is clear without explanation
You also need to remove the headrest guides and the Kalina emblem. The latter is attached through paralon to a plastic crap (I don’t know what to call it) and to fabric with staples.
The upholstery is removed and you can start washing.
The springs on the front seat were sagging, so it was decided to turn them over. On the back, I left the top 2 as they were (curved back, but turned the rest over. Like lumbar support)
I don’t remember where, but I read that to prevent the seat from sagging, they tighten the springs with clamps
While I was doing all this, my wife soaked the upholstery
After a night in the bathroom, they went to the car. Strangely enough, they dried in the bathroom in about 4 hours. I didn't wait and started reassembling it.
It was decided to replace the wire with clamps
The rest is in reverse order.
Now that you’ve read everything and some are already scrolling further, so as not to burden people’s brains at the very beginning, I’ll explain why I didn’t remove the back of the rear seat - the back of the upholstery is attached to pistons, which I was frankly too lazy to go after))).
This is where I will end the story... I hope I helped someone.
Thank you all for your attention and good luck in your endeavors. See you in the open spaces of the drive.
PS I will be grateful for reposts and likes. That's all for sure now.
Price tag: 0 ₽ Mileage 36070 km
Algorithm for dismantling the rear trim
On the rear doors, the trim is fixed using ten plastic clips and two screws for attaching the handle. The technology for performing dismantling work consists of the following stages:
- Removing the handle used to lift the glass. To do this, you need to use an awl to remove the half ring that holds the axial lever.
- Removing the plugs on the door and unscrewing the mounting screws. After this, the element itself can be easily removed.
- Click the piston using a flathead screwdriver. This is easily done by pulling back the bottom corner in the decorative panel.
- Release the remaining clips by removing the door card.
As a rule, the procedure for removing the trim on the back door of Kalina does not take more than 10 minutes. Although dismantling itself is not difficult, it is better not to rush, since due to inexperience you can break all the clips.
By the way, the Kalina car is a very acceptable option, which is distinguished by its price-quality ratio.
The advantages of Kalina, according to car owners, are as follows:
- cheap and cheerful - the main qualities of Kalina;
- high-quality chassis;
- the first repair occurs after approximately 10 thousand km;
- It’s quite quiet inside the cabin;
- comfortable seats;
- high-quality upholstery;
- climate control;
- high cross-country ability;
- reliable engine;
- affordable service.
Considering the above advantages of the Kalina car, it is worth considering this vehicle option if you have a relatively modest budget.