Design and types of window lifters
Window regulators are a device designed to raise or lower car windows.
At the moment, there are a huge number of options for these devices, but the design, despite the differences in component parts for different models, is similar, it includes:
- grooves that hold the glass by the side edges
- so-called “rails” that ensure the movement of glass
- Seal and damper, glass movement limiters in the up and down direction.
A window regulator of any design consists of two main elements:
- drive unit
- lifting mechanism - transmitting vibrations of the drive movement to the glass, and thereby ensuring its movement.
The drive is divided into two types:
- Mechanical, known to us from Soviet cars, where in order to lower or raise the window, you need to turn the window lifter handle.
- Electric, typical of modern cars, where to move the glass you just need to press the window button. The electric drive consists of a reversible electric motor with a worm-type gearbox.
In addition, window regulators differ depending on the mechanism of glass movement:
- rack and pinion
- cable
- lever
Each option has its pros and cons and technical features. All these device options have one thing in common: one day they fail; this problem especially often occurs in a model that is so popular today as the Lada Kalina.
There can be dozens of reasons why power windows malfunction, but the most common are the following:
- The commutator brushes of the electric motor, which is responsible for the glass movement process, freeze. This happens, as a rule, due to overheating of fragile graphite brushes, unstable to sudden temperature fluctuations, and this factor starts a chain reaction: overheating of the brushes begins to melt the nest, which is made of plastic in all Kalinas, and not of the best quality. For this reason, the brushes lose mobility, and the device can only be brought into working condition using a hammer. At the initial stage of the breakdown, it is enough to give a good knock or two on the door trim, but after a couple of weeks, this method stops working, and then you will have to disassemble the window regulator to repair it.
- Another cause of failure, typical of the Lada Kalina, as well as many other VAZ models, is the ill-conceived electrical circuit. The contacts cannot withstand the load placed on them, there is no unloading relay, which is why all the window regulators fail at once, and then it is necessary to repair not only the window regulators themselves, but also the remote control.
When it is impossible or too problematic to repair the device, it is more advisable to replace it with a new one. The following options are suitable for the Lada Kalina:
- electric window lifter Garnet VAZ – 530 rub.
- electric window regulator Ningbo – RUB 1,699
- electric window lift AUTO-GEO – RUB 3,300.
Of course, the price is directly related to quality, but if the budget is limited, then the domestic option is not bad.
Now let's talk about how to install window regulators yourself.
Repair of the side rear view mirror or disassembly instructions (photo)
, which is attached with 3 pistons to the door itself. Next, use a cross-head screwdriver to unscrew 3 screws.
and the mirror ends up in your hands
Next comes the analysis of the mirror itself. To begin, remove the mirror element; to do this, pry it up on one side with your fingers and, using force, remove it (it is difficult to remove)
Here's a view of the inside of the mirror
(Here you can see the ends of the cables of different colors and one is missing), but here is the mirror element
Replacing the mirror element on the exterior rear view mirror of Kalinas, Grants and Prioras
Video review on self- replacement
mirror element on the outside rear view mirror of such vehicles.
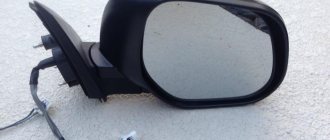
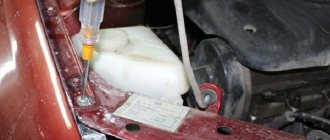
An autopsy showed that one of the cables with which the mirror element is adjusted had burst. A donor mirror with a broken body was found and it was decided to replace the cable. Unscrew the 4 screws that secure the turntable to which the mirror element is attached
and we see a torn cable
Unscrew 3 more screws securing the mirror housing to the base
Remove the boot seal
remove the adjustment lever
The cables are marked by color: red, blue, yellow. Visually we find the torn one and take it out. We take the same color from the donor and put it in its place, it is more convenient to insert it first into the turntable, then using a pliers into the adjustment lever. After assembly, I broke another cable and decided to replace everything.
Assembly is carried out in reverse order. This way I saved some money on the mirror.
Replacing mirror elements may be required for the following reasons:
1. The mirror element cracked due to impact or temperature changes
2. Replacing a regular mirror element with a heated mirror element
3. Mirror elements from the car were stolen.
The question arises: How to replace the mirror element? What is the technology and how to remove the mirror element yourself, without being a car service specialist. With little skills this is not difficult.
It should be remembered that when dismantling and installing the mirror element, care must be taken not to allow large loads on the mirror sheet, since it is not rubber and will burst after a critical load threshold. That is, patience and tenderness
Of course, if the mirror element has already burst or cracked, then you can safely pull it out of the mirror housing, the main thing is not to break off the side mirror of the car itself and not to turn the car over. So, let's begin.
1. When removing the mirror element, it is necessary to turn it out as much as possible so that a gap is formed at the top between the element and the mirror body
Be careful when using electrical adjustment to avoid damaging the mirror motors.
2. The mirror element is usually attached in the center to a round seat with latches that disengage with the seat when dismantled
3. It is necessary to apply force to the mirror element from within the mirror itself, distributing this force as much as possible over the area of the mirror element to avoid distortion. This is achieved in several ways:
• Those whose fingers are not very spread out with their rings can insert them into the gap formed between the mirror body and the mirror element and press from the inside onto the backing of the element until it falls out of the body; with the other hand, of course, you need to catch it.
• Take 2 screwdrivers and hold them in your hand in the form of an inverted V; the ends of the screwdrivers press the element from inside the mirror and dismantle it.
• A rope or twine, folded in half, is inserted into the gap between the element and the mirror, distributed in the center of the mirror, the ends of the twine are clamped in the left hand, the right hand holds the mirror body so as not to damage it. By smoothly pulling the twine, the mirror element is removed from the mounts and falls out. In this case, the right hand holds the mirror body, so you need to find a third hand somewhere that will catch the falling mirror element.
4. The installation of mirror elements is carried out, as they say, in the reverse order - the latches are inserted into the mounting grooves on the mirror itself and the element is fixed by pressing evenly with the entire palm. It is not recommended to hammer the element with a hammer, press on the edge, or rest with your feet.
If the mirror element is heated, then it is necessary to provide for the presence of wiring for it in advance.
And this is a separate replacement for the glass of the mirror element:
Type selection
Now in stores you can find various options for mirrors for the Lancer. Decide in advance which one is right for you and buy it. As standard, the Lancer is equipped with aspherical models on the left side and observation (panoramic) models on the right. This shape increases visibility, but, unfortunately, both types distort the perspective, other cars and objects seem further away than they are, this must be taken into account when maneuvering.
The left (aspherical) mirror consists of two parts: closer to the driver, the main convex one, followed by a smaller one (about ¼ of the area) with variable curvature. It reflects cars moving behind and to the side of your car. The parts are separated from each other by a vertical line. The right (convex) mirror has a constant curvature of the entire surface.
When replacing, it is not necessary to adhere to the type installed at the factory. You can buy the left block with panoramic glass; its cost is significantly lower than the standard aspherical one. But keep in mind that with this option the view will be somewhat reduced.
How to disassemble the side view mirror on a viburnum
Owners of a Lada Kalina car often think about possible improvements to their vehicle. Changes may concern the functional properties of the car or its appearance. Lada Kalina in the first body version has a discreet but stylish design. As for the restyled model, the exterior of the car has a little more aggression, which, by the way, suits it very well.
General characteristics of the car
Lada of the latest generation
You can change the appearance of your car in different ways. What tricks do Lada owners go to in order for their vehicle to stand out from the gray mass of cars. Tuning can change the appearance of a car beyond recognition. New bumpers, airbrushing throughout the body, eyelashes on the headlights, engine and interior tuning - this is just a small list of possible changes. More modest car owners try to only slightly emphasize the individuality of the Lada.
Kalina in the cheapest configuration differs only in mirrors and door handles, which are not painted in body color. In order not to overpay when purchasing another package, and not to lose the appearance of the car, you can buy covers for mirrors and handles. These elements are sold in pairs; if one is lost or broken, you will have to purchase a new pair.
As for the restyled version of the Lada Kalina, even in the basic configuration, which is called “standard”, all elements are painted in the body color. In this case, car owners change anything in the appearance of the car only based on their own desires.
For Kalina, both in the old and in the new body, new mirror caps will not hurt. These elements will help change not only the color of the mirrors, but also their shape and function. Nowadays, the market offers a large assortment of linings, allowing you to select parts in accordance with the taste preferences and financial capabilities of the buyer. These can be standard attachments for Kalina mirrors or painted in body color or equipped with additional options. Variations of forms are also very diverse. Stylish embossed mirror caps give the car sporty features. With them the car looks faster and more energetic.
Regular linings made of black plastic will cost 2-3 times less than those painted in body color. But in any case, it is an inexpensive and quite accessible pleasure.
What are mirror caps used for?
Installing overlays is advisable for several reasons.
- The aerodynamic capabilities of the Lada Kalina are improving. At speeds above 80 km/h, the mirrors “whistle” noticeably less, since they have a more streamlined shape.
- The car acquires an attractive appearance. Different overlays make it possible to experiment with the appearance of the car without damaging the paintwork and the car owner’s wallet. Kalina, unlike most domestic passenger cars, has large exterior mirrors. This not only provides a good overview. Such linings give the car a certain charm.
- Lada mirror covers can be purchased complete with LED turn signal repeaters. This plays an important role in ensuring safe driving. When viewed from the front, the side turn indicators are poorly visible when driving, which can lead to an emergency. Installing overlays with signal repeaters will help avoid this problem.
Original mirror attachment
Having decided to purchase such parts for your car, it is important to know that the mirror caps that fit the Lada Kalina before 2013 will no longer fit on a car in a new body. In stores you can buy samples for each car variant, you just need to warn the seller about the make of the car and the year of its manufacture
You can purchase chrome, black, white and other trims. They can take the form of ordinary stripes, be placed on the corners of mirrors, or completely repeat their shape. Corners that cover only part of the mirrors look like part of the styling. Their choice depends on the character and taste preferences of the owner.
Methods for installing overlays
Even a beginner can handle installing the covers on mirrors created by VAZ. But if in doubt, it is better to send the car to a professional car service to avoid damage to the paintwork of the mirror with glue or solvents. The linings are equipped with all necessary fasteners or sealant.
Cost of covers for Kalina mirrors
They cost on average from 500 to 1000 rubles, depending on the shape, color and method of attachment. Unpainted overlays can be purchased for only 200 rubles. Chinese cheap analogues cost very little (100-300 rubles), but are significantly inferior in quality. They are more fragile, brittle and inelastic.
Mirror covers for the Lada Kalina are the simplest but most noticeable tuning element!
The VAZ service station provides complete diagnostics and repairs of the Lada Kalina (1118) sedan.
Our car service specialists have extensive experience in maintaining and repairing VAZ vehicles, and thanks to our own auto parts store, we always have the necessary parts in stock.
View the price list for basic VAZ repair work
Prices for our car service services are significantly lower than the market average, which allows you to carry out high-quality repairs at an affordable price.
STO VAZ provides the following types of services:
- Car repair Lada Kalina (1118) sedan;
- Full diagnostics of VAZ 1118: diagnostics of the engine, brake system, suspension, compression measurement;
- Maintenance of Lada Kalina 1118 sedan: changing engine and transmission oil, replacing filters, replacing technical fluids, replacing the brake system and timing belt;
- Repair of the chassis: suspension, clutch, steering, brake system;
- Tire fitting and storage;
- Car wash;
VAZ-1118 is a new model of AVTOVAZ LLC, the production of which began in 2004. This is a five-seater passenger car with front-wheel drive, a front engine and an all-metal welded body. Lada Kalina is distinguished by a reinforced structure of the roof, sills and central pillar. Additionally, safety is ensured by bumpers made of impact-resistant polypropylene. The engine is four-cylinder, four-stroke, in-line, eight-valve, with a displacement of 1.6 liters.
In the basic configuration, Lada offers electric power steering, and as an additional set of options you can choose seat belt pretensioners, air conditioning, airbags, heated front seats, electric rear-view mirrors and an anti-lock brake system. All VAZ-1118 vehicles are equipped with special catalytic exhaust gas converters.
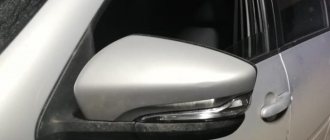
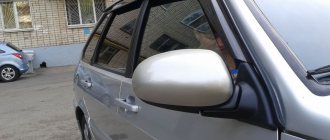
The exterior rear view mirror on the Lada Kalina is designed and dismantled very simply and conveniently, like everything on this model of a domestic car (in my opinion, the best in terms of price-quality ratio).
This particular mirror is suitable for both Tens and Priora. As we can see in the photo above, the mirror mounting principle is the same as on other Ladas, with one small difference. The side mirror is attached to three self-tapping screws using a shaped screwdriver (see photo above).
The side mirror itself (in this case, simple, without a turn signal repeater, with manual adjustment) consists of two parts. The main part (the mirror itself) and the protective cover. Connect these parts carefully and accurately by aligning the grooves on the mirror and the inserts on the lid and press it. It should click into place.
Next, lean the mirror on the outside of the door so that all three guides and the cable connection fall into place (photo above). Then, screw in and tighten the three screws. Make sure that the mirror on the outside of the door is level and properly positioned.
And now, that same “one small difference” - instead of the Zhiguli plastic nut that we screw onto the connection of the control cables, here it is attached to the same Zhiguli corkscrew, which on the classics secures the door lock cylinder. And finally, put on the plastic panel so that the adjustment lever fits into the rubber frame, lean the panel against the two guides in the corresponding holes and press it.
Mirror for Kalina, price 3000 rubles (with mechanical adjustment and without repeater)
Detailed and universal method
Universal method In the car, you need to snap the plastic cover that covers the mirror mounting screws. After removing the cover, unscrew the three screws holding the mirror in place and remove it
After this you need to carefully remove the rubber pads
If the rubber gaskets are damaged, it will be very problematic to buy new ones; they are rarely sold separately.
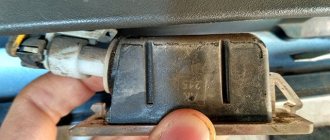
Now unscrew the two screws that secure the mirror adjustment joystick. Analysis of the joysticks themselves. The procedure is simple, you just need to carefully remember the position of the cables and the color, as different colors are responsible for their adjustment. Next, you need to remove the three screws that are located on the bottom plastic corner. this is the most susceptible to damage during vehicle operation. Then you need to remove it. How to remove a mirror element has already been described above. After removing the mirror element, you need to unscrew the four screws and remove the rest. We put on silicone glue
The easiest way, of course. ask a mechanic you know or send the car to an auto repair center if you need to replace the mirror or paint it. But most owners are accustomed to repairing their car themselves. This is a significant money saving.
Important nuances
Let's start with him. They serve to provide the motorist with a panoramic view while in the driver's seat. Moreover, this is true for cars with left and right-hand drive. Only the recommendations should be applied slightly differently.
If you have a left-hand drive, follow these instructions very carefully. If the car is right-hand drive, then the advice on the left side mirror is applied based on the right mirror. And vice versa. I think you've got this point figured out. But in general, right-hand drive cars are a separate topic for discussion, since they are not adapted to our traffic regulations. Too many problems arise. Especially when trying to overtake another car. But let's leave these conversations for another thematic material.
First, keep in mind that cars can be equipped with 2 types of mirrors. Moreover, they can use an electric drive or a mechanical type of drive, where a special lever or joystick is responsible for the settings. Here you need to work manually. I think each of you will understand, using your own car as an example, what to press and where.
Electric ones are more convenient, but are not found on all cars. But everywhere there is the possibility of adjusting the position.
When operating a car, consider what type of mirror is located on the sides of the car.
- With a spherical surface. Their characteristic feature is the ability to distance objects. That is, they create the impression that the car is further away from you than it actually is. It creates a deceptive effect, distorting the reality of what is happening. Not the best option. And if you have similar mirrors on your Polo or other car, many advise replacing them;
- With flat glass surface. Such designs are the most optimal for learning to look and adjust mirrors without distorting reality. They are considered the most suitable for car use, since they can cover the entire road.
Having decided on these questions, you can proceed directly to the settings.
Basic knowledge
You won't be able to neglect the tuning process if you understand the purpose of proper tuning - reducing blind spots. A dead zone is a space on the side, behind or in front of the car, which, during a natural driving position, is hidden from the driver’s eyes and is not displayed in the rear-view mirrors. Controlling blind spots is especially important when changing lanes in heavy traffic. When another vehicle is in the blind spot, this means that it has not yet appeared in the field of peripheral vision, but is no longer visible in the reflectors.
Since reflective elements in a car are always installed at an angle, and are often convex in shape, the degree of reflected objects depends on the distance to the mirror element and the viewing angle. That is why the setup begins with setting the correct position of the driver's seat and taking your usual driving position.
Is the stereotype true?
You need to configure mirrors according to the principle - reflections should not duplicate the same information, but complement each other.
In the left corner it is clearly demonstrated that the incorrectly adjusted right mirror element shows the position of the car, which is clearly visible in the central reflector. The Community of Automotive Engineers came to this answer to the question: “how to adjust mirrors in a car” back in 1995 experimentally. It is worth recognizing that this method of adjustment goes against the usual recommendations of experienced drivers. The latter recommend adjusting the mirrors in the car so that the convexity of the rear of the car is displayed in the near corner. This position of the rear view mirrors has a right to life, but only in the case of drivers who do not feel the dimensions of their car. The unusual setting not only makes it difficult to reverse and park, but also prevents a novice driver from quickly developing a road situation in his head.
The photo clearly demonstrates the effectiveness of the mirror position, which is unusual for most drivers. With the traditional setup of fig.2, we see that the red car has left the driver's field of vision and is in the blind spot. An incorrectly adjusted reflector fig.5 displays a green car, which is unnecessary, since it is visible in the central mirror. When configured correctly, there is no blind spot on the left side of the driver, and a green car appears in the right side mirror as soon as it disappears from the central reflector.
To adjust, you need to place the car among static objects according to a pattern close to the images. To be able to double-check the correctness of the settings and remember the approximate position of the mirrors, so that later they can easily reproduce it.
Balance, useful tips
In some cars, getting rid of blind spots is extremely difficult or even impossible. Fortunately, there are not many such cars. It is worth recognizing that reflectors set in the described position can in some cases make driving difficult. Therefore you can:
- if necessary, immediately before parallel parking or driving in reverse, install a rear-view mirror on the side (in the traditional way). A slight downward slope will help you see the curb better. Never make adjustments while moving! Therefore, immediately after parking, you need to re-adjust the mirrors, since then in a hurry you can simply forget about it;
- When reversing, when you are sure that there are no obstacles on the right side, you can only navigate by the mirror closest to you. It’s more convenient to move this way, and in addition, later from the parking position you will have to reconfigure only one reflector;
- install additional side reflectors that will be aimed at blind spots.
Now you know how to properly adjust your car mirrors.
Search
Choosing a mirror in Kalina
Kalina mirror often requires replacement. This is justified by the difficulties of the first years of driving and the desire to install a more beautiful part.
Replacing a side mirror is not a complicated process; it is important to be careful and follow a certain method
How to make a worthy choice?
Exterior mirrors are one of the most important and important parts of a car. Without them, it is impossible to look at the situation and move along a busy highway. Side view mirrors often require replacement, which is explained by their greatest “trauma” while driving. Before starting work, you need to choose a balanced version of the mirror part. This could be a similar or more sophisticated mirror in Kalina. If you're having trouble choosing, you'll need to familiarize yourself with the basic setup mechanisms.
There are the following types of mirrors:
Ease of use depends on the choice of mechanism. The articulated mirror element is the most common type. Almost all modern cars do not do this.
The lever control is based on a joystick or lever located inside the cab and is pulled to the side by a narrow cable.
Electronic mirror element. this is a modern mechanism. It is found in new cars equipped with many additional features. Its implementation. comfort and safety.
Main advantages of the electronic mechanism:
- increased appearance;
- anti-glare coating;
- heating;
- Built-in double turn signal.
How to remove
and disassemble the side mirror
by car Lada
Kalina
.
replacing the mirror element with an exterior rear view mirror from Kalina, Grants and Priors
Video review of the self-service mirror element on the external rear view mirror of such cars
Heated mirrors. These are modern developments that simplify the life of every motorist. Increased visibility allows you to better navigate city roads. This option reduces the likelihood of accidents and increases the chances of noticing a dangerous moment. Lastly, the clarity and appearance of this item is much better than the standard part.
The anti-reflective coating on the viburnum mirror allows you to reflect both the sun and bright light. The anti-glare effect ensures good visibility while driving.
Heated mirrors. this is a convenient option. Thanks to this, you don't have to remove snow and ice from the glass. This is a very nice and convenient addition. Finally, there is a built-in signal repeater. This Lada Kalina Mirror element allows everyone to know the traffic about future maneuvers. Which simplifies the trip and makes it safe.
When choosing the best mirror element for Lada Kalina, personal preferences should be taken into account. Of course, do not forget about convenience and safety.
Reasons for replacement and the process itself
Replacing a mirror on a Lada Kalina may be required in the following cases:
- in case of damage to the mirror element, due to a stroke or a decrease in temperature;
- if you want to improve your car;
- in the absence of “parts” (as a result of theft).
How to change a mirror yourself, and what is needed for this? If you have a little skill, you can get the job done easily. The main thing is that you need to consider, disassemble and install it yourself
this is caution. This will prevent damage to the new element and damage to the car body. When removing an object, you need to unscrew it as much as possible.
A gap between the part and its body will indicate this process. In this matter, the main thing is not to damage the motors of the elements. The design itself can be carefully unscrewed with a Phillips screwdriver. It must be unscrewed from the car body and disconnected. The question of how to disassemble a mirror is closed. The next step is to install a new element
When removing an item, you need to unscrew it as much as possible. A gap between the part and its body will indicate this process. In this matter, the main thing is not to damage the motors of the elements. The design itself can be carefully unscrewed with a Phillips screwdriver. It must be unscrewed from the car body and disconnected. The question of how to disassemble a mirror is closed. The next step is to install the new element.
The mirror element itself is located in the center, where it is securely secured with latches. The main thing is that he corrects himself correctly. Apply force and press on the part itself. The side member is then bolted to the car body.
The process is not complicated, the main thing is not to damage the gaskets on the viburnum samples and not to spoil the mirror element yourself.
Post Views: 2
Heating installation
If the car is not equipped with heated rear view mirrors, you should ensure that this option is available before installing the covers. During the cold season, this issue becomes most pressing. The large mirrors of the Lada Kalina will be of no use if they freeze completely and take a long time to warm up. Some car owners buy heated mirrors and install them on their vehicle. This installation is simple, but still requires some skill and experience. You need to know how to disassemble the door panel to route and connect all the wires.
There is a more complex, but much less expensive method. You can purchase flexible heating elements (GEN) and connect the heating to regular Lada Kalina mirrors.
Required materials and tools:
- flexible heating elements that exactly fit mirrors in size;
- Double-sided tape;
- stationery knife;
- file;
- tools for removing rear view mirrors;
- wires, heat shrink, electrical tape, etc.;
- construction hair dryer;
- screwdriver.
First you need to remove the mirrors of the Lada Kalina. Once this task is completed, the mirror element should be detached. The mirror can be attached using double-sided tape or special glue. You can easily remove a mirror glued with tape using the blade of a stationery knife. With glued elements the situation is a little more complicated. The glue softens when heated, which can be achieved using a hair dryer or hot water. It is important that the heating is gradual. A sharp temperature change can cause the mirror to crack.
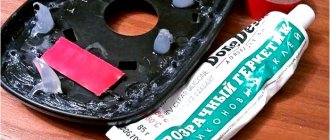
The removed part must be thoroughly cleaned of any remaining glue or tape and degreased. The HEN must be cut along the contour of the mirror without affecting the heating coils. If necessary, the spirals can be carefully bent into shape. At the place where the mirror is attached, use a screwdriver to carefully make holes for the wires. To prevent the wires from sticking out, the space for them can be sharpened with a file or knife. The wires are pulled through the mirror body and connected by soldering.
The door panel should be disassembled with extreme care to avoid damaging the vehicle's wiring. For those who have never disassembled a mirror and panel before, it will be useful to know how others do it. But even if this is not possible, it won’t be too difficult to figure everything out on your own. The mirror is glued in place with double-sided tape. The flexible heating element is also attached to the tape.
Next, we assemble the mirror housing and attach it to the car. We install covers on the mirrors using already known technology. We pull the wires through the door panel and connect them to the standard rubber band for the central locking wires.
timing belt
A terrible problem that occurs with viburnum is a broken timing belt. It is impossible not to notice this problem. It doesn’t happen that you start the car in the morning and the belt is broken.
No, the belt breaks while moving and nothing good can happen here. The valves meet the pistons and bend them, and the entire piston can often break apart, which can lead to expensive repairs.
These are all 16 valve engines; eight valve engines do not have such consequences, because the pistons have recesses for the valves, and it is these recesses that help avoid collisions between the valves and the pistons.
No one is safe from a belt rupture, just check it more often, then you can notice the threat of a rupture and replace the belt that threatens to break in time. There is also an option to install pistons with grooves in a 16-valve engine, this will also help avoid serious consequences if the belt breaks.
Another problem - the pulley turned. Occasionally it happens that it turns over two or three teeth, because of this the sensor shows the wrong phase and the engine does not start. You need to remove the belt and check whether the mark on the pulley and the rear cover of the timing belt matches.
If not, then you need to turn the pulley (in rotation) until the marks match. The work is troublesome, you need to disassemble a lot of things to get where you need to, you also need to keep track of the marks on the camshaft and crankshaft, in general there is a lot of fuss.
Ignition coils
If everything possible has been checked, but the car won’t start, and you don’t want to take it to the service station until you’ve tried everything that you can try to fix it yourself, check the ignition module (coil).
First, let's check the wiring. We disconnect the block of wires from the coil, connect the middle wire to the plus of the multimeter (in voltmeter mode), and connect the minus of the multimeter to ground.
If, when you turn on the ignition, a voltage approximately equal to the battery voltage appears, then everything is in order with the power supply; we check the control circuits.
To do this, connect a multimeter to the middle and one of the outer wires of the harness and turn the crankshaft with the starter - a voltage of a couple of volts should appear, similarly with the other outer wire. If the wiring is normal, check the coil.
We switch the multimeter to ohmmeter mode, connect the tester to the middle and one of the outer terminals of the coil, if the circuit shows infinity, then that’s it - an open circuit. Same with the other extreme conclusion.
If everything is in order, we continue. We check the secondary winding - to do this, the coil must be removed from the engine and turned over. We connect the tester to the paired coil connectors - cylinders 1-4 or 2-3.
If it shows something other than infinity (should be something around 4 kOhm) then everything is fine, there is no break. Same thing with the other couple.
Replacing the mirror element
If you only need to replace the mirror element, the task becomes much easier. Sequencing:
- Use your hand to turn the glass to the upper right corner;
- Insert a screwdriver into the gap formed at the bottom so that its end gets between the mirror element and the rotating plate of the housing in the area of the latch (see section A-A in the diagram). The same can be done with your fingers if they fit into the gap;
- Carefully and smoothly press the mirror element away from the body until it comes out of the latch (a click will be heard);
- Repeat this action with the second latch:
- Press the element away from the remaining clips. This can already be done by hand;
- Remove the part.
Before installation, look and remember the locations of the clamps. Attach the element to the body and hold it with your palm (not your fingers) along the entire plane. With your other hand, press alternately on the locations of the clamps. The element should snap into place with characteristic clicks.
The diagram shows the right mirror element for the Mitsubishi Lancer. Changing the left one is done in the same way.
Removing the door trim
To gain access to the elements that fix the mirror, you first need to remove the door trim.
The sequence of actions is as follows:
- Removing the key blocking the lock.
- Removing the plugs.
- Sequentially unscrew the screws and screws holding the upholstery.
- To remove the upholstery, you need to insert a flat-head screwdriver wrapped in electrical tape into the groove between the upholstery and the door panel (but it’s better to use a special device). The clamps provide some resistance, but significant force during dismantling is unacceptable.
- The rods of the locking mechanism are removed, the upholstery is moved back to a distance limited by the length of the wires supplying the lifts.
- The wiring is carefully removed, after which the door trim is also dismantled.
How to glue a car mirror to the windshield
First we need to decide on the glue that we are going to use.
What glue should I use?
The main rule: the glue holding the interior mirror to the windshield must be two-component. Yes, there are many varieties of all-purpose glue. But in this case, universal glue will not work. The fact is that two-component glue perfectly withstands sudden temperature changes, high humidity, and most importantly, vibration. Conclusion: the mirror element should not be glued with universal glue.
There is a second option: use light-curing glue. This is a substance that quickly “sets” when exposed to sunlight. This glue can be purchased at specialized auto stores. But it has a serious drawback: to work with it, a powerful ultraviolet lamp is required, without which reliable bonding cannot be achieved. Some car enthusiasts claim that you can do without it, just sticking the mirror on a sunny summer day is enough. But such gluing cannot be called reliable.
The conclusion is simple: the best and least troublesome option for gluing a mirror is two-component glue. For example, Loctite 37438, which has become incredibly popular recently. By the way, it is sometimes used to glue DVRs that have a loose fastening device.
How to attach a mirror element
To keep the mirror securely on the windshield, you must follow the following algorithm:
- Select the location for installing the mirror. It should be glued in the center of the glass, at the same distance from both the passenger and the driver.
- The windshield is cleaned of dirt. First, this is done with a rag, then the surface of the glass is wiped with alcohol.
- The mirror is disassembled as indicated above (after all, in fact, only the bracket on which the mirror will be installed needs to be glued to the glass).
- A thin layer of glue is applied to the bracket and to the windshield. After this, you must wait at least 15 seconds. Glue is applied to the interior mirror bracket
- Then the bracket is installed on the windshield and lightly pressed down manually (and if you decide to install the mirror entirely, without disassembling, then after installation it must be additionally secured with tape, which will support the mirror until the glue sets). The interior mirror is glued to the windshield
- The glue must dry properly, so you cannot drive the car for 24 hours.
Mounting the Device on a Bolt-On Bracket
Not all modern cars have interior mirrors glued to the windshield. In some cases, the mirror bracket is attached the old fashioned way: with bolts to the ceiling. In this case, you need to act like this:
- The mirror together with the mounting bracket is installed in the ceiling niche and held by hand. The interior mirror is installed in a niche and held by hand
- Self-tapping screws are inserted into the holes and tightened using a Phillips screwdriver.
- Sockets with installed self-tapping screws are closed with plastic plugs (provided that such are provided in the design of the bracket).
Common device problems
Let's look at a few troubles that every car enthusiast may encounter.
Peeling off the mirror surface
Sometimes this kind of trouble happens even on new cars. The reasons can be very different.
- the manufacturer decided to save money and used a low-quality adhesive;
- during the work, the master did not allow the glue to set properly;
- the mirror came unstuck due to too sudden temperature changes (and this is the most common reason, especially in frosty winter).
In all these cases, the car owner will have to use two-component glue, as shown above.
Glass replacement procedure
The mirror element of both the exterior and interior mirrors may be damaged. Below is the sequence for replacing it:
- The glass is removed from the mirror body.
- The new mirror element has several plastic hooks (in our example there are 4). These hooks are inserted into the mounting holes in the mirror body, after which you need to press very carefully on the mirror element.
The new mirror element is installed into the mirror housing manually - A characteristic click will be heard, indicating that the plastic hooks have engaged and the glass has “settled” into place.
The procedure for replacing mirror elements in interior mirrors is similar to that given above (the only difference is that there are usually 2 plastic latches in the interior mirror, not 4).
Mirror for viburnum
The viburnum mirror often requires replacement. This is due to the difficulties of the first years of driving and the desire to install a more beautiful part. Replacing a side mirror is not a complicated process; the main thing is to be careful and follow a certain algorithm.
How to make a worthy choice?
Exterior mirrors are one of the most popular and essential parts of a car. Without them, it is impossible to monitor the situation and move along a busy highway. Side-view mirrors often require replacement, due to their high “trauma” during movement. Before work, you need to choose the best option for the mirror part. This could be a similar or more advanced mirror for Kalina. If difficulties arise when choosing, you need to familiarize yourself with the basic adjustment mechanisms.
The following types of mirrors are distinguished:
Ease of use depends on the choice of mechanism. The hinge type mirror element is the simplest. Many modern cars do not have it.
Lever control is based on a joystick or lever, which is located inside the cabin, and it is connected to the side part using a thin cable.
The electric mirror element is a modern mechanism. It is found in new cars and is equipped with a lot of additional features. Its use means comfort and safety.
Main advantages of the electric mechanism:
- increased visibility;
- anti-glare coating;
- heating;
- built-in turn signal backup.
Heated mirrors are modern developments that simplify the life of every motorist. Increased visibility allows you to better navigate city roads. This option reduces the likelihood of an accident by increasing the chances of noticing a dangerous moment. Finally, the clarity and appearance of this item is much better than the stock part.
The anti-reflective coating on the mirror on the viburnum allows you to reflect the sun and bright lights. The anti-dazzle effect maintains good visibility while driving.
Heated mirrors are a convenient option. Thanks to it, there is no need to scrape snow and ice from the glass. This is a very nice and convenient addition. Finally, a built-in signal repeater. This element of the Lada Kalina mirror allows you to notify all road users about upcoming maneuvers. This makes driving easier and safer.
When choosing the optimal mirror element for the Lada Kalina, you must take into account personal preferences. Naturally, we should not forget about convenience and safety.
Video
How to disassemble the side mirror on a VAZ 2110, see the following video:
Hello everyone, today there will be an article on replacing the mirror element of the exterior mirror on Kalina. Not long ago there was a comment on one post with a request to publish similar material, and now - I finally managed to make a visual aid for this repair.
So, we don’t need practically anything from a tool, a maximum of two screwdrivers: with a flat blade and with a cross-shaped blade. In principle, you can do this without removing the mirror from the car, but of course it’s more convenient to work with it removed.