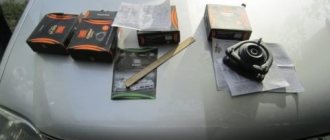
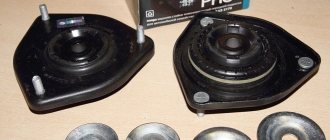
From about 24,000 km a buzzing sound appeared from behind, at first I didn’t pay attention, I thought about the tires, because before everything was driving in the snow, but then the sound, of course, came only from the left side. I took it for a spin and finally overcame my mother’s laziness, hung up the steering wheel, there is also a rustling noise (not to be confused with the bearings), and there is also a noticeable recoil. I also checked the right side, so far everything is fine. The case is no longer covered under warranty because the bearings are only 1 year old or 30,000 km whichever comes first, I've had the car for over a year. OD didn’t even think about any replacements, we ourselves have a mustache, we have enough tools, even skills, the procedure is simple and no one except me will lubricate it for the future. Of the bearings available in stores, only those from Vologda turned to import, having not the most successful experience in using their modern products. Personally, I am impressed by SKF, NTN, SNR. I didn’t find the last two right away, but SKF could be ordered from Emeks. Here I would like to draw your attention to the fact that this bearing can be found by two numbers - VKBA 1307 and BA2B633313C. The first set BA2B633313C and hub nuts, price 1480 RUR, the second only 660 RUR. Of course I ordered a second one) The bearing itself is absolutely the same as Samara, 10s, Priors, the first Kalina. A little about it from topic 8: Bearing 256706 Rear wheel bearing for VAZ 2108, 2109, 2110, 2111, 2112 cars. It has the following design features: ball, angular contact, double-row, closed type (seals on both sides). Having two rows of rolling elements, it is capable of fixing the shaft under axial load in both directions. There is a roller analogue of this bearing - 537906, it has a higher load capacity, but also a lower rotation speed.
Technical parameters and dimensions of rear wheel bearing 256706: Inner diameter (d): 30 mm; Outer diameter (D): 60mm; Width (H): 37 mm; Weight: 0.4 kg; Ball diameter: 9.525 mm; Number of balls: 28 pcs.; Permissible dynamic load: 30.1 kN; Static load capacity: 25.9 kN; Rated speed: 6500 rpm
They are produced simultaneously at four factories in our country: • JSC Saratov Bearing Plant (SPZ marking) - produces, according to experts, the best bearings for rear hubs in our country, and they are not very expensive. • 23 GPZ (or VBF, Vologda) - among motorists it is considered the best plant, but Saratov bearings are in no way inferior to them in terms of durability, are less likely to be counterfeited and are a little cheaper. • SPZ-4 (Samara) - produces products for the budget conscious. But if you need a high-quality rear wheel bearing, it is better to pay attention to the manufacturers presented above. • 20 GPP (Kursk) - currently not produced. SKF part number VKBA1307
Domestic bearings are manufactured according to GOST 520-2002, imported ones - according to ISO 15: 1998. According to the international designation system, this bearing has the number BA2B33313C.
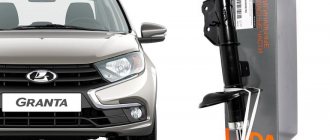
A few more words, our front bearing is not that cheap, I found it for SKF 1700 only in the store, and the most famous SKF VKBA 1414 bearing set + nut costs up to 2400! NTN can be found for 1200.
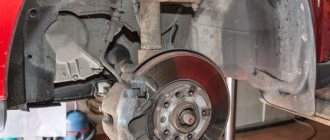
And now about the replacement itself. Loosen the hub nut, loosen it with a 30mm socket with a handle, remove the drum (2 guides screwed into 2 adjacent holes helped me), remove the ABC drive plate, completely unscrew the hub nut and remove the hub and bearing assembly from a hand pin or puller (2 or 3 feet).If someone's drum is already very worn and the side is not worn, you need to release the handbrake first. I was a little surprised, but my hub came off the axle quite easily by hand.
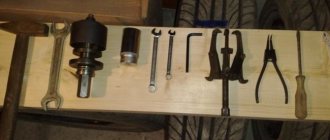
In order for the entire work process to go as quickly as possible and without unnecessary hitches, we will need the following tools:
Rear wheel bearing replacement tool.
- The head is taken at "7" and "30".
- Collar.
- Wrench or tube extension.
- Great hammer.
- Vice.
- Ratchet.
- Wooden block.
- Extractor with swing arm.
- Special pliers for retaining rings.
Step-by-step procedure for removing the hub
- First of all, when the car is still standing on its wheels (read more about the configuration of the bolts and the sizes of the standard wheels), you need to tear off the nut securing the hub.
We tear off the nut using a wrench with an extension.
- When the nut gives way and breaks, unscrew the four bolts securing the wheel and remove it.
- Having reached the brake drum, we inspect it for damage and disassemble it.
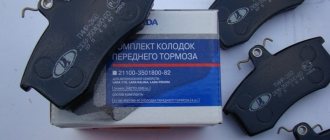
- Then, along the way, you can pay attention to the condition of the brake pads and brake cylinder; if there is a high degree of wear on the pads and there are stains on the cylinder, they should be replaced
- Further work on the hub is easier to carry out without brake elements.
- So, finally unscrew the hub mounting nut.
- Next, we put a special puller on the hub, grabbing the inner surface and resting the central rod against the drive shaft. We place it in this position.
- Then we begin to unscrew the central part of the extractor, thus removing the hub from its position.
- After a few turns it will easily rise from its place.
- This completes the work of removing the hub, disassembling and replacing the bearing.
Press the puller firmly to prevent it from slipping.
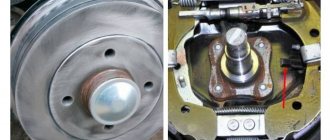
Here's what the hub and bearing assembly look like when removed.
Step-by-step procedure for replacing a wheel bearing
- We fix the hub tightly in a vice and check that everything is fixed in a stable state.
- When everything is ready, take pliers and remove the O-ring.
These pliers make it easy to give away the ring.
For greater smoothness, lubricate the area to be treated.
This is what the removed bearings and all elements look like.
The hub and retaining ring must be cleaned of dirt.
Work on installing a new part on a seat
- Coat everything generously with fat. (Please note that in this case it is impossible to save fat - approx.).
- Then we reassemble the hub in a vice, place the new bearing strictly in the center and lightly hit the housing with a hammer, or rather through a block, and put it in place. Once the bearing is aligned with the hub housing, it is easier to trim using the same 30-gauge socket. (When you work this way, you will be successful if you take your time and hit with light, alternating strokes - approx.).
The main purpose of this operation is to avoid breaking the new bearing.
You can also press the bearing into the hub using a long bolt and thick metal washers. The hub is placed in a vise and the bolt and washers are used as a press and tightened in a smooth and precise motion as the nut is tightened. (This method is not the easiest, but it is also relevant for carrying out this work - approx.).
It takes a lot of effort to press the bearing in this way.
If these rules are correctly and strictly followed, replacing the wheel bearing on a Lada Kalina can be done within 1.5-2 hours.
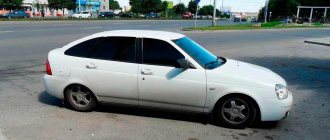
Lada Kalina Station wagon "Kalinka" › Logbook › Replacing rear wheel bearings
Good morning everybody. I decided to describe how I changed the rear wheel bearings. It all started, as I can say, I intuitively decided to check whether the rear wheels of my Kalinka were dangling or not. He came up and began to swing first one rear wheel, and then the other of the stationary car. And I didn't like how the car seemed to wobble from side to side. Then he lifted one wheel, then the other, and shook it. The result is kickback on both wheels. Upon inspection, the bearings did not rustle or hum. I discovered this by accident. The odometer reading at the time of inspection was 66,843 km. I decided to change. I went to the car market and bought SAMARA SPZ-4 bearings for 425 rubles. Many people bet on Vologda; I bet on Samara, I want to see how many kilometers to travel.
Bearing SAMARA SPZ-4.
We are starting to replace the bearings. I want to say right away that during the replacement, neither exhaust devices nor vices were used. Everything was done the old fashioned way on “knees” and birch forests. 1). I took off the steering wheel;
The factory bearings have not been changed, the factory paint indicates this. The nuts were not touched and this is a fact.
2). Unscrew the hub nut;
I had to build a lever.
3). He removed the sanitary pads; 4). I removed the hub by hand (I couldn’t even believe it), the seal was small.
There is factory marking paint.
I removed the hub assembly.
5). Removed the safety ring. I removed the old bearing with 32 heads.
I disassembled the bearing for analysis. Marking Vologda.
I disassembled the bearing with grease, there are no liners, no damage, no dirt. This means that he simply recycled his resource.
No shells, cracks, etc.
6). I washed the hub and pressed in a new bearing, having previously lubricated the seats with a thin layer of lubricant. Just in case, I checked the grease in the new bearing.
The new SAMARA bearing contains grease.
Pressing in a new bearing using a birch wedge and a race from the old bearing.
First, he pressed her against the chicken with light movements.
this is how I pressed it further using the old bearing holder.
7). I installed the safety ring with my own hands without tools, which means it’s possible. Eight). I installed the hub in place with the 32 head and then tightened it down with the hub nut. The estate was small. Maybe because I lubricated the seats.
Gently tap on the inner race of the bearing.
Everything is fine. The nut was tightened instantly, just like at the factory. From old tags.
Nine). We put everything back together in reverse order and check if there is any play. In my case it is not on both wheels.
Sliding bearing is used.
P.S. Now he finds, as they say, “three differences.” I went to the garage today to put things in order after fixing my car. I cleaned the bearings of grease and found the following differences, see below.
What does a bearing consist of?
The marking is embossed in a different font. Not visible in the photo.
The separators are made of plastic, of different colors and shapes, and are hardly noticeable.
One has a collar, the other doesn't. There are also several collars inside.
If you experience excessive noise or rumble from the rear wheel while driving (especially when turning - rough), the wheel bearing on the rear wheel may have failed. If similar symptoms are observed at the front, the front wheel bearing should be checked. It is quite simple to diagnose this problem; it is enough to make successive unscrewing movements on the suspended wheel, and if there is significant play, then it is time to change the bearing.
Replacing the rear wheel bearing on a Lada Kalina in this video:
Typical symptoms
This is the most interesting thing. In order to determine the failure of a node, there are several ways. At the very initial stage, the behavior of the bearing can be ignored; at this stage, a slight hum, buzzing, and small tapping noises can be heard. Also, one of the first symptoms is a hum when turning (at the very initial stages of a breakdown). This sound is often confused with tire noise. However, over time the sound can be compared to a jet plane. An indirect sign can be considered the complete disappearance of any noise at the moment of turning, but when the car moves in a straight line, everything returns.
Causes and consequences
If this is not done in time, it can lead to a minimum of sudden locking and uneven wear of the wheel and consequently further damage and, at best, can lead to a road accident.
In this article we will tell you in detail how to replace the bearing on the rear hub of a Lada Kalina car with your own hands in the garage.
Note!
Lada Kalina cars are equipped with a double-row ball bearing, which during operation does not require additional lubrication and adjustment, only to say that this device does not require any maintenance during operation.
What affects the resource?
The key factor influencing this parameter is lubrication. It is embedded inside a non-separable housing. The material is designed for the entire service life. Although on some domestic cars the element can be disassembled and serviced. Below we highlight several factors that can cause a wheel bearing to fail:
- Quality of roads. This is the main reason why this element fails. The fact is that the bearing does not have damping parts in its design and absorbs all the impacts from road irregularities. Accordingly, the higher the speed and the deeper the hole, the higher the risk of being left without a bearing. Yes, the design is impact resistant. But if this continues constantly, the element simply cannot withstand it and will crumble.
- Operating environment. Every winter, tons of chemicals are spilled onto the roads. As a result, the salt begins to corrode not only the body, but also the suspension parts. This also applies to the wheel bearing. Also, the element does not like exposure to water. This does not mean that the car should not be washed frequently or that it should not be driven in the rain. It is enough to periodically check the tightness of the protective cap and the presence of lubricant under it.
How to check the serviceability of a wheel bearing? There are several ways to do this. We will tell you about each of them in more detail.
Preparing to replace the bearing
In order for the entire work process to go as quickly as possible and without unnecessary hitches, we will need the following tools:
Rear wheel bearing replacement tool.
Step-by-step procedure for removing the hub
- First of all, when the car is still standing on its wheels (read more about the configuration of the bolts and the sizes of the standard wheels), you need to tear off the nut securing the hub.
We tear off the nut using a wrench with an extension.
Press the puller firmly to prevent it from slipping.
Here's what the hub and bearing assembly look like when removed.
Step-by-step procedure for replacing a wheel bearing
- We fix the hub tightly in a vice and check that everything is fixed in a stable state.
- When everything is ready, take pliers and remove the O-ring.
These pliers make it easy to give away the ring.
For greater smoothness, lubricate the area to be treated.
The hub and retaining ring must be cleaned of dirt.
Work on installing a new part on a seat
- Coat everything generously with fat. (Please note that in this case it is impossible to save fat - approx.).
- Then we reassemble the hub in a vice, place the new bearing strictly in the center and lightly hit the housing with a hammer, or rather through a block, and put it in place. Once the bearing is aligned with the hub housing, it is easier to trim using the same 30-gauge socket. (When you work this way, you will be successful if you take your time and hit with light, alternating strokes - approx.).
The main purpose of this operation is to avoid breaking the new bearing.
It takes a lot of effort to press the bearing in this way.
If these rules are correctly and strictly followed, replacing the wheel bearing on a Lada Kalina can be done within 1.5-2 hours.
Removing the hub from the car axle shaft
So, the first step, when the car is still on wheels, is to rip off the hub nut by first prying up and removing the protective plastic cap in the center of the wheel.
We also tear off the wheel rim bolts, and after lifting the car with a jack, we finally turn them out. In principle, the pads do not need to be removed, but I carried out the work when they were no longer there. Unscrew the rear hub nut completely, as shown in the photo:
Then the fun begins. It happens that even with a little hand effort, pulling towards yourself, the hub can be removed from the axle shaft without any problems, but this does not always happen, fortunately. The ideal option for dismantling is to use a special puller with rotary grips. We put it on the hub, grabbing it by the inner part and tighten the central rod of the puller with a wrench, thereby pulling the hub off the axle shaft.
As a result, after a few turns of the bolt, everything can be dismantled without any problems. The final result can be seen below:
There doesn’t seem to be anything difficult with removal, but then it will be a little more interesting, especially without a bearing puller.
Method number 3
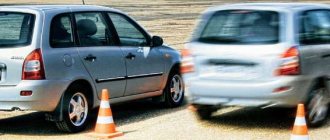
In this case, we will need to apply emergency driving skills. The advantage of this method is that we do not need to look for a long stretch of road and accelerate the car to high speeds. But the evenness of the coating is also important. So how do you check a wheel bearing? We accelerate the car to 20-30 kilometers per hour and begin to sharply turn the steering wheel left and right. This way we will check how much the car body rolls. The skid should increase if the wheel bearing is faulty. All this will be accompanied by a characteristic hum. On turns it intensifies significantly.
Also, in this way we can determine which side the element is faulty on. When turning right, the load goes to the left bearing (since the body moves in the opposite direction). But you can find out whether it is a rear element or a front one only on a lift.
Review of manufacturer prices for front and rear hinges
How to choose and buy quality parts
Service center specialists strongly recommend purchasing consumables and components exclusively from specialized stores, representative offices, and official dealers.
To a lesser extent, you need to use the services of unverified suppliers who sell spare parts at an unusually low cost.
When purchasing, check the catalog numbers with the actual data specified in the operating instructions for the technical device. If such a brochure is not available, consult a specialist.