- Information
- Note
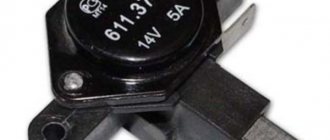
Designation: 897.3702 (analogue TRT5)
Applicability: VAZ-2170, VAZ-2171, VAZ-2172, VAZ-1117, VAZ-1118, VAZ-1119 “Kalina” and others with generators 9402.3701-14, 9402.3701-06 .
Multifunctional voltage regulator with brush assembly 897.3702 is designed to automatically regulate the voltage at the generator output within specified limits in all operating modes of the electrical equipment system, when changing the generator rotor speed, electrical load, and ambient temperature.
Design Features
- To smooth out transient processes and reduce mechanical loads on the generator drive belt, the voltage regulator has the functions of smooth excitation of the generator and a smooth response to a connected electrical load with a maximum duration of 2.5±0.5 seconds.
- The voltage regulator provides the ability to lightly indicate generator set faults by high and low voltage at the generator output, low voltage on the generator phase (for example, in the event of a break in the generator drive belt), as well as in the event of a short circuit in the excitation circuit.
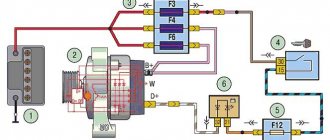
Generator connection diagram for Lada Priora VAZ-2170, 2171 and 2172
Lada Priora VAZ-2170, 2171 and 2172 are equipped with a generator 5102.3771 with the following characteristics:
- Maximum output current at 14 V = 80A
- Adjustable voltage, Volts = 13.8–14.4
- Power density = 205 W
- Generator weight = 5.4 kg.
The figure above shows a wiring diagram for the generator on the Priora , here is its explanation:
1 – battery;
3 – main fuse block;
4 – ignition switch;
5 – mounting block;
6 – battery fault warning light
The voltage to excite the generator when the ignition is turned on is supplied to the “D+” terminal of the regulator through the battery warning lamp No. 6 in the instrument cluster. After starting the engine, the excitation winding is powered by three additional diodes installed on the generator rectifier block. The “W” output of the generator is not used on Lada Priora cars. The operation of the generator is monitored using the battery warning light located in the instrument cluster. When the ignition is turned on, the lamp should be on, and after the engine starts, it should go out. If the lamp does not go out after starting the engine, you need to take a multimeter in your hands and check the presence of voltage supply to the on-board network from the generator.
Source
general description
In principle, the Priora generator is not bad. But its power is not enough on luxury models with installed air conditioning. You may hear advice to install an additional diode bridge. But, unfortunately, this option is suitable for those who understand electrical circuits and are comfortable with a soldering iron. The easiest way is to install a three-level voltage regulator. First you need to check the operation of the generator. Measure the voltage at the positive terminal of the generator and the battery terminals. Without load, the voltage should be at least 13.8 volts, under load - at least 13.5. An ideal option at low temperatures in winter is 14.8-14.3 volts. If there is a difference in the readings, then the contact at the generator output should be cleaned. This can be done with a wire brush or sandpaper. If the parameters are below acceptable values, then you should check the condition of the brushes on the generator and think about replacing the voltage regulator.
Which generator is better to install?
Regardless of which generator is installed on the Priora, the owners of these cars often replace the unit due to the fact that not all devices allow connecting various equipment to the on-board network. Which manufacturer is good and which device is better to install on the Lada Priora?
You can supply generators of the following brands:
- BATE 90 ampere;
- KZATE 115a;
- BOSCH 120 amp;
- devices manufactured by VAZ for 120 or 115a.
Generator unit for Priora
In principle, other models of generator devices for domestic cars can be found on sale. When purchasing, the main thing is to check the integrity of the unit so that there are no signs of damage on the body. It is better to use high power so that there is a power reserve, thereby the device will last longer. In addition, it should be taken into account that it is not recommended to install less powerful generators, especially if many devices are connected to the vehicle’s on-board network.
Air conditioning systems
One of the consumers is a heating device. It is part of the climate control system. A control controller works with this system. The work is automatic. The driver only sets certain parameters.
On cars, the electrical circuit of a VAZ Priora may contain air conditioning systems. After pressing the button, the relay is activated, the compressor is turned on, power is supplied to the electromagnetic clutch, and the pump is turned on. The air conditioning turbocharger begins to rotate, creating pressure, and begins to regulate refrigerant through the system.
parking lights
For example, the electrical circuit of a Lada Priora station wagon has the function of both automatic and manual activation of side lights. The activation itself occurs after turning the handle for the side lights and headlights on the dashboard. The contact is triggered and the lights turn on.
The circuit contains fuses that serve to protect against overvoltages and short circuits. Power is supplied to a lamp located on the dashboard. To adjust the brightness of the lights, a special regulator located on the lighting control module is used.
The headlight design of the Priora differs from other cars. The electrical circuit of the VAZ Priora contains a light sensor, as well as a lighting control unit. After turning on the ignition and the lighting control button, the electronic unit responsible for lighting control is activated.
If there is not enough light outside, the unit receives a signal from a sensor located on the windshield. There is also a rain sensor there. After receiving such a signal, the electronic control unit supplies power to the electromagnetic relay coil. Power is supplied to the headlights.
Catalog brands
- home
- Contacts
- Delivery
- Payment
- Guarantee
- About Us
For wholesale buyers
- For regular customers
- Guarantees
- Purchase returns
- Working hours:
Mon-Fri: 08:00-20:00, Sat-Sun: 10:00-18:00 - Phones:
+7-906-340-88-71 - OGRNIP
305631907700016
This information resource is not a public offer. The availability and cost of goods please call. Manufacturers reserve the right to change the technical specifications and appearance of products without prior notice.
Source
Anchor malfunction.
Another common malfunction of a modern generator is wear of the armature slip rings. This is due to their small diameter and high armature speeds. On old-style generators, the rings had a larger diameter, and the armature rotated at a lower speed and therefore were less subject to wear, but the wires of the armature winding could fall off in them, which also leads to malfunction. To check, you can connect a test lamp in series with the power source and slip rings, or measure the resistance between them. The lamp should be lit when connected, and the resistance value should be about 0.5 - 2 Ohms. Upon visual inspection, the slip rings should not be worn.
All these recommendations are just a small part of the malfunctions that most often occur in operation. If the check fails to determine the malfunction, you must contact the service for a complete, professional diagnosis and repair of the generator.
“If you notice an error in the text, please highlight this place with the mouse and press CTRL+ENTER” “If the article was useful to you, share the link to it on social networks”
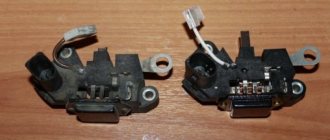
Replacing Priora generator brushes
The relay regulator is made together with brushes. At first I removed the generator to replace the relay regulator, but this task turned out to be quite labor-intensive due to the inconvenience of its location, especially the Priora with air conditioning and the hose prevents me from doing this. The second time I did not remove the generator.
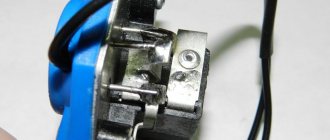
I disconnected the wires. I took off the back cover, it is secured with three latches on the sides, you just push them out and the cover can be easily removed
Removing the relay regulator was also not difficult, just unscrew the two mounting bolts and disconnect the connector from the relay regulator contact.
Putting everything back together wasn't too difficult either. The photo shows the relay regulator after I trimmed the contacts with sandpaper and then put it in place. It turned out to be in working order, but I had already purchased a new relay regulator. For some reason, brushes often fail, especially when you encounter this problem in winter, apparently this is due to high energy consumption due to the heater and loads when starting a cold engine.
And now when the prior generator does not charge, I first check the brushes
Regulator replacement
Replacement will not be difficult.
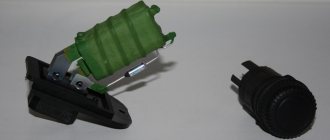
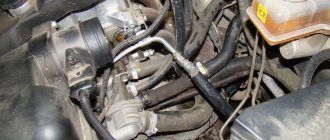
The only difficulty is getting to the generator, since air conditioning pipes are laid in this area. But if you get the hang of it, replacing the regulator won’t take much time. Before starting work, disconnect the battery terminal to avoid short circuit. Then we disconnect all the wires that go to the generator and remove the rear plastic cover of the generator. We remove the old charging relay.
On the new regulator, it is necessary to replace the “mother” terminals with ring terminals. We install the new regulator on the generator and screw the terminals to the same contacts as in the case of the old relay. It is very important to install the ring evenly on the positive terminal of the generator and be sure to place a textolite washer between the bolt head and the ring terminal. Otherwise, there is a chance of burning the generator stator. If you don’t have a washer on hand, you can make a plastic plug for screws from the cap.
We put everything in its place and rejoice at the result.
Removal and installation instructions
As practice shows, the main reason why a unit fails is the connection of various electronic devices to the car’s on-board network. Many energy consumers need high voltage generators. Therefore, when purchasing a node, you need to consider how many devices will connect to it. If you take a 115A or 120A mechanism, this will be the most reasonable choice for cars “stuffed” with electronics.
Find out more about dismantling and installation below:
- To perform the work, you will need a 13 key. First of all, you need to disconnect the battery.
- In accordance with the operating instructions, dismantle the mechanism drive belt. After this, you can disconnect the wiring block from the D+ connector on the device.
- Then you will need to move the rubber boot and unscrew the nut. Having done this, you can disconnect the wiring from the terminal pin.
- After these steps, unscrew the nut of the screw of the lower clamp of the assembly to the special bracket. The nut itself can be removed with a spacer sleeve.
- Next, remove the retaining screw. After this, the nut securing the assembly to the upper mount can be completely unscrewed. The adjusting screw also needs to be completely unscrewed, then remove the tension bar.
- After completing all these steps, you can remove the mechanism from the machine. The unit is being repaired with the replacement of all necessary elements. After the repair is completed, the generator can be put back in place; the installation procedure looks identical to dismantling, only all steps are repeated in reverse order. After installation, it is necessary to adjust the strap tension. If the belt is not adjusted, this may cause the mechanism to malfunction. After all the actions completing the repair procedure, the tension bar fixation nut must be tightened to a torque of 20 Nm.
How to test the generator regulator relay. Do it yourself, using a multimeter. Very simple
Problems of “undercharging”, as well as “overcharging” of the battery in principle, can be caused by many reasons, but the very first and most common on many cars (our VAZs are no exception here), as well as on many motorcycles, is the output of the generator relay-regulator from building.
This device, despite its compactness, will protect your battery and make its service life much longer.
However, if they fail, it can simply kill the battery in a matter of weeks, so if you see white streaks, and also, the engine does not start after night, even the starter does not “turn” - it’s time to check the relay regulator of your car, and here’s how it works do it yourself, and today I’ll tell you in detail...
No recharging of Lada Priora battery (VAZ 2170, 2171, 2172)
Checking electrical equipment
| See all advertisements in the archive |
| 1. Check if the alternator drive belt is broken. If a break occurs, replace the belt and adjust its tension (see “Replacing the alternator belt”). |
| 2. If the belt is intact, check and, if necessary, adjust its tension (see “Generator belt tension”). |
| 3. If the belt tension is normal, check to see if fuse F1 in the fuse and relay mounting block has blown. The location of the fuses and their ratings are indicated in this manual (see “Electrical faults”), in the vehicle repair manual, in the electrical diagram, on the housing of the mounting block and on the fuses themselves. If the fuse is blown, replace it, start the engine and check to see if the low battery light goes out. If the light goes out, you can continue driving. |
5....to the starter...
| 4. If the battery discharge lamp does not go out, check the wires connected to the positive terminal of the battery... |
| 6. ...and to the generator. Wires may be broken, broken inside the insulation, or have oxidized or unreliable contacts. Correct the problem and start the engine. If charging current appears, you can continue driving. |
| If, after taking the measures, the charging lamp continues to light up while the engine is running, then the possible cause of the malfunction lies in the generator itself. There may be several reasons, and it is better to eliminate them in a car service center or garage, and you just have to hope that the energy reserve in the battery is enough to get to them. |
| Recommendation |
| In order to reduce current consumption when driving a car with a faulty generator, if possible, turn off the radio, unnecessary lights, heater fan, window defroster, etc. |
| You will need: flat-blade and Phillips-blade screwdrivers, a 12" wrench (two), a DC voltmeter, a megohmmeter. |
| 1. Remove the rubber boot and connect the “+” wire to the “B+” terminal of the generator, and the “–” wire to the generator housing. |
| 2. Start the engine and turn on the car's headlights. |
| 3. After 15 minutes of engine operation at medium speed, measure the voltage; it should be in the range of 14.4–15.1 V. If undercharging or overcharging is observed (the voltage does not fall within the specified limits), replace the voltage regulator. |
Description Identification numbers Keys Dashboard Instruments Trip computer Heating and ventilation Ventilation control Lock control Control of power windows Using seat belts Airbags Child seat Adjusting seats Adjusting the steering column Using mirrors How to shift gears What to carry Starting the engine Malfunctions when starting the engine Checking the ignition Checking the fuel supply Injection faults Lost idle If the engine runs unevenly Inspect the spark plugs Jerks while driving Does not accelerate Stalls while driving Loss of oil pressure Engine overheats No battery recharging Engine knocks Suspension knocks Gearbox knocks Causes of knocks and noises Steering wheel vibration Brake problems Replacing a wheel
priora-vaz.ru
Three-level voltage regulator Priora 115a
what do we have? Send us a link, we will take a look and offer the same, and possibly lower, price.
Designed to replace the standard voltage regulator built into the generator in case of its unsatisfactory operation or failure.
Extends battery life.
Allows you to set the optimal battery charging mode depending on the ambient temperature and operating conditions.
Allows you to recharge the battery when the car is parked for a long time or when it is discharged for other reasons.
Specifications:
Setting voltage, V: Three levels: 13.6 – low, 14.2 – nominal, 14.7 – high
Generator types: 3002.3771, 332.3771, 3202.3771, 3212.3771, 4302.3771, 94.3701, 9402.3701, 9422.3701, 3740.3771-38, 3743.3771-61, 3747. 3771-93, eld-a-21214, LG01214
Attention! Prepayment is required for this product
Hello people! In general, there was a well-known problem with the KZATE 115A generator with a voltage regulator; when the speed was lowered, the voltage dropped to 12 for a couple of seconds. In general, as expected, the Chinese LV replaced it, all the voltage drops disappeared. I also threw in a dubbing of 50 kg (I forgot to say that there was a loss of voltage to the generator, it gave 13.8 at idle, and 13.1 came to the battery, so I decided to throw dubbing at the same time) In general, there are no voltage surges and now the gene outputs 14.5 and under full load 14.1 also comes to the battery. The question is that everything seems to be fine, but sometimes when you turn on the heated rear window and press the power windows up (not every time, but I noticed it twice) the battery light on the panel came on for seconds, maybe it’s that the blades just haven’t gotten used to it yet? (RN comes with a brush assembly if anyone didn’t know) thanks in advance
Well, they made my baby
by Adminrive · Published 10/16/2014
Be afraid bitch
by Adminrive · Published 03/12/2015
At least something new
by Adminrive · Published 02/16/2017
4 comments
Yes, they haven’t gotten used to it yet... because the anchor is not new.....
clean the fuse on the generator....then the terminals with fine sandpaper....and also clean the fuse on the body and engine.....and remove this dubbing, everything will be fine
Yuri, where is the fuse for the generator? Otherwise, it doesn’t interfere with dubbing and it will obviously be better with it)
Stas, it's in a black box next to the battery
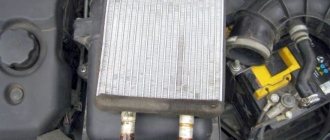
The actual question is in the table of contents of the topic. Below is a photo of the voltage readings without load, with full load and the appearance of the viburnum brushes themselves.
Why did it happen so?
Perhaps the automatic requests do not belong to you, but to another user accessing the network from the same IP address as you. You need to enter the characters into the form once, after which we will remember you and be able to distinguish you from other users exiting from this IP. In this case, the page with the captcha will not bother you for quite a long time.
You may have add-ons installed in your browser that can make automatic search requests. In this case, we recommend that you disable them.
It is also possible that your computer is infected with a virus program that is using it to collect information. Maybe you should check your system for viruses.
If you have any problems or would like our support team, please use the feedback form.
What does it look like and where is it installed?
Now let's find out where the VAZ-2107 charging relay (carburetor) is located. Initially, this device was placed away from the generator on the arch under the hood (on the left side). On newer “sevens” equipped with an injection system, the voltage regulator was combined with a brush assembly.
The first voltage regulators were based on electromagnetic relays; they worked quite slowly and required constant intervention. The problem is that mechanical elements wear out very quickly. In addition, it was constantly necessary to adjust the gaps in the relay. Modern semiconductor devices operate silently, quickly, without electromagnetic relays. One silicon crystal can perform the functions of several mechanical relays.
( 2 ratings, average 4.5 out of 5 )
Which TRN is suitable for LADA
| Generator, article number | Automobile | TRG, article number |
| 26.3701, 37.3701, 371.3701, 372.3701 | VAZ-2107, -2108, -2109, -2110, OKA | 67.3702-01 |
| 3002.3771, 332.3771, 3202.3771, 3212.3771, 4302.3771, 94.3701, 9402.3701, 9422.3701, 3740.3771-38, 3743.3771-61, 3747.3771- 93, eld-a-21214, LG01214 | VAZ, GAZ | 67.3702-02 |
| 4052.3701, 409.3701, PRAMO “ISKRA” 5102.3771, -10, 5112.3771, -10, 5122.3771, -10, -30, 5142.3771, AAK 5727 | VAZ, GAZ, UAZ with generators PRAMO “ISKRA” 5102.3771, 5122.3771 | 67.3702-04 |
| G222 | VAZ-2104, -2105, -2107 | 67.3702-09 |
| 26.3701, 37.3701, 371.3701, 372.3701 | VAZ-2107, -2108, -2109, -2110, OKA | 67.3702-11 |
| 3002.3771, 332.3771, 3202.3771, 3212.3771, 4302.3771, 94.3701, 9402.3701, 9422.3701, 3740.3771-38, 3743.3771-61, 3747.3771- 93, eld-a-21214, LG01214 | VAZ, GAZ | 67.3702-12 |
| generators with an additional three diodes, the excitation winding of which is connected to the positive circuit | 673.3702 |