The Lada Granta ignition module is an important component of the ignition system in a car. The main purpose of the product is to supply high voltage to the spark plugs, which in turn produce a spark to ignite the air-fuel mixture in the car engine.
In cases where the module is damaged or inoperable, engine malfunctions occur (misfires, fuel in the cylinders does not ignite, engine tripping and other troubles).
Sequence of actions to independently replace the ignition module on a Lada Grant
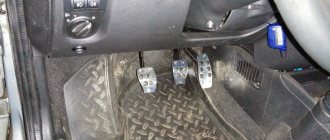
- We install wheel chocks on the rear row of wheels for safety purposes.
- Using a key set to “12”, unscrew the terminals from the battery. It is enough to turn off the negative power, but experts recommend both.
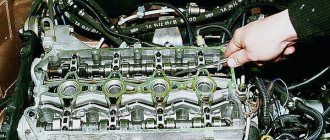
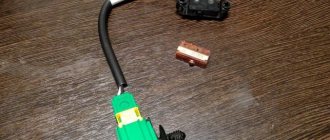
- In the center of the engine compartment we find the contact chip for the ignition module. It is held on by a special latch. We unclip it and take it out.
We detach the contact chip
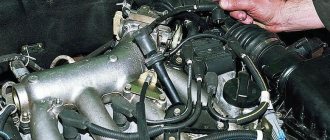
- Disconnect the four high-voltage wires from the coil module. We hold it by the rubber base and remove it from its seat.
- By analogy, disconnect the remaining three wires.
Disconnecting the wires
- Unscrew the four screws with a Phillips-head screwdriver and remove the ignition module of the Lada Granta 8-valve. It is placed on a metal bracket.
Link on topic:
Tuning Lada Granta: bringing the car closer to ideal
Removing the ignition module
- We remove the module.
Afterwards we carry out troubleshooting, diagnostics, and inspect the seat. We install the new module and assemble the mechanism in the reverse order.
Replacing the ignition module on the Lada Grant is completed.
Note to the driver! During the assembly process, be extremely careful and follow the order in which the high-voltage wires are connected to the module. Inconsistency in “polarity” leads to unstable operation.
Repair
Before checking the cover or other structural elements, you need to prepare for repair work. Repairing the cover, replacing the distributor oil seal and other tasks to restore functionality are carried out after setting the marks. How to set marks - marks are applied to the device body, its cover, as well as the drives of auxiliary elements - this will allow you to maintain the required ignition timing without adjustment. Also, before removing the assembly, mark the position of the wires that go to the spark plugs, since if you mix them up during further installation, this may lead to damage to the mechanism.
As for the repair itself, it is performed like this:
- After dismantling the device, the cover is diagnosed. If you notice that it is broken, then it will have to be replaced with a functional one.
- Next, you need to check the distributor slider - it needs to be changed if the fuse has melted or rust and fumes have appeared on the element.
- After these steps, the dust shield is dismantled - first, the voltage terminal is removed, after which the two bolts securing the Hall sensor support plate are unscrewed, and the plate itself is also removed after these steps. Having done this, remove the retaining ring from the plate pin, unscrew the bolts securing the vacuum corrector, and remove the component itself. Then the support plastic is pulled out and its bushing is diagnosed - there should be no signs of damage on it.
- Next, remove the spring ring that secures the coupling pin. If you see that the condition of the ring is sad, it needs to be changed, because otherwise it will be of no use. Next, you need to knock out the pin from the coupling - it can only be replaced if the pins have worn out.
- Many car owners are interested in the question of how to check the capacitor. This element can also fail, so check the capacitor first. You will need to prepare a multimeter. Diagnostics is carried out by a tester.
- A centrifugal control device with a roller is removed from the structure. The distributor is replaced if there are gaps, signs of wear and other damage (the author of the video is Roman Romanov).
Ignition system malfunctions, solutions
| Symptoms of a problem | Remedies |
| Intermittent engine idling | Unit dismantling, diagnostics, replacement with a new one |
| When driving “downhill” the engine does not have enough power and “asks” for a downshift | Checking the cleanliness of the fuel filter, ignition diagnostics |
| Difficulty gaining speed | Checking the serviceability of the fuel system and ignition system |
| Detonation (friction) of the power unit | Replacing coils, cleaning fuel equipment |
| Jerks when accelerating | Checking the serviceability of the fuel system, spark supply |
Diagnostics of the distributor runner
The slider is replaced if this element can no longer perform its functions. You may need a multimeter for diagnosis.
How to check the slider at home, several options:
- The multimeter probes must be installed in the place where the slider itself is connected to the coal at the point of breakdown. To identify a breakdown, you need to carefully look at the device - the spark will go either completely to the side, or only partially. But it should be borne in mind that a breakdown cannot always be determined.
- Another diagnostic option is to test the device using a central cable type. You will only need to dismantle the cover itself, then bring the high-voltage cable from the reel to the distributor, then try to start the engine. When cranking the starter, if the distributor is broken, the spark will start to jump. If there is no slippage, then you don’t need to look for the cause of the problem here.
- If there is a crack on the runner, the spark will go to the side. In the event that the resistance of the element is completely burned out, but an attempt to restore the conductor could occur. In turn, this could lead to electrical breakdown of the element and its complete failure. In this case, it must be completely replaced.
After the repair, the distributor is adjusted. The adjusted mechanism is put in place; during installation, it is important to correctly match the marks and connect the high-voltage cables. The procedure for adjusting the ignition as a whole may differ depending on the vehicle, and there may be several adjustment options.
Sequence of actions for self-diagnosis of ignition on a Lada Grant
- To check the module, connect the terminals (crocodiles) of the multimeter to the central terminal of the wire block. We activate the ignition, the tester shows the voltage, which should be close to 13 - 14 V.
Check
Note to the Driver! If there is no voltage on the central harness, then look for the cause of the malfunction in the electrical wiring connecting the coils and the contact group of the lock.
- To diagnose the health of the control circuit, we use a probe with a 2 W lamp. We connect the tester terminals to the outputs of the block. If there is no damage to the circuit, the lamp will flash.
Tester with a lamp
By analogy, we take measurements on the remaining three pads.
- To check the proper operation of the coil, first disconnect the block with the high-voltage wire harness. We connect the terminals to the extreme outputs and measure the voltage.
Voltage measurement
To check the secondary winding, we connect the tester to the coil according to the scheme: 1 – 4 / 2 – 3 cylinders.
In good condition, the coil will show a resistance of 4.0 Ohms. Gravity towards infinity is the first sign of circuit damage.
We check the spark plugs according to the following scheme: unscrew them from their standard place, put on the cradles, start the engine. In good condition, a spark jumps between the electrodes.
We replace faulty parts with new ones.
Examination
The ignition coil can be checked in two ways: using a diagnostic tool and using a multimeter.
The diagnostic device provides 100% information about the condition of the part, but this method is not always affordable for many Grant owners. Therefore, many people check the coil using a conventional multimeter.
Checking the coil with a multimeter
The video below details how to test an ignition coil using a multimeter.
Addresses of companies providing ignition replacement services (Moscow, St. Petersburg, Kyiv regions)
| № | Name | Address |
| 1. | "EuroSTO on Motorny" | lane Motorny 3, Kyiv |
| 2. | "AUTO" | st. Krasnotkatskaya, 42-E, Kyiv |
| 3. | "Vilgud car services in Moscow" | lane Seversky, 24 - 125 |
| 4. | "Car service 24 hours" | Moscow, 2nd Vyazovsky pr-d, 4 building 5 |
| 5. | "Car service Person" | St. Petersburg, Kurskaya st. 28 m. Obvodny Canal |
| 6. | "PIT STOP" | PARNAS, SH. VYBORGSKOE, 33, ETC. MARSHAL BLUCHER 41 BOLSHEVIK Ave. 10 ETC. ISKROVSKY, 7 |
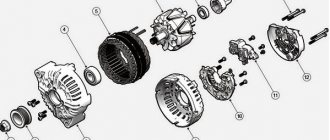
Distributor VAZ 2108-09
The PR on front-wheel drive VAZ cars with a carburetor engine is of the contactless type; it is fundamentally designed in the same way as the contactless distributor on the Classic, but has its own design features and looks completely different in appearance. The shaft of the VAZ-2108 distributor is short, it is driven directly from the camshaft, and is installed on the cylinder head.
List of online stores selling reels (Moscow, St. Petersburg, Kyiv regions)
| № | Name | Address |
| 1. | "AUTOKLAD" | https://www.autoklad.ua/ |
| 2. | "AUTOKLONDAYK" | https://autoklondayk.com.ua/ |
| 3. | "PITBIKECLUB" | https://pitbikeclub.ru/ |
| 4. | "ASTARTER" | https://www.astarter.ru/ |
| 5. | "AUTOPRIWOS" | https://www.autoprivos.ru/ |
| 6. | "DENSO" | https://www.denso-am.ru/ |
Related link:
Tips from experts on replacing the thermoelement in the Lada Granta thermostat
Brand tour
A significant number of OEM reels are in fact produced by the companies that will be listed. This does not mean that there is no point in taking the original. Rather, you gain time by almost immediately selecting the spare part you need, installing it and getting back on the road.
Of the expensive goods, it is worth paying attention to those that are in boxes with the names of the following companies : Valeo (France), Beru (Germany), Magneti Marelli (Italy). The quality of the coils from these companies is very high, but the price, as they say, is steep.
Coils from these companies are very popular: Bosch (Germany), NGK (Japan), Tesla (Czech Republic).
A budget solution can be reels from the Czech company Profit, as well as the well-known Danish JP Group. They will have to be replaced more often than more expensive devices, but even in this case their purchase will be profitable.
Review of manufacturers, article numbers of coils for 8 (16) valve Lada Granta
| Catalog article / OEM | Price, rub.) | Pump mileage (thousand km) |
| Coil BREMI 20466 | From 1300 | 85 – 95 |
| MEAT & DORIA 10573 | —/— | —/— |
| NGK 48336 | —/— | —/— |
| U5116 6545432 | —/— | —/— |
| NGK 48312 | —/— | —/— |
| U2065 5646534 | —/— | —/— |
| (module) SOATE 2111-3705-03 | From 950 | 55 – 65 |
| MZATE-2, article number 3705010-01 | —/— | —/— |
| FENOX IC16004O7 | —/— | —/— |
| SOATE 3705-03 | —/— | —/— |
| MZATE-2, 4601.3705 | —/— | —/— |
| RENAULT/LADA 3705010-03 | From 1100 | 65 — 75 |
*prices are current as of November 7, 2018.
Another online store selling spare parts for the ignition system:
- Ignition coils
- Glow plugs
- Denso spark plugs
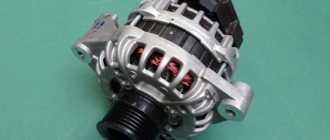
Coil purpose
The main job of the ignition coil on a Grant vehicle is to generate a reliable and powerful spark at the plug that effectively ignites the fuel mixture in the combustion chamber. A huge voltage is generated in the coil, which can reach 40 kV, which is a lot, for example, in a regular household outlet there is only 220V.
The ignition coil is also called the ignition module; both names for this part will be correct.
Reviews
| № | Positive |
| 1. | Victor: I’ve been driving Grant for the second year, no complaints, the ignition works properly. Even in winter the car starts with a half turn. |
| 2. | Vasily: I strictly adhere to the manufacturer’s recommendations, carry out scheduled technical inspections, and buy original consumables. |
| 3. | Gennady: at 50,000 km the spark plug of the second cylinder failed. I don’t consider this a defect, since the deadline for domestic parts is quite acceptable. |
| 4. | Ignat: I’m pleased with the build quality of the Lada Granta; for a budget car it’s very good. Minor flaws are always present, but they can be eliminated. |
| 5. | Vitaly: during the next maintenance, the mechanic pointed out the need to replace the spark plugs. Relatives traveled 65,000 km. The store advised me to buy BREMI 20466. I've been driving it for two months, no complaints. |
| 6. | Igor: in two years of driving the Lada Granta, I replaced several spark plugs once, and there were no more breakdowns. I believe that careful treatment of the car and original parts are the main factors that ensure long service life. |
| 7. | Vasily: I’m happy with my car, it hasn’t let me down once in two years, I haven’t made any investments other than scheduled maintenance. |
| Negative | |
| 1. | Victor: the first time the ignition module flew for 45,000 km, it was replaced under warranty. Second time at 75,000 km. I bought BREMI 20466 in the store. The cost is 300 rubles more, but the quality is good. |
| 2. | Gennady: I do not recommend purchasing a domestic Lada Granta. The car is crude, there are many flaws and defects. I am considering the option of Renault Logan. |
| 3. | Dmitry: I’m dissatisfied with the car, there are a lot of comments, shortcomings, there is a defect. |
Related link:
Replacing the clutch sensor on the Lada Grant: expert advice
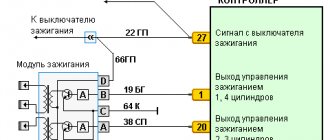
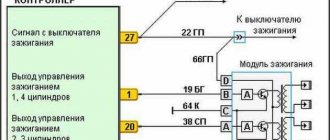
Wiring diagram
Many people wonder how to connect high-voltage wires; most often this question arises after replacing spark plugs. It is necessary to connect the wires in strict sequence, but if they are mixed up, the car may not operate correctly or may not start at all.
To connect the wires correctly, you need to know the cylinder counting order. On the Grant, the cylinders are counted from the timing belt from left to right, that is, the leftmost cylinder will be number one, and the rightmost cylinder will be number 4.
There are 4 pins on the coil, which are marked with numbers. Each number indicates a cylinder number. The wire of the first terminal should be connected to the spark plug of the first cylinder, etc.
Visual inspection of the IKZ
When visually inspecting an element, you will need to carefully examine the surface of its body; this is necessary to identify chips, cracks and burnt areas on it. In order to remove the IKZ from the engine, use a 10mm socket wrench or Torx E8 (this depends on the engine model).
After removal, carefully inspect each coil, paying special attention to the absence of melted areas and leakage of plastic, as well as the condition of the rubber cap and the correct location of the spring located in the inside of the coil. If any defects are found during a visual inspection, the part will need to be replaced. If they are absent, you can start checking the IKZ with a multimeter.